An arpeggiator is basically a step sequencer that plays each note of a chord individually in an ascending or descending pattern across one or more octaves.
Assign Mode and Arpeggio Controls
A unique aspect of the Jupiter-4 design is that the arpeggiator does not have an "on/off" switch, per se. Instead, the white Arpeggio section direction buttons interact with the blue Assign Mode buttons - only one of these buttons is active at any time, so pressing any of the Arpeggio or Assign Mode buttons disables any other currently selected mode buttons. At any given time, Mercury-4 is either in a "live play" mode (one of the blue Assign Mode buttons pressed), or one of the Arpeggio direction buttons is pressed, enabling the arpeggiator.
Jupiter-4/Mercury-4 Arpeggio Range
The Jupiter-4 arpeggiator's implementation is unique in that it doesn't have a range control; range is dependent on where notes are played on the keyboard. This is easier explained visually, so have a look at this festive image that took me a while to draw in Photoshop...

Arpeggios play in the octave of keys pressed plus one octave above the top C key, as follows:
Octave Four (red)- Notes play in a two-octave range (played notes + one octave above).
Octave Three (blue)- Notes play in a three-octave range (played notes + two octaves above).
Octave Three (green)- Notes play in a four-octave range (played notes + three octaves above).
Octave One (orange)- Notes play in a five-octave range (played notes + four octaves above).
If notes notes are played "across" ranges like this inverted Dm triad:

... then arpeggio ranges will depend upon each note played. In other words, the A note would have a three-octave span, but the D and F notes would have a two-octave span.
Arpeggio Controls
Following are the Arpeggio section controls. You may have noticed that there's no rate slider - the arpeggio rate is controlled by the Arp S/H Rate slider in the Trigger section at top left.
Pattern- These buttons select the order in which the notes of the chord will be played. Another JP-4 quirk to be aware of is that the arpeggiator actually plays notes in the order you play them on the keyboard, but the Pattern setting then affects the order of the octaves that pattern moves in. (We know, it's kinda weird.)
Up- Notes play from lowest to highest.
Down- Notes play from highest to lowest.
Up & Dwn- No play from lowest to highest then back to lowest.
Rnd - Notes play in random order. If you want to impress your 80s friends, select Random, and the factory "Bass" preset, hold down an E2 chord and it's instant Duran Duran "Rio."
(And if they're super hardcore Durannies, put the arpeggiator in Up mode, set the clock speed really slow, select the factory "Voice" preset, play an E minor triad, and they'll be waiting, for the "Night Bo-oat." Nick Rhodes loved his Jupiter-4!)
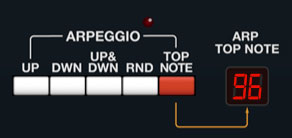
Range Set button and Arp Top Note display- In the preceding Jupiter-4/Mercury-4 Arpeggio Range section, we explained that the highest note that can be played by a real Jupiter-4 arpeggiator is one octave above the very top note of the keyboard (C5). But this doesn't totally work in virtual synth world, because Mercury-4 doesn't know what the top note of your MIDI controller is... hence Range Set button/Arp Top Note display.
This may seem complicated, but we promise, it's easy - to set the very top note the arpeggiator can play, click the Range Set button, then hit the key on a MIDI keyboard controller you'd like to be the top arpeggiator note. Unlike the original, notes played within one octave of the top note will play across a one octave range (unlike the original's two-octave minimum arpeggio range). Notes within a two-octave range beneath the top note will play a two-octave arpeggio range and so forth.