The upper left tabs and nine buttons above the keyboard affect which of the three panel "views" is currently visible and editable, as well as how Pro Soloist plays layers.

Panel Mode
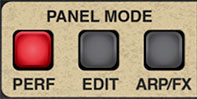
There are three panel views for the main control area above the keyboard. Each of these displays a different group of controls - essentially like tabbed windows on a computer (but with a more vintage-synth vibe). These are set by clicking the Perf, Edit, and FX Panel Mode buttons.
The current Panel Mode setting has no effect on sound, it simply changes which set of parameter controls are currently displayed. Following is a rundown of each Panel Mode button:
Perf (Performance)- This is the default view. If you're familiar with the original ARP Pro Soloist, this view is almost identical to the original instrument panel. This is intentional so that users can play Cherry Audio's Pro Soloist just like the real thing (don't forget the bell-bottoms). If you'd just like to use the old-school presets and Touch Sensor controls like the the original instrument, you don't need to use the other Panel Mode views and controls.
Edit- The original instrument's spartan control panel would lead one to believe the Pro Soloist was a relatively simple affair, but in fact, an impressively complex synthesis architecture lived under the hood. The Edit panel allows user editing of the full roster of Pro Soloist's synthesis parameters, including its unique five bandpass filter Resonator Bank and a powerful six-slot tabbed Mod Matrix.
Arp/FX- This where you'll enable and edit Pro Soloist's arpeggiator and audio effects, including Global Limiter, Distort, Phaser, Flanger/Chorus, Echo, and Reverb effects.
Layer Mode
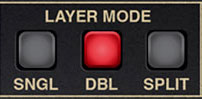
These buttons globally sets keyboard voice triggering.
Single (Sngl)- This is the standard keyboard mode where one voice plays, just like the original. The upper voice plays across the entire keyboard range, and the lower voice is disabled.
Double (Dbl)- Upper and lower voices are stacked and both play across the entire keyboard range.
Split- The keyboard is split with the lower voice playing in the keyboard range below the split point, and the upper voice playing in the keyboard range above the split point.
To set the split point, click the Split button; the button flashes. Play the key of the desired split point. The LED note display stops flashing and the split point is set.
Layer Control Tabs and Buttons
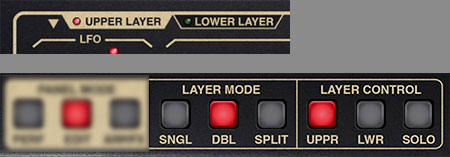
These tabs and buttons select which layer's Panel Controls are currently viewed and editable when Double or Split Layer Mode is enabled. If Single mode is currently selected, only the Upper layer plays, and the Layer Control buttons aren't needed. When Single mode is selected, the Layer Control Lower and Solo buttons are disabled and will appear dimmed, and the Upper Layer and Lower Layer tabs will be hidden.
Upper Layer tab and Upper (Uppr) button- Panel controls affect the Upper layer only. LED's and illuminated buttons are red. Note that the Upper Layer tab and Upper Layer Control buttons do the same thing and function in sync.
Lower Layer tab and Lower (Lwr) button- Panel controls affect the Lower layer only. LED's and illuminated buttons are green. Note that the Lower Layer tab and Lower Layer Control buttons do the same thing and function in sync.
Solo- Solos the sound output of the currently selected edit layer. The button flashes when Solo mode is engaged. This is useful if you're editing a sound and you'd like to essentially mute the other layer.
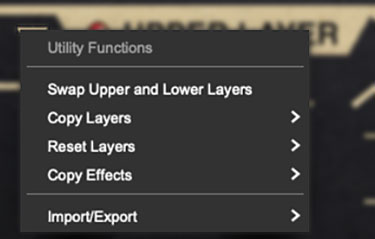
Layer Utility menu- This one is real easy to miss, but clicking the inverted gold triangle (good band name) opens the Layer Utility menu. It allow Upper and Lower layer sounds to be moved back and forth, independently initialized, and more. Remember that if you accidentally mess anything up with these commands, you can always undo with [ALT-Z] (Windows) or [⌘Z] (Mac), or by clicking the counterclockwise undo arrow in the top menu strip.
Swap Upper and Lower Layers- Reverses the locations of the upper and lower layer.
Copy Layers- Duplicates one layer to the other.
Reset Layer- Initializes all settings of the selected layer only.
Copy Effects- Duplicates the settings of all effects from one layer to the other; this is only relevant if FX Mode is set to Dual Layer on the Arp/FX page. If FX Mode is currently set to Global, the Copy Effects menu options will be grayed out.
Import/Export- The Import/Export command allows layers to be moved between sound presets. Data from the source preset isn't affected.
The process is simple - select the appropriate Copy <Upper or Lower> Layer to Memory sub-menu to copy the data into Pro Soloist's memory, then choose the destination preset, click the Utility button and select the appropriate Paste to <Upper or Lower> Layer submenu.