
This is the the primary panel mode, intentionally designed to closely emulate the original Pro Soloist panel control configuration. Here you'll select from the Pro Soloist "factory" paddle-switch presets, and enable the Touch Sensor aftertouch controls, "wahwah" and vibrato mod, and more.
Touch Sensor Effects
As mentioned, "Touch Sensor" is ARP terminology for what we now call aftertouch, and to review, aftertouch refers to modulation applied by pressing a keyboard key harder after a note has been played.
The global amount of Touch Sensor mod is set using the Touch Sensitivity left-hand slider and it must be set higher than zero for Touch Sensor effects to work.
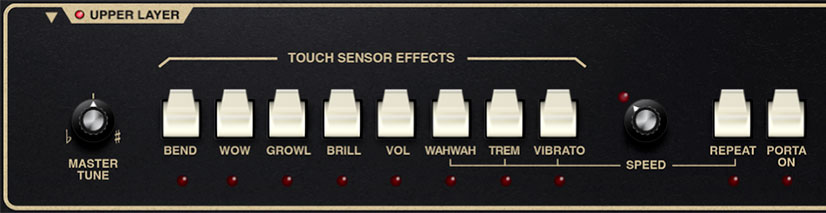
Bend- Enables upward pitch bend via aftertouch.
Wow- Enables resonant filter brightness mod via aftertouch. Note that when Wow is engaged, the filter resonance gets cranked and the Resonance knob in the Edit Panel Mode is disabled and dimmed. Also short for "Wendy O. Williams," late vocalist of 80s TV-wall-destroyers, The Plasmatics.
Growl- This is a clever bit of aftertouch modulation intended to emulate the growling sound of woodwind and brass instruments. For you tech-y types, it's a 32 Hz LFO modulation of the filter cutoff frequency using a unique waveform, and the LFO is independent of the "normal" onboard LFO.
Brill (Brilliance)- Enables filter brightness mod via aftertouch. It's basically the same as the above Wow effect but the resonance level is unaffected.
Vol (Volume)- Enables volume mod via aftertouch - pressing harder makes notes louder.
WahWah- Enables aftertouch-controlled filter cutoff (brightness) mod via LFO. Wahwah-ing rate is set with the Speed knob to the right.
Trem (Tremolo)- Enables aftertouch-controlled amplitude mod via LFO. Tremolo rate is set with the Speed knob to the right.
Vibrato- Enables aftertouch-controlled pitch mod via LFO. Vibrato rate is set with the Speed knob to the right.
Speed- Sets the onboard LFO rate for Touch Sensor Wahwah, Tremolo, Vibrato, and Repeat as well as for any other LFO routed mod (particularly mod routings configured using the Edit Panel Mode Mod Matrix). The LED flashes at the current rate. Note that the Speed control is duplicated in the Edit Panel Mode LFO section; these controls are locked to each other and for all intents and purposes are the same control, just displayed in two places for convenience.
Repeat- Automatically retriggers the ADSR envelope generator at the current Speed setting. Repeat is not affected by aftertouch control. It's super useful for banjo settings, because fake vintage-analog synth banjo solos are BLOWIN' up the charts these days, take our word! You can thank us later when you're rich.
Porta On (Portamento)- Enables portamento, aka glide. Instead of instantly snapping between pitches, glide slides gently between notes. The Porta On switch works in conjunction with the Porta Speed slider in the left-hand controls section, and is unaffected by aftertouch control.
Preset Paddles

These engage super-accurate emulations of the original Pro Soloist's 30 factory presets. We eliminated the original instrument's semi-wonky "bank" switch - to select a preset, either click the paddle repeatedly, or drag it with the mouse. Note that only one preset per layer can be active at any given time, and selecting a preset automatically disables the previously selected preset (i.e., sets its paddle switch to the Off position).
Hierarchically speaking (had to google the spelling), the Preset Paddles are a level down from the main Cherry Audio preset browser. That is, Preset Paddle selections are saved within the main preset browser. If any controls or parameters are edited in the Perf, Edit, or Arp/FX panels, these are saved with the preset browser sound.
We won't walk you through every single Preset Paddle, but suffice to say, we went to a fair effort to precisely match these to the original instrument. If you don't want to delve into the synth parameters on the Edit page, mixing Preset Paddle combinations in Double mode can yield surprisingly nifty sound combinations, particularly when goosed (that's a technical term there) with Pro Soloist's onboard effects. To do this, set Panel Mode to Perf, Layer Mode to Double, and use the Layer Control Upper and Lower buttons to alternate the view of the Preset Paddles for the Upper and Lower layers.
Preset Paddles and Effects - Important!
Engaging one of the Preset Paddles will disable any currently engaged effects. This was done to ensure that the original factory presets sound "vintage-correct" when the Preset Paddles are engaged. Besides the on/off/mode buttons, all other effects controls settings are retained.
Keep in mind, that disabling effects happens when combining Preset Paddles in Double or Split mode as well. This makes it easy to audition different Preset Paddle combinations.