The Drum Trigger Sequencer is a 16-step trigger/gate sequencer with eight independent channels. It can store up to 32 patterns in a bank, and also includes a song mode for chaining patterns into complete songs - essentially a complete standalone drum machine, minus the sounds. It also includes some very useful features such as per-row step accents, adjustable swing, and pattern/song loading and saving. And though it bears a resemblance to a familiar vintage drum machine, it’s far easier to use.
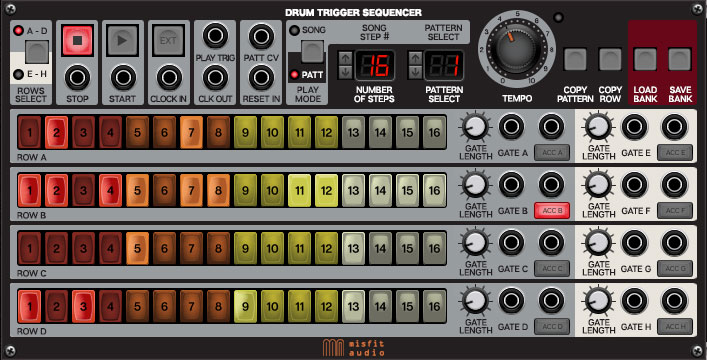
We’ll start by going over its controls, beginning at bottom left:
Rows A-H Step On/Off Buttons- Use these to turn steps on and off. Enabling a step sends a +5V gate to the row’s output jack at a duration corresponding to the Gate Length knob setting. Multiple adjacent step buttons can be turned on or off by clicking a button and dragging the mouse across adjacent buttons - this is particularly convenient for quickly creating 16th-note high-hat patterns (make sure to start the click-drag movement on a button, not a blank panel area).
Gate Length- Sets the length of the +5V gate signal for enabled steps from 1ms to 250ms. Depending on Gate Length and tempo settings, sometimes the gate can be long enough to extend to the next step. If you have multiple adjacent steps enabled, and you’re not hearing some of the drum hits, check that the Gate Length knob setting isn’t too high - if you’re using the Drum Trigger Sequencer with Misfit Audio drum modules, the Gate Length setting won’t affect their sound anyway, so use a a short Gate Length setting. However, if you’re using the Drum Trigger Sequencer to trigger VCA’s or mod inputs, the Gate Length control becomes very useful for defining note or mod durations, and you can make use of “overlapping” steps to create long note values.
Gate A-H Output Jacks- “Normal” CV output jacks for each row.
Gate A-H Accent Output Jacks and Enable Buttons - Each row includes a separate accent output. These are disabled by default, but clicking an Acc button enables accent mode for a row. When enabled, the row’s step buttons now cycle through three positions when clicked - off (no illumination/no gate out), on (medium illumination/gate out to “normal” out jack), or accent (bright illumination/gate out to Acc out jack).
Moving up to the top row area:
A-D / E-H Row Select- Though only four step rows are visible, the Drum Trigger Sequencer actually contains eight independent rows with the A-D / E-H Row Select button toggling the currently visible set. The step button background color turns beige to indicate that rows E-H send gate signals to the jacks at the far right of the panel. Toggling the view has no effect on active steps, it just changes which set is visible.
(We decided this was a nice compromise, as opposed to stuffing 128 itty-bitty buttons on one screen. Besides, big flashy buttons look cool.)
Stop/Start Buttons and CV Jacks- Use these to externally control the stop and start buttons with +5V pulse or gate voltages. The Drum Trigger Sequencer defaults to stop mode, but patches saved in play mode will save that way - i.e., they’ll begin playing as soon as the patch is selected.
Ext Clock In Button and CV Jack- The Drum Trigger Sequencer has its own internal clock, but it can be externally clocked by plugging a clock source into the Clock In jack and toggling the Ext button.
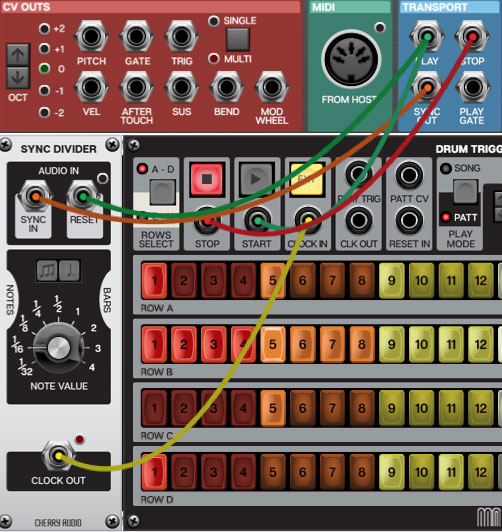
To sync to a DAW clock, see the Syncing The Drum Trigger Sequencer To A DAW section below.
Play Trigger- This sends a +5V pulse signal when play mode is initiated. This useful for resetting synced sequencers (or any other module with a synced clock) when initiating play with elaborate patches.
Clock Out CV Jack- Sends clock CV. One step = one clock pulse.
Pattern CV In Jack- Allows selection of pattern numbers via CV. The 32 patterns are mapped across 0 to +5V. This is useful in conjunction with sequencers, or for some real fun, route the output of a DC module to to the Pattern CV jack and map a hardware knob or slider to the DC Amount knob via the Performance Control knobs for continuous real-time pattern selection.
Reset In- This resets the Drum Trigger Sequencer to step one when it receives a +5V pulse voltage. It’s useful for multi-sequencer patches and/or when the the Drum Trigger Sequencer is being externally clocked. (If you’re syncing to a DAW, plug the I/O Panel Play out jack into the Reset In jack for more consistent sync.)
Song and Pattern Modes
Much like a classic drum machine, the Drum Trigger Sequencer operates in two modes: Pattern and Song mode. In the default Pattern mode, it simply loops the currently selected pattern over and over. If Song mode is selected, the left LED number display becomes a song step number indicator. For each step, a pattern number can be selected in the right LED number display. A song can have a maximum of 99 steps.
Note that step row buttons can be turned on and off in pattern or song mode and when stopped or during playback.
Play Mode- Toggles between Pattern and Song mode.
Number of Steps / Song Step #
Pattern Mode- This display and its up/down buttons globally set the number of pattern steps from 1-16 for all rows. Number of Steps is independently set for each pattern; this makes it easy to create songs with varying time signatures (in case you’re doing an electro tribute to Rush or ELP). Step button on/off status for buttons beyond the current Number of Steps setting will be retained, so experimenting with pattern lengths won’t mess up existing patterns.
Song Mode- When the Drum Trigger Sequencer is set to song mode, the display and up/down buttons become Song Step #. With the Drum Trigger Sequencer in stop mode, simply a select a pattern for each step number using the Pattern Select LED number display. A song may have up to 99 patterns steps.
Pattern Select
Pattern Mode- With the Drum Trigger Sequencer in pattern mode, use this LED number display and its up/down buttons to select the current pattern.
Song Mode- The Pattern Select display and buttons select the pattern that plays at the currently selected song step number. The pattern number can even be selected while a song is playing, but it’s much easier to choose patterns with the Drum Trigger Sequencer in stop mode.
Song Mode “Stop” and “Loop” Patterns- There are two special types of patterns available only in Song mode:
Stop- If pattern number 0 is selected, the Drum Trigger Sequencer stops playing - this is intended for song endings.
Loop- Clicking the down arrow one step below pattern 0 selects LP, which is short for “loop.” This makes the entire song loop indefinitely (Because your jam is so totally wicked, everyone will want to hear it forever. We understand.)
About song and pattern memory: An instance of the Drum Trigger Sequencer module remembers all 32 patterns and all song step data as long as it’s open. It will also store this pattern and song data when saved into a preset. Existing song and pattern data will not be retained when a new Drum Trigger Sequencer instance is opened. If an instance with pattern or song data is open and an additional instance is opened, the newly opened instance will be blank, but the Save Bank and Load Bank menu buttons can be used to store, open, and transfer patterns and songs. (More about saving and loading banks below.)
Tempo- This handsome knob adjusts tempo from 30-240 BPM. This should cover the entire tempo range anyone could need, but you can always externally clock the Drum Trigger Sequencer if you need something really nutso (or want to perfectly lock to another clock source). The blinking LED shows a quarter-note visual tempo indication.
Swing- Also known as “shuffle,” Swing adjusts the feel of beats by delaying every other 16th note a small amount. Originally heard in blues and jazz, swing has been heard more recently in house music and “New Jack Swing” (made popular in the late 80s by Bobby Brown, Bell Biv Devoe, and others who wore pants resembling drapery). The easiest way to hear its effect is to set up a high-hat module, enable all 16 steps in the row triggering it, and turn up the Swing knob. Note that the Swing setting is global; i.e. it affects all patterns simultaneously. Swing setting is stored with presets and saved banks.
Storing and Loading Song/Pattern Banks
The Drum Trigger Sequencer can store and load banks of patterns and songs. Bank files will have a .dtsbank extension. Here’s what’s stored in a bank:
32 patterns (including accents and accent mode status for rows)
One song
Tempo setting
Swing amount setting
All of the above data is also stored with saved patches, so you may not need to use the bank load/save functionality, but it’s useful for certain situations, such as loading a new song and patterns into an existing patch setup, or trading songs and patterns with other Voltage Modular users, or transferring files to another computer (the bank file sizes are very small, BTW).
Load Bank- Use this to open existing bank files from your computer’s hard drive.
Save Bank- Use this to store a bank file to your computer.
Copy Pattern- Click this to open a pop-up menu for copying any pattern to any other pattern location. This is useful for creating variations of a pattern. The source pattern remains unaffected when copying.
Pro Tip- The Copy Pattern function can be used to quickly clear a pattern location number. Just click the Pattern Select up arrow to choose an empty pattern, then use Copy Pattern to copy the empty pattern to the location you’d like to clear.
Copy Row- Click to copy any button row to any other row. Particularly useful for copying pattern rows from the A-D page to the E-H page (because you can’t see buttons rows on the separate pages).
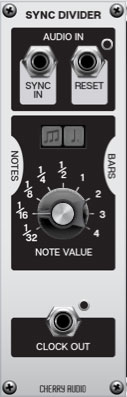
Syncing The Drum Trigger Sequencer To A DAW
If you’re running the Drum Trigger Sequencer as a plug-in virtual instrument within a DAW environment, it’s likely that you’ll want to sync to the song project’s master clock. This is what Voltage’s Sync Divider module is used for.
Sync vs. Clock Voltages, A Primer- Sync signals are rapid, constant pulses (specifically, 96 pulses=one quarter note) that only change rate in accordance with tempo. When Voltage is used as a virtual instrument in DAW software, the sync signal is constantly output from the IO Panel Sync jack - it does not start and stop with DAW play and stop commands, and it doesn’t know where the beginnings and ends of bars and notes are. You could route this directly to the Drum Trigger Sequencer’s sync in, but it would cause it to run at super-fast 1/96th-note divisions of the master tempo. By design, sync signals are intended to be subdivided down to musically useful clock signals.