
Generally, these control "overall" instrument parameters - mostly how voices are assigned and the upper and lower layers, which we'll explain in gruesome detail!
Voice Assign
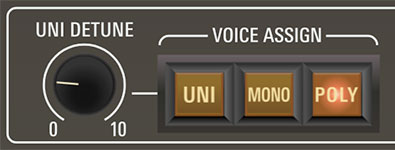
Uni (Unison) Detune knob- The Uni Detune knob is used in conjunction with the Uni Voice Assign mode to spread the tuning of the oscillators for fat sounds.
Voice Assign buttons- The Voice Assign section determines how incoming notes are assigned to synthesizer voices as follows:
Uni (Unison)- One note sounds at a time. Multiple rank voices will stack according to the current Number of Voices setting. The Uni button should be used in conjunction with the Unison Detune knob explained above.
Mono- One note sounds at a time with both ranks sounding.
Poly- Multiple notes can sound simultaneously with the maximum polyphony determined by the Number of Voices setting.
Number of Voices

2/4/8/16- Sets the maximum number of notes that can simultaneously sound. Like the original instrument, there's no voice stealing. In other words, if the maximum number of voices are currently held down and new notes are struck, the new notes will not be audible until previously played keys are released.
Pitch Ribbon and Bend Range
Yamaha pitch ribbons are unique in that they don't have a set center location - the "zero" point is wherever you place your finger (which may be an 80s Paul Young hit), or in the case of GX-80, wherever you click the mouse.
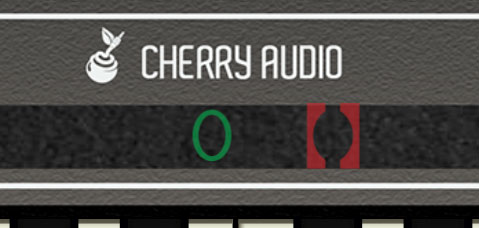
To use the ribbon, click and hold the mouse button or trackpad and move right or left. The green oval indicates the "home" nominal pitch position, and the red brackets will move left or right as the mouse is moved. The brackets turn green when aligned over the oval, indicating that pitch is "home." If the button is released at any time, pitch will instantly snap back to normal.
Linear/Semi- These define the response of the pitch ribbon.
Linear- The pitch ribbon behaves exactly as the original. Upward bend range is maximum one octave (if you start at the very bottom), and maximum downward range is essentially infinite (if you start at the very top), that is, low enough that audio becomes non-note clicks.
Semi- Bend range behaves like a modern synth with max up and down range set in semitones. Maximum bend depth is an octave up/down.
Bend Range- This sets the maximum amount of bend via a USB/MIDI controller pitch bend wheel.
Layer Mode
Understanding the Layer Mode and Panel sections is extremely important in order to take full advantage of GX-80's monster two-CS-80s = GX-1 architecture, so we strongly recommend studiously reading this section... in your studio!
Both the original CS-80 and the GX-1 featured a voicing architecture based on "ranks," wherein each rank is a complete synthesizer voice consisting of an oscillator, highpass and lowpass filters, a noise generator, a sine wave oscillator, envelope generators for the filter and VCA respectively, and a VCA. The CS-80 included two of these voice ranks, each capable of playing up to eight independent polyphonic notes - a total of 16 hardware synth voices under the hood, which is why it sounds huge. The GX-1 featured four of these eight-note poly voice ranks for its two main keyboards and sounded even huge-er, which is why it cost rock star $$$ in 1974 money, and thus, was only owned by rock stars.
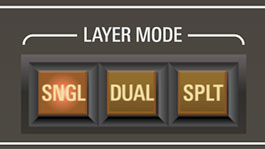
When GX-80's Layer Mode is set to Single, it behaves like a CS-80, that is, two voice ranks (I and II on the panel, i.e. "upper"). When Layer Mode is set to Dual or Split, four voice ranks are active as with GX-1 (I, II, III, and IV on the panel).
Single- Voice architecture is like a CS-80, i.e. two voice ranks (I and II on the panel).
Dual- Voice architecture is like a GX-1, i.e. four stacked voice ranks (I, II, III, and IV on the panel) play at once.
Split- Like Dual mode, but instead of stacking the four ranks, the keyboard is split. The two Lower ranks (III and IV) play on the bottom half of the split, and the two Upper ranks (I and II) play on the top half of the keyboard split.
To set the keyboard split point, click the Split button, which will flash, and hit the key on the keyboard where you'd like the split to occur. You can use the onscreen keyboard, a USB or MIDI keyboard controller, or the QWERTY Musical Typing Keyboard (MTK).
Panel
Because displaying the controls for four sets of Rank Voice Parameters would have made the UI enormous, GX-80's panel displays two sets of Rank Voice Parameters like a CS-80. These are referred to as Upper (voice ranks I and II) and Lower (voice ranks III and IV).
Dual mode is essentially the same as stacking two almost entirely independent CS-80's, so it's capable of generating ponderously enormous sounds! Almost every GX-80 parameter is completely independent when using the Dual and Split modes, including Rank Voice Parameters, the entire Performance Controls section, the Tone Selector preset buttons, all effects (two complete sets of effects under the hood), and most of the Left-Hand Control parameters. Effects can be made global for the entire instrument by setting the Effects Mode switch in the upper-left corner to Global.
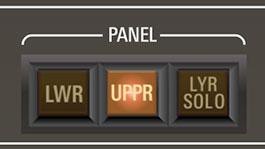
Lower- GX-80's panel displays control settings for the Lower ranks (III and IV).
Upper- GX-80's panel displays control settings for the Upper ranks (I and II).
Besides the Lower/Upper button illumination there are a couple of ways to quickly tell which ranks are currently being displayed and edited:
All rectangle frames are white in Upper mode and Orange when in Lower mode.
All panel roman numerals rank indicators will show as I/II in Upper mode and III/IV in Lower mode. (Except for the left-hand control section sustain mode, because those Roman numerals are associated with ranks. Hey, we didn't design the original, ok?)
The other exception is that the Effects section rectangle is always white when the Effects Mode switch is set to Global. This is to let you know that only one set of global effects is active for the entire instrument.
Layer Solo- The currently displayed panel layer is soloed for easier editing when in Dual or Split mode. The Lyr Solo button flashes when active in order to minimize, "why the heck isn't this making noise?" incidents.
Clicking the Lwr and Uppr buttons while Lyr Solo is active instantly switches which layer is audible - this is really handy when editing layered patches.
GX-80 logo- This one's actually not a joke - clicking on the big GX-80 logo displays “about” information, and shows the version number and current registered user ID.