
These controls are (mostly) intended for live tweaking, and they're a huge part of what makes the original instruments (and GX-80) so beautifully expressive to play. The majority of these use "paddle" controls - i.e. sliders that rotate in an arc. These controls were appropriated from Yamaha's organ line, and like an organ, they operate backwards from a typical slider control - full up position is off, and their amount increases as they're pulled toward the player. Obviously it's a little tough to play a keyboard and fluidly move these with a mouse or trackpad - if you have a MIDI/USB controller with a bunch of sliders or knobs, we heartily recommend assigning many hardware slider or knob controllers (See the MIDI Controllers Setup and the MIDI Tab section for info on how).
Performance Controls operate independently for each pair of ranks (I/II and III/IV).
Tuning Controls
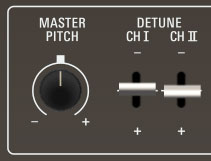
Master Pitch- Sets pitch globally for the entire instrument up or down a half-step.
Detune Ch I / Ch II /Ch III / Ch IV- Adjusts the tuning of the oscillators up or down a half-step. These are particularly useful for individual detuning when stacking ranks using the Dual Layer Mode.
Ring Modulator

When two audio sources are combined, a ring modulator's output contains only the sum and difference frequencies of the two signals, while removing common frequencies. The audio result is a sound with inharmonic frequency content, which is useful for synthesizing bells, metallic clangs, and other special effects, and is also interesting and musical when applied sparingly. The CS ring mod combines the summed output of Rank I and II with its own independent oscillator or Rank III and IV, if Dual or Split mode is active.
Ring Mod Speed Envelope
The ring modulator includes a dedicated single AD envelope generator for controlling speed. Since there is only one ring modulator per layer, It behaves as a monophonic modulator. The attack and decay phases initiate upon note-down, and will only retrigger once all keys have been released. Note that you don't have to use the ring mod envelope - the attack/decay Depth paddle can be left at zero and a constant ring mod level can be set with the Mod. paddle.
Attack- Sets the initial length of speed increase from the current Speed paddle setting.
Decay- Sets the time for speed to fall from max at the end of attack phase to the current Speed paddle setting.
Depth- Sets the maximum amount of attack/decay envelope speed increase.
Speed- Sets the basic ring mod speed.
Mod. (Modulation)- Sets the basic ring mod depth.
Sub Oscillator
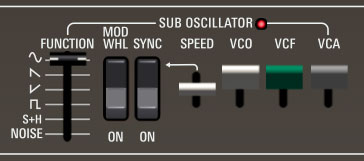
The Sub Oscillator generates sub-audio range signals intended for modulation purposes. It affects both currently active ranks (I/II or III/IV) equally.
Function- We're not entirely sure how they arrived at this lofty title - it's usually referred to as "LFO waveform" on other synths. Available waveforms are sine, sawtooth, inverted sawtooth, square, sample and hold, and noise.
Mod Wheel- This is a really handy, but potentially confusing feature, so don’t skim this section. If the switch is in the Off position, the LFO is always “on.” Its effects will be immediately audible by moving the VCO, VCF, and VCA sliders. Setting to the On position enables control of LFO depth with an external keyboard controller mod wheel. If the mod wheel is all the way down, LFO depth is zero. This makes setting up a mod wheel to add vibrato or wah effects real easy. If it seems like the LFO isn't working, make sure the Mod Wheel switch is not on.
Sync- When the Sync switch is enabled, LFO speed will lock to host tempo when using GX-80 within DAW software, or to the current tempo in the top menu bar when using the standalone version. .
Speed- The Rate slider sets the speed of the Sub Oscillator. We've replicated the insanely fast speed of the original CS-80 (well into the audio range) enabling all manner of clangorous, raunchy sounds to be created. The LED beside the Sub Oscillator panel text flashes at the current modulation rate.
VCO- Sets oscillator pitch mod depth.
VCF- Sets highpass and lowpass cutoff frequency mod depth.
VCA- Sets amplitude mod depth.
Feet
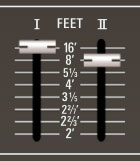
Feet I/II/III/IV- Sets the coarse pitch range for each oscillator in traditional organ footage settings of 16', 8', 5 1/3', 4', 3 1/5', 2 2/7', 2 2/3' and 2'. The 3 1/5' and 2 2/7' footages are from GX-1; these are not available on the original CS-80.
Some of the range settings are not typically divisible-by-2 octave settings; instead, they're derived from various organ footages and match the settings of the original GX-1. Even though these are stepped controls, it's fun to set these up for control via a MIDI hardware knob or slider. For reference, these are the musical intervals associated with each footage:
• 16' : an octave below the note played
• 8' : unison
• 5 1/3' : a fifth above unison
• 4' : an octave above unison
• 3 1/5' : a major third above the octave
• 2 2/7' : an octave and minor 7th above the octave
• 2 2/3' : a fifth above the octave
• 2' : another octave higher (two octaves above the unison)
Tone Selector
The original CS-80 predated the use of modern computer memory to store patch settings. It included 22 non-editable single-rank factory presets divided between the two voice ranks. When one of these presets was selected, the Rank Voice Parameter controls were disabled. Four user memories were also included. These were programmed using four miniature versions of the Rank Voice Parameter controls, hidden beneath a hinged door at the left side of the instrument. The illuminated Tone Selector buttons were used to select either a factory preset, user memory preset, or live panel mode (the current Rank Voice Parameter control settings).
We chose not to exactly replicate the original CS-80's clunky preset memory scheme (and take our word, the GX-1's user sound creation and storage were even worse). However, we wanted to include the factory patches, and we liked the idea of a rank-specific sound bank for user sounds. We replicated the CS-80 factory rank presets plus we added a User mode that allows storage of 22 non-volatile custom rank presets with the Tone Selector buttons. Here's how it works:
Tone Selector colored buttons- The top row recalls sounds for the upper rank in the currently visible layer; the bottom row recalls sounds for the lower rank in the currently visible layer.
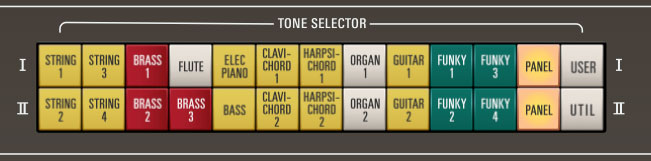
When in normal (factory preset) mode, clicking any of the buttons recalls the factory patch for the appropriate rank, and the Rank Voice Parameter controls instantly change to the correct positions.
Panel buttons- When a Panel button is toggled on, the current rank sound uses the current Rank Voice Parameter controls. Selecting a factory preset button shuts off the Panel button; if a Rank Voice Parameter control is edited, the factory button shuts off and the Panel button illuminates. This "overwrites" the previous Rank Voice Parameter control settings; but you can always get back to the previous settings by clicking the circular undo arrow in the top purple menu strip.
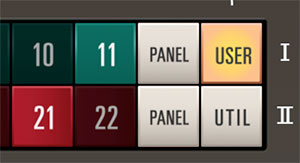
User bank button- The User presets allow saving or recall of the voice parameters for that rank only. This is useful for quickly creating and experimenting with composite sounds from multiple ranks. The 11 presets per bank (22 total) are intended for user favorites and will remain in GX-80's memory when "powered-down" and will be the same even across multiple instances of GX-80 running in a DAW. If no sound has yet been saved to the user button, the button appears dark.
Saving a Rank sound to a Tone Selector User slot- Make sure the Tone Selector is in User mode (User button lit); the buttons will be green and red with numbers on them. Right-click on a button and select Save Rank <I/II/III/IV> Sound (the menu will show I and II or III and IV depending on the current Lower or Upper selection in the Panel section).
Note that memory slots 1-11 store sounds for Rank I and III, and slots 12-22 store sounds for Rank II and IV. However, sounds can be saved from one bank to another. For example the current sound from rank I can be saved to button 12, which applies to ranks II and IV. This makes it easy to move rank sounds back and forth between ranks.
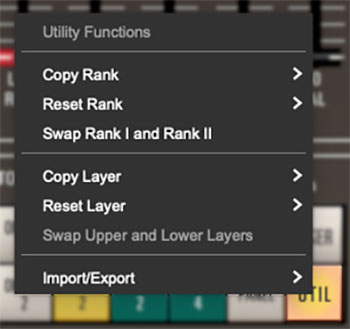
Utility button- Allows rank sounds and entire layers to be copied, swapped, and deleted.
The following three functions affect Rank Voice Parameters only, i.e. one of the single I/II/III/IV rank horizontal rows of voicing controls.
Copy Rank- Duplicates one rank to the other. Unlike Swap Rank, the end result is that the same settings are applied to both ranks.
Reset Rank- Initializes all settings of the selected rank.
Swap Rank I and II / Swap Rank III and IV- Reverses the locations of the ranks on the currently viewed layer.
The remaining three commands are similar to the utility functions explained above, but these affect an entire layer, i.e. Effects, Rank Voice Parameters I and II or III and IV, and Performance controls. Because most of these commands affect both layers, most only work when in Dual or Split Layer Mode; if Single mode is selected, they will be grayed out.
Copy Layer- Duplicates one layer to the other. Unlike Swap Upper and Lower Layers, the end result is that the same settings are applied to both layers.
Reset Layer- Initializes all settings of the selected layer.
Swap Upper and Lower Layers- Reverses the locations of the the upper and lower layer.
Import/Export- The Import/Export command allows ranks (I, II, III, and IV) or layers to be moved between sound presets. Data from the source preset isn't affected.
The process is simple - select the appropriate Copy <rank or layer> to Memory sub-menu to copy the data into GX-80's memory, then choose the destination preset, click the Utility button and select the appropriate Paste to <rank or layer> submenu.
Mix, Brilliance, Resonance
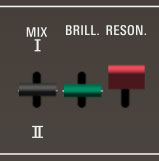
Besides making a fabulous title for a Sundance film about The Rolling Stones, these controls offer fast and powerful global control over both currently active ranks (I/II or III/IV). The original instrument refers to these as "overall" controls.
Mix- Adjusts the mix between the currently active ranks ranks (I/II or III/IV).
Brill. (Brilliance)- Adds or subtracts from the frequency of the highpass and lowpass filters for currently active ranks ranks (I/II or III/IV).
Reson. (Resonance)- Adds to the resonance setting of the highpass and lowpass filters for currently active ranks ranks (I/II or III/IV).
Touch Response
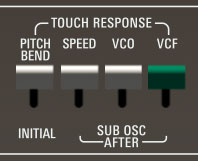
These controls relate to how GX-80 responds to keyboard velocity (how hard the key is played) and aftertouch (increasing key pressure after notes are played).
Pitch Bend- Pulling the paddle downward causes notes to swoop up to pitch from below. The harder the key is struck, the lower the initial pitch will be. The "swoop" speed remains constant regardless of velocity or the control setting.
Sub Osc After- These allow modulation of sub oscillator parameters via aftertouch.
Speed- When the Speed paddle is pulled down, pressing harder after a key is played causes the sub oscillator to speed up. The further the paddle is pulled down, the more dramatic the speed increase when aftertouch pressure is applied.
VCO- Allows modulation of sub oscillator pitch mod depth. If the Sub Oscillator VCO paddle is already on, the Touch Response VCO Sub Osc After slider adds additional mod depth.
VCF- Allows modulation of sub oscillator highpass and lowpass frequency mod depth. If the Sub Oscillator VCF paddle is already on, the Touch Response VCF Sub Osc After slider adds additional mod depth.
Keyboard Control
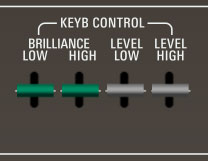
These allow scaling of the highpass and lowpass filter cutoff frequencies and amplitude based upon what range notes are played on the keyboard. Generally speaking, they work "out from the center" of the keyboard; that is, they have no effect on the center keyboard octave and become more noticeable toward the low and high extremes of the keyboard range. They can even out the tone across the keyboard resulting in a very enjoyable and intuitive playing experience. In Dual layer mode, by setting these controls in opposite ways on different layers, the layers can effectively crossfade from one to another as you play up the keyboard.
Brilliance Low- Pulling this paddle forward causes the highpass and lowpass filter cutoff settings to increase as notes are played lower on the keyboard. The further the paddle is pulled forward, the greater the amount of keyboard scaling that will occur. Pushing the paddle back results in the opposite effect.
Brilliance High- Pulling this paddle forward causes the highpass and lowpass filter cutoff settings to increase as notes are played higher on the keyboard. The further the paddle is pulled forward, the greater the amount of keyboard scaling that will occur. Pushing the paddle back results in the opposite effect.
Level Low- Pulling this paddle forward causes the overall amplitude to increase as notes are played lower on the keyboard. The further the paddle is pulled forward, the greater the amount of keyboard scaling that will occur. Pushing the paddle back results in the opposite effect.
Level High- Pulling this paddle forward causes the overall amplitude to increase as notes are played higher on the keyboard. The further the paddle is pulled forward, the greater the amount of keyboard scaling that will occur. Pushing the paddle back results in the opposite effect.
Layer

Layer Level- Sets the combined volume of the currently displayed voice ranks (I/II or III/IV). This is most useful for balancing the levels of multi layer Dual or Split mode sounds.
Master
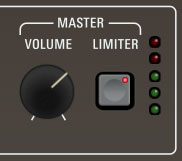
Volume- Controls the overall instrument volume.
Limiter- This is a switch that applies a transparent limiting effect to help prevent overloading and clipping.
Output Level- Overall output level meters. You'll want to optimize the output to avoid clipping using the Layer Level knob and Master Volume knob as well as the VCF Level and Sine Level sliders in the Rank Voice Parameters. Green = good, red = bad.