
The MAIN page is where you'll likely spend most of your time. It includes just about all the controls you'd encounter on a real tonewheel organ. Click the MAIN button at the top left enter MAIN view. If the Effects tab at the left of the keyboard is disabled, it'll look like the image above. If the Effects tab is on, the three stomp box effects appear on top of the cabinet:

VOLUME
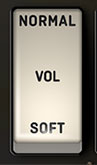
Volume- When set to the Soft position, this rocker switch cuts overall volume by roughly 50%. Obviously you could accomplish the same with the master Volume knob at the far right of the panel, but we kept this in for authenticity. Appropriate when playing Christmas carols at grandma's. Not appropriate for "Highway Star."
VIBRATO AND CHORUS
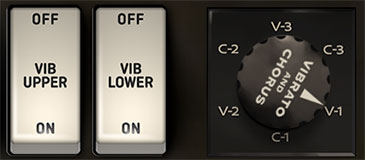
The Vibrato and Chorus in a vintage tonewheel organ is not like the vibrato or chorus effects in guitar amps or stomp boxes. Tonewheel organs included a unique and somewhat complex "scanner vibrato" circuit that's been super accurately simulated in Blue3.
Vibrato Lower- Enables and disables vibrato/chorus for the top manual (aka the Swell manual).
Vibrato Upper- Enables and disables vibrato/chorus for the bottom manual (aka the Great manual).
Vibrato and Chorus- Sets the type and depth of the scanner vibrato/chorus circuit, which adds pitch modulation. The vibrato and chorus are essentially the same; the difference is that vibrato is the pitch modulated signal only, whereas chorus settings mix the "dry" (no pitch modulation) signal with the pitch-modulated signal.
DRAWBARS
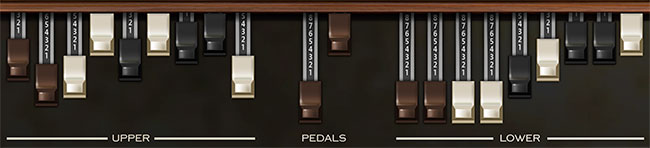
Upper, Pedals, and Lower Drawbars- The drawbars set the relative volumes of nine harmonics, and are the heart of the tonewheel organ sound. The Upper and the Lower manuals each have nine drawbars, each controlling a single harmonic from one of the 91 tonewheels. They range in pitch from 16’ to 1' and get louder as they are pulled out. They get their names, in feet, from pipe organs, where the longest pipes produce the lowest pitches and the shortest pipes produce the highest pitches. The 8’ drawbar is the fundamental tone, while the 16’ and 5 1/3’ drawbars produce sub-harmonic tones.
It’s helpful to think of drawbars in groups of three - lows, mids and highs. If you want to add shimmer, pull out any of the top three. For more power, pull out the middle three, etc.
The pedals are far simpler with just two drawbars, 16’ and 8’ covering low frequencies.
The Upper and Lower manuals actually have two sets of drawbars each: the A# set and the B set. These correspond to the inverse keys at the left end of the keyboard and act like drawbar presets, or more precisely, registrations. This makes it easy to switch between, for example, a soft comping sound and a screaming solo sound very quickly.
Tonewheel balance can be fine-tuned, and alternate tonewheel sets may be selected in the Tonewheels section of the EDIT page. See the Edit Page section for more information.
DRAWBAR REGISTRATION PRESETS
The original B3, C3, and A100 featured a unique system for saving Upper and Lower drawbar settings (the two Pedal drawbars did not use the preset system). For each preset, individual drawbar settings were configured by turning a series of screws inside the organ. This didn't exactly lend itself to quick patch editing, but cut them some slack - this predated the microprocessor revolution by four decades!
The Presets are selected using the bottom octave of black keys. Unlike the original instruments, presets can be saved by simply right-clicking one of the ten preset keys from C to A. Keep in mind that each manual has its own independent set of inverted-keyboard presets; in other words, Upper manual inverted keys always control Upper manual drawbars, and Lower manual drawbars always control the Lower manual drawbars.
INVERTED KEYB NOTE | FUNCTION |
|---|---|
C | programmable preset location (right-click) |
Db | programmable preset location (right-click) |
D | programmable preset location (right-click) |
Eb | programmable preset location (right-click) |
E | programmable preset location (right-click) |
F | programmable preset location (right-click) |
Gb | programmable preset location (right-click) |
A | programmable preset location (right-click) |
Bb | select "left" virtual drawbar settings |
B | select "right" virtual drawbar settings |
The programmable locations (Db - A keys) are global, that is, drawbar presets saved on the inverted keys stay the same, regardless of the currently selected sound in the main instrument patch browser (the big popup dealie in the top purple menu strip).
The Bb and B keys work a little differently. On a real vintage tonewheel organ, there are four sets of nine drawbars plus two bass drawbars - the Upper and Lower manual each have two sets of nine drawbars, and the Bb and B inverted keys select whether the left or right set is currently active. This allowed a player to have fast access to two different sounds for each manual. Because most Blue3 users don't have a 42" inch-wide display, and we didn't want to make the drawbar controls teeny, Blue3 only displays a single set of drawbars for each manual, and the B and Bb inverted keys select a "virtual" set of drawbars. In other words, it behaves as if there are two separate sets of drawbars for each manual, we just don't show both sets.
Unlike the global C - A locations, both Bb and B inverted key "virtual" drawbar memories are separately stored with each saved sound preset.
And finally regarding the C key, on an original tonewheel organ, the bottom C always sets all drawbars of the manual to 0. That is, it shuts off sound for that manual. We didn't think that was super useful in a modern virtual instrument, so in Blue3, bottom C is a preset location just like the Db-A keys. If you'd like bottom C to reset all drawbars to 0, simply set all the drawbars for the manual to 0 and right-click the C key to save this configuration as its preset.
FACTORY DRAWBAR REGISTRATION PRESETS
Remember at the beginning section when we discussed how the inverted preset keys on original tonewheel organs were semi-permanently "programmed" using set screws inside the organ? We've thoughtfully (we are SO thoughtful) included these factory presets. The table below shows the names and registrations of the factory presets:
UPPER MANUAL PRESETS
|
PRESET KEY |
REGISTRATION |
DESCRIPTION |
LOUDNESS |
|---|---|---|---|
|
C |
none |
Cancel |
No sound |
|
Db |
00 5320 000 |
Stopped Flute |
pp |
|
D |
00 4432 000 |
Dulciana |
ppp |
|
Eb |
00 8740 000 |
French Horn |
mf |
|
E |
00 4544 222 |
Salicional |
pp |
|
F |
00 5403 000 |
Flutes 8' & 4' |
p |
|
Gb |
00 4675 300 |
Oboe |
mf |
|
G |
00 5644 320 |
Swell Diapason |
mf |
|
Ab |
00 6876 540 |
Trumpet |
f |
|
A |
32 7645 222 |
Full Swell |
ff |
|
Bb |
Upper Left drawbars |
No percussion |
|
|
B |
Upper Right drawbars |
With percussion |
|
LOWER MANUAL PRESETS
|
PRESET KEY |
REGISTRATION |
DESCRIPTION |
LOUDNESS |
|---|---|---|---|
|
C |
none |
Cancel |
No sound |
|
Db |
00 4545 440 |
Cello |
mp |
|
D |
00 4423 220 |
Flute & String |
mp |
|
Eb |
00 7373 430 |
Clarinet |
mf |
|
E |
00 4544 220 |
Diapason, Gamba & Flute |
mf |
|
F |
00 6644 322 |
Great without reeds |
f |
|
Gb |
00 5642 200 |
Open Diapason |
f |
|
G |
00 6845 433 |
Full Great |
fff |
|
Ab |
00 8030 000 |
Tibia Clausa |
f |
|
A |
42 7866 244 |
Full Great with 16' |
fff |
|
Bb |
Upper Left drawbars |
|
|
|
B |
Upper Right drawbars |
|
|
Reset Factory Preset- If a preset key has been edited, (i.e., a drawbar registration has been saved via right-click), right-clicking the key and selecting Reset Factory Preset resets the key to the corresponding registration in the above table.
MAPPING MIDI CONTROLLERS TO DRAWBAR REGISTRATION PRESETS
Obviously, the bottom octave of a MIDI controller can be used to select the registration presets, but what if you'd like to assign alternate buttons of a MIDI/USB controller to select preset keys C-A? Keyboard keys (inverted or normal) don't allow the right-click MIDI Learn functionality of Blue3's other controls, but there's an easy workaround.

The drawbar registration preset buttons on the PERFORM page are standard control buttons. This means you can right-click and assign a MIDI/USB hardware control to them like any other button. You can even assign to them to respond to different keys on a keyboard controller (when in MIDI controller Learn mode, instead of pressing a button on your MIDI controller, whack a key instead).
SUPER-HANDY HIDDEN DRAWBAR UTILITIES MENU
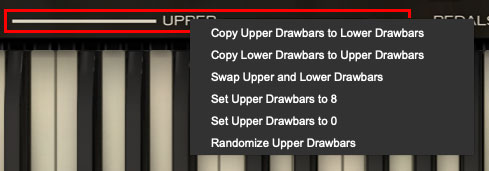
Clicking on Upper or Lower or the adjacent horizontal lines beneath the drawbars opens a popup window with useful utilities for copying, reset, and more. (We generally try not to hide things in the UI, but we didn't want to ruin the vintage tonewheel organ vibe.) The utility menu options are as follows:
Copy Upper Drawbars to Lower Drawbars- Duplicates the current Upper drawbar settings on the Lower Drawbars.
Copy Lower Drawbars to Upper Drawbars- Duplicates the current Lower drawbar settings on the Upper Drawbars.
Swap Upper and Lower Drawbars- Moves Lower drawbar settings to the Upper drawbars, and Upper drawbar settings to the Lower drawbars. You may need to relinquish your keys to the glass bowl on the coffee table with this option...
Set Upper/Lower Drawbars to 8- Sets the Upper or Lower drawbars to "all-out" rock bombast.
Set Upper/Lower Drawbars to 0- Sets the Upper or Lower drawbars to zero position, effectively disabling sound for the drawbar set.
Randomize Upper/Lower Drawbars- Sets each of the drawbars of the set to a random value. Perfect for those, "I am overwhelmed by all these drawbar setting options" scenarios.
Note that Drawbar Utilities menus function the same way on the PERFORM page.
PERCUSSION
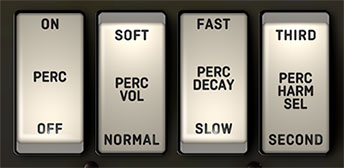
Percussion on a vintage organ isn't meant to imply a drummer or the 14 guys banging on stuff in Santana (unless one of those guys is Gregg Rolie). Just like the real thing, the percussion circuit creates a polyphonic but single-trigger short "ping" either a 2nd or 3rd harmonic above the original pitch, and only sounds for the Upper manual.
A couple of things to remember: Blue3 acts just like the real instrument, so when you select Normal volume, the percussion will be louder but the sound of the drawbars will be slightly lower as well. Also, the Percussion circuit “steals” the 1’ drawbar, so you won’t hear the 1’ drawbar when Percussion is on. The Percussion controls are as follow:
Percussion- Enables Percussion for the top manual.
Percussion Volume- Selects "normal" (loudish) or more subdued percussion volume.
Percussion Decay- Selects the rate at which percussion decays.
Percussion Harmonic Selector- Selects whether the percussion pitch is the second or third harmonic above the fundamental.
NOTE(S): On the real instrument, Percussion only triggers when using the B registration key. You can set Blue3 to work this way or have Percussion trigger in all registration keys. (To enable this, click the Settings gear icon in the top purple menu strip, select Instrument, and enable Percussion On All Registrations.)
Percussion settings can be fine-tuned in the Percussion section of the EDIT page. For more information, see the Edit Page section.
DRIVE
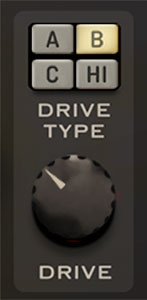
The combination of the organ’s preamp and a rotary enclosure’s amplifier create a wonderful growl than many players love. The Drive section offers a number of overdrive options. Controls are as follows:
Type - Four different tube simulations to choose from for just the right amount of character.
Types A, B, C are all simulations of the 40-watt amplifier in a 122/147, but each with a different tube set, with each adding progressively more dirt. HI (short for high gain), simulates a 100-watt British guitar amp for this Jon Lord moments.
NOTE: Drive type C is very nearly a direct match for overdrive included in earlier releases of the Blue3 instrument.
Drive - Sets the amount of saturation. Depending on the type selected, drive goes from a subtle warmth, to a nice grunge or all the way to screaming/melt your face off.
VOLUME/KEY CLICK

Volume - Master volume for the entire instrument. You'll want to keep the output meter in the green - unlike the adjacent drive controls, pushing the master into the red results in undesirable digital distortion.
Key Click - This sets the level of the inherent (and generally desirable) electronic "click" noise made when a key is played. Just like a real tonewheel organ, the click sound only occurs when the first note is played and isn't heard on following notes until all keys are released and a new note is struck.
Key click characteristics can be fine tuned in the Key Click section of the Edit Page.
EXPRESSION PEDAL
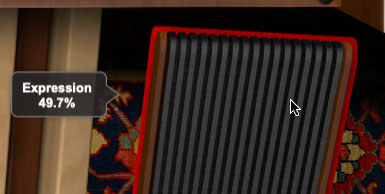
This is the rocker pedal immediately to the right of the foot pedals. On a real vintage organ, the expression pedal not only controls the volume, but also affects the overall brightness of the instrument as the pedal gets pushed further down. Blue3 responds the same way.
Blue 3's expression pedal can be operated either by clicking and dragging directly on the pedal, or preferably by assigning a hardware volume pedal controller. As with all hardware controls, assignment is super easy - once you have a volume pedal plugged into your controller, right-click the volume pedal, and select MIDI Learn, and move the volume pedal. That's all! Any other hardware controller (mod wheel, slider, etc.) can be assigned in the same way. For more information on assigning MIDI controllers, check out the MIDI Controllers Setup and The MIDI Tab section.
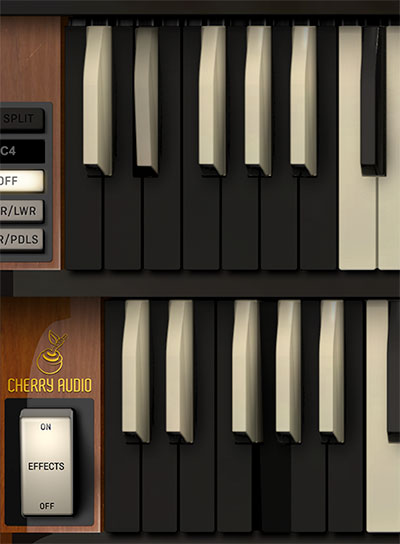
KEYBOARD SPLIT
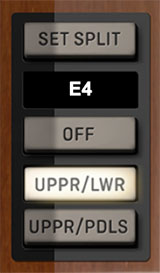
Keyboard Split allows a USB/MIDI keyboard transmitting on a single MIDI channel to play a combination of either the lower manual or pedals with the left hand, and the upper manual with the right hand. This lets you play both manuals or the pedals and upper manual using a single MIDI controller.
Set Split - To set the split the point, click the Set Split button. The button begins flashing; strike the key on the USB/MIDI controller where you'd like the split to be. The Set Split button will stop flashing and the split is set. The split note is shown in the display beneath the Set Split button. Split point can also be set by clicking the note display and choosing a note.
SPLIT MODE SELECT BUTTONS
Split Off - Disables keyboard split.
Split Upper/Lower - Upper and Lower manuals will respond on the Upper manual's currently selected MIDI channel, with the Upper manual responding to keys above the split point and the Lower manual responding to keys below the split point.
Split Upper/Pedals - Upper and Pedal manuals will respond on the Upper manual's currently selected MIDI channel, with the Upper manual responding to keys above the split point and the Pedal manual responding to keys below the split point.
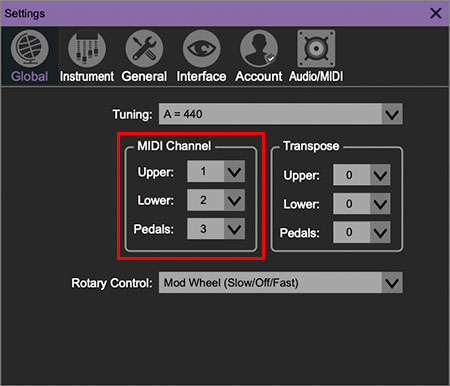
NOTE: Split is always controlled by the the Upper manual MIDI channel, as defined in the Global tab of the Settings page. This defaults to MIDI channel 1; if your USB/MIDI controller keyboard is set to output MIDI channel 1, you most like won't need to change anything. When split is set to the Off position, the manuals and pedals are controlled according to the MIDI channel settings in the Global tab of the Settings page.
The MIDI channel settings for the Lower manual and Pedals are unaffected by Split mode, that is, they will continue to be triggered by their respective MIDI channels regardless of whether Split mode is on or off.
For more information, please see the Settings section.
EFFECTS
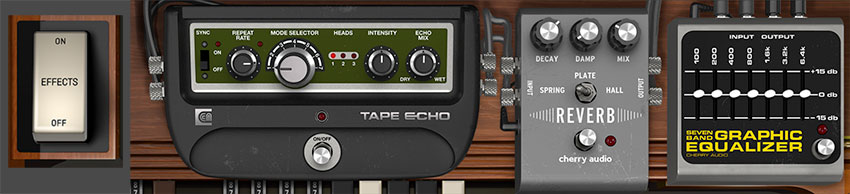
Effects - The Effects tab hides and shows and enables and disables the Tape Echo, Reverb, and Graphic Equalizer effects. Read more about these in the Stomp Box Effects section.
ROTARY SPEAKER CONTROLLER

Rotary Speaker Control- The "half-moon" three-position switch, as it's referred to, controls the famous rotary speaker effect. Its three settings are as follows:
Chorale- Slow rotation effect.
Stop- No rotation.
Tremolo- Fast rotation effect.
Note that if the currently selected cabinet is Direct or 4x12, the rotary speaker control won't do anything (because unless you know something we don't, nothing spins inside a direct box or 4x12 guitar cab).
Full controls for selecting rotary speaker models and parameters are available on the CABINET page. Read more about the rotary speaker modeling in the Cabinet section.