Clicking the settings gear opens a window with multiple tabs for configuring various "under-the-hood" settings. These are mostly set-and-forget kind of parameters; everything you'll usually use is in the main UI.
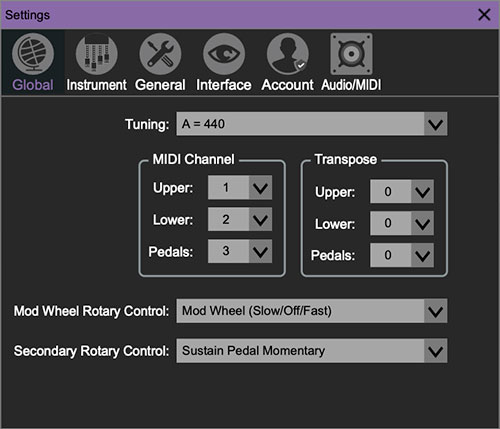
Tuning- Allows global tuning of Blue3 from A=432 Hz to A=445Hz. Generally you'll want to leave this at its default concert tuning setting of A=440Hz. (Unless you're playing with a not-easily-tuned instrument such as a piano, xylophone, or one of your bandmates is one of those "music sounds better at A=437 Hz" nitwits.)
MIDI Channel- This lets you set reception MIDI channels for the Upper, Lower, and Pedal manuals. This is useful if you're using multiple USB/MIDI controllers. If you're using a single MIDI controller and would like access to both manuals, or the Upper manual + Pedal manual, we recommend using the Split function to the left of the Upper manual on the MAIN and EDIT pages. Split mode always uses the Upper MIDI channel; the Lower and Pedals manuals always respond to the MIDI channels set here regardless of whether Split is currently active.
For more info on using Split, please see Keyboard Split in the Main Page section.
Transpose- Allows incoming MIDI data to be independently transposed up or down two octaves. This is useful for those of you who got suckered into buying own handy space-saving two-octave keyboard controllers.
Mod Wheel Rotary Control- Defines how the mod wheel controls the "half-moon" rotary speaker switch at the the bottom left of the keyboard.
Secondary Rotary Control- Defines an additional MIDI hardware controller for rotary speaker speed control. Take it from us, sustain pedal slow/fast is super handy in live performance applications (when your left hand has to be doing something else).
Note that the Aftertouch Toggle and Aftertouch Momentary selections can be used with mono or poly aftertouch.
INSTRUMENT
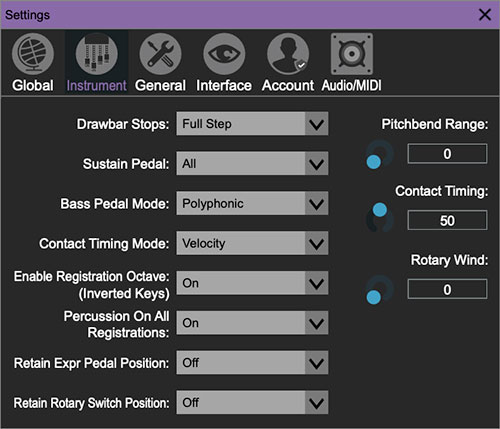
Drawbar Stops- Depending on the model, some vintage organ drawbars had definitive clicks at each number stop and some don't. Drawbar stops lets you select whether the drawbars move in full number steps, half-number steps, or move continuously.
Pitchbend Range- Blue3 notes can be bent using a pitchbend wheel, just like a synthesizer. This sets the range from 0 to 12 steps (i.e. an octave).
Sustain Pedal- Allows a hardware sustain pedal to be used to hold notes. The popup allows assignment to any of the manuals, all three, or none. Note that sustain pedal functionality is disabled if the sustain pedal is assigned to control rotary speaker speed (set using the Rotary Control parameter in the Global tab).
Bass Pedal Mode- Allows the Pedal manual to play monophonically (one-note-at-a-time), polyphonically, or polyphonically with mono release. Poly/Mono Release means that only the earliest note played rings when Pedal manual notes are released - this sounds cleaner if multiple pedal notes are accidentally played. Keep in mind that Pedal manual release is really only a concern when the Decay knob in the Pedals section of the EDIT page is turned up.
Contact Timing Mode/Contact Timing- When set to Velocity, the timing between key contact closures is affected by how fast you play a key, just like the real thing. In Fixed mode, the timing between key contact closures is always the same. Both modes are scaled by the Contact Timing amount control directly to the right.
Contact Timing: Adjusts the maximum time delay between key contact closures when pressing a key. This is based on the the MIDI velocity and affects the sound of the key click.
Enable Registration Octave (Inverted Keys)- This allows you to disable the bottom-octave black key presets, in case you're a clumsy fool who unintentionally hits them during live performances (i.e., me).
Rotary Wind Amount- Adjusts the level of wind noise created when the horn rotors go by the microphones. Fill in your own off-color joke here.
Percussion On All Registrations- A real B3 only plays Percussion when the B registration on the Upper manual is selected (i.e. percussion doesn't work if the inverted key B "left side" drawbars are selected). If this is on, Blue3 will play Percussion on both the Bb and B registrations.
Retain Expression Pedal Position- When turned on, the position of the expression stays the same when changing presets. In the Off setting, expression pedal position is stored with presets.
Retain Rotary Switch- When turned on, the position of the rotary speaker speed switch (at the bottom left of MAIN and EDIT pages) stays the same when changing presets. In the Off setting, rotary speaker speed switch setting is stored with presets.
GENERAL

Add Undo For Control Changes With the Mouse- Enabling this allows undo of knob/slider/button adjustments. You’ll want this on if you want the ability to undo all aspects of patch editing and programming.
Create A Log File For Usage- This creates a text doc of all of Blue3's internal and routines during use. It is mainly intended for our tech staff should you experience any issues. Clicking Show Log Folder opens the folder containing Blue3 log file docs.
Load Last Preset On Startup (Standalone Only)- Automatically loads the last preset used when Blue3 standalone version is started.
Preset Folder- Displays the current location of Blue3's sound presets. This can be changed by clicking and typing in the field.
Browse... - Displays the current location of preset folder in the file manager.
Set Default- Sets the current displayed Preset Folder path as the default location
Clear Cache Files- Deletes all log files, temporary sounds, and the image cache.
INTERFACE
Allows customization of Blue3's user interface settings.
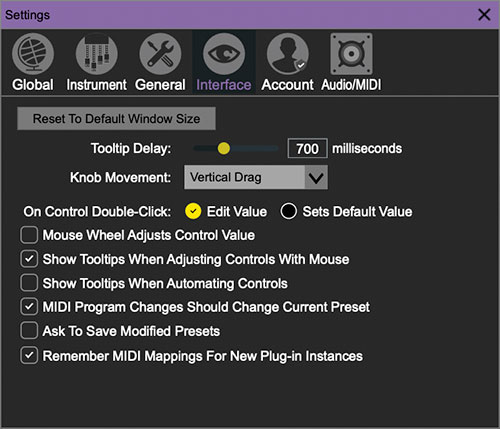
Reset To Default Window Size- Resets the Blue3 workspace to default size. Use this to reset the window size if the window somehow becomes too large for your display and can't be resized.
Tooltip Delay- Tooltips are those informative bits of text that pop up when hovering over a control (go ahead and try it, we’ll wait…). The Tooltip Delay setting defines how long you must hover before the tooltip pops up.
Knob Movement- Defines how mouse movements relate to turning onscreen knobs. It defaults to Vertical Drag, but can be changed to Horizontal Drag, or Rotary Drag if you're one those folks that cut their teeth on the Steinberg Model E VST back in 2000.
On Control Double-Click- Defines what happens when the mouse is double-clicked on a control. If Edit Value is selected, an exact number can be entered by typing the number and hitting [ENTER] or [RETURN]. If Sets Default Value is selected, double-clicking a control resets it to its default value.
Mouse Wheel Adjusts Control Value- Enabling this lets you adjust knob, slider, and switch values by moving the mouse wheel. This works great with a standard mouse wheel, but you'll want to disable it if you're using an Apple Magic Mouse (which will move the control AND scroll the window).
Show Tooltips When Adjusting Controls With Mouse- Displays parameter tooltips/values when the mouse is hovered over a control or as a control is moved with mouse clicked.
Show Tooltips When Automating Controls- Displays parameter tooltips/values next to controls any time a control is changed, i.e. if a control is moved via an assigned MIDI controller or a Perform panel knob, etc.
MIDI Program Changes Should Change Current Preset- Allows MIDI program change messages to change Blue3 patches.
Ask To Save Modified Presets- This opens a dialog window asking if you'd like to save changes if a patch has been edited and a new patch is selected. If you're the type that likes to click through presets and tweak a control here and there, it can be annoying to have a window pop-up asking if you'd like to save every time you switch presets - if you're that person, keep this off.
Remember MIDI Mappings For New Plug-in Instances- When enabled, Blue3 remembers all MIDI Tab controller settings.
ACCOUNT

Settings for your personal login information and account.
Email- Displays the email address of the current login.
Update Login Info- Clicking this opens the same email and password login screen you’ll see when initially launching Blue3.
View Account Settings- This opens your personal account page on the Cherry Audio Store website containing information about modules purchased and more.
Software Update- We often fix bugs and make improvements; below are options defining how Blue3 handles updates.
Check For Update- Click this to see if an updated version of Blue3 available.
Status-
Automatically Install Updates- Updates are automatically downloaded and installed.
Ask Before Installing Updates- By default, Blue3 automatically downloads new versions of modules when available. Checking this box defeats automatic updates and will ask if you’d like to install updates when they become available.
We’ll never make changes that can potentially “break” existing patches but we recommend enabling Ask Before Installing Updates if you’re using Blue3 for live performances or other “mission critical” situations.Never Install Updates- Blue3 never automatically installs updates.
Show Updates On Toolbar- Checking this will display an icon in the toolbar next to the logo letting you know there's an update available.
Show Notifications From Cherry Audio- We occasionally will fire off in-app advertisements; disabling this checkbox will hide them. We hate repetitive, annoying ads as much as you do, so we don't use this feature too often.
AUDIO/MIDI
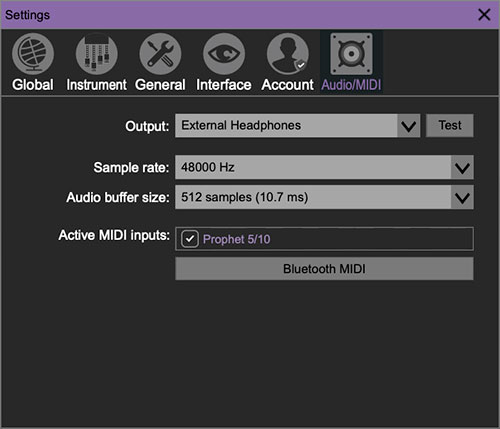
Not to be confused with the extinct audiomidi.com where I unfortunately used to work, these are settings for audio and MIDI hardware input and output.
The Audio/MIDI tab is only visible in the standalone version of Blue3.
Output- Use this drop-down menu to choose a physical audio output source. This defaults to Built-In Line Output, i.e. your computer’s onboard system audio, but you’ll get better fidelity with an external professional audio interface. The biggest audible difference is usually reduced background noise or hum.
The Test button will produce a brief sine wave when clicked; this will help with troubleshooting, aka, “WHY THE HECK ISN’T THIS MAKING ANY NOISE?!?”
Sample Rate- This sets Blue3's global sample rate. Lower sample rates offer better performance, but if you have a fast computer, high sample rates may offer slightly improved fidelity. (Translation: a fabulous opportunity to increase CPU overhead, because unlike every other human on earth, your rock and roll-destroyed ears are able to hear frequencies far beyond 20 kHz.)
Audio Buffer Size- As with any digital audio app, this defines performance vs. note latency, and will largely depend upon computer CPU speed. A professional external audio interface will almost always exhibit better performance than “built-in” system audio. Lower settings will result in less latency (in the form of faster response to notes played), but will increase the chances of audio gapping or crackling noise.
Active MIDI Inputs- Enable MIDI input sources, i.e. MIDI/USB keyboards, pad controls, MIDI knob/fader control surfaces, etc. Check boxes to enable one or more devices. If a MIDI/USB controller isn't working, make sure the appropriate box is checked here. We put this this piece of info way in the back of the manual, to make it extra challenging to find out why things aren't working (not really, just ended up here!).