Getting Started
Eight Voice Architecture
Top Toolbar, Preset, and Focus Controls
VCO 1 and 2
Filter Section
Envelope 1 and 2
LFO 1 and 2
Voice 1-8 Assign and Key Range
Output Section
Master Controls (Bottom Strip Controls)
Link Groups 1 and 2
Mini-Sequencer
Effects Section
Voice Duplication
MIDI Controllers Setup and The MIDI Tab
QWERTY Musical Typing Keyboard (MTK)
Settings
Looking in the bottom vicinity of a voice module, you'll see these are actually two sections, but their functions are closely related, so this chapter will be a "two-fer."
These controls regulate how each voice responds to incoming note data, most significantly, whether the voice plays monophonically (i.e. all incoming notes played on the keyboard sound one at a time, dependent on priority setting), or whether it plays polyphonically (i.e. notes are distributed to multiple voice modules in order to play chords). But there's more going on under the hood, and understanding how 8 Voice's various notes assign modes operate is the key to unlocking its massive flexibility, and understanding why Cherry Audio makes the coolest synths on the face of the earth. (Too much?)
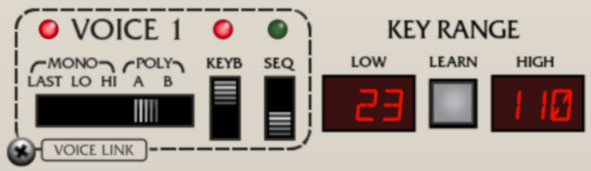
Voice 1-8 Assign Mode

Voice Active LED- The LED next to Voice # is a bi-color LED that glows red when it's receiving a MIDI note (i.e. note played on a keyboard controller or from a DAW), or green if the note is received from the onboard Mini Sequencer. This isn't just another cool flickering light - because of the many ways voices can be configured, it's often very useful to know which voice(s) is currently playing.
Voice Assign Mode switch- Since each voice is monophonic (i.e., it can only sound at a time), the five-position slider switch selects how the voice responds to incoming note data. Note that Env 1 and Env 2 always retrigger with every note played regardless of assignment mode.
Mono/Last- The voice responds to all incoming notes. The most recently played note takes priority.
Mono/Lo- The voice responds to all incoming notes. The lowest note played takes priority. Env 1 and Env 2 will retrigger with every note played.
Mono/Hi- The voice responds to all incoming notes. The highest note played takes priority. Env 1 and Env 2 will retrigger with every note played.
Poly/A and Poly/B- Notes played are distributed amongst voices set to the same poly group (Poly A or Poly B). The maximum number of notes that can be played simultaneously corresponds to the number of voices set to the same poly bus. The manner in which incoming notes are assigned to voices depends on the switch settings in the Poly Assign Mode section, which we'll explain in some other far-flung part of this manual, once you've well forgotten all the stuff we just explained. Hooray!
Poly A and Poly B can be thought of as "lanes" or MIDI channels and are useful for creating "stacked" polyphonic patches. Typically you'd set voices 1-4 to Poly A and voices 5-8 to Poly B. Voices 1-4 would be used to create one sound (i.e. same parameter settings for voices 1-4), and voices 5-8 would be used for a different sound (again, with the same settings for voices 5-8). The end result would be a dual-sound stacked patch with four-voice polyphony.
Voice Link 1-8 buttons- These work in conjunction with the Link Group 1 and 2 button groups in the bottom control section and allow parameters of multiple voices to be controlled using a single voice as a "master." This is one of Eight Voice's most killer features - it's so great, it has its own section: Link Groups 1 and 2.
Keyb switch- When switched to the up position, the voice responds to incoming notes played from a MIDI controller or a DAW sequencer.
Seq switch- When switched to the up position, the voice responds to incoming notes from Eight Voice's onboard Mini Sequencer.
If both the Keyb and Seq switch are in the off position, the voice is disabled and is dimmed. Because there's a lot going on with Eight Voice, dimming inactive voices makes it a little easier to understand what's going on and which voices are currently making noise.
(This is the part of the manual you'll be reading with your tail between your legs when you get upset that the voice is "broken" and some smarmy Cherry employee (i.e. me) pastes a link into the internet forum. Don't be that guy!)
If both the Keyb and Seq switch are in the on position, the onboard Mini-Sequencer controls the voice and the keyboard will transpose the sequence. This is a pretty nifty feature, and we'll remind you all about it in the Mini-Sequencer section.
Key Range
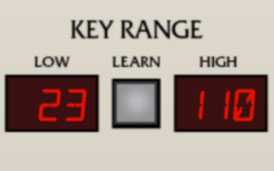
Key Range specifies the MIDI note range the voice will respond to. This is very useful, as it opens the door to keyboard splits and layering, which can get pretty awesome when combined with the mono and poly voice assign modes.
Learn button and Low/High displays- Key Range has only one super easy-to-use control, and that's the Learn button (in the immortal words of Beavis and Butthead, "if I wanted to learn, I'd go to thkool!"). These are displayed as MIDI note numbers.
To set a keyboard range, click the Learn button; the number in the Low display flashes. Hit the lowest keyboard note you'd like the voice to respond to. The number in the High display will now flash; hit the highest note you'd like the voice to respond to. The key range is now set and learn mode is disabled. If you make a mistake, simply repeat the process. Low and High key range can also be set by clicking and dragging on the number displays.
To reset a voice's range to MIDI notes 0-127, simply double-click the Learn button.
Setting Key Ranges with Poly Modes- When setting key ranges, all voices currently set to Poly A or Poly B mode will be set to the specified key range. This is easier to explain with an example - if voices 1, 2, 3, and 4 are set to Poly A, and Voice 1's key range is set, all four voices will be set to this range. The same goes for Poly B. We made it work this way because it would be confusing if you had to remember to set all voice modules used in a poly patch to the same key range. Additionally, any voice currently set to one of the poly modes can be used to set the range - in other words, in the preceding example, the range could be set with the Key Range controls in voice 1, 2, 3, or 4.
This "auto key range copy" function works independently for Poly A and Poly B, and 8 Voice will remember the current range settings for both as you change voice assign switch settings, as well as the mono key range settings for each individual voice.