Getting Started
Eight Voice Architecture
Top Toolbar, Preset, and Focus Controls
VCO 1 and 2
Filter Section
Envelope 1 and 2
LFO 1 and 2
Voice 1-8 Assign and Key Range
Output Section
Master Controls (Bottom Strip Controls)
Link Groups 1 and 2
Mini-Sequencer
Effects Section
Voice Duplication
MIDI Controllers Setup and The MIDI Tab
QWERTY Musical Typing Keyboard (MTK)
Settings
Assigning internal and external hardware controls adds a whole new dimension of control and musicality to patches, and it's really easy to do. The MIDI Tab is where all controller assignments can be viewed and tweaked. First we'll show how to assign an external hardware controller to an Eight Voice control, then we'll go over all parameters in the MIDI Tab.
Note that all Eight Voice voice module controls are independently assigned. For example, assigning a MIDI hardware controller to Voice 1's Resonance knob, only affects the Resonance knob for Voice 1. However, one MIDI controller can easily be assigned to multiple controls (the Resonance knobs for any or all eight voice modules, for example).
Basic External Hardware Control Assignment
This is the quick, "I just want to assign a hardware control right now!," section. We recommend reading this entire section to best take advantage of Eight Voice's swift MIDI control assignments. We also recommend reading "The Shining" by Stephen King, but that's not important right now.
In this example, we’ll assign a hardware slider control to Voice 1's filter cutoff Frequency knob.
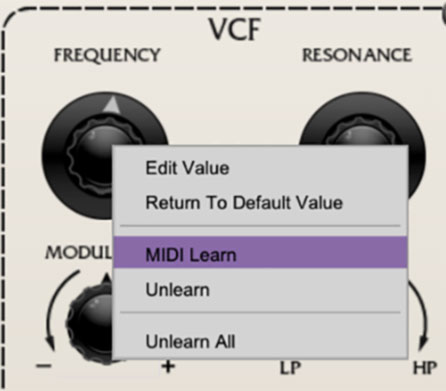
Begin by right-clicking on the Frequency knob in Voice 1's VCF section and selecting MIDI Learn. A transparent purple overlay appears over the knob indicating that it's in learn mode. Now move the desired hardware control device. The purple overlay disappears and the hardware control will move the onscreen knob. If you get cold feet (or accidentally put the wrong control into learn mode), learn mode can be aborted by right-clicking and selecting Stop Learning.
This is the basic procedure for assigning hardware controllers to almost any Eight Voice control.
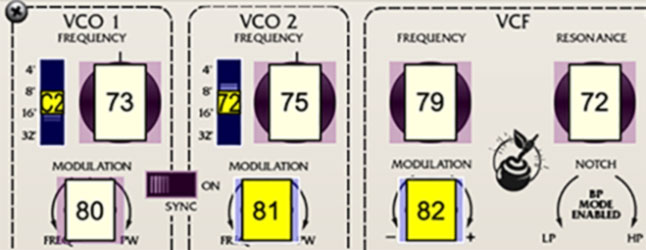
When in MIDI learn mode, any previously assigned controller numbers will show in squares. These indicate the MIDI continuous controller number of the assigned hardware control (these are also displayed in the MIDI library tab at left).
Once a MIDI controller has been assigned, in addition to real-time control of an Eight Voice parameter, you’ll also be able to record and play back controller data from a DAW.
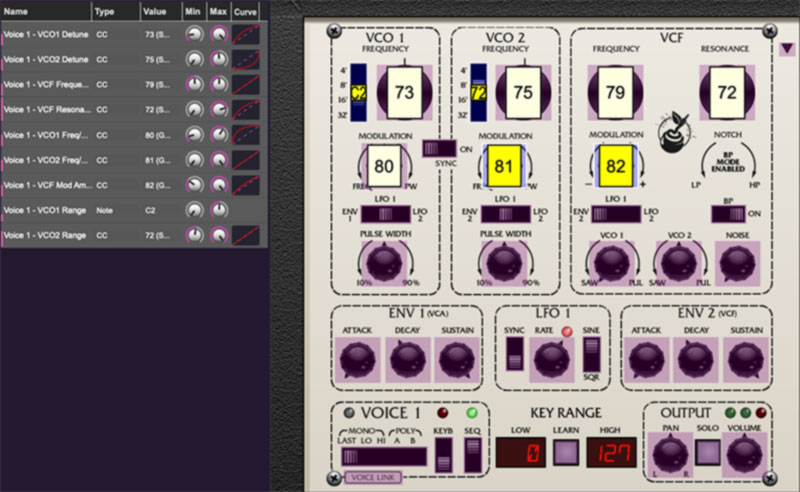
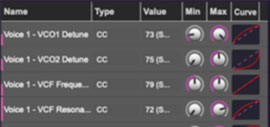
The MIDI Tab
This is command central for all MIDI controller assignments. Here you’ll be able to see information about all currently assigned controllers and adjust control ranges.
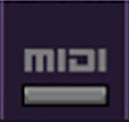
To view or hide the MIDI Tab, click the MIDI button in the top toolbar.
MIDI Learn button- This is almost exactly the same as enabling MIDI learn mode by right-clicking a control. Click the MIDI Learn button to enter learn mode (all controls turn purple). Unlike right-clicking on specific knobs, where Eight Voice automatically exits controller assignment mode, clicking the MIDI Learn knob "stays on" to enable assignment of multiple hardware controls. This is handy for quickly assigning a bunch of knobs, sliders, or the buttons of a grid-style controller.
To assign multiple controls, click MIDI Learn, click an on-screen control, move the desired hardware knob or slider, continue clicking and assigning on-screen controllers until all desired controls are assigned, then click Stop Learning to exit learn mode.
Remember that a single hardware knob/slider/button isn't limited to controlling just one parameter - a single hardware controller can simultaneously operate as many controls as you'd like. Combined with the MIDI Tab's controller range and inversion controls explained below, this can be a very powerful and customizable way to control parameters.
MIDI Tab Columns
Name- Displays the name of the parameter being controlled.
Type- There are five possible types of controller automation in Eight Voice:
Note- Notes played on a MIDI keyboard controller, expressed as C-1 to G9
CC (MIDI Continuous Controller)- The standard 128 MIDI controller numbers as defined in the MIDI spec. More specifically, these are the controllers transmitted by hardware knob and slider controls. MIDI CC’s can be used to control parameters in real-time or recorded and played back within DAW software.
MMC (MIDI Machine Control)- The MIDI control protocol for tape machine-style transport controls. Back in the dark ages, this was used to control wonky old Tascam and Fostex reel-to-reel monsters, but it's useful if your MIDI controller has tape-style transport control buttons.
Pressure- Most modern keyboard controllers transmit controller data when keys are pressed and released as they're held down. The vast majority of keyboard controllers with aftertouch transmit "mono" aftertouch only; in other words, aftertouch data is the sum of all keys to one single data stream. Note that Eight Voice only responds to mono aftertouch.
Key- This allows keys of the computer QWERTY keyboard to at as button controls for Eight Voice's onscreen controls.
Value- Displays the specific automation controller. In the case of a Note this would show a MIDI note number (C-1 to G9, for a MIDI CC, this would be the MIDI CC controller number, etc. Clicking on the value opens a pop-up menu where all values are displayed and can be selected.
Min- Sets a limit on the lowest value any automation control can set a mapped controller to. This actually recalibrates the range of the automation controller to the remaining parameter range.
Max- Sets a limit on the highest value any automation control can set a mapped controller to. This actually recalibrates the range of the automation controller to the remaining parameter range.
Curve- These allow the customization of how incoming MIDI CC controls affect the movement of Eight Voice's onscreen controls, ranging from exponential to linear to logarithmic curves.
Super Tricky Min-Max Tricks and Eight Voice's "Two-Way" knobs- Not only can parameter ranges be limited via the Min and Max knobs, mapped control destinations can be completely inverted by setting the Min knob all the way up and the Max knob all the way down (or anywhere in between).
Limiting and inverting parameter ranges with the Min/Max controls is particularly useful when multiplexing a single hardware control to operate multiple parameters. Along with the Curve control, the customization possibilities are super flexible.
__________________
Assigning Hardware Knob and Slider controls to Eight Voice's Bi-directional Knob Controls- Sets many of Eight Voice's controls have a "zero" point at center position, and increase when moved left or right (oscillator and filter Modulation depth, and VCO 1/2 levels in the Filter section), you'll notice that assigned controllers will always start at the onscreen knob's full left position, which will likely not be the desired start position.
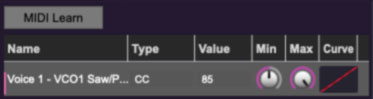
Example 1 / Center Zero to Full Right- Here we'll assign a hardware knob or slider to vary Filter/VCO 1's pulse wave volume from zero to max. Assign the desired hardware knob or slider by right-clicking the Filter/VCO 1 Saw/Pulse knob, selecting Learn and moving the hardware knob or slider. Now click the MIDI button in the top purple menu strip to open the left-hand MIDI tab. In the Voice 1 - VCO Saw/Pulse column, set the Min value to 50%. Minimum setting on the hardware control will now set Filter/VCO 1 Saw/Pulse to its center/zero position.
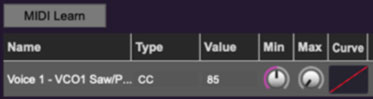
Example 2 / Center Zero to Full Left- Let's say you wanted a hardware knob or slider to adjust Filter/VCO 1's saw wave volume from zero to max - as with the example above, we'll need the lowest controller value to correspond to the onscreen knob's center position and we need to invert the incoming controller data so that increasing the control value moves the onscreen control counterclockwise.
Assign the desired hardware knob or slider by right-clicking the Filter/VCO 1 Saw/Pulse knob, selecting Learn and moving the hardware knob or slider. Now click the MIDI button in the top purple menu strip to open the left-hand MIDI tab. In the Voice 1 - VCO Saw/Pulse column, set the Min value to 50%, and the Max value to 0%. Minimum setting on the hardware control will now move Filter/VCO 1 Saw/Pulse to its center/zero position, and increasing it will rotate the onscreen knob counterclockwise to increase the saw volume.
__________________
MIDI Tab Column Configuration Right-Click Menu
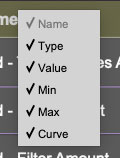
Right-clicking anywhere in the top row (Name, Type, Value, etc.) displays the column configuration menu. Checking/unchecking these allows hiding and display of each column. This has no effect on assignments.
MIDI Tab Parameters Right-Click
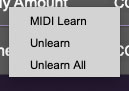
Right-clicking on an assigned parameter opens the menu above.
MIDI Learn- This is used to change the controller assigned to a particular parameter.
Unlearn- Deletes the selected automation parameter.
Unlearn All- Deletes all controller assignments for the patch. Eight Voice will display a warning dialog prior to deletion in order to thwart potential unlearn-related disasters.