The original instrument featured a sequencer that could be used either in real-time by playing passages into it live, or in step-time, by entering notes one-by-one. The real-time mode was honestly pretty wonky, and if you're used to a modern DAW, let's just say you likely wouldn't find it very useful. With that in mind, we made the decision to implement Elka-X's sequencer strictly as a step sequencer. The good news is that Elka X's sequencer is powerful, easy to use, DAW project syncable, and a heck of a lot of fun.
Step Sequencer Structure
The Step Sequencer consists of four individual monophonic sequences, each with a user-definable length of up to 128 steps. Sequence playback can be assigned either to the lower or upper layer.
Each stored Elka-X patch contains its own four sequences which are stored with the patch.
Controls
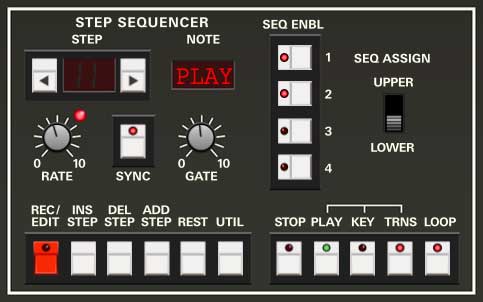
Main Sequence Controls
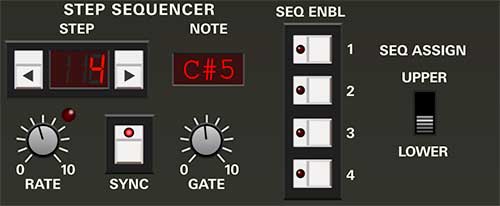
Step buttons and display- Each click of these buttons increments the current sequence step down or up respectively. Hold the mouse button down to move quickly through steps. We don't need yer dang carpal tunnel syndrome lawsuit, pal!
Note display- This display indicates the MIDI note of the current step. To change the note, click the Rec/Edit button and play a new note on a MIDI/USB controller, or click the display and choose a note from the popup menu.
Seq Enable 1/2/3/4- These serve double-duty; in normal mode these toggle each of the four sequences on on and off. When record mode is enabled, they select which sequence is currently being edited; the active sequencer button will flash.
Seq Assign- Chooses whether the sequencer controls the Upper or Lower layer. Since the Keyboard section Single setting always plays the Upper layer, Sequence Assign defaults to the Upper position. As a result, the Keyboard mode needs to be set to Double or Split for the step sequencer to play the Lower layer. (Keep in mind that the Panel Control Utility button make it easy to move sounds back and forth from the Upper to Lower layer and vice-versa.)
Rate- Sets the sequence playback speed. The LED flashes to indicate the current rate.
Sync- Engaging the Sync button locks the sequencer timing to master tempo. When engaged, the Rate knob snaps to note values ranging from 1/64th note triplet to 8 beats. Sync mode locks to the tempo in the top toolbar when using the Elka-X standalone version or the current project tempo when the plug-in version is used in a DAW.
Gate- Globally sets the length of sequencer notes. A setting of 50% equals half the length of a step. Note that the Gate setting directly interacts with filter and amplifier decay and release settings, so you may need to fine-tune these for desired results.
Sequence Enable 1/2/3/4- These serve double duty:
In playback mode (Rec/Edit off), these toggle the four sequences on and off. The four sequences can be enabled individually, or in any simultaneous combination.
When Rec/Edit mode is enabled, these select which sequence is currently being recorded to or edited. Only one Sequence Enable button can be active when in Rec/Edit mode. When starting with all sequences blank (i.e., a blank patch), Sequence Enable button 1 will be active when the Rec/Edit is pressed. At all other times, Elka-X defaults to the most recently recorded to or edited sequence #.
Sequence Assign Upper/Lower- This sets which layer plays sequence data.
A note about Upper/Lower sequence playback:
You may be wondering, "Why can't I play back different sequences on different layers at the same time?" This was actually our original intention, but once we started unpacking the inevitable "what happens if the user does this?" questions, it became clear that the logistics of playing back two or more sequences to different layers - particularly how to handle multiple sequences in Split keyboard mode along with the Key and Transpose modes - was going to be complicated, hard-to-use, and confusing. With that in mind, we decided to stick with the much-easier-to-implement-and-understand sequence-plays-a-single-layer configuration. Surely you have at least one hand to play the darn keyboard with!
Sequence Edit Controls
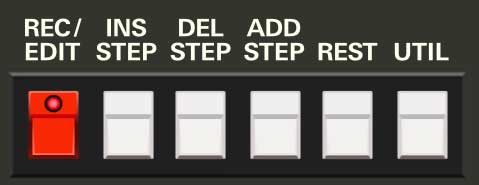
Besides the Record/Edit button itself, the following buttons are only active when record mode is engaged.
Record/Edit- Toggles the record/edit mode on or off for the currently selected sequence.
Insert Step- Adds a sequence step before the currently selected step number and shifts all following steps forward; the new step will contain rest (indicated by a dash in the Note display).
Delete Step- Removes the currently selected step number and shifts all existing following steps back.
Add Step- Adds a sequence step following the very last step in the current sequence.
Rest- Makes the current sequence step rest, i.e. no note sounds. The Note display will show a dash ( – ) for the current step. To revert the a rest step back to a standard note, simply enter a note while on the step while in Record/Edit mode.
Utility- This opens a popup menu with useful "housekeeping" commands. The first group of commands is repeated for all for sequences:
Sequence 1/2/3/4 commands-
Transpose Up- Transposes the current sequence up by a semitone or an octave
Transpose Down- Transposes the current sequence down by a semitone or an octave
Copy To- Makes a copy of the selected sequence number to the remaining sequence location of your choice.
Move To- Moves the currently selected sequence number to the remaining sequence location of your choice and erases the sequence from the original location.
Clear Sequence- Erases the current sequence and initializes the current sequence. Elka-X opens an, "Are You Sure?," dialog box to prevent accidental erasure (I think I saw Accidental Erasure open for Clan of Xymox in '85 at the Roxy).
Clear All Sequences- Erases all four sequences. Elka-X opens an, "Are You Sure?," dialog box to prevent erasing by accident.
Import/Export- This enables sequences to be copied between Elka-X patches.
Copy Sequencer Data to Memory- This temporarily copies all four sequences to Elka-X's internal memory in order to allow pasting sequence data to a different patch.
Paste Sequencer Data- This pastes all four sequences from the source patch. All four sequences in the destination patch will be overwritten.
Paste Only Sequences with Note Data- This pastes only sequences containing note data. The destination location will be overwritten. If the source sequence location does not contain note data, it will not overwrite the destination sequence location. This lets you combine sequences from patch with sequences in the current patch. The Utility Move To and Transpose Up/Down commands are particularly useful here.
Here's how to copy sequencer data between two Elka-X patches:
With the source patch selected, click Utility>Clipboard>Copy Sequencer Data To Memory. Now select the destination patch (make sure the source patch is saved before leaving it) and click the Utility button. Sequencer data can then be pasted in using the Paste Sequencer Data or Paste Only Sequences with Note Data commands.
Transport Controls
Stop- Stops sequencer playback.
Play- Starts sequencer playback.
Key- Enables sequencer playback only when a key on the keyboard is played. When Key is pressed, the Play button illuminates and the sequencer is "armed," that is, it waits to start playing until a key on the keyboard is played. Sequence playback stops when all keys are released.
Transpose (Trns)- When enabled, all sequences will transpose according to keys played on the keyboard. The "home" transposition (i.e., non-transposed) is always be C1. The range can be "fine-tuned" by using the Utility button Sequence #>Transpose Up/Transpose Down commands. The semitone transpose commands (-1/+1) are especially useful for dialing in sensible sequence note locations when playing split patches with a sequence on one hand and chords/melodies on the other.
Loop- When toggled, sequences automatically loop back to their first step for continuous play. Disabling Loop is useful if you'd like to use the sequencer for "one-shot" sequences - particularly for firing off rapid one-time note passages.
Creating Sequences
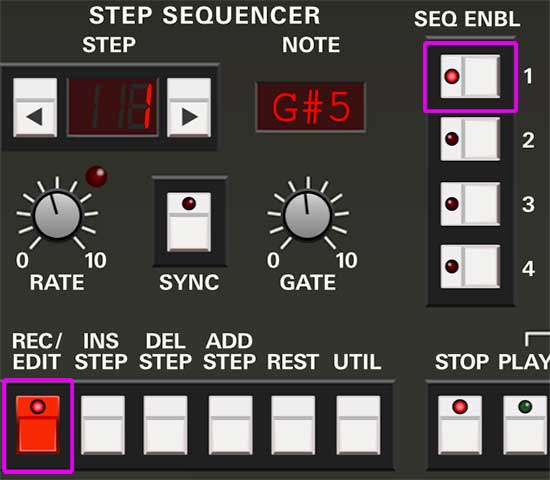
Enable Recording and Select Sequence- Click the Rec/Edit button, then select the sequence # 1, 2, 3, or 4 button beneath Sequence Enable. The selected sequence button LED will flash.
Entering Notes- When in Rec/Edit mode, the easiest way to enter sequence notes is to simply single notes on a MIDI/USB controller, Elka-X's onscreen keyboard, or using the onscreen QWERTY musical typing keyboard (enable the MTK using the keyboard icon in the top purple menu strip). The step # will automatically advance when a note is played. Notes on a step can also be manually selected by clicking in the digital Note display and selecting a MIDI note from the popup menu. To add a rest to the current step, click the Rest button at the bottom. Rest steps are represented by a dash in the Note display.
When Rec/Edit is clicked, a new sequence will have single step. A new step will be added with each played note or rest - in this way, you won't have to separately add a step for every new note, and you won't need to define the sequence length prior to creating a sequence. (This is that "easy-to-use/fun" part we were talking about in the intro.)
Editing Sequences
Editing notes couldn't be easier. Enable Record/Edit mode, and move to the desired step using the Step up/down buttons. Play a new note on a MIDI/USB controller, or click the popup Note display and select a different note, or hit the Rest button if a rest step is desired.
The sequence that's currently being recorded or edited can be changed by selecting a different Seq Enable number - it's not necessary to exit Rec/Edit mode.