The Effects panel contains KR-55C's four individual effects, a global Bus Compressor, and a global Bus Limiter.
Individually Assignable Effects
The Overdrive, Flanger/Chorus, Delay, and Reverb are configured so that each instrument can be separately assigned to each effect using the Effects Routing Matrix on the Mixer page (more info on the Effects Routing Matrix section here)
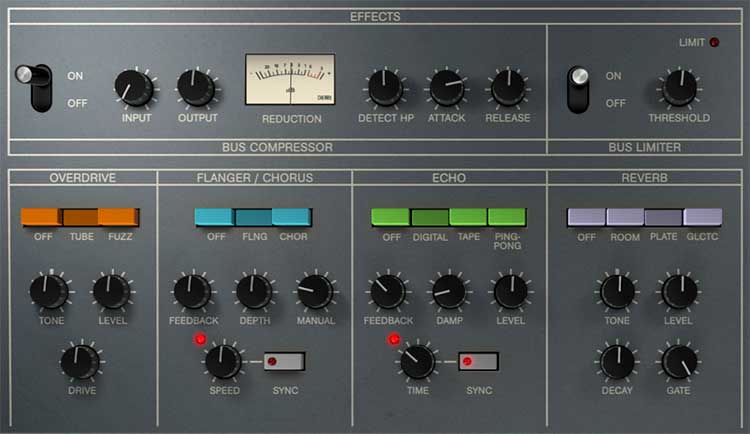
Overdrive
Mode buttons- Enables Overdrive and selects the type.
Off- Overdrive effect is disabled.
Tube- This is the mellower distortion mode. Use it to add just little bit of vintage hair to sounds.
Fuzz- Aggressive and raunchy vintage fuzz tone.
Tone- This is a tilt-style EQ; rotating counterclockwise from center increases bass, rotating clockwise increases treble.
Level- Overall volume; this doesn't affect the amount of distortion. Because increasing drive amount causes an overall volume increase, Level can be used to balance things out.
Drive- Amount of distortion.
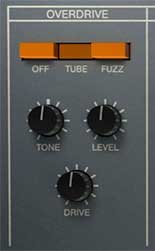
Flanger/Chorus
Mode buttons- Enables Flanger/Chorus and selects the type.
Off- Flanger/Chorus effect is disabled.
Flanger- Flange mode is enabled.
Chorus- Chorus mode is enabled. Note that the Feedback knob is disabled when in Chorus mode.
Feedback- Sets the amount of internal feedback when in Flange mode. Higher values result in a more intense flange sound.
Depth- Sets effect depth, i.e. the amount of modulation.
Manual- Sets the delay time length from 1-13ms. Shorter delay times result in more of a "jet passby" swoosh, particularly with Res at higher settings.
Speed- Sets the modulation from 0.01-6 Hz speed.
Sync- Engaging the Sync switch locks the modulation sweep time to master tempo. When engaged, the Speed knob snaps to note values ranging from 1/64th note triplet to 8 beats. Sync mode locks to the Main panel Tempo knob setting when using the KR-55C standalone version or the current project tempo when the plug-in version is used in a DAW.
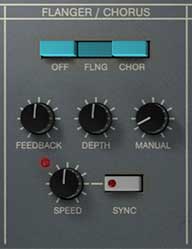
Echo
Mode buttons- Enables Echo and selects the type.
Off- Echo effect is disabled.
Digital- Clean sounding digital delay.
Tape- Reproduces the effect of a vintage "space echo" tape echo.
Ping-Pong- Echoes alternate between audio channels.
Feedback- Routes the output to the input for additional repeats. Be careful at high settings as this can result in runaway feedback madness.
Level- Sets the volume of the echo repeats.
Sync- Engaging the Sync switch locks the echo time to master tempo. When engaged, the Time knob snaps to note values ranging from 1/64th note triplet to 8 beats. Sync mode locks to the Main panel Tempo knob setting when using the KR-55C standalone version or the current project tempo when the plug-in version is used in a DAW.
Time- Sets echo time, from 1 to 2000 ms. If the Sync switch is enabled, time settings snap to synchronized note values (see Sync above).
Reverb
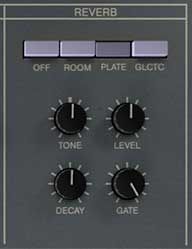
Mode buttons- Enables Reverb and selects type.
Off- Reverb effect is disabled.
Room- Recreates a vintage algorithmic-style medium room verb.
Plate- A medium-to-large studio plate-style algorithm.
Galactic- Cherry Audio's exclusive, giant, spacey reverb.
Tone- This is a tilt-style EQ; rotating counterclockwise from center increases bass, rotating clockwise increases treble.
Level- Sets the volume of wet reverb signal.
Decay- Sets the length of reverb release time/size of room.
Gate- This sets the threshold of the integrated noise gate. At full clockwise position, the gate effect is disabled. The gate threshold increases as the knob is rotated counterclockwise. This allows reverb tails to be abruptly chopped off for the reverb effects that launched a thousand 80s hits!
Global Effects
The Bus Compressor and Bus Limiter are global for the entire instrument and both used for control of dynamics, but the Bus Compressor is colored sounding and intended for "glueing" a drum mix together, or at extreme settings, smashing the heck out of it, whereas the Bus Limiter is designed to keep overall levels under control in a transparent fashion.
The Bus Compressor is after the Overdrive, Flanger/Chorus, Echo, and Reverb in the signal path, and before master volume knob. Conversely, the Bus Limiter is after the master volume knob, to prevent you from setting your DAW on fire. (What? It could happen...)
Bus Compressor
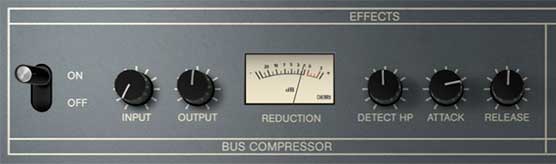
Off/On- Enables and disables Bus Compressor effect.
Input- Sets the input level feeding the compressor. This is important, because higher levels make the compressor more reactive and heavy-handed (which can be a good thing!).
Output- The most rudimentary explanation of a compressor is that it levels signal dynamics by making quiet signals loud, but in reality, it's reducing the volume of peaks. This results in an overall loss of signal level. The Output knob introduces "make-up gain" in order to compensate for this loss of level. Its setting isn't critical, but the Off/On switch can be used to set it by comparing the relative level of un-effected vs. compressed signal.
Reduction Meter- Shows the amount of compression applied. The needle nominally sits at zero dB, and moves to the left to indicate how much compression is occurring.
Detect HP- This one can be a little hard to wrap your head around. The detector is the part of the compressor that listens to incoming program to determine the amount of gain reduction. Because bass-heavy material tends to affect gain reduction to a far greater degree, loud and/or distorted kick drums will cause the compressor to "pump;" in other words, every time a loud kick drum hits, the volume of the entire pattern will temporarily dive, dependent upon the settings of the Attack and Decay knobs. (Depending on what you're doing, this may actually be just the desirable "PA overload" effect you're looking for.)
Placing a highpass filter into the detector circuit reduces the affects of bass-heavy material on overall compression and helps to alleviate this phenomena. The Detect HP knob sets the frequency of detector circuit highpass filtering with the highpass frequency increasing as the knob is turned clockwise.
Note that because the Detect HP is not in the actual audio path, it does not affect the EQ or frequency content of the actual audio content.
Attack- Sets how long it takes for the onset of compression. If you're not experienced with compressors, the Attack parameter can seem a little "backwards," but think about it like this:
Fast attack times (low knob settings) mean that compression occurs quickly; in the case of drums this means that the initial transient gets tamed and smushed, and makes the duration of the drum hit sound at a more even volume (instead of quick spike).
Slow attack times (higher knob settings) mean that when the compressor gets hit with the big volume spike of drum, it doesn't turn the volume down nearly as quickly, and "lets through" some of the transient for more impact.
The secret of good compression settings for drums is to experiment - you generally want to let a little transient through, but still have enough compression to increase the apparent overall volume.
Release- Sets how long it takes for the compressor to recover or "let go" of the signal. What you need to know is that longer release times (higher knob setting) are more gentle, and lower release times (low knob setting) result in more aggressive sounding drums (hooray!).
Bus Limiter
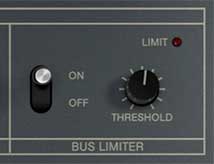
Off/On- Enables and disables Bus Limiter effect. The LED above the switch indicates current enabled or disabled status.