Both of the original KR-55 machines were strictly preset machines, with no facility for user-programmed patterns. This is a real shame, because they were great-sounding machines and almost certainly would've been far more successful if user programming was possible. With that in mind, Cherry KR-55C includes a comprehensive user pattern/song programming mode.
The pattern programming mode UI uses a variation of the familiar "xOx" Roland-style interface, and allows for patterns up to 32 steps in length in groupings of 3 or 4. Notes may also be "played in" in real-time using the Inst Trigger button, or you can skip all KR-55's onboard pattern and song programming and use it strictly as a sound module, triggered by a DAW (but where's the fun in that?).
User Patterns and the Patch Browser
Each saved patch in the browser (purple menu strip at the top) consists of:
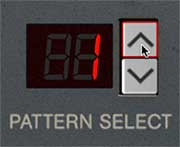
99 patterns, selectable with the up/down increment buttons in the Pattern Select selection. (Patt/Song switch set to Patt)
1 song, i.e. a set of chained patterns. A song can be up to 99 steps. Please see the next chapter for more information on Song mode.
Creating a User Pattern
Creating your own pattern is super easy. Here's how:
• Click the New button in the top-left corner.
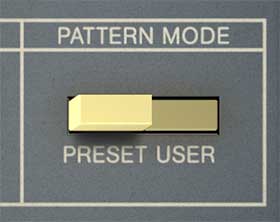
• Set the Pattern Mode buttons at upper right to User.
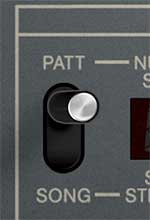
• In the Programmer section, set the Patt/Song switch to Patt.
• In the Programmer section, choose the number location where you'd like the new pattern to reside using the up/down increment buttons beside the Pattern Select display. If you don't have any patterns currently programmed, you can leave it set to 1. (Remember that every saved preset in the patch browser stores its own unique set of 99 patterns, so you don't need to worry about overwriting existing patterns.)
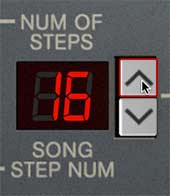
• Using the up/down increment buttons next to the Num of Steps display, select the number of pattern steps. This determines the pattern step where the rhythm will loop back to step 1.
We recommend starting out with a simple 1 bar pattern with 16th-note step resolution. To do this, set Num of Steps to 16 using the up/down increment buttons.
The Num of Steps pattern length can be set to accommodate triplets (set Num of Steps to 12 or 24), or odd time signatures (set Num of Steps to 15, 21, or some other crazy thing that would do Howard Moon proud).
• Using the Instruments Selector knob, select the first instrument you'd like to program. Since there isn't an audible "click track" per se, it's helpful to begin by programming an instrument as a metronomic reference, such as a hi-hat or bass drum at quarter-note intervals (i.e., steps 1, 5, 9, and 13). These can easily be altered later when the rhythm is established.
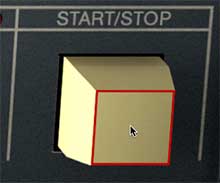
• Pattern steps can be entered with KR-55C in stop or play mode, but it's more creative and fun to program patterns while in play mode. To enter play mode, click the Start/Stop button
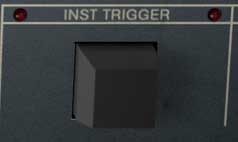
Additional instruments can be added by choosing them with the Inst Select and entering steps with the numbered buttons or in real-time with the Inst Trigger button.
User Mode Button Functions
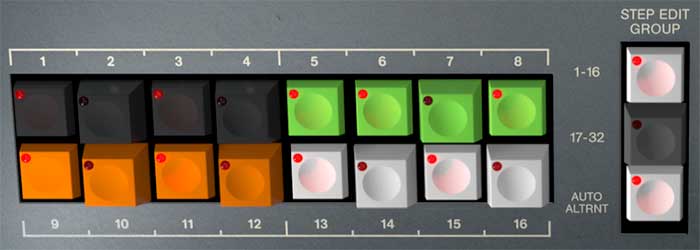
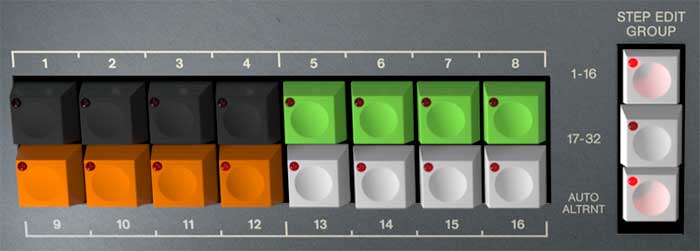
Step Buttons 1-16 and 17-32- These enable and disables pattern beat steps for each instrument. The LED in the corner will illuminate if a step is active. The LEDs change to display active steps when instrument voices are select with the Instruments Select knob in the Programmer section. Multiple adjacent buttons can be enabled or disabled by dragging the mouse pointer across them - we're particularly fond of the this feature, particularly for enabling a bunch of consecutive high-hats (or rim shots, if it's "Time To Get Ill"). It's also useful for disabling consecutive buttons even if some are on and some are off. Finally, it's also real handy if you're enabling steps on the same 16th note divisions - for example, for a four-on-the-floor kick, drag from 1-9 and 5-13.
Step Edit Group- Earlier we mentioned that a pattern can be up to 32 beats long (i.e., 2 bars of 4/4 with 1/16-note resolution). Since KR-55C only has 16 step buttons, the Step Edit group buttons act as "shift" controls. The panel labels will change appropriately to indicate whether you're currently editing steps 1-16 or 17-32, or 1-12 and 13-24 if the programmer division switch is in 3 position.
If the current Num of Steps setting in the Programmer section is 16 or less, the 17-32 button won't be needed and will be dimmed and disabled. This will be the case if you're working with one-bar 4/4 patterns (i.e. 16 beats long). The same applies if the Programmer division switch is set to i and the Num of Steps is 12 or less.
Auto Alternate- When using patterns longer than 16 beats (or 12 beats in 3 mode), toggling Auto Alternate automatically switches between the first "bank" of steps and the second while playing. This makes it easier to see what's going when a pattern is playing. Disable Auto Alternate if you'd like to work on one set of steps while a pattern plays.
Auto Alternate button is dimmed and disabled if Num of Steps is set to 16 beats or less (or 12 beats or less in 3 mode).
Inst Trigger- When Pattern mode is set to User the functionality of the Intro/Fill-In button becomes an individual instrument trigger button. When clicked, the currently sound chosen with the Inst Select knob is heard, and the two adjacent LEDs flash.
Inst Trigger has a few uses. When KR-55C is stopped, it simply one-shot triggers the sound currently selected with the Inst Select knob. When KR-55C is playing, it adds that instrument to the pattern, quantized to the closest step location. This is handy if you can "feel" where you'd like a hit more quickly than figuring out where it lies visually. If you frequently use the Inst Trigger button when programming patterns, consider assigning it to a hardware MIDI controller button or key via right-clicking it (full info on assigning hardware controllers can be found here).
The Inst Trigger button will not enter pattern notes when in Song play mode. We did this because it could potentially really mess up a bunch of patterns if they're changing rapidly while playing in song mode.
55A vs. 55B Model Setting in User Mode
Just a quick PSA - the Model setting only affects the built-in factory patterns. It makes no difference at all when programming user patterns, other than the style and color of the user interface. The same goes for the drum voices themselves - the sounds (and user edit parameters) are exactly the same in either mode.