If KR-55C is being used in a DAW, you may want to forego its internal pattern and song programming and instead use the DAW for programming and playing MIDI notes. This might be a little less fun than clicking colorful buttons on and off, but it allows far more flexibility in terms of note placement/quantization and velocity.
No special setup is required as KR-55C always responds to incoming MIDI note data from a MIDI/USB controller or the DAW itself, but there are a few things to be aware of.
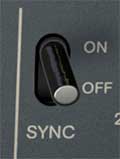
Sync
Make sure that Sync switch in the Tempo sectio is set to Off to prevent the internal pattern sequencer from playing back when DAW play is initiated.
Velocity
When using KR-55C's onboard pattern programming, notes alway play at full volume, but when using a DAW, note volume is always controlled by MIDI velocity. This offers a whole other level of expression, but if you'd the everything-loud-all-the-time vintage drum machine experience, make sure to crank up note velocities - most DAWs have editing facilities that make this easy to do.
Transferring KR-55C Patterns to a DAW using Drag-Export
The Drag-Export button in the Programmer section makes it really easy to copy patterns to a DAW. Simply click and drag the Drag Export button array to the desired position in the KR-55C instrument DAW timeline/grid (you can also drag to your computer's desktop to create Standard MIDI file - super cool, right?). Keep in mind that Drag-Export works for patterns or entire songs.
When playing back the newly created MIDI clip, make sure to set Host Sync to the Off position, otherwise the pattern will simultaneously play fromKR-55C's sequencer and the DAW, and no one wants that malarkey.
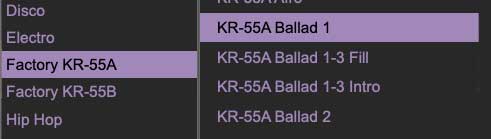
Drag-Exporting Factory Preset Rhythms
When Pattern Mode is set to Preset, a plastic cover (ok, not really plastic) conceals the Programmer section, including the Drag-Export button - bummer! But there's a simple workaround - all of the factory preset patterns, intros and fills for both the 55A and 55B are included as user patterns in the preset browser. Simply select the pattern you'd like in the preset browser and use the Drag-Export button as detailed above.
Default Voice MIDI Mapping
The onboard instrument default MIDI notes assignments are shown in the table below. We mostly stuck to Standard MIDI drum mapping, but a few were changed in order to avoid three octaves jumps for some of the percussion voices. The good news is that MIDI note assignments are easily custom editable; more about this below the table.
CUSTOMIZING MIDI NOTE MAPPING
MIDI note assignments for drum voices can be customized by clicking on the triangles to the left the Decay controls on the Instrument Edit page. The easiest way is to select MIDI Learn Note; the triangle begins flashing. Tap the note on the keyboard you'd like to assign, and that's all. Alternatively, select the second menu <instrument name> MIDI Note, and choose the note from the popup menu.
Instrument can be reset to their default MIDI note by (you guessed it) selecting Reset to Default MIDI Note. This is actually handy if you forget the original mapping note.
The hi-hat menu includes two separate MIDI note assignments - one for the closed hi-hat voice and one for the open one. These are actually the same "voice," i.e. sound source, under the hood with separate envelopes for realistic-sounding opening and closing hats.
Custom MIDI note mappings are individually saved per patch - they are not globally altered.