In addition to its preset patterns, users could program custom patterns into the original CR-78- it was one of the first, if not the first user-programmable drum machine. However, it had major limitations: patterns could only consist of four instruments, only four user patterns could be stored, and the method(s) for programming them were archaic (the better of the two methods required buying a now-crazy-rare "write switch" hardware box with a couple of buttons for programming notes and rests. Don't even ask what the charlatans of Reverb.com are foisting this gadget for nowadays...).
With that in mind, we abandoned the original programming method, and implemented custom pattern programming via the familiar TR-808-style 16-button interface (or 24 buttons - more on this later).
User Patterns and the Patch Browser
Each saved patch in the browser (purple menu strip at the top) consists of:
99 patterns, selectable with the up/down increment buttons in the Pattern Select selection. (Patt/Song switch set to Patt)
1 song, i.e. a set of chained patterns. A song can be up to 99 steps. Please see the next chapter for more information on Song mode.
Creating a User Pattern
Creating your own pattern is super easy. Let's start from scratch... follow along at home!
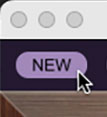
• Click the New button in the top-left corner.
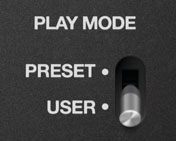
• Set the Programmer section Play Mode switch to User.
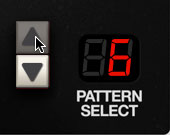
• Using the up/down increment buttons beside the Pattern Select display, choose the number location where you'd like the pattern to reside. If you don't have any patterns currently programmed, you can leave it set to 1. (Remember that every saved preset in the patch browser stores its own unique set of 99 patterns, so you're not going to overwrite anything.)
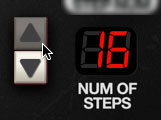
• Using the up/down increment buttons next to the Num of Steps display, select the number of pattern steps. This determines the pattern step where the rhythm will loop back to step 1.
If you're creating a standard one-bar pattern, leave this set to 16 (one bar with 16th-note step resolution). If you're creating a triplet-feel pattern, you can flip the subdivision switch to the 6 position (one bar with quarter-note triplet step resolution). Also useful for cover versions of early J-Lo songs (if you had to write owner's manuals, you'd be making bad jokes too).
Num of Steps can also be set to any desired length to accommodate odd time signatures. If you're doing that, we'll assume you and your fellow Mahavishnu Orchestra tribute bandmates know what you're doing.
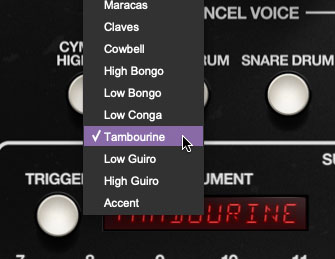
• Using the Instruments Selector knob, select the first instrument you'd like to program.
• Pattern steps can be entered with CR-78 in stop or play mode, but it's more creative and fun to program patterns while in play mode. Click the Start/Stop button to enter play mode.
• Since there isn't an audible "click track" per se, it's best to program a simple timing reference; the bass drum (BD) or hi-hat (HH) on 1/4 notes (steps 1, 5, 9, 13) works well. This can easily be altered later when the rhythm is established.
Additional instruments can be added by choosing them with the Instruments Selector and entering steps with the numbered buttons or in real-time with the Trigger button.
Accent Steps
An accented step increases the volume of all instruments on a step by an amount determined by the Main panel Accent knob . Accents are global; i.e. the volume of all instruments on an accented step is increased. Accent steps are added or deleted like any other instrument by selecting Acc with the Instrument Selector knob.
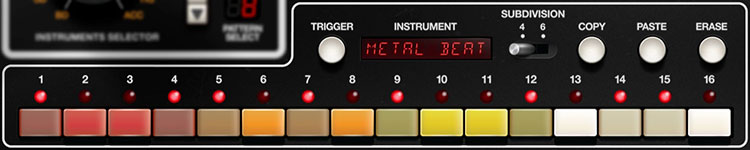
Here we'll cover the details of the controls in the bottom area when the User Play Mode is selected - there's some important info here, so we don't recommend skimming this section.
Trigger- This triggers currently selected Instruments Selector sound. If a pattern is currently playing, notes will be entered in the pattern buttons below, quantized to the nearest pattern step. The Trigger button will not enter pattern notes when in Song play mode.
Instrument display window- Indicates the instrument currently selected with the Instruments Selector dial. Included so you wouldn't need to remember what CL or TMB stands for. (We're pretty sure TMB is a rad MTV show starring that hunky Carson Daly, though.)
The current instrument can also be selected by clicking on the display window. The Instruments Selector knob will change to the appropriate position.
Step Buttons- These enable and disables pattern beat steps.
Subdivision- Ok, drum machining is about to get real here. We apologize.
A few of original CR-78 preset rhythms have a triplet or "swung" feel (Waltz, Shuffle, Slow Rock, Swing, and Boogie). That is, they're not 4/4 beats with sixteenth-note resolution, and therefore cannot be correctly entered using the standard one-bar, 16-button classic 808-style interface.
The original CR-78 master clock runs at 24 pulses per quarter note (PPQN) - in other words, it can have up to six notes in the space of a quarter note (i.e., six sixteenth notes), enabling the triplet/swung patterns mentioned above. We contemplated the idea of always displaying 24 buttons in User mode, but ultimately decided that the eight extra buttons would complicate the interface when working with standard 16-step 4/4 patterns. The Subdivision switch lets you choose, depending on song timing - set it to 4 when creating 16-step 4/4 patterns, or 6 when programming triplet/swung beats.
With that said, because we added a Swing button, it is possible to program simpler 4/4 beats (Subdivision switch set to 4) and add a swing feel using the Swing button settings, but you'll probably want to take advantage of the Subdivision6 setting for full-on triplet-feel patterns (like "Hold The Line" by Toto, because who doesn't love that jam?).
Copy- This allows duplication of entire patterns or single instruments from one Pattern Select number location to another. It's useful if you're assembling a song and want to create multiple variations of patterns.
Copy Current User Pattern- Copies all instruments of the current user pattern into CR-78's memory buffer.
Copy Current Instrument Pattern- Copies the steps of the instrument currently selected with the the Instruments Selector knob. This one is especially nifty because it lets you copy the steps of any instrument to any other instrument (using the Paste button Paste Instrument command) in any pattern. It's really useful for "doubling up" instruments.
Copy Preset Pattern- Copies all instruments of the selected factory pattern into CR-78's memory buffer. This is useful if you'd like to modify elements of a factory pattern, or use one of them in Song mode.
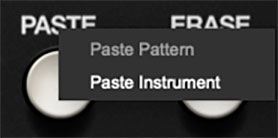
Paste- Allows pasting entire patterns or parts of patterns. Note that pasting a pattern or single instrument will overwrite the existing pattern or instrument.
Paste Pattern- Pastes all instruments of the current pattern into the current pattern location.
Paste Instrument- This pastes a single instrument into the current pattern location. Use the Instruments Selector knob to choose which instrument will be pasted. Multiple instruments can be pasted by selecting them consecutively with the Instruments Selector knob and repeatedly pasting.
Erase- This initializes either the entire pattern or individual instruments.
Erase Current Instrument- Disables all steps of the instrument currently selected with Instruments Selector knob.
Erase Current Pattern- Disables all steps for all instruments of the currently selected pattern.
Erase All Patterns- Disables all steps of all patterns in the current patch (i.e. the patch selected in the top purple menu strip). Prior to this operation, CR-78 will display an "Are You Sure?" dialog to avert potential calamity.
Step Buttons (red/orange/yellow/white)- These enable and disable individual note steps in a pattern. Toggled buttons have a "pressed down" appearance, and the LED above will glow.
Multiple adjacent buttons can be enabled or disabled by dragging the mouse pointer across them - we're particularly fond of the this super-handy feature. It's also useful for disabling a button row even if some are on and some are off. And in case you missed it elsewhere, the Cancel Voice buttons operate the same way.