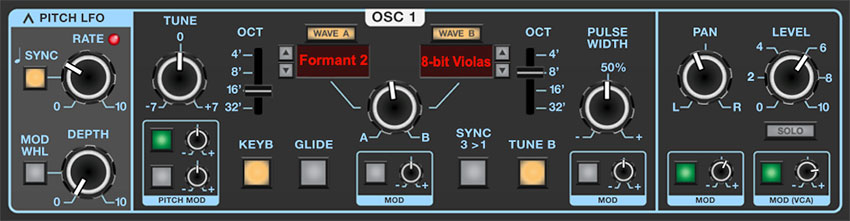
Dreamsynth’s three dual-waveform oscillators are perhaps its most special component. The basic concept is that each oscillator simultaneously outputs two virtual analog or sampled waves, with their blend set either manually, or CV-controlled via one of Dreamsynth’s numerous mod sources.
The initial inspiration was to allow a simplified, two-plane version of the morphing “vector” synthesis made famous by the vintage Prophet VS and Korg Wavestation synthesizers, but once the A/B wave modulation was implemented, we found this arrangement enabled a tremendous level of tonal flexibility. In this section, we’ll go over the oscillator controls, and offer some power user tips and tricks.
With exception of Osc 3’s Lo range setting, controls and operation are identical for all three oscillators.
Pitch LFO
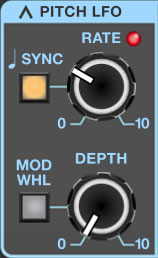
Each oscillator has its own dedicated triangle-wave low-frequency oscillator, hard-wired to oscillator frequency. These let you add oscillator vibrato without having to "waste" one of the main LFO's (which can be used for more serious sound mangling!). Note that the Pitch LFO always affects wave A and B equally.
Rate/Sync- Sets the Pitch LFO rate from 0.01 to 30 Hz. Toggling the Sync button locks the rate to host tempo when using Dreamsynth within DAW software, or to the current tempo in the top menu bar when using the standalone version. When the Sync button is enabled, the Rate knob snaps to musically relevant settings ranging from 8 bars to 1/64th-note triplets.
Depth- Sets the depth of pitch modulation from zero up to one octave.
Mod Wheel- Toggling the Mod Whl button routes your MIDI controller's mod wheel to control depth - this a fast and easy way to set up mod wheel-controlled vibrato. When enabled, the maximum amount of mod wheel depth is set by the Depth knob.
Setting Equal Pitch Mod Wheel Depth For Multiple Oscillators: If you'd like an equal amount of pitch for all three oscillators, there are some things to be aware of. The three Pitch LFO's are free-running - in other words, they don't reset when keys are struck, and though they may be set to the same rate, they aren't phase locked - that is, each LFO will always be at a different point in its modulation sweep. If you're modulating all three oscillators with all three Pitch LFO's this means the pitch of each oscillator will always be a little different. Depending on the nature of the patch, this may not be a concern, but if you'd like identical pitch mod for all three oscillators, there are a couple of ways to accomplish this:
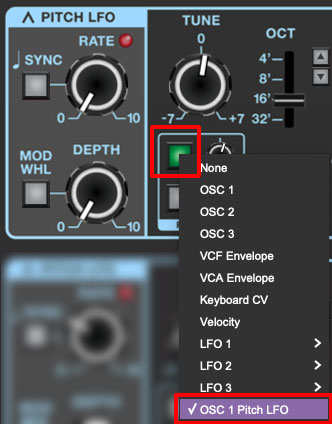
Set the Pitch LFO to the desired settings for one oscillator - in this example, we'll use Osc 1. Now we'll use Oscillator 1's Pitch LFO to modulate Oscillator 2.
Click on one of the square mod source buttons in Oscillator 2's Pitch Mod box (see above image), and select OSC 1 Pitch LFO. Make sure both oscillators' Level knobs are up and increase the mod attenuator knob until the vibrato depth matches up. This will be easier if both oscillator Tune knobs are zeroed, and the Master section Analog Drift knob (at the bottom right) is all the way down. If you're using the Mod Whl button, note that it only needs to engaged for the one Pitch LFO used. Repeat the above assignment process for the third oscillator and/or Strings section Pitch Mod.
Another method to get equal pitch mod for all oscillators would be to assign one of the main LFO's to multiple oscillators' Pitch Mod sections. Mod wheel-controlled depth can be set up by clicking the LFO's mod source pop-up and selecting Mod Wheel, then turning up its associated attenuator.
Main Oscillator Controls
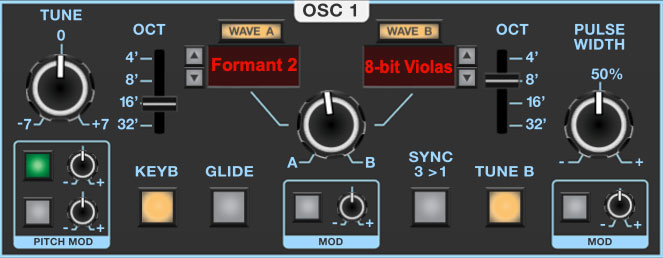
Tune- Allows fine-tuning of pitch or creating intervals between Wave A and Wave B. It's also useful for fattening up multi-oscillator patches by detuning a small amount. Its range is a smidge over a fifth, up or down.
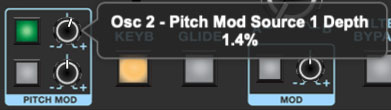
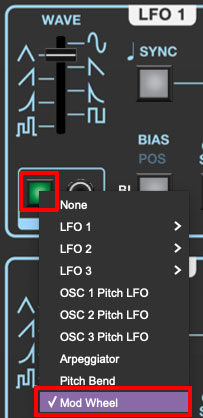
Pitch Mod Source buttons and Attenuator knobs- These allow positive or inverted modulation of the Tune knob. Clicking one of the small square buttons opens a pop-up menu where the mod source can be selected. The attenuator knobs next to buttons set a positive or inverted mod amount for the selected mod source. To choose a different mod source, click the button and choose another modulator, or choose None to disable modulation. The button turns green to indicate a mod source is currently active; hovering over the button displays the current mod source.
(The tooltip pops up relatively slowly by default. To adjust how quickly the tooltip displays, click the Settings gear icon in the top purple menu strip, select the Interface tab, and adjust the Tooltip Delay parameter.)
Both Pitch Mod selector buttons and attenuators have the same function, we just provide two in order to enable two separate pitch mod sources.
Octave- These slide switches independently set the coarse pitch range for Wave A and Wave B in standard organ footage settings of 32', 16', 8', and 4'.
Wave A/B select buttons- These allow selection of Dreamsynth's over 400 waveforms. Wave A and B always play simultaneously (unless None is selected for one or both). To select a wave from the pop-up menus, click the Wave A or Wave B button, or on the red name displays beneath the buttons.
Dreamsynth includes the following four different wave types:
Analog- These are modeled virtual analog waves (they are not samples). They're designed to include the aperodicity (dude, check out our big words) and mojo you'd expect in a vintage analog synth.
Looped PCM Samples- These comprise the bulk of Dreamsynth's waves, divided across 11 categories. Following their attack portion, these will loop infinitely.
Single-Cycle- As their name implies, these are sampled digital waves that are just one-cycle long. Conceptually, they're similar to analog waves, but with more complex shapes. Single-cycle waves were used in the early digital synths such as the Ensoniq ESQ-1 and the Korg DW-6000/8000, when digital memory was still pricey.
One-Shot- These are also PCM samples, but they play briefly and end without looping. They're useful for drum, percussion, and transient sounds.
Wave A/B up/down buttons- Located next to the wave display windows, these allow quick selection of the previous or next wave in the pop-up wave menu. Though you won't be able what the next wave is, these are handy for rapid sound exploration.
Wave A/B mix knob and Mod box- Here's where the magic happens - this sets the volume balance between Wave A and Wave B. On its own, it's useful for creating composite waveforms, but it really comes into its own when the Mod box beneath is used to modulate the mix of two waves, allowing all manner of evolving or rhythmic vector synth-style tones, or all points in-between (quite literally).
Keyboard- Shutting this off disconnects the keyboard's control voltage. This allows the oscillator frequency to remain constant regardless of keys played on the keyboard. This can be useful in a number of situations:
When an oscillator is playing a drum or transient sound, and you want the pitch to stay constant across the keyboard.
If an oscillator is being used as a mod source (either in audio range, or in the case of OSC 3, as a low-frequency oscillator), and you don't want the mod rate to change as you play up and down the keyboard.
The oscillator is being used as a "drone," that is, to play the same note.
Helpful range trick: If the Keyb button is disabled and the oscillator's pitch won't go low (or high) enough using the Octave and Tune controls, set its Pitch Mod box source to +10V and use the mod attenuator knob to add or subtract - this will increase the pitch range immensely.
Glide - Also known as "portamento," glide delays the voltage change between pitches for a sliding effect. Clicking the button enables glide independently for each oscillator. Glide speed is set globally using the Glide knob in the Synth Voice Assign section at the far left.
Sync 3>1 (OSC 1 only)- This causes VCO 1 to force reset the start of VCO 3's waveform to the beginning of its cycle, resulting in the classic Cars “Let’s Go” tearing harmonics sound (or No Doubt’s “Just A Girl,” for children of the 90s) when the oscillator 3's pitch is swept.
Quick Sync Sweep Patch Tutorial (no extra charge!)
Enable the Sync 3>1 switch.
Set Osc 1's Level knob to zero, and turn up Osc 3's Level knob.
Set Osc 1 and Osc 3's Wave A pop-ups to Analog>Pulse, and make sure the A/B mix knobs are set to A.
Set Osc 1 and Osc 3's Octave controls to 16'.
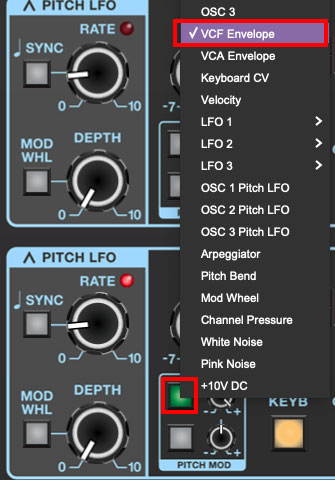
Click one of Osc 3's Pitch Mod box mod destination buttons, set it to VCF Envelope, and turn the attenuator knob up to max.
Set the VCF Env controls to Attack=0, Decay=4, Sustain=0, Release=0.
Play A, B, D... D, Db, B, then A on the keyboard. Ponder how cool The Cars are/were.
Filter Bypass (OSC 2 and 3 only)- As its name implies, this removes the filter section from the oscillator audio path. This is really useful if, for example, one oscillator is playing juicy sawtooth waves with a pronounced filter sweep, but you'd like to layer in a plingy, crystalline bell without its high frequencies getting squashed by the filter. Similarly, the Filter Bypass button is useful for maintaining the impact of one-shot drum and percussion samples.
Tune B- The Tune B button disables the Tune knob for Wave B only. This is a super cool feature because it enables detuning of Wave A and Wave B.
The simplest example would be to disable the Tune B button, center the A/B mix knob, set Wave A and Wave B to Analog>Ramp, then set the Tune knob to around 0.10 semitones. This results in a classic big, fat dual oscillator analog synth tone using just one oscillator.
Pulse Width and Mod box- Sets the width or "duty-cycle" of pulse waves (Analog>Pulse), from a perfect square (50%) to a very narrow pulse. It has no effect on other waveforms. The Pulse Width Mod section can be used to dynamically vary the pulse width.
Oscillator Pan and Level Controls
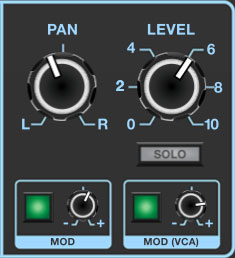
Pan and Mod box - Sets the oscillator panning position left to right. Remember that following the oscillators, Dreamsynth's audio path is fully stereo (including the filter section), so stereo pan positions are maintained. The Mod box beneath the Pan knob allows all manner of modulation of pan position.
Level and Mod (VCA) box - Sets the overall oscillator volume. The Mod box beneath the Level knob allows volume modulation - for all intents and purposes, this means each oscillator has its own independent voltage-controlled amplifier (VCA). This enables a lot of functionality, from simple LFO tremolo affects, to audio-rate amplitude modulation (using one of the oscillators as a mod source), to elaborate rhythmic layered patches when modding with LFO rates synced to host tempo.
Solo button- When toggled, the Solo button disables all other oscillators, as well as the Strings section. It's very useful when programming patches. Note that the oscillator and Strings section Solo buttons can be combined as desired.