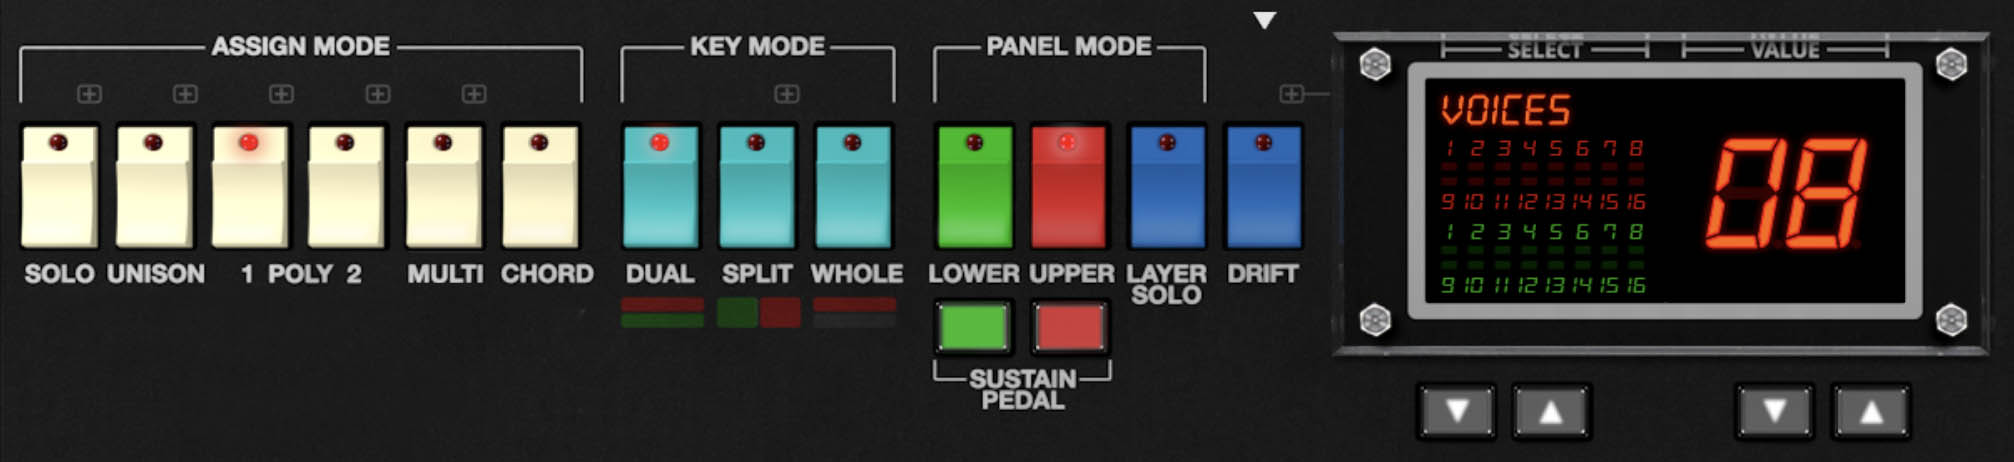
Assign, Key, and Panel Mode Sections
Mercury-8 can play it three ways: as a focused single-sound synth, as a stacked two-part instrument with completely different patches layered together, or as a true split keyboard where one sound lives on the lower keys and another takes the upper range.
You shape all of this through three sections that act as the command center for how the instrument behaves: Assign Mode, Key Mode, and Panel Mode. Together they decide how voice polyphony is handled, how the keyboard is divided, and which layer of the synth is visible at any moment. Once you understand how these sections interact, building splits, stacks, and tight single patches becomes second nature
Key Mode
Key Mode decides how Mercury-8's bi-timbral engine behaves. It tells Mercury-8 whether you want one sound stretched across the full keyboard, two sounds stacked into a single bigger patch, or a true split with one part on the low keys and another on the highs. In other words, it sets the global rules for how the keyboard distributes voices and how the Upper and Lower layers appear when you play.
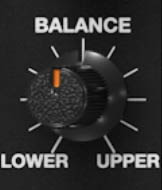
The Balance knob in the Master section lets you control how loud the Lower and Upper layers are relative to one another. Use it to push one part forward or even them out. The Layer Utility menu in this same area gives you quick tools for managing layers. You can swap them, copy one to the other, or reset a layer entirely. We’ll walk through those options in detail later in the chapter
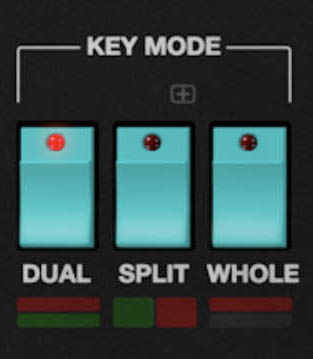
Dual - Upper and Lower layers are stacked and play across the entire keyboard range.
Whole - This is the standard keyboard mode. The Upper layer plays across the entire keyboard range, and the Lower layer is disabled.
Split - This mode allows you to divide or blend the Upper and Lower layers across the keyboard in a variety of ways. This makes it easy to create expressive, bi-timbral setups such as bass in the left hand and leads or pads in the right, or smooth transitions between the Lower and Upper layer sounds.
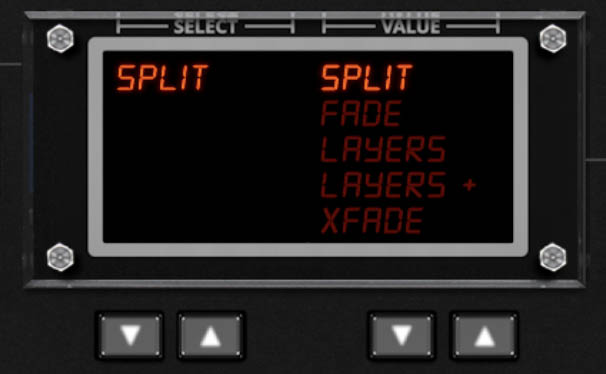
To activate Split Mode, first enable the Split button, then use the central Main Display's arrow buttons (or just click directly into it) to choose the desired split behavior.
Split Modes
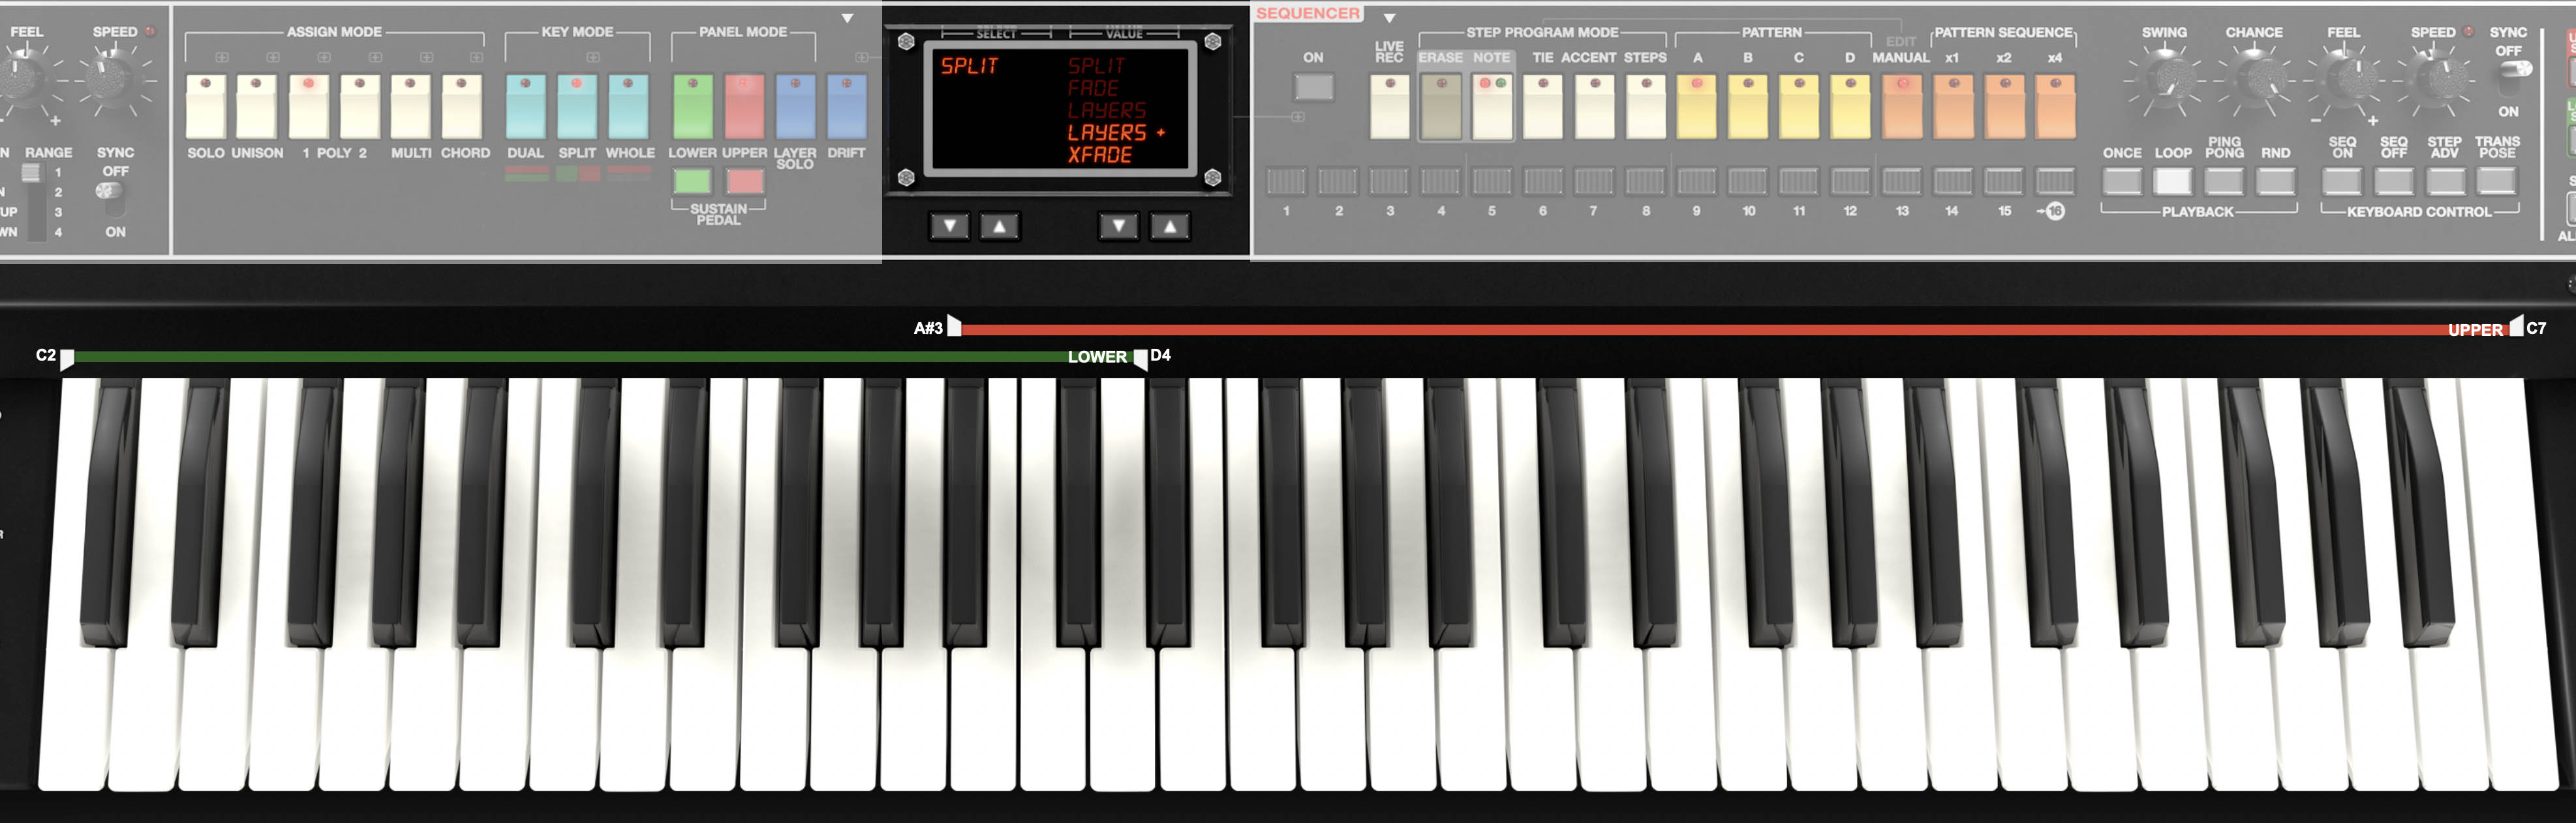
Mercury-8 includes four Split modes: Split, Fade, Layers, and Layers + XFade. Each gives the Upper and Lower parts a different way to meet in the middle. Whether you want a clear breakpoint, a gradual blend, or full stacking, you can dial in the response that fits your style
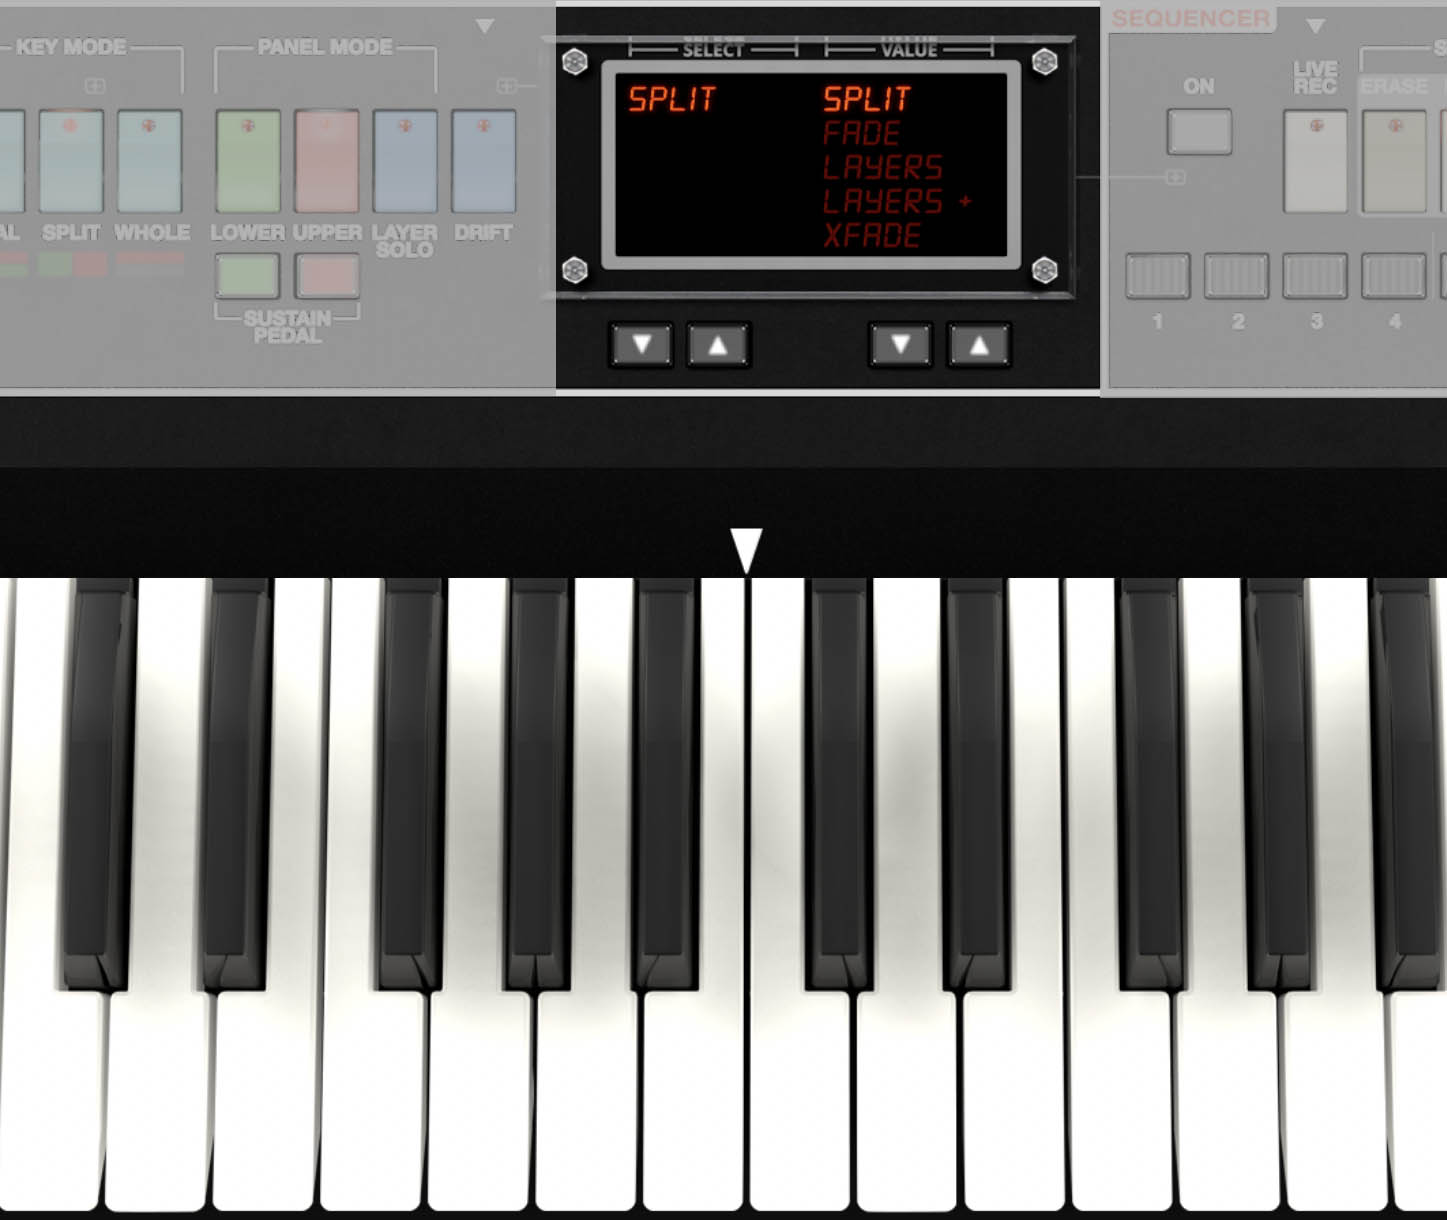
Split
Creates a hard split between the Lower and Upper layers. Notes played below the split point trigger the Lower sound; notes above it trigger the Upper sound.
• To set the split point, drag the small triangle above the keyboard display.
• The split point is shown where the green (Lower) and red (Upper) ranges meet.
Fade
Creates a soft transition between the two layers. Instead of an abrupt hand-off at the split point, the Lower layer gradually fades out as the Upper fades in.
• Use the same drag method to set the transition point.
• This mode is ideal for softer blends such as evolving pads or acoustic-style splits (for example, strings below, brass above).

Layers
Provides independent range sliders for each layer: a green bar for the Lower layer and a red bar for the Upper.
• Drag either bar to define each layer’s key range.
• Where the two ranges overlap, both layers sound together, creating a crossfade region.
This mode offers precise control over how much the two sounds overlap or remain isolated.
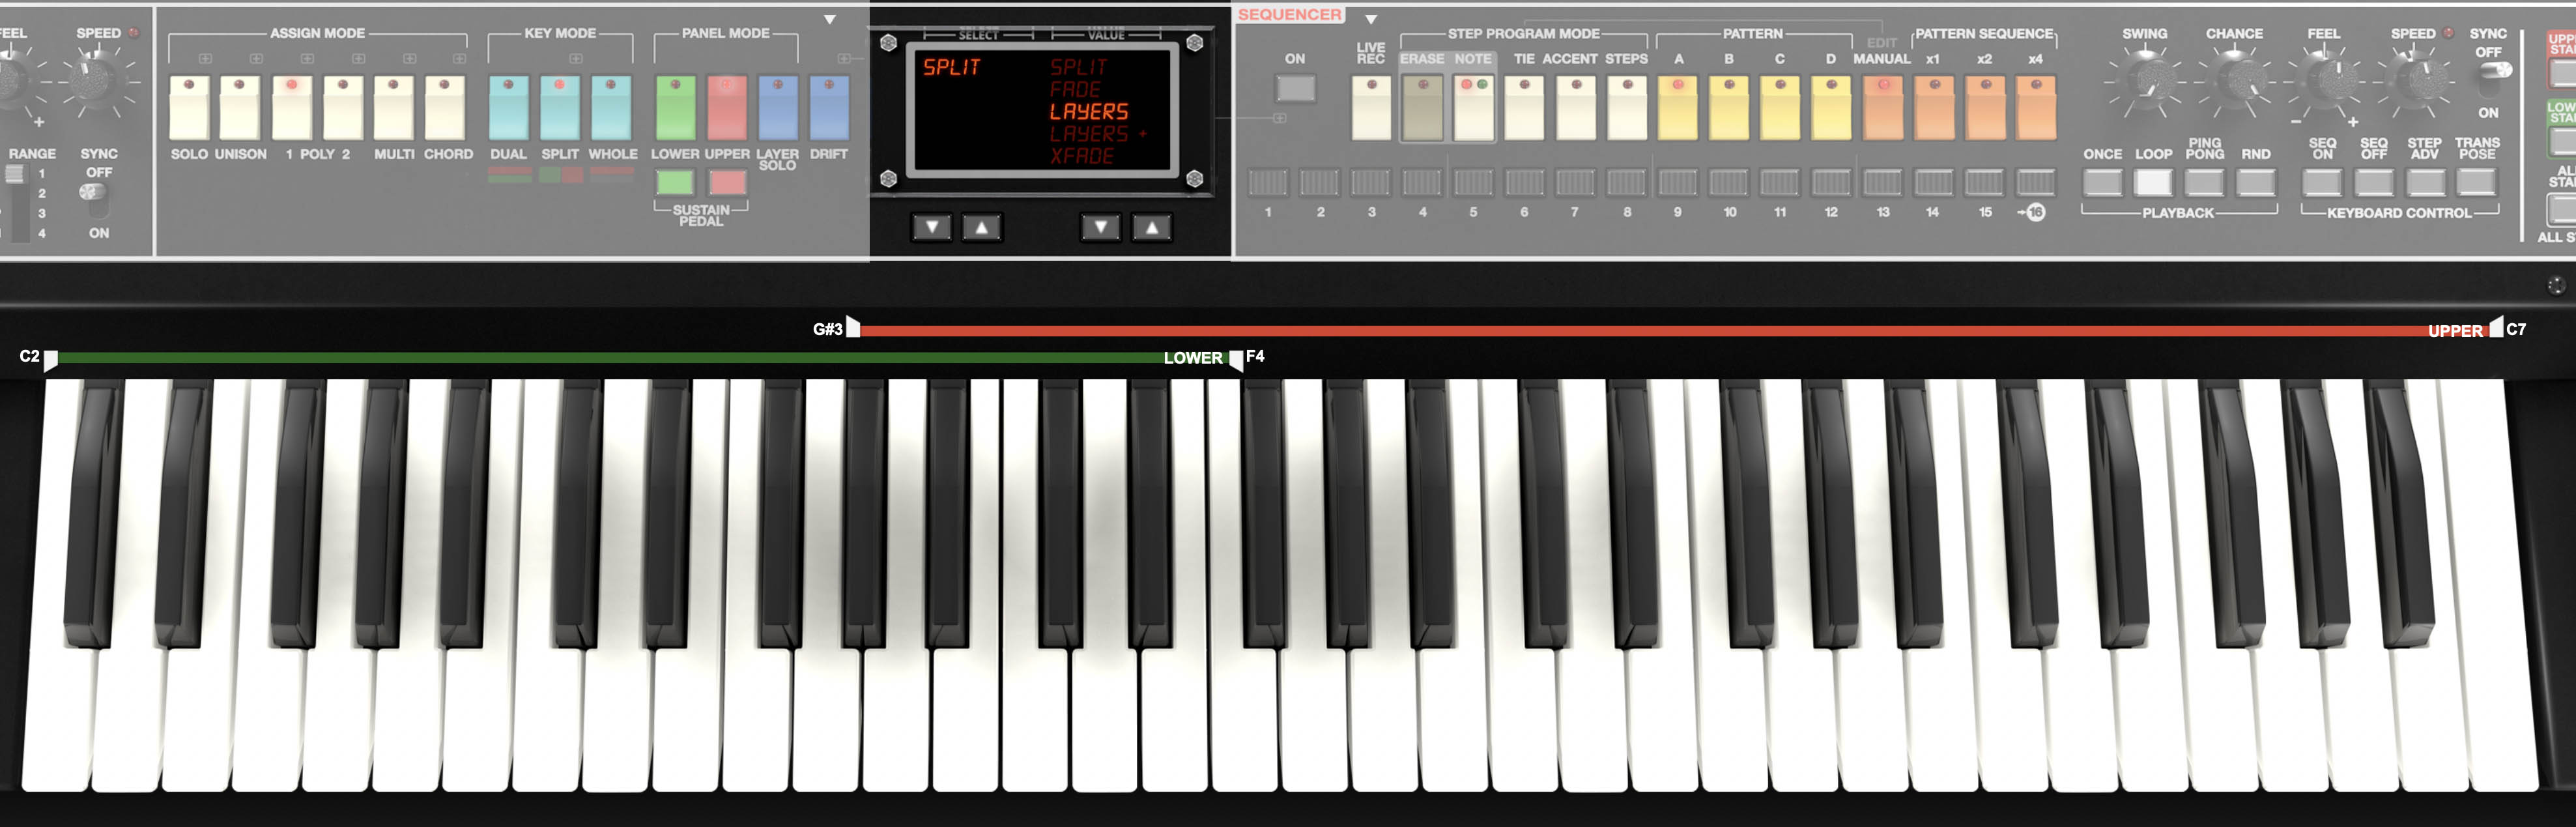
Layers + XFade
Works similarly to Layers, but introduces a smooth, dynamic crossfade across the overlapping range, rather than both layers playing at full volume in the shared region.
• Use this mode for natural, organic transitions between sounds. For example, blending an evolving pad into a bell tone or shifting from synthy electric piano to strings as you play higher.
Panel Mode
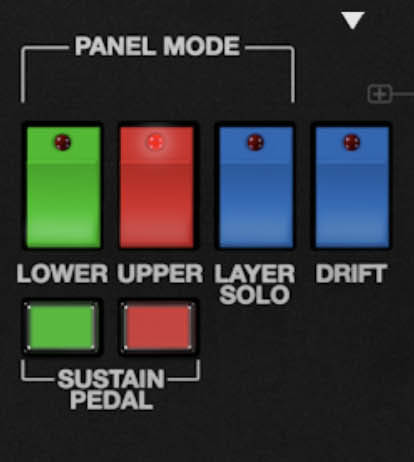
This section is super important. As explained above, Mercury-8 can operate in three modes: Whole, where one sound plays across the entire keyboard range, Layer, where two separate sounds (layers) are stacked across the entire keyboard range, or Split, where two individual sounds are played above and below a user-specified split point.
With this in mind, the Panel Mode section allows selection of which control parameters are currently displayed when in Layer or Split mode. These two sounds are referred to as the Lower or Upper layers.
Lower/Upper
Selects whether the onscreen controls show current settings for the lower or upper layer.
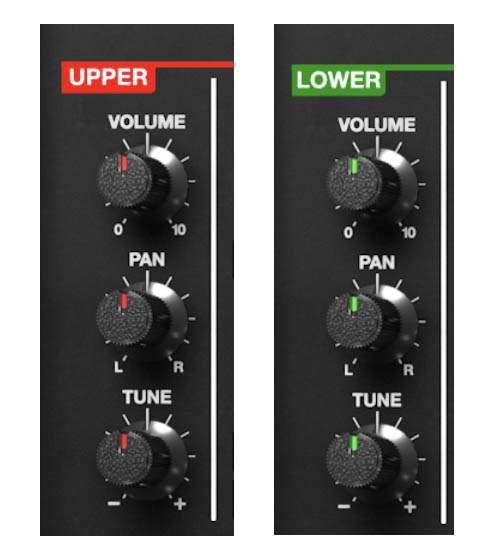
When Upper is selected, the LEDs and all relevant knob and slider marks indicator lines will be red. When Lower is selected, the LEDs and all relevant knob and slider marks indicator lines will be green. The rectangular Layer header on the left side of the panel will be red when upper mode is active, and green when when Lower mode is active.
Layer Solo
Solos the layer currently selected Lower or Upper layer for editing. This is useful if you're editing a sound on a layer and don't want to hear the other layer. The Layer Solo button only works in Layer and Split Key Modes. When toggled, the Layer Solo button flashes in the appropriate red or green color so you won't forget you're in solo mode.
Drift
If you’ve ever played a vintage analog synth that’s been around the block a few decades, you know the charm: every note has a little wobble, every filter sweep breathes a bit differently, and the whole thing feels alive. That’s not an accident. It’s the natural result of analog circuitry slowly drifting out of perfect calibration. The result? Warmth, movement, and that living, breathing quality that’s sometimes missing in the digital world.
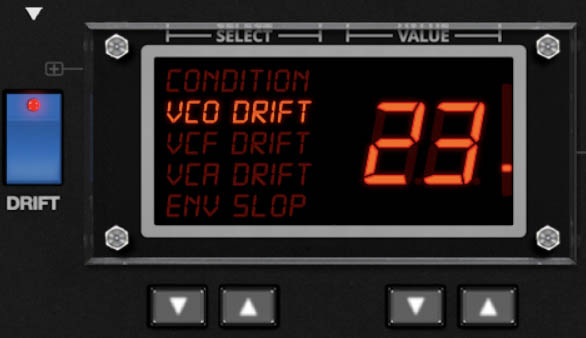
Mercury-8’s Drift feature faithfully recreates that desirable instability. Found in the Panel Mode section, Drift can be switched on via the Drift button. Once enabled, the Main Display lets you either:
Dial in individual drift amounts (0–100) for each component — VCO Drift, VCF Drift, VCA Drift, and Envelope Slop — or
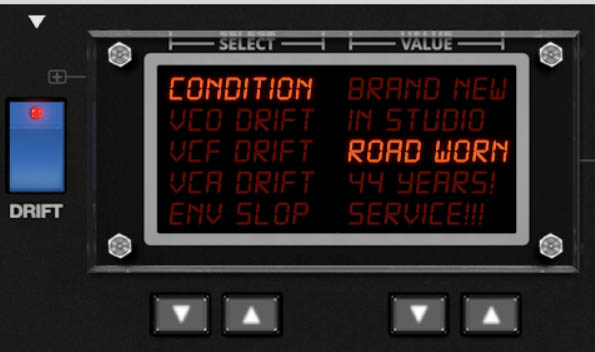
Choose one of several Condition presets that apply realistic combinations of drift across all sections.
Each Condition preset represents a different life stage of a JP-8–style synth, from showroom-fresh to road-weary veteran:
Brand New – Minimum drift; everything’s tight and in tune.
In Studio – Slight looseness, just enough to feel analog.
Road Worn – Warm and unpredictable, like a synth that’s seen a few tours.
44 Years – Well aged, with plenty of drifty character.
Service!!! – A technician’s nightmare, but a sound designer’s dream.
Individual Parameters:
VCO Drift – Random pitch variations in the oscillators (0–100).
VCF Drift – Filter cutoff instability (0–100).
VCA Drift – Subtle amplitude fluctuations (0–100).
Envelope Slop – Randomized timing and contour deviations in the envelopes (0–100).
We generally recommend keeping a touch of Drift active to preserve that analog warmth. However, there’s one exception: if you’re using Cross Mod and want precise, in-tune modulation relationships, set Drift to 0. The control is extremely sensitive, and a little drift goes a long way toward chaos.
Sustain Pedal Assign
The two Sustain Pedal buttons below the Panel Mode section let you enable or disable sustain pedal functionality for each layer independently.
Lower – When lit, the sustain pedal will affect only the Lower layer.
Upper – When lit, the sustain pedal will affect only the Upper layer.
This allows flexible control in Split or Dual modes. For example, you can sustain a pad in the Lower layer while playing a lead in the Upper layer without sustain, or vice versa.
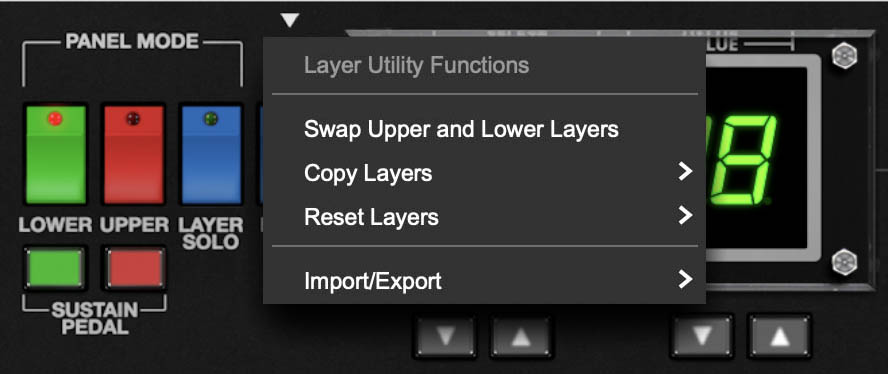
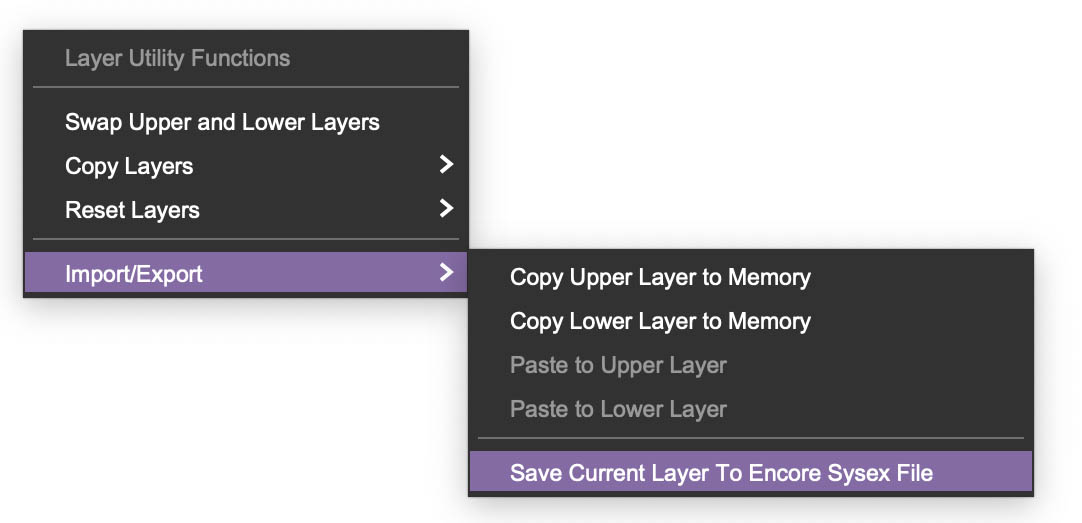
Layer Utility Dropdown Menu
The Layer Utility dropdown menu allows Upper and Lower layer sounds to be swapped, copied, reset, or exported.
Swap Upper and Lower Layers - Reverses the locations of the Upper and Lower layer.
Copy Layers - Duplicates one layer to the other.
Reset Layer - Initializes all settings of the selected layer.
Import/Export- The Import/Export command allows layers to be moved between sound presets. Data from the source preset isn't affected.
The process is simple: Select the appropriate Copy <Upper or Lower> to Memory sub-menu to copy the data into Mercury 6's memory, then load a new destination preset. Click the Layer Utility dropdown and select the appropriate Paste to Layer submenu. Note that you may have to change Key Mode during this process. For instance, if you copy a Layer to memory with plans to create a new Dual or Split, you may have to change the Key Mode of the destination preset to paste to the Lower Layer.You can also use the Save Current Layer to Encore SysEx File command to save and export the current preset's active layer to a SysEx file. For more information, see the Appendix: Importing Original JP-8 SysEx Data
The "You should really read this" Section
Following are some tips that should make this Lower and Upper business easier to understand, complete with bold text, so you know we mean business. (Don't push us, or we'll mash the CAPS key too and sound like one of those grammatically impaired unhinged internet weirdos.)
Switching between Lower and Upper parameter display has no effect whatsoever on sound, it just alternates which layer's knob and button settings are currently displayed.
Whole Key Mode always uses the upper layer only.
Panel Mode Upper and Lower selection only works in Layer and Split Key Modes. When in Whole mode, Upper is automatically selected and the Lower and Layer Solo buttons are disabled and grayed out.
Lower and Upper layer sounds always save as one single sound patch.
Step-by-Step Example - Creating Your Own Layered Sounds
In the following examples, we'll step through the process of selectively using a layer of an existing preset as a foundation for your own sound. As you are auditioning presets, note whether they already feature lower and upper-layer tones, and use the Solo button and switch between the upper and lower layers to isolate the tone you're after.
For instance, say you come across a preset that has a chime sound in the upper layer that you would like to use. You could change Key Mode to Whole, then save it as a new user preset. But if want to combine it with another tone such as a pad to create a new Dual preset, this is where the Layer Utility Functions drop-down menu comes in. As detailed above, you can manage layers in various ways, such as swapping layers, copying and pasting one layer over another, resetting just one layer to its initial patch, or copying a layer to memory like a clipboard. This includes all additional elements like effects and patterns.
In this example, you will want to copy the chime sound from the upper layer with Import/Export, Copy Upper Layer to Memory. Now you can browse to or create a pad sound. If it's a single-layer whole-mode preset, you'll need to change it to Dual mode to make room for the chime sound. Use the utility menu to swap the pad sound to the lower layer. Then go back to the utility menu to paste the chime sound to the upper layer. At this point you can tweak the two layers individually or make global adjustments to balance, volume, effects, and so on, and save it as a new user preset.
The process for creating a Split is the same. Find the layer you wish to use and copy that layer to memory. The create or find that other layer, change that to a Split if it's not already, then paste the previous sound to the appropriate layer. As outlined above, there are several more options available for splits, such as adjusting the split point and exploring extended layering options in the central display.
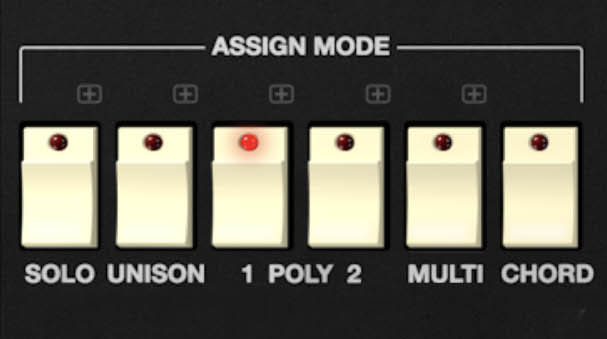
Assign Mode
The Assign Mode section determines how Mercury-8 allocates and triggers voices during performance. These switches replicate and expand upon the JP-8’s voice assignment behaviors, offering flexible control over mono, poly, unison, and chord playback modes. Only one assign mode can be active at a time.
Solo
Engages monophonic operation, meaning only one note will sound at a time. Solo mode includes additional performance parameters accessible from the Display:
Trigger – Selects how envelopes are retriggered.
o Legato: Envelopes trigger only when all previous notes are released. Perfect for smooth, connected lines.
o Multi: Envelopes retrigger on each new key press, even when notes overlap. This is great for punchier playing styles.
Priority – Determines which note plays when multiple keys are pressed simultaneously.
o Low: The lowest note has priority.
o High: The highest note has priority.
o Last: The most recent key played has priority (typical modern behavior).
Tip: For expressive lead or bass sounds, use Legato with Last priority. It delivers classic analog-style phrasing with natural glide between notes.
Unison
Stacks multiple voices on a single note for a rich, detuned sound. When Unison is active, the Display offers several additional parameters:
Voices – Sets the number of voices stacked per note (up to 16).
Mode –
o Mono: All stacked voices play a single note (traditional unison).
o Poly: Voices are dynamically subdivided across multiple notes, enabling polyphonic unison, a modern twist that creates wide, ensemble-like chords.
Detune – Adjusts the tuning offset between stacked voices (range 0–99). Small values produce gentle thickening. Higher values yield massive detuned width.
Trigger – As in Solo mode, choose between Legato or Multi retrigger behavior.
Tip: For classic supersaw pads, try Poly Unison with 6–8 voices, Detune around 25–35, and Multi trigger for a lush, animated texture.
Poly 1 / Poly 2
These two polyphonic modes determine how voices are allocated and cycled when playing chords:
Poly 1: Standard round-robin voice assignment. Each new note steals the oldest released voice.
Poly 2: Prioritizes voice reuse for repeated notes, producing smoother envelope and filter retriggering. This is particularly useful for legato chords or pads.
Chord
Chord mode lets you assign a user-defined chord shape that’s played back whenever a single key is pressed. This makes it easy to create complex harmonies or stabs with one finger.
To program a chord:
Enable Chord mode.
Hold the desired notes on the keyboard.
Press the Chord button again — the chord is stored until you program a new one.
You can then transpose the chord by playing any key. The chord definition remains active until changed or the preset is switched.
Tip: Combine Chord mode with Unison Detune or Dual Layering for massive, cinematic stabs and evolving harmonic textures.
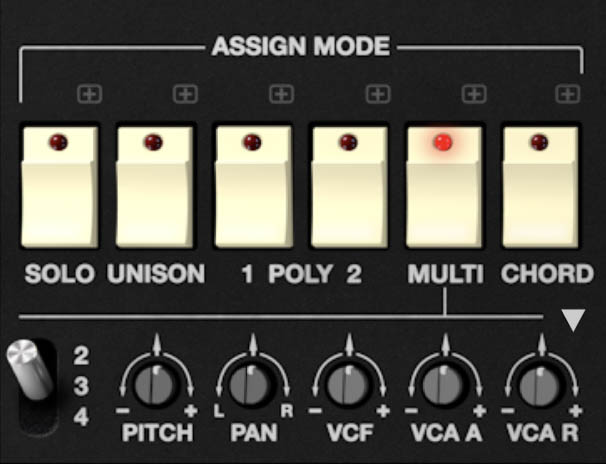
Multi
When you enable Multi, the Multi Voice controls appear below the Multi-button. These "offset" knob controls allow you to tweak several key sound parameters: Pitch, Pan, VCF, VCA Envelope Attack, and VCA Envelope Release. This enhances the sound of the selected patch with slight per-note/voice variations. It's like handing each voice in a chord its own distinct personality. When used creatively, it unlocks an entire new dimension of animation and complexity.
Offsets are set on a per-note/voice basis by first setting the desired voice with the 2,3,4, toggle switch at the left of the offset knobs, then setting the desired offsets for that voice.
One you have set the desired offsets for each voice, with each note played, Mercury-8 cycles through notes in the following way: the first note that is played uses the normal, unaltered synth parameters, the second note's parameters are offset by the knob settings in the #2 offset, the third note by the settings in the #3 offset, and so forth.
An easy way to understand Multi mode functionality is to set Mode to Multi, and Voices to 4. In the #2 offset controls, use the trimmer to set Pitch to something odd, like +9. Now slowly play and hold four consecutive notes. Hear how the pitch of the second note played is offset?
You may be wondering how the offset knob controls function when the Voices control is set to 8 or 16. In this case, the sequential nature of Multi mode repeats. If you look closely, you'll see that when Voices is set to 8, the main voice controls and each offset parameter box now have two voice active LEDs each. When voices is set to 16, each offset parameter box gets four voice active LEDs. If you're in Multi/Poly mode (see below) and a 5th note is played, the main voice sounds, when a 6th note is sounds, multi voice 2 sounds, and so on until a maximum of 16 voices is sounding (i.e. four LEDs for each multi voice), at which point the cycle starts over.
It is important to note that there are a number of Multi mode parameters available in the display. Let's go over how each Multi voice mode operates, then we'll detail the available offset parameters that are selectable.
VOICES - Choose the maximum number of voices for Mult Mode.
MODE - choose from the following options:
Unison- Unison stacks multiple voices monophonically according to the current Voices setting. Since all voices play simultaneously in unison mode, they won't cycle through as with poly modes - they all play at once. The offset controls still work on individual voices, allowing super massive sounds. By retuning the Pitch trimmers of the synthesizer offsets to form triads, you can create one finger chords. Note that the Detune knob still does its random-ish oscillator detuning thing on top of the offset box Pitch controls, so it's easy get out in the weeds tuning-wise.
Poly- Multiple keys can be played simultaneously with the maximum number of notes set by the Voices control. The first available voice sounds - in other words, held notes will never get stolen. When playing one note at a time, the note will always sound from voice 1 of the primary synth. However, when playing multiple notes together, notes play sequentially and step to the next multi voice group.
Cycle Loop: This setting cycles through the available voices in a fixed, repeating order. The first note you play uses Voice 1, the next uses Voice 2, and so on, wrapping back to the first voice when it reaches the end. This creates a predictable, rotating pattern, often producing a consistent panning or modulation movement across repeated notes depending on the pan and modulation settings of the sound.
Cycle Ping-Pong: As the name implies, this mode bounces back and forth through the voice order. For example, with four voices, it will move 1 → 2 → 3 → 4 → 3 → 2 → 1, and repeat. This back-and-forth can produce a more symmetrical stereo effect, useful for creating motion that feels less repetitive than loop mode but is still structured.
Cycle Random: Each new note is assigned to a random voice, meaning there's no fixed pattern to the order. This results in a more dispersed stereo image depending on voice pan settings. This can be great for thick textures or more organic, unpredictable behavior in some patches.
These settings are especially impactful when combined with subtle variations between voices such as slight pitch detunes, panning offsets, or modulation differences, making the Note Order parameter a powerful tool for spatial animation and timbral variation.
Multi Mode Voice Panel Parameters
Adjustments made to these trimmers can be subtle to simulate the slight variations one might expect between multiple chained synthesizers or voice components. You can also apply extreme settings to produce single-fingered chords or patterns, stereo effects, and more.
Pitch - Fine tuning of the pitch, offset from the primary synthesizer settings, for the synth voice in a range from -12 to +12 semitones. By retuning the Pitch trimmers of the individual panels to form triads, you can create one-finger chords, or use in conjunction with the arpeggiator to create a transposable one-finger four-note step sequence.
Pan - Sets the % offset of output placement for the synth voice from left to right in the stereo image.
VCF - Sets the % offset of the Filter Frequency for the synth voice, from -100% to +100%.
VCA A - Sets the % offset of the VCA Envelope Attack for the synth voice, from -100% to +100%.
VCA R - Sets the % offset of the VCA Envelope Release for the synth voice, from -100% to +100%.

Multi Voice Presets
The downward-pointing arrow ▼ above the set of trimmer knobs provides several panel configuration quick presets, such as Hard Panned, Slightly Detuned, Well Worn, and so on. Each preset applies pre-configured settings to all three voice panels at once to achieve the effect described.
Unison Multi is a collection of nine tuned panel sets primarily intended to be used when Keyboard mode is set to Multi / Unison mode, and includes individual tunings (Major, Minor, Major 7, etc.) and variations with hard panning. These are also useful for producing melodic sequences when used with the arpeggiator.
Also included are Reset Trimmers, Copy, and Paste. Unlike the presets detailed above, these commands are applied per single panel. For instance, selecting Reset Trimmers on synth panel 3 resets only that panel. Settings can also be copied from one panel and pasted to another without changing the third.
Layer Master Section
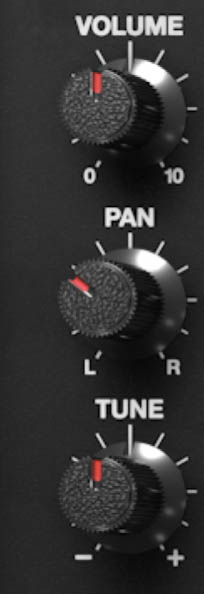
While this section isn't actually contained within the Assign, Key, and Panel Mode section, it's useful to talk about it here as it functions as sort of a master settings for each layer. These are independent for each layer.
Volume- Sets the layer volume.
Pan- Sets the position of the layer in the stereo image. The Pan knob only affects dry signals - Flanger/Chorus, Delay, and Reverb effect wet signal panning isn't affected (because you don't want big, wide stereo chorus, for example, collapsing into one-speaker mono).
Tune- Sets the tuning of the layer, up or down by one semitone. This control may seem like a "set and ignore" control, but it's useful in Layer mode, because VCO-1 doesn't have a fine-tuning control. Without the Layer Tune control, tuning for both layers of VCO-1 would be always be locked; Layer Tune allows some detuning for fatter sounds.