Mercury-8 features a complete five-slot, studio-grade effects rack that lets you add depth and motion directly within the synth. Each slot can host one of Cherry Audio’s built-in processors, from swirling choruses and lush reverbs to crunchy distortions and atmospheric delays.
Because Mercury-8 is bi-timbral, both the Upper and Lower layers have their own independent five-slot effects chains. This means each layer can have a completely different sound design and processing setup. For example, a bright, echo-enhanced lead on the Upper layer and a warm, chorusy pad on the Lower. Whether you’re working in Dual, Split, or Whole mode, the two layers remain fully independent and can be mixed, balanced, or processed separately.
Each effect can be tweaked, bypassed, reordered, copied, soloed, duplicated, or saved for use in other presets. You can even modulate entire chains with a dedicated Effect Modulator.
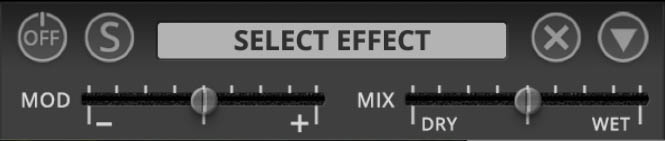
Quick Tip:The mini FX panel is always visible, but click the Effects tab at the bottom right for the full parameter view and deeper editing. Alternatively double-click the effects "footer" (the part with the always-visible mod and mix controls) to toggle the view from mini to full.
Quick Controls (Always Available)
Even if you’re in Keyboard View, the most essential FX controls are always within reach, sitting neatly under the chain:
All FX On/Off – Instantly bypasses the entire chain.
Level – Adjusts the overall level of the chain.
Stereo – Widens (or narrows) the stereo field after processing.
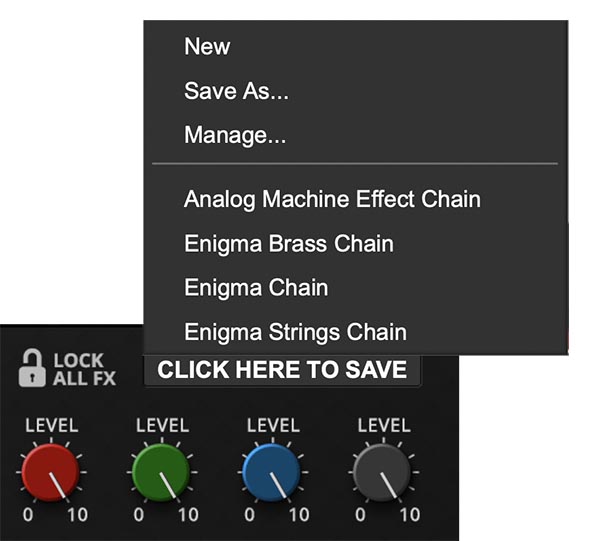
Section Selectors (Color-Coded)
At the bottom of the panel you’ll see three colored squares. These pick which section’s effects chain you’re editing:
Red – Upper
Green – Lower
Gray – Global (affects both Upper and Lower)
Click the color, build your chain, and get creative. Each chain is fully independent, so yes, you can have phasers and ping-pong delays on an Upper layer pad and tape echo and reverb on a Lower layer brass sound.
Per-Effect Controls
Each effect block in a chain has its own set of mini-controls:
On/Off – Toggle the effect.
Solo – Bypass all other effects to hear just this one.
Remove (X) – Delete the effect from the chain.
Menu – Copy, paste, duplicate, move, swap, or save.
Modulation Amount – From the Effect Modulator.
Wet/Dry Mix – Blend processed vs. dry signal.
The Effect Modulator
Sometimes you may want to modulate a delay time or a phaser sweep for extra movement or a bit of weirdness. Enter the Effect Modulator. It's a dedicated LFO just for the effects. Used subtly, the Effect Modulator can add motion and depth. Push it harder, and things can get more dramatic and unstable. Either way, it’s one of the quickest ways to make an effect feel more varied and animated.
Each effect has one specific parameter that is permanently tied, or “hard-wired,” to the Effect Modulator. In other words, you don’t assign modulation destinations manually. The destination is already chosen for you by the effect’s design.
To see which parameter is being modulated, look for the arrow labeled “Mod” on the effect’s panel. That graphic points from the affected control down toward the Effect Modulator, making it easy to spot the modulation target at a glance. If a control has that arrow, it’s the one the Effect Modulator will affect.
This means every effect has its own built-in modulation relationship. On one effect, the Effect Modulator might animate delay time. On another, it might sweep a tonal or spatial parameter. The exact target depends on the effect, but the visual cue is always the same: Follow the “Mod” arrow.
Effect modulator controls include:
Speed – 0.01 Hz to 20 Hz, or tempo-syncable from 1/64T to 8 beats. LED above flashes in time.
Waveform – Ramp, sawtooth, triangle, sine, square, or random.
Delay – Fade-in time for modulation (0–5000 ms).
Sync – Locks modulation speed to host tempo.
Mod Wheel – Lets your MIDI Mod Wheel scale the modulation depth in real time.
Key Reset – Restarts the waveform with each key press.
Managing Effects Chains
Building and wrangling effects and effect chains straightforward. Use the Effects menu dropdown (the triangle) to save and move effects and chains.
Add an Effect – In the Effects View, select a section (Upper, Lower, or Global). Click the Select Effect dropdown to pick your effect, then tweak away.
Delete an Effect – Click the “X” next to its name.
Save a Chain – Display the Full Effects view → Use the Click Here To Save dropdown menu → Save As. Name it, reuse later.
Recall a Saved Chain – Load from the same dropdown.
Solo an Effect – Hit the “S” button; all others mute.
Reorder – Drag the effect by its top “grip” edge to rearrange.
Numerical Edit – Double-click a knob/slider, type a value, press Enter.
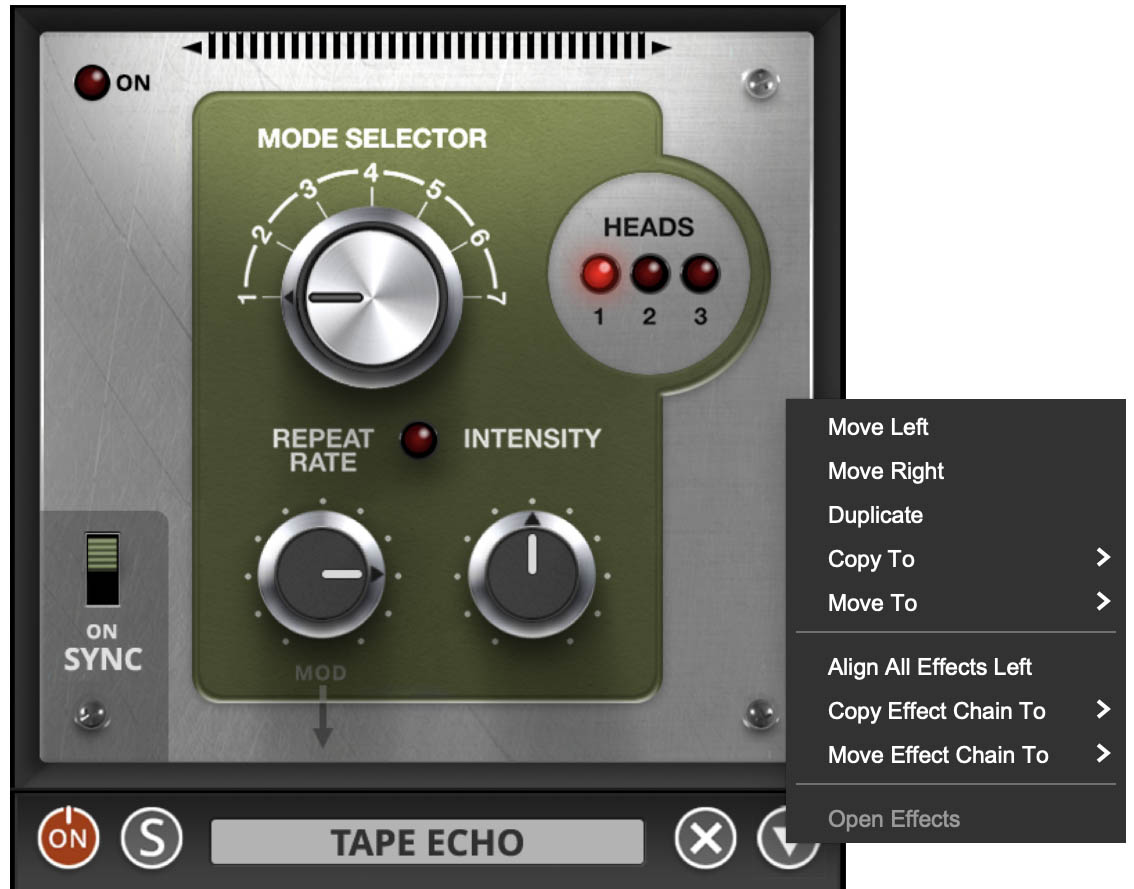
Copy Effect to Another Section – Click the triangle dropdown → Copy To → choose Upper or Lower.
Copy or Move Entire Chain – Click the triangle dropdown → Copy/Move Effect Chain To → choose Upper or Lower.
Duplicate an Effect – Click the triangle dropdown → Duplicate (places a copy right next to it).
Swap an Effect or chain – Click the triangle dropdown → Swap an Effect Chain with → choose Upper, Lower, or Global.
Align Effects – Click the triangle dropdown → Align All Effects to automatically shift all effects to the left, closing any empty slots in between.
Lock All FX – Click the padlock icon to keep the current effects chain in place when switching presets. Any new preset you load will use your locked chain instead of its own, making it easy to carry your favorite effect setup from sound to sound.
Practical Tips
Don’t overlook the Global chain. A touch of reverb or EQ here can glue all three sections together.
The Effect Modulator + Mod Wheel combo is excellent for live performance. Map it, and suddenly your phaser swoops in only when you push the wheel.
Try saving a few favorite chains and re-using them across presets. Treat them like your personal pedalboards.
Extreme stereo widening can be fun in headphones, but keep an ear on mono compatibility if you’re making tracks.
The library of Effect Chains that you build over time is shared with other Cherry Audio instruments that utilize this same system, from Trident Mk III synthesizer (October 2025) onward.
The Effects
There are 20 effects in total to add potency to any Mercury-8 sound. Whether you’re after subtle polish, full-throttle grit, or spacey atmospheres, these effects add even more character to any patch.
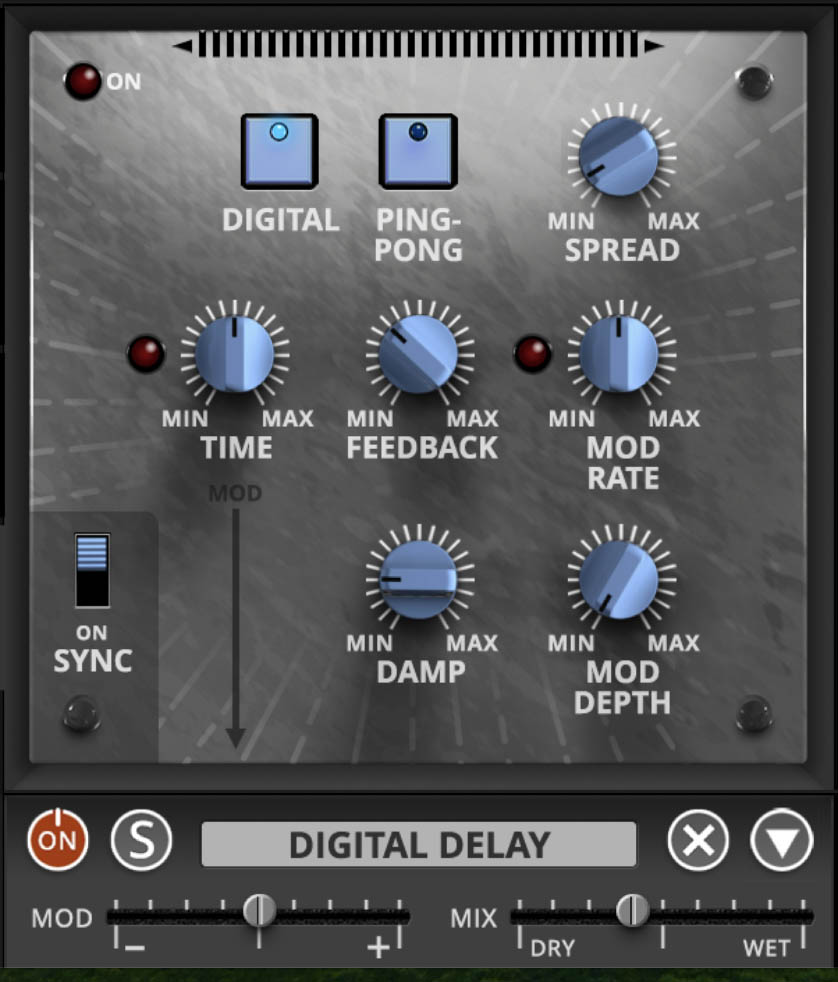
Digital Delay
Delay pedals and tape echoes have been a keyboardist’s sidekick for decades. The Digital Delay offers three classic flavors:
Digital – Clean, pristine repeats.
Tape – Warm, saturated echoes.
Ping Pong – Echoes that bounce between left and right for stereo ambience.
Controls:
Delay Time – Sets the gap between repeats (1 ms to 2000 ms). With Sync on, times follow the beat (1/64T to 8 bars). This can be controlled by the Effect Modulator.
Feedback – Controls how many repeats you get. Low values = slapback echo; high values = infinite runaway.
Spread – Adjusts the stereo width of the delayed signal.
Damp – Softens repeats by filtering highs, making echoes darker and rounder.
Mod Rate / Mod Depth – Adds modulation to delay time. Subtle settings = chorus shimmer; extreme = pitch warbles and glitching.
Tip: Try Digital mode with high feedback and a little modulation depth for a psychedelic wash that hovers on the edge of freak out.
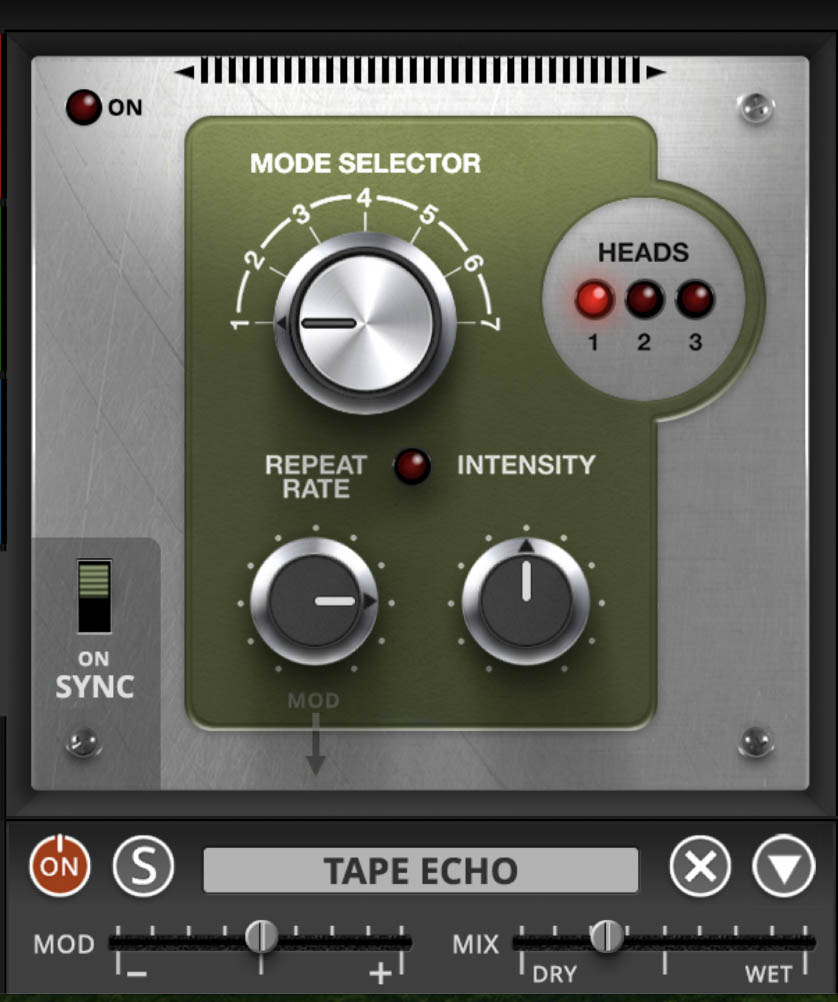
Tape Echo
Few effects are as iconic as tape echo. Originally created with loops of magnetic tape and multiple playback heads, these machines defined the sound of countless dub records, psychedelic jams, and experimental soundscapes. the Tape Echo captures all that vintage character without the headaches of demagnetizing heads or replacing tape loops.
Controls:
Mode Selector – Chooses which playback heads are active. Each mode offers different rhythmic subdivisions and textures, from simple single repeats to multi-head cascades.
Repeat Rate – Sets the delay time. Lower values = slower, spaced-out repeats; higher values = rapid-fire echoes. With Sync engaged, rates lock to host tempo. Modulation can be applied here by the Effect Modulator for even more vintage spaciness and psychedelic vibes.
Intensity – Controls feedback (how much of the echo feeds back into itself). Low settings = quick fadeouts; higher values = dense, self-oscillating repeats and greater sonic mayhem.
Heads Indicators (1–3) – Lights show which tape heads are active for the selected mode.
Practical Tip: For classic dub-style echo, select multiple heads with Intensity cranked high, then ride the Repeat Rate knob during playback for wild pitch sweeps. For more subtle use, stick to a single head and moderate intensity to add depth without overwhelming the mix.
Digital Reverb
Back in the ’70s, reverb meant spring tanks or giant plates welded into studio walls. Digital reverbs were exotic, studio-only beasts. The Digital Reverb gives you a compact, modern reverb with three classic models:
Room – Tight, natural ambience.
Hall – Expansive, lush decay.
Plate – Smooth, metallic sheen.
Controls:
Predelay – Time before the reverb kicks in (0–150 ms). Longer predelays create a sense of bigger space. This can be controlled by the Effect Modulator.
Decay – Length of the reverb tail, from short and snappy to cavernous. Modulation target. This can be controlled by the Effect Modulator.
Highpass / Lowpass Filters – Shape the tone of the reverb by trimming boomy lows or harsh highs.
Mod Routing Switch – Chooses whether modulation affects Predelay or Decay.
Tip: Use a short Room reverb on Strings to glue them into a mix, or a long Plate on Brass for cinematic atmosphere.
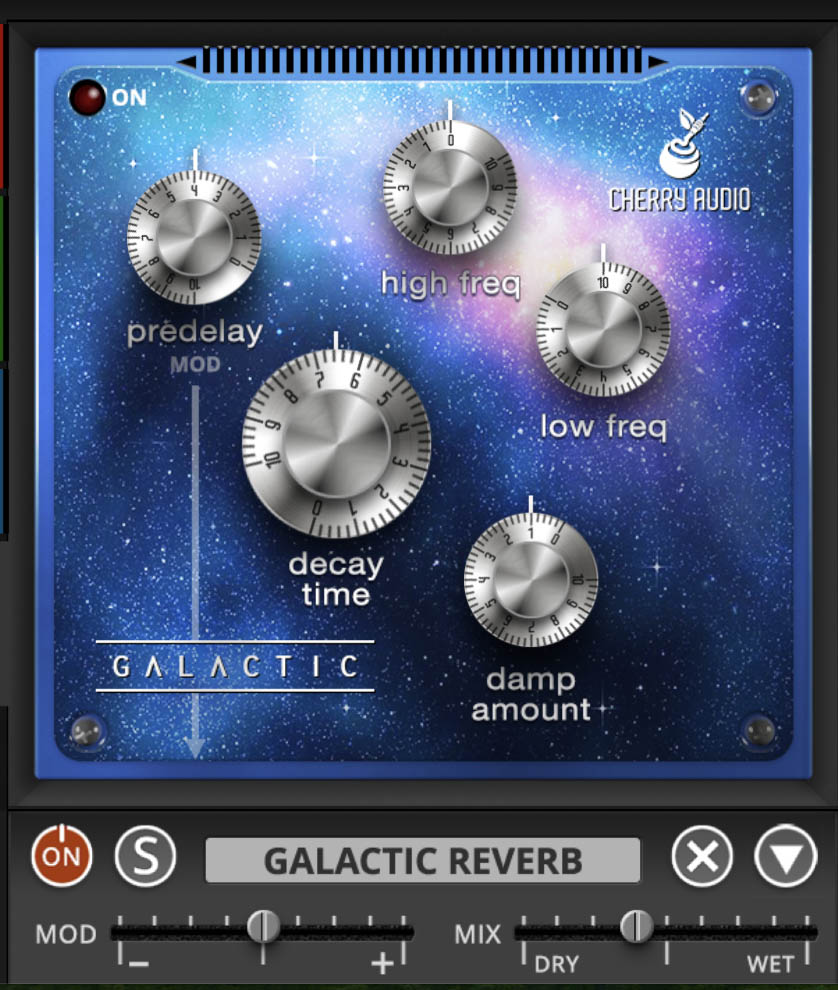
Galactic Reverb
When you need more than a room, hall, or plate to launch your sound into the stratosphere, reach for Galactic Reverb. Designed for cavernous, cosmic spaces, it excels at ambient washes, cinematic swells, or simply making your synth sound like it has left the building (and maybe the planet).
Controls:
Predelay – Sets the time before the reverb begins (0–150 ms). Short settings keep things tight; longer values create separation between the dry attack and the wash of reverb. This can be controlled by the Effect Modulator.
Decay Time – Determines how long the reverb tail lingers. Dial it short for manageable ambience, or long for infinite, space-drifting sustain.
High Freq – Adjusts the tonal brightness of the reverb by shaping the high-frequency response. Higher settings yield shimmering, airy tails; lower settings make the reverb darker.
Low Freq – Sets how much low end is preserved in the reverb. Keep it up for a massive, bass-heavy wash, or pull it back to avoid muddiness.
Damp Amount – Controls the damping of reflections over time. Higher values cause the reverb tail to lose brightness as it decays, simulating natural absorption in real spaces.
Tip: For lush pads, combine a long Decay Time with a rolled-back Low Freq and moderate Damp Amount to create a deep but clear ambient space. On leads, try adding a touch of Predelay so the note speaks clearly before the reverb bloom takes over.
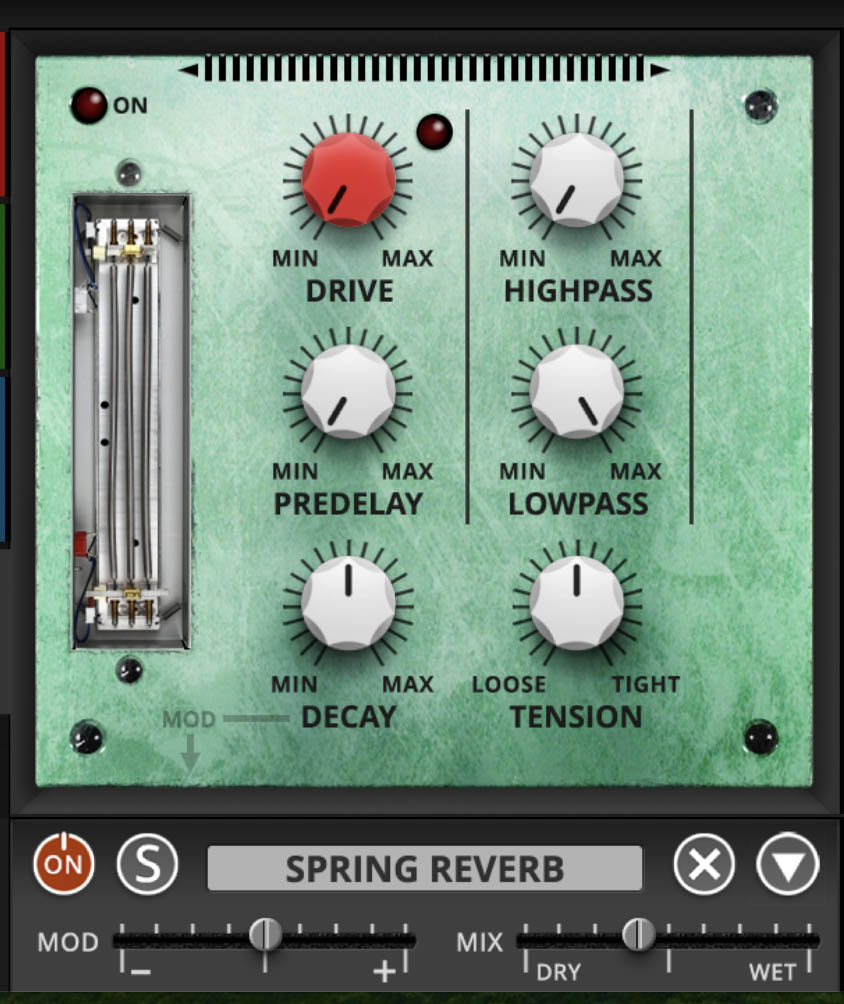
Spring Reverb
Spring reverb is one of the most distinctive ambience effects in music history. From surf guitar twang to vintage organs to early synths patched through amps, its metallic, splashy character has a charm all its own. The Spring Reverb recreates the sound of physical springs housed in tanks, complete with extra controls that let you shape it far beyond the originals.
Controls:
Drive – Pushes the input signal into the springs. Higher settings increase saturation and grit, adding vintage bite to the reverb.
Predelay – Sets the time gap before the reverb begins (0–150 ms). Useful for keeping the dry attack clear before the spring kicks in.
Decay – Adjusts how long the spring vibrations last. Low values yield short, splashy bursts; higher settings give longer, ringing tails. This can be controlled by the Effect Modulator.
Highpass / Lowpass – Filters that trim unwanted lows or highs from the reverb signal. Use them to tame muddiness or harsh metallic overtones.
Tension – Simulates the tightness of the springs. Looser = wobblier, more boingy character. Tighter = more controlled, refined response.
Tip: For vintage organ vibes, set Decay short and Tension loose to get that splashy, percussive spring burst. For a more modern twist, roll back the Lowpass, tighten the Tension, and add a touch of Drive for a darker, thicker ambience.
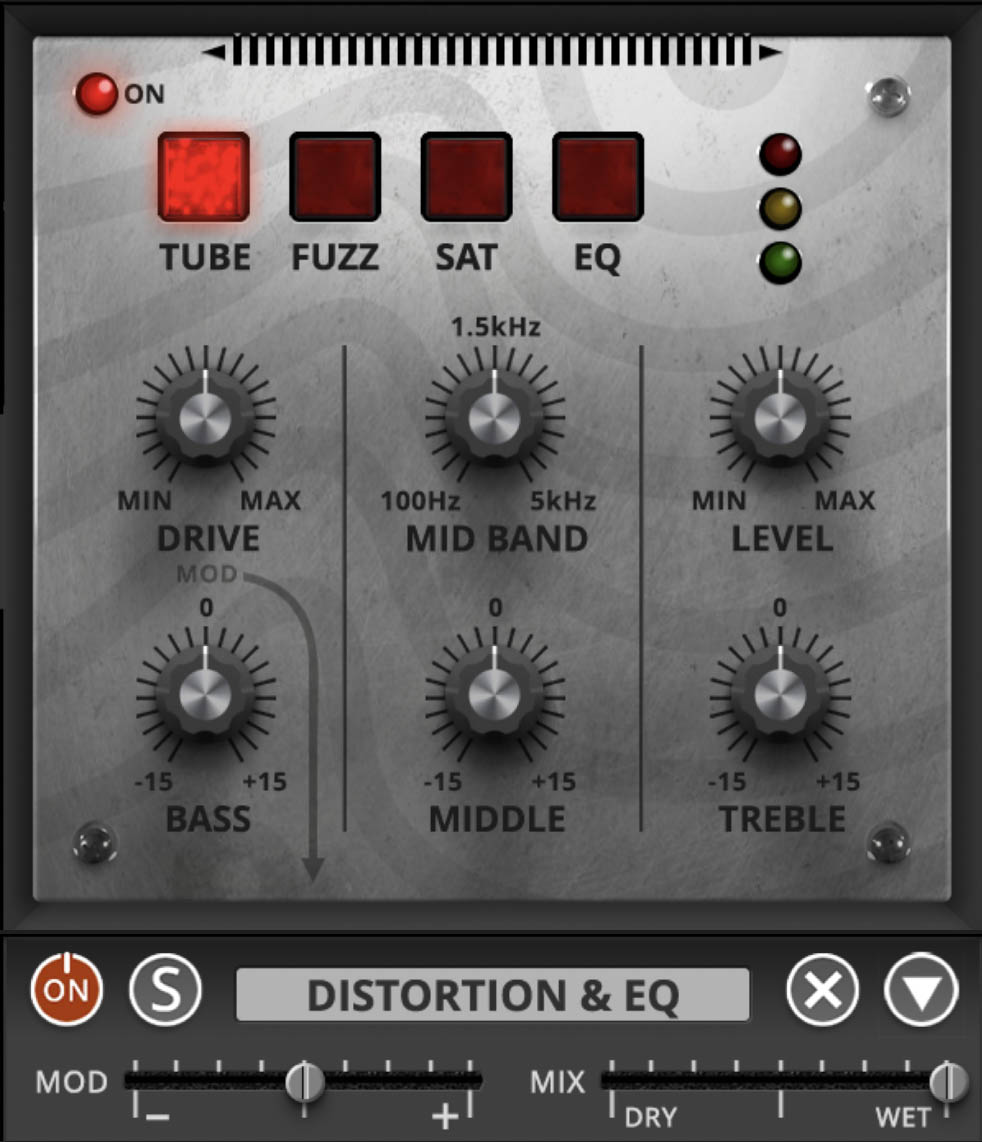
Distortion & EQ
Sometimes clean just won’t cut it. Distortion adds grit, attitude, and warmth. The Distortion & EQ effect offers four modes:
Tube – Smooth overdrive like a cranked guitar amp.
Fuzz – Aggressive, buzzy saturation modeled after germanium fuzz pedals.
Sat – Tape-style saturation for warmth and compression.
EQ – A standalone 3-band equalizer without added drive.
Controls:
Drive – Amount of gain/saturation (active in Tube, Fuzz, and Sat modes).
Level – Output volume to balance the effect.
Bass / Middle / Treble – ±15 dB gain for tone shaping.
Mid Band Frequency – Selects which frequencies the Middle control boosts/cuts.
Modulation Target – In Tube, Fuzz, and Sat modes, Drive is modulatable. In EQ mode, the Mid Band frequency can be modulated.
Tip: A touch of tape saturation can add body to Strings or Brass without sounding distorted. Crank Fuzz on a Lead sound to make it snarl.
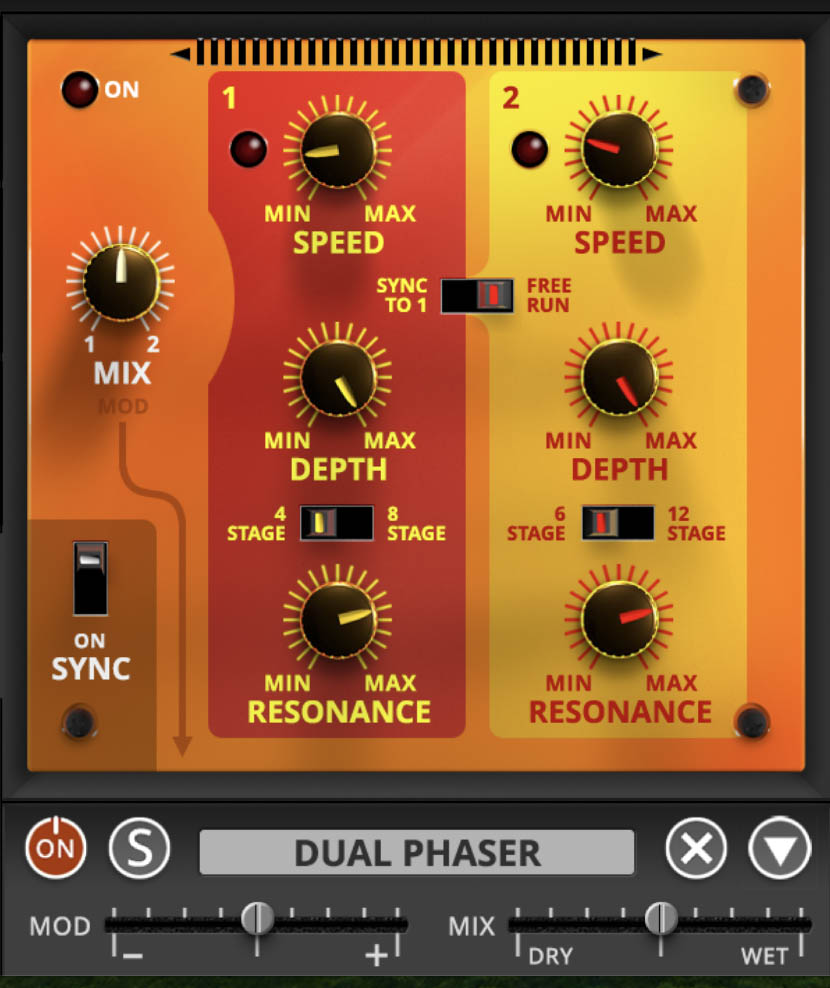
Dual Phaser
Phase shifters were everywhere in the ’70s, and the legendary Mu-Tron Bi-Phase set the standard. The Dual Phaser brings that same rich, sweeping character times two.
Each phaser has its own controls, but you can sync them together or let them run wild independently.
Controls (per phaser):
Speed – Sweep rate (0.01 Hz–8 Hz, or tempo-synced from 1/64T to 8 beats).
Depth – Intensity of the phasing effect.
Stages – Number of filters in the phaser circuit. More stages = deeper, more pronounced sweeps.
Phaser 1: 4 or 8 stages.
Phaser 2: 6 or 12 stages.
Resonance – Emphasizes the notches for sharper, more hollow tones.
Mix – Balances between Phaser 1 and Phaser 2. Can be modulated.
Sync - the Sync switch determines whether the two phaser stages run free and independent or whether one is locked to (synchronized with) the other:
Off (unsynced): Each phaser has its own LFO running freely. This means they can drift in and out of alignment, creating evolving, swirling movement and complex stereo textures.
On (synced): The second phaser’s sweep is locked to the first. Instead of moving independently, both phasers cycle together, so you get a more unified, rhythmic phase motion. This setting is tighter and more predictable, useful when you want a consistent pulse or groove.
Tip: Try syncing both phasers at different stage settings (e.g., 4 vs. 12) for complex, evolving sweeps.
Flanger & Chorus
These two modulation effects use short delays to create movement and depth. Flanging mixes dry and very short-delayed signals for a sweeping “jet plane” comb-filter sound. Chorus uses slightly longer delays to thicken tones, simulating multiple instruments playing together.
Flanger Controls:
Speed – LFO rate of the sweep (0.01 Hz–8 Hz, or tempo-synced).
Depth – Amount of sweep applied.
Delay – Sets the base delay time (1–13 ms). Shorter = brighter notches.
Resonance – Boosts the notches, producing the classic jet-flange effect.
Chorus Controls:
Speed – LFO rate of the sweep (0.01 Hz–8 Hz, or tempo-synced).
Depth – Amount of sweep applied.
Waveform – Shape of the LFO (sine, triangle, saw, ramp). Each yields a different flavor of movement.
Shared Control:
Mix – Balances Flanger and Chorus. Can be modulated.
Tip: Use a slow, shallow chorus on Brass to add width without getting in the way, or crank up flanging on a lead synth for ’70s sci-fi drama.
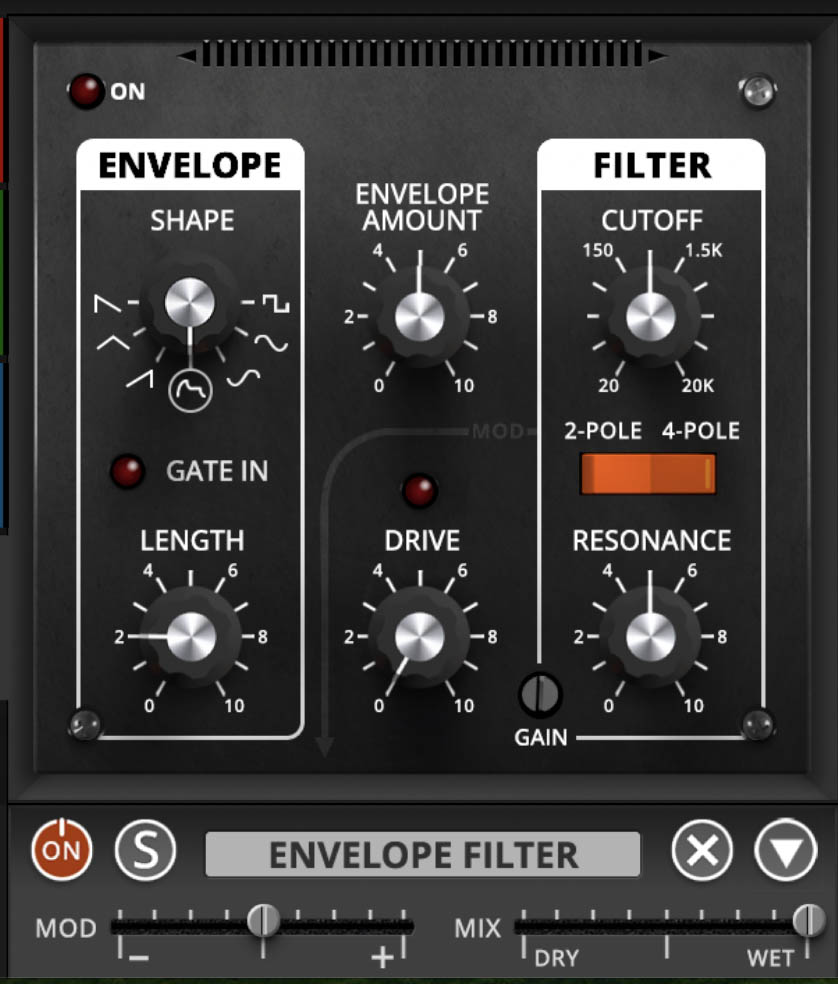
Envelope Filter
The Envelope Filter is a triggered modulation effect. Every time you play a key, it generates a filter sweep. Unlike a traditional envelope follower that reacts to signal volume, this one gives you consistent, predictable sweeps. Great for auto-wah effects, synth zaps, and funky textures.
Envelope Section:
Shape – Pick an envelope contour (ramp, triangle, square, etc.). Shapes determine how the filter cutoff moves over time. Square acts more like an LFO.
PARA/POLY Switch
PARA (Paraphonic)- One shared envelope and filter for all notes.
POLY (Polyphonic)- Each note triggers its own envelope and filter, enabling more detailed, note-specific modulation.
Length – Duration of the envelope sweep. Short = snappy; long = slow evolving.
Envelope Amount – Sets how far the filter cutoff moves in response to the envelope.
Filter Section:
Cutoff – Base frequency of the filter. The envelope adds/subtracts from this point.
2-Pole / 4-Pole – Choose slope steepness: 2-pole = smoother; 4-pole = sharper. This can be controlled by the Effect Modulator.
Resonance – Boosts frequencies at the cutoff, making sweeps more dramatic.
Drive – Adds gain before the filter for extra grit and presence.
Other Controls:
Gain (Trimmer) – Balances the output level.
MOD Slider – Adjusts how much modulation is applied.
MIX Slider – Balances dry vs. processed.
Tip: Set a long ramp-up shape with high resonance on Strings for dramatic sweeps that evolve with each note, or go short and snappy for funky auto-wah leads.
Tip 2: Filters on Filters
You don’t have to trigger the Envelope Filter with an envelope at all. Just leave the sensitivity low and it becomes a fixed filter instead. This essentially gives you an extra paraphonic filter that you can apply to a single sound, or drop in the global FX chain for the whole mix. Stack it with the synth's built-in filters, and the multiple filters line up in series to carve out shifting bands of tone. This technique is an excellent way to shape formant-like textures, focus a patch more narrowly, or travel to new sonic realms the synth never imagined.
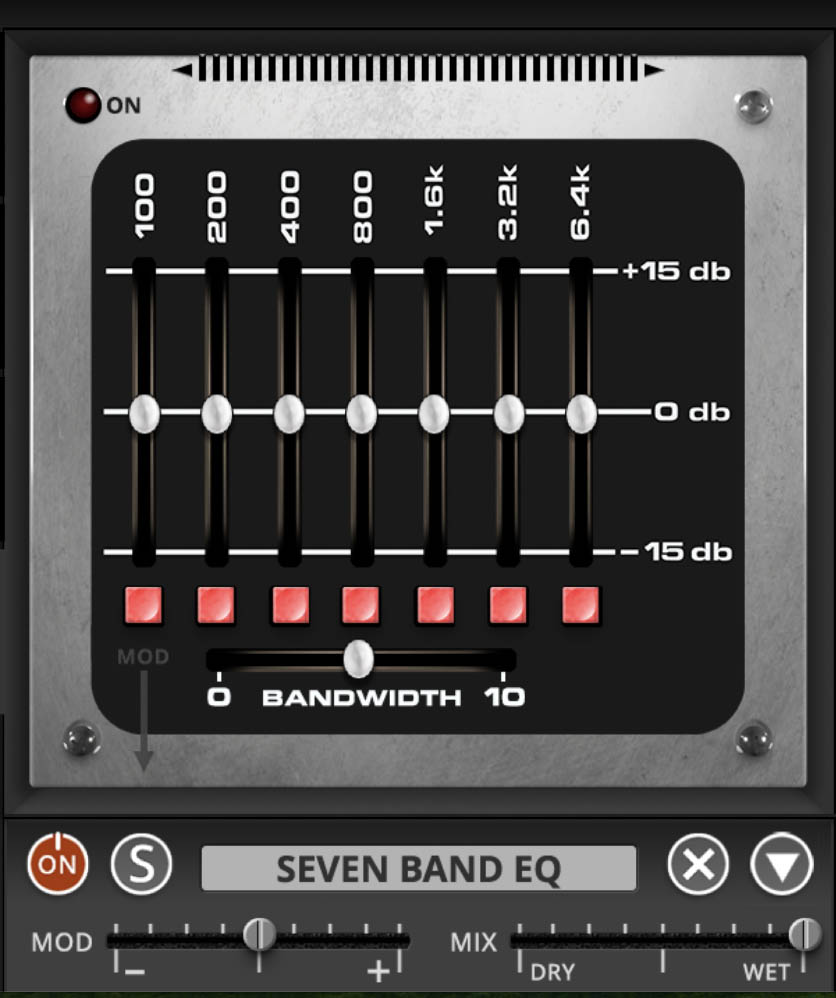
Seven Band EQ
Equalization is one of the most fundamental tools in shaping sound, and the Seven Band EQ makes it straightforward and musical. Modeled after classic graphic equalizers, this effect lets you boost or cut seven key frequency ranges to sculpt tone, tame problem areas, or bring out character in any sound.
Controls:
Frequency Bands (100, 200, 400, 800, 1.6k, 3.2k, 6.4k Hz) – Each vertical slider boosts or cuts its band by up to ±15 dB. Push up to emphasize, pull down to reduce.
100 Hz – Sub-bass and low-end weight.
200 Hz – Warmth or muddiness.
400 Hz – Body and thickness (or boxiness if overdone).
800 Hz – Midrange punch.
1.6 kHz – Presence and edge.
3.2 kHz – Clarity and attack.
6.4 kHz – Brightness and air.
Bandwidth – Adjusts how wide or narrow each band’s effect is. Lower values = broader, smoother curves. Higher values = tighter, more surgical adjustments.
As with all other effects, the Seven Band EQ can be modulated, opening the door to rhythmic tone-shaping or evolving filter-like sweeps across multiple bands.
Tip: Use gentle boosts or cuts across a few bands for natural tone shaping. For example, trimming a little 200 Hz mud while boosting 3.2 kHz clarity on Brass. Or crank up 100 Hz and 6.4 kHz together to give synth basses thump and sparkle.
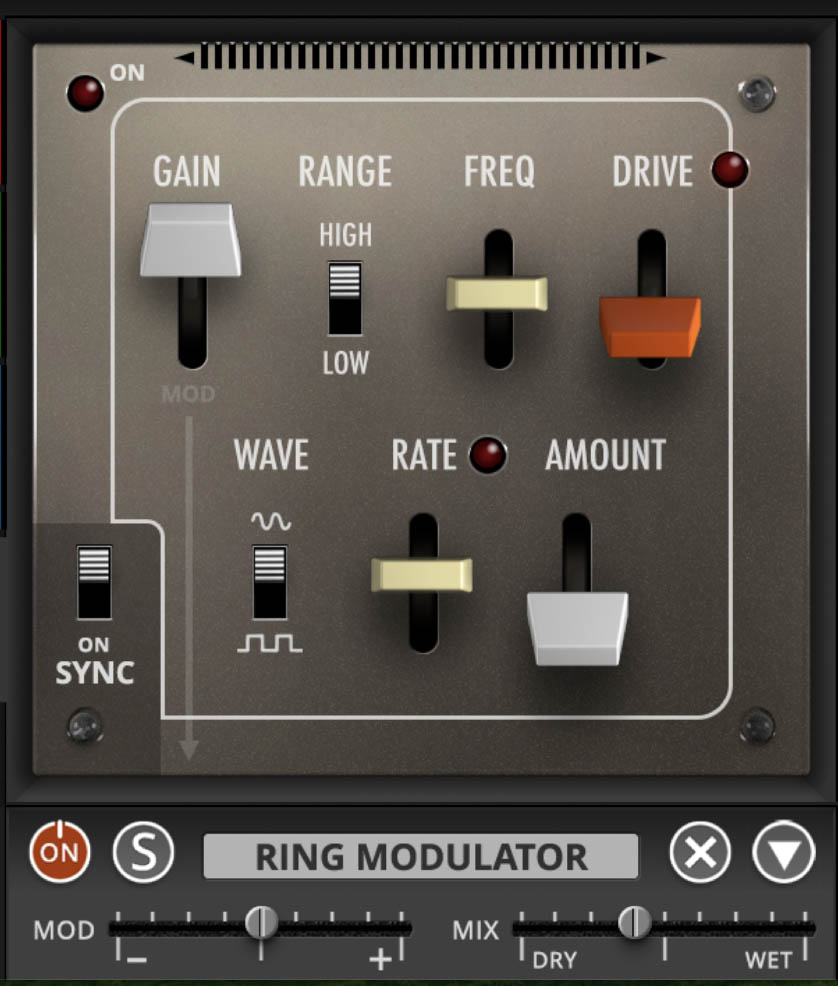
Ring Modulator
Ring modulation is the sound of science fiction ray guns, metallic clangs, and otherworldly textures. By multiplying your signal with an internal oscillator, it creates sum and difference frequencies that often sound inharmonic, robotic, or downright alien. The Ring Modulator gives you full control over how wild (or subtle) things get.
Controls:
Gain – Adjusts the input level sent into the modulator. Higher gain means a stronger, more pronounced effect.
Range (High/Low) – Switches the oscillator’s frequency range. Low is better for tremolo-like modulation; High ventures into bell tones and metallic territory.
Freq – Sets the frequency of the carrier oscillator. Lower settings = slow, throbbing tremolo. Higher = clangorous sidebands.
Wave – Selects the oscillator’s waveform: sine for smooth, or square for harsher, edgier modulation.
Rate – Controls oscillator speed when in Low range (essentially tremolo rate). Syncs to tempo when Sync is enabled.
Amount – Sets the depth of modulation, from subtle shimmer to total signal disintegration.
Drive – Adds gain and harmonic grit after the modulation stage, thickening or dirtying up the output.
Tip: For classic sci-fi “flying saucer” tones, set Range to High, pick a sine wave, and crank Freq into the audio range. For more musical use, try Low range with Rate synced to tempo and it becomes a tempo-locked tremolo that adds groove without going completely alien.
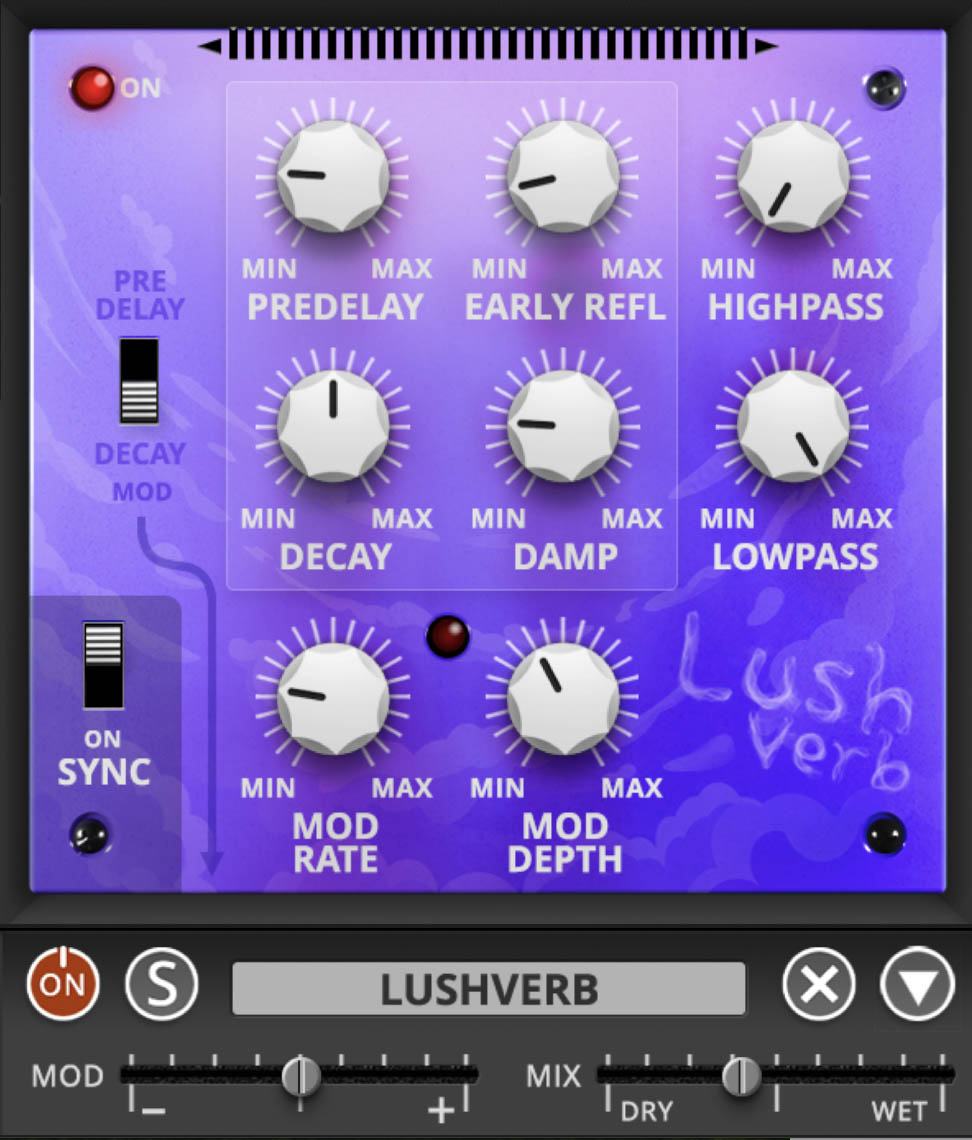
Lushverb
If you want your sounds to swim in ambience, Lushverb is your go-to. As the name suggests, it’s built for wide, dreamy reverberation that can be subtle and supportive or massive and enveloping. With tone-shaping filters and built-in modulation, it excels at everything from natural roominess to lavish, evolving textures.
Where Galactic Reverb reaches for infinite, cosmic expanses, Lushverb focuses on silky smoothness and animated depth. It's the kind of reverb that flatters synths, vocals, and pads by wrapping them in a glowing halo.
Controls:
Predelay – Time before the reverb kicks in. Short = immediate wash; longer = clearer separation between dry sound and reverb bloom.
Early Reflections – Shapes the very first echoes you hear when a sound bounces off walls. Low settings keep things tight and intimate, like you’re in a smaller space. Higher values push those reflections further forward, adding presence, punch, and a sense of real room before the tail blooms. Great for adding dimension without always using longer decay times.
Decay – Sets the length of the reverb tail, from short ambience to cavernous sustain. Can be modulated.
Highpass / Lowpass – Trim low-end rumble or high-end fizz in the reverb signal to keep mixes clean.
Damp – Determines how much brightness is lost over time. Higher values = tails that darken as they fade.
Mod Rate / Mod Depth – Add movement to the reverb tail by modulating its delay lines. Subtle settings = gentle shimmer; extreme settings = chorus-like animation.
Sync – Locks modulation to host tempo for rhythmic effects.
Mod Switch (Predelay/Decay) – Chooses whether modulation applies to the Predelay or Decay parameter.
Tip: For ambient pads, set a long Decay, roll off some lows with the Highpass, and add a touch of Mod Depth for evolving atmospherics. For tighter mixes, use shorter Predelay and keep Decay moderate, adding just enough Damp to sit naturally under the dry sound.
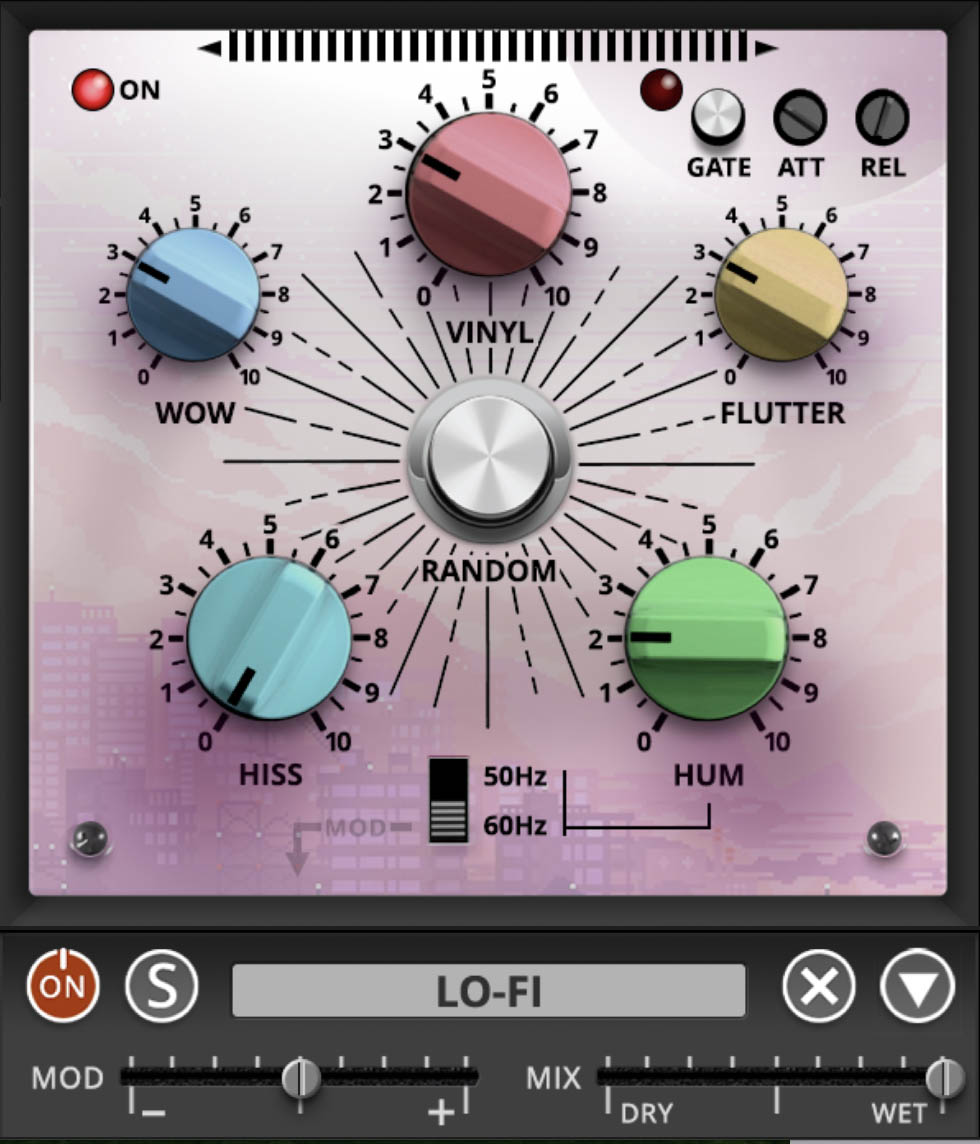
Lo-Fi
Sometimes perfection is the enemy of vibe. Lo-Fi is designed to rough up your sound with the kinds of imperfections that make old recordings feel warm and gritty. From dusty vinyl crackle to wobbly tape warble, this effect can take pristine synth tones and throw them straight into the basement of a 1970s record store.
Controls:
Vinyl – Adds record-like crackle and pops. Higher settings = more frequent, louder artifacts.
Wow – Simulates the slow pitch drift of a warped record or stretched tape.
Flutter – Adds faster, jittery pitch variations, like a worn cassette transport.
Hiss – Introduces broadband noise, reminiscent of tape or cheap electronics.
Hum – Injects mains hum into the signal, with a switch for 50 Hz / 60 Hz to match regional power noise flavors.
Random (center knob) – Introduces unpredictable fluctuations across the effect parameters, enhancing the chaotic, analog feel.
Noise Gate – To help keep the grit under control, Lo-Fi includes a Gate. Think of it as an automatic volume control. It lets your instrument through when you’re playing, and slams the door shut when things go quiet, keeping hiss, hum, and crackle from hanging around between notes.
Enable Button: Switches the gate on and off.
ATT (Attack): How quickly the gate opens when you play a note. A fast attack gives you sharp, immediate entrances; a slower attack eases the noise in more gently.
REL (Release): How quickly the gate closes after the sound drops below the threshold. A short release cuts noise instantly. A longer release lets things fade more naturally.
Gate Tip: When using long-decay sounds (especially with reverb or delay), you might hear “chatter,” that sputtering, open-close-open stutter as the gate struggles to decide whether the tail is loud enough to keep. If that happens, try increasing the Release for smoother fades, or dial back your effect tails slightly. A touch of balance here makes the difference between vintage character and sounding like a broken speaker.
Lo-Fi Tip: For subtle retro flavor, add a touch of Wow and Hiss to synth pads. For full-on grit, crank Vinyl and Hum and let the Random knob do its thing. It's great for lo-fi hip-hop or downtempo textures that need a worn, nostalgic character.
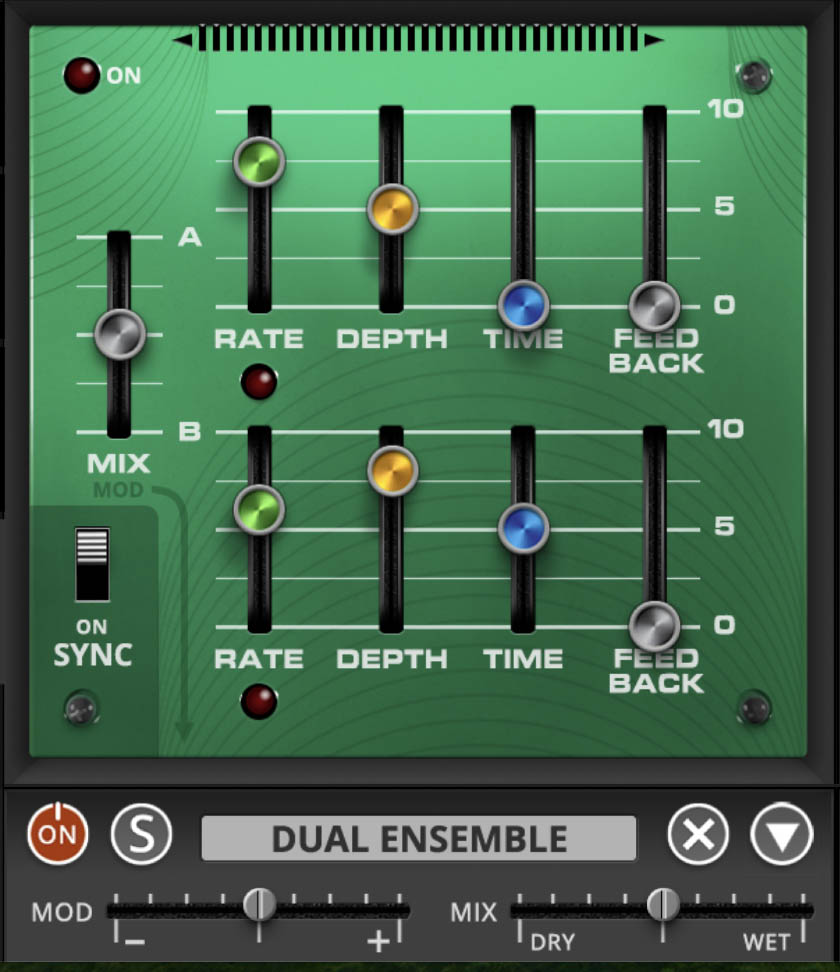
Dual Ensemble
The lush, swirling sound of ensemble effects is a hallmark of vintage string machines and poly synths. The Dual Ensemble effect gives you two fully independent ensemble units for everything from subtle shimmer to deep, swirling motion.
Controls (for each Ensemble A & B):
Rate – Sets the speed of the modulation (how fast the pitch/phase shifts). Slow = gentle drift; fast = warbly motion.
Depth – Controls how far the pitch is detuned by the modulation. Low = subtle thickening; high = seasick wobble.
Time – Adjusts the base delay time of the effect. Longer times = looser, more chorus-like feel; shorter times = tighter, phase-like coloration.
Feedback – Feeds the delayed signal back into itself for resonance and more pronounced movement.
Shared Control:
Mix – Balances between Ensemble A and Ensemble B. Use it to layer two different modulation speeds and depths for a rich, evolving chorus.
Tip: For classic string-machine shimmer, set both ensembles with slow Rates and low Depths, then balance them with the Mix slider. For a more psychedelic wash, give one ensemble a slow, deep drift and the other a faster, shallower variation. The interaction creates a lush, animated stereo field.
Note: If you’re torn between Dual Ensemble and Chorus/Flanger, think of it this way: Ensemble excels at smooth, swirling textures with a vintage string-machine flavor, while Chorus/Flanger covers more dramatic sweeps, jet whooshes, and thicker doubling effects.
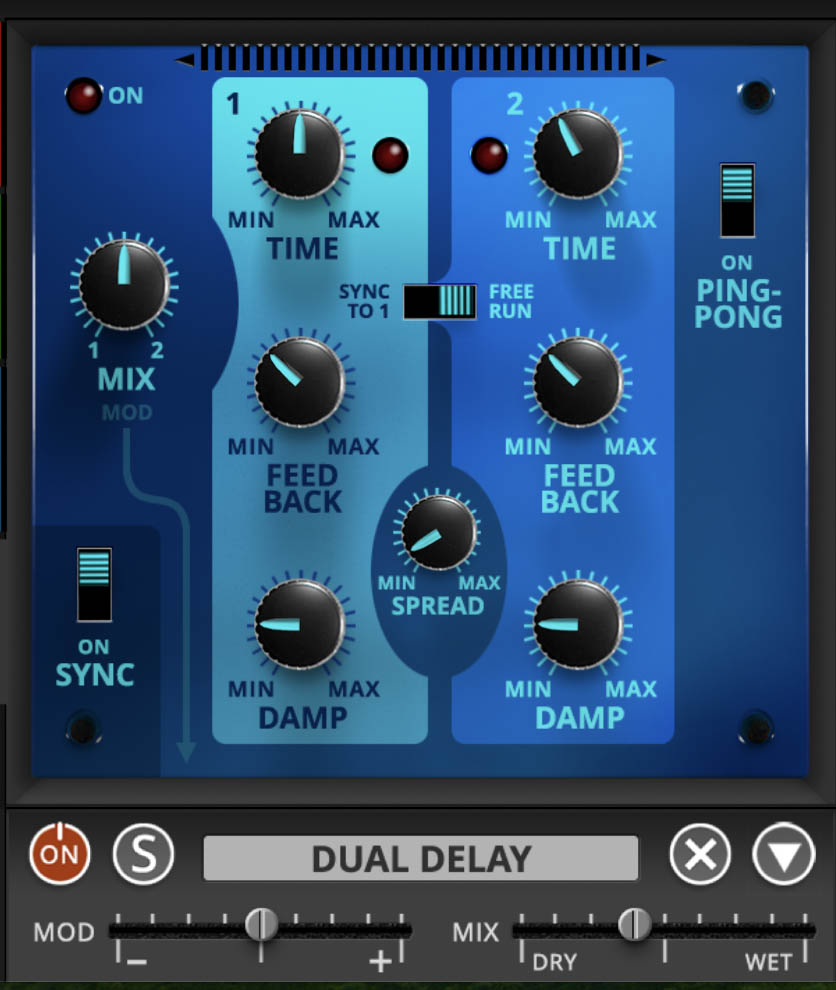
Dual Delay
Why settle for one echo when you can have two? The Dual Delay lets you run two independent delay lines side by side for everything from tight rhythmic interplay to wide, spacious echoes. Each delay has its own controls, and you can sync them to tempo, run them free, or send them bouncing across the stereo field in ping-pong mode.
Controls (per Delay Line 1 & 2):
Time – Sets the delay length. With Sync engaged, times lock to tempo divisions; in Free Run they’re adjustable in milliseconds.
Feedback – Determines how many repeats occur. Low = quick slapback; high = long echoes or self-oscillation.
Damp – Applies high-frequency damping to the repeats, making them darker and more natural as they fade.
Shared Controls:
Mix (1/2) – Balances between Delay 1 and Delay 2.
Sync/Free Run Switch – Toggles between tempo-synced and free-running time modes.
Spread – Adjusts stereo spacing of the delays. Low = centered echoes; high = wide, panned echoes.
Ping-Pong – Sends repeats alternating left and right for a classic stereo bounce.
Tip: For rhythmic complexity, set Delay 1 to dotted eighths and Delay 2 to quarters, then spread them wide for instant “U2-style” echo textures. For ambient sound design, keep both delays long, add plenty of Damp, and engage Ping-Pong for endless stereo wash.
Note: If you’re wondering whether to reach for Dual Delay or Digital Delay, here’s the difference: Digital Delay is quick and straightforward, with classic single-line flavors (digital, ping-pong). Dual Delay offers more flexibility, stereo interplay, and rhythmic layering. This is great when you want echoes to become part of the composition.
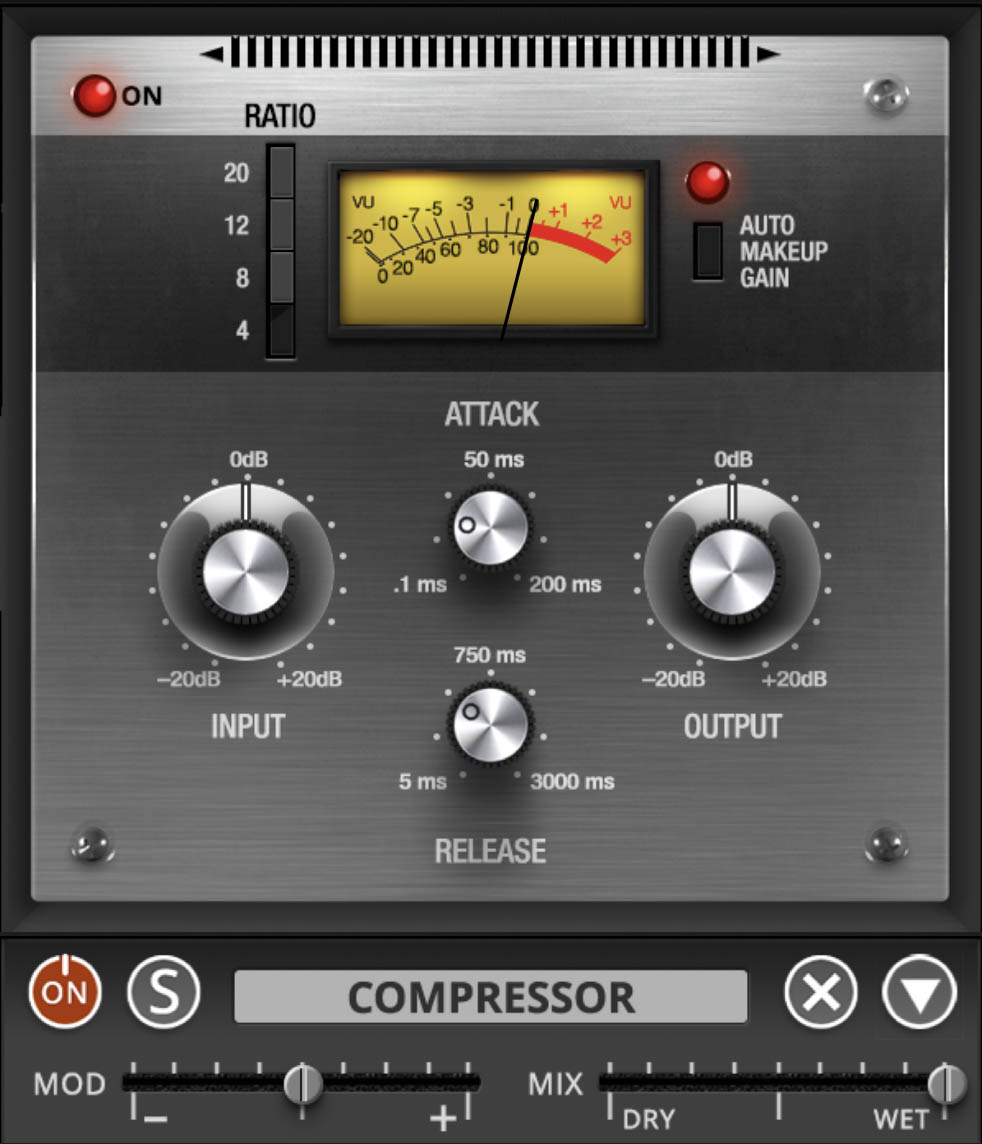
Compressor
Compression is a powerful tool for shaping the dynamics of your synths. It can make basses hit harder, leads sit firmly in a mix, and pads feel more even and controlled. The Compressor keeps things simple, with just the essential controls you need to add punch, presence, or smoothness to your patches. It operates with a fixed threshold of –12 dB and built-in auto makeup gain, ensuring consistent levels without extra balancing work, making it very plug-and-play. Dial in Attack and Release to taste, push the Input until you like what you hear, and you’re good. There's no need to trouble with gain staging or threshold hunting.
Controls:
Ratio (slider at top) – Sets how much the signal is reduced once it passes the threshold. Lower ratios (4:1) = gentle smoothing. Higher ratios (12:1, 20:1) = firm control.
Input – Adjusts how much signal is pushed into the compressor. More input = more compression.
Output – Balances the overall level after compression so the processed signal matches or exceeds the bypassed sound.
Attack – Controls how quickly the compressor reacts, measured in milliseconds (ms). Fast = tight and snappy; slow = allows more of the transient bite through.
Release – Sets how quickly the compressor recovers, measured in milliseconds (ms). Fast = punchier feel; slow = smoother, sustained leveling.
VU Meter – Shows how much gain reduction is being applied, so you can see the effect as well as hear it.
Auto Makeup Gain – One common side effect of compression is that the overall signal level can drop as peaks are reduced. Normally you’d compensate for this with an Output (or Makeup Gain) control, nudging the level back up by ear. The Compressor effect saves you that step by including built-in auto makeup gain that you can switch on or off. With it on, as you increase compression, it automatically boosts the signal so your processed sound stays roughly as loud as the uncompressed version. The benefit is that you can focus on shaping punch and dynamics without constantly juggling output levels, making the Compressor faster and more intuitive to use.
Compressor Specs:
Input: -20dB to +20dB
Output: -20dB to +20dB
Attack: .1ms to 200ms
Release: 5ms to 3000ms
Detector HP: 100Hz
Threshold: -12dB
Soft Knee (-3dB below threshold)
Tip: For synth bass, use a medium Attack and fast Release to keep the low end solid without losing punch. On pads, slower Attack and Release settings even out the dynamics, giving you a warm, flowing texture that sits perfectly under leads and arpeggios.
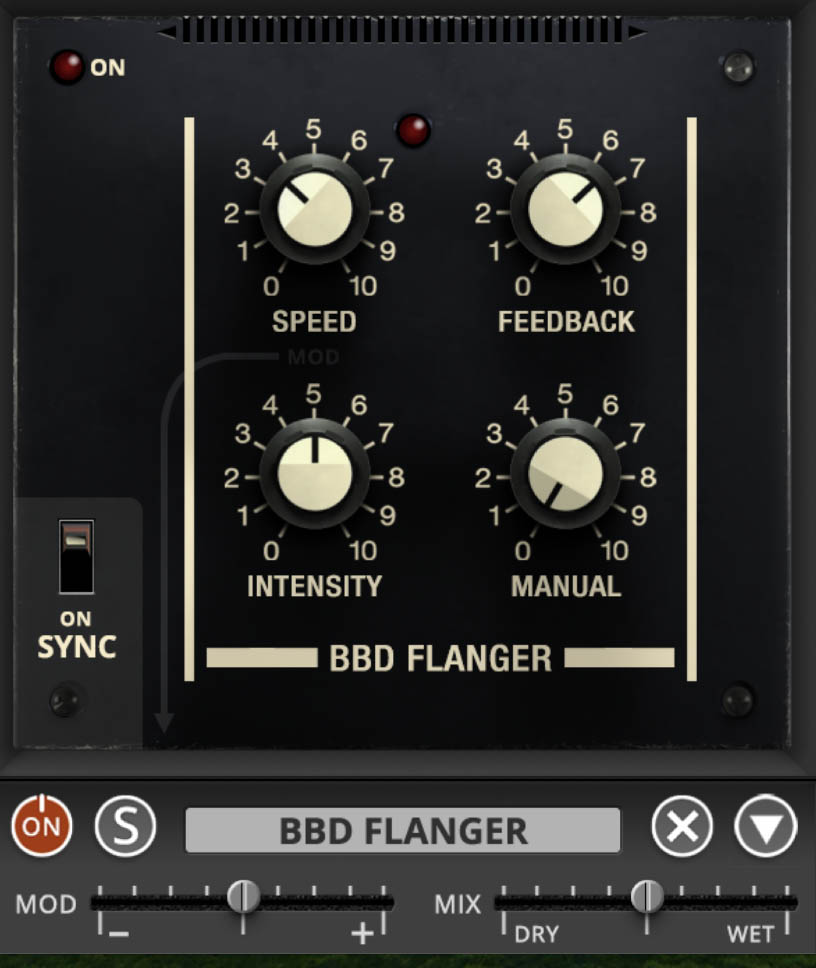
BBD Flanger
Flanging is all about mixing a signal with a very short, modulated delay, creating swooshing comb-filter effects. The BBD Flanger nails the character of vintage bucket-brigade analog units, known for their warm, slightly gritty sound compared to pristine digital models. This makes it ideal for thickening synths, adding movement to pads, or creating the classic jet plane sweep.
Controls:
Speed – Sets the LFO rate that modulates the delay time. Slow = gradual sweeps; fast = rapid, shimmering motion.
Intensity – Adjusts how much the LFO affects the delay time. Subtle settings = gentle movement; higher = deeper sweeps.
Manual – Manually offsets the flanger’s delay time. Use it to set the starting point of the sweep or to park the flanger for static comb-filter tones.
Feedback – Feeds part of the output back into the input. Low = smooth, subtle flange. High = resonant, metallic sweeps with that signature jet-like sound.
Sync – Locks the modulation rate to host tempo for time-synced sweeps.
Tip: For classic “jet whoosh” effects, set Feedback high, Speed slow, and Intensity deep. For subtler chorus-like thickening, keep Intensity low, Manual slightly offset, and just a touch of Feedback.
Note: If you’re deciding between BBD Flanger and Flanger/Chorus, here’s the distinction: BBD Flanger delivers darker, warmer, more organic sweeps. This is perfect for vintage-style movement. Flanger/Chorus offers cleaner, brighter modulation and the flexibility to switch into chorus mode.
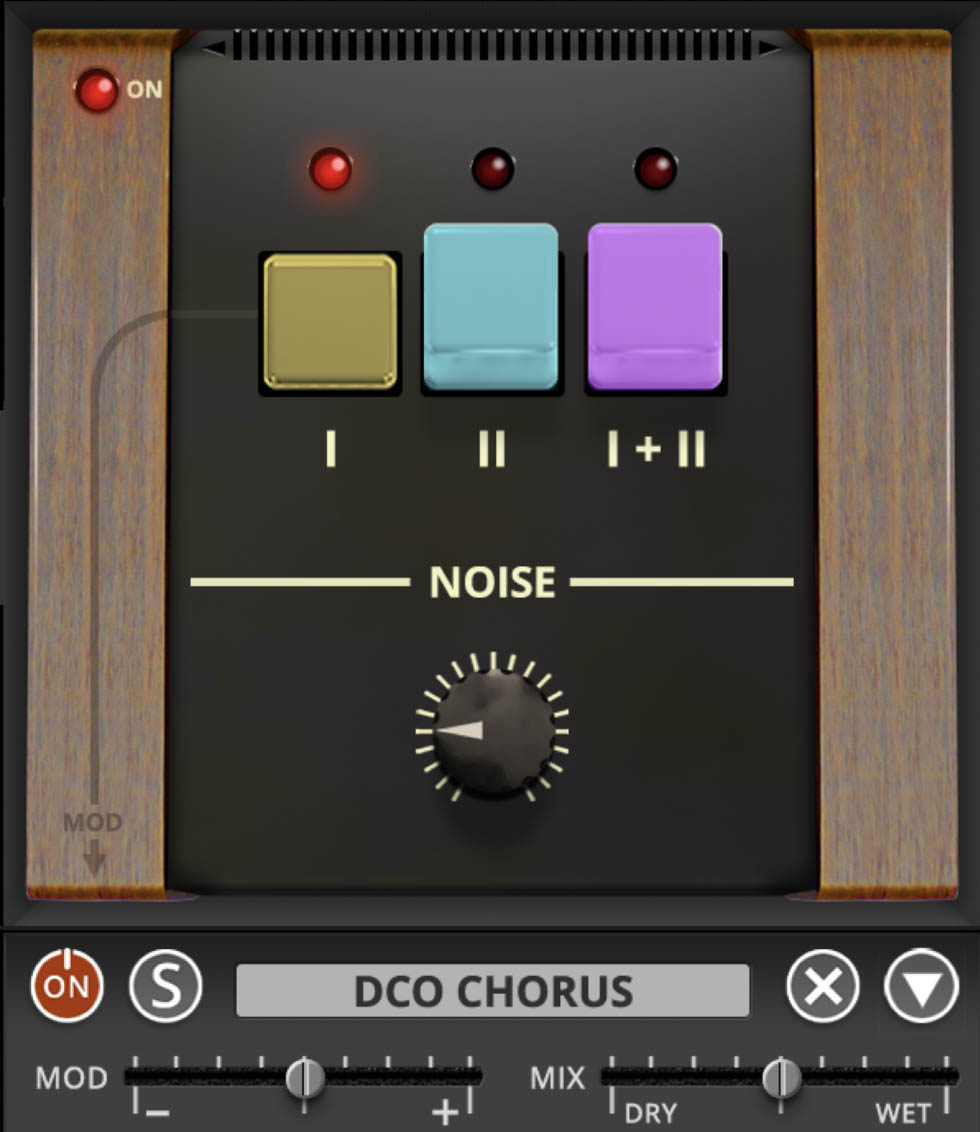
DCO Chorus
Inspired by the legendary stereo chorus of the Juno‑60, the DCO Chorus in the Mercury‑8 adds rich, swirling movement to analog pads and is great for beefing up textures with that classic 80s spread. The Juno-60’s original chorus gave its single-oscillator engine a depth and width that made it a hallmark of synthpop and electronic music.
Controls:
I – The first mode gives a rich chorus effect, adding width and shimmer. It's ideal for thickening pads, strings, and other sounds
II – The second mode intensifies the chorus effect by increasing the modulation speed by 70%. It great for lush textures, or anything where you want the synth to bloom.
I + II – Both modes engaged simultaneously. This third variation was a feature of the Juno-60 (pressing both buttons) and became a go-to trick for an unmistakably intense chorus. The modulation speed is faster, the depth shallower, and it uses a sine wave instead of a triangle wave.
Noise Level (knob) – Adds a subtle analog-style noise floor to the effect chain, helping the chorus feel less digital and more lived–in.
Tip:
For a warm pad that never sits still, set mode II, dial Noise Level low, and let the chorus breathe. Want your lead to spread? Use I + II, pull Noise Level up a bit, then stack a subtle delay behind it for full ’80s width.
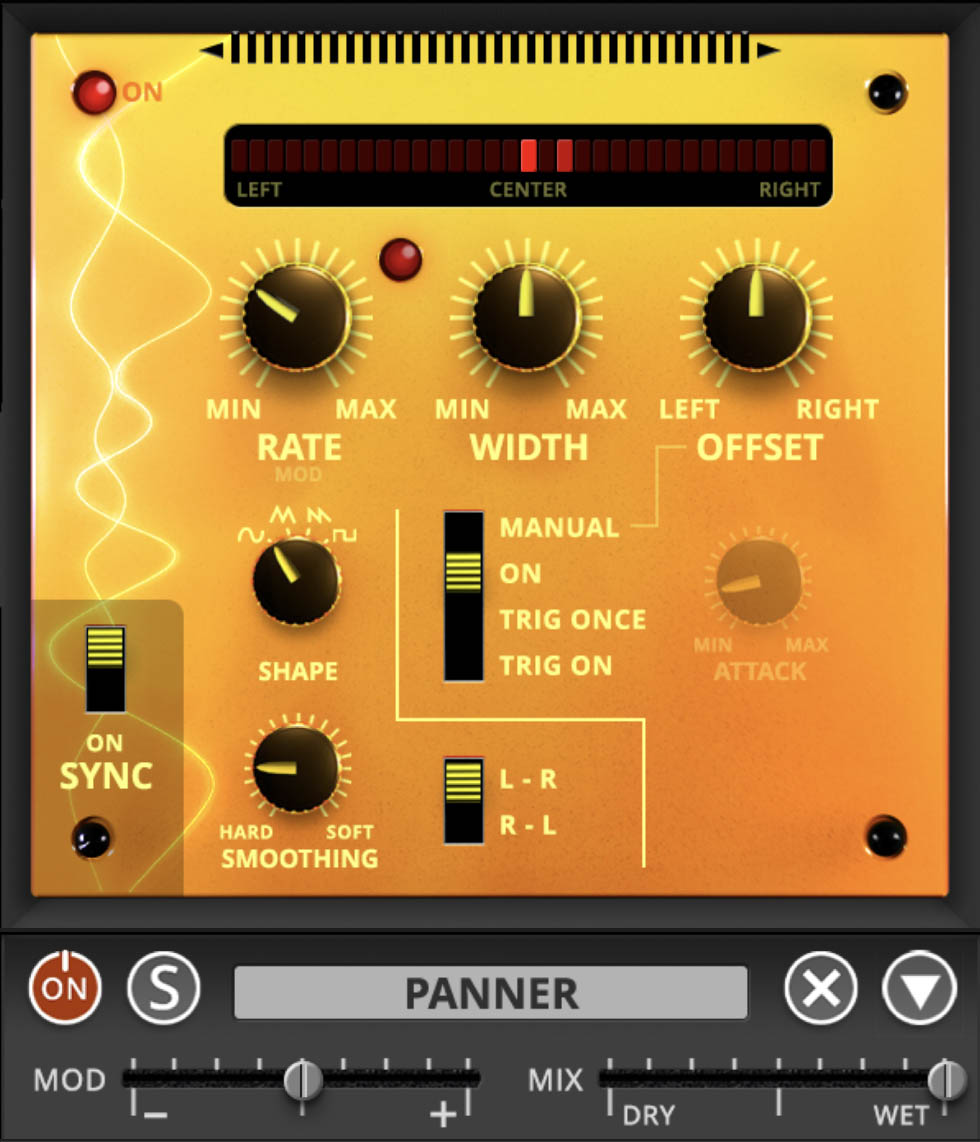
Panner
The Panner effect brings life and movement to your patch in the stereo field. Use it to animate a wandering pad, give your lead a swirling stereo motion, or simply place layers dynamically across the stereo field. By controlling how your sound moves left-to-right, how wide the sway is, and how quickly it sweeps, you can turn a static sound into a living soundscape. To trigger the Panner, press a key on the keyboard. If you continue to down a key (or keys), pressing other keys won't retrigger the effect.
Controls:
Rate (Min → Max) – Sets the speed of the movement across the stereo field. Lower settings slow down the pan sweep; higher settings make the motion rapid and rhythmic.
Width (Min → Max) – Determines how far the sound moves from left to right. At minimum the motion is subtle; at maximum it spans the full stereo spectrum.
Offset (Left ↔ Right) – Lets you set the starting point or bias of the movement. Move towards “Left” to start or favour the left side; move towards “Right” to start/favour the right.
Shape – Selects the modulation waveform used for panning (sine, triangle, saw, square). Different shapes give different character to the movement.
Smoothing (Hard ↔ Soft) – Controls how quickly the panning transitions occur: “Hard” gives abrupt jumps or sharp movement, “Soft” smoothens the glide between positions.
Mode Switch (Manual / ON / Trig Once / Trig ON) –
Manual: Panning follows the Offset knob only – no automatic sweep.
ON: Continuous automated panning according to Rate, Width, Shape, and Offset.
Trig Once: On receiving a trigger event (i.e. pressing a key on the keyboard), the panning sweep runs once and then stops. In this mode, the Attack knob is active.
Trig ON: On receiving trigger events, panning restarts automatically each time a key is pressed (if no other keys are currently held down). In this mode, the Attack knob is active.
Attack (Min → Max) – Active when Mode is set to Trig Once or Trig On. Sets how quickly the panning sweep begins after the trigger. Short values give an immediate sweep. Longer values ease in gradually.
SYNC (Off / On) – When ON, the Rate control syncs to the synth's own tempo setting (in standalone mode) or if used in a DAW, to the project tempo. When OFF, Rate is freely set in Hz.
Tip:
For a slowly drifting stereo pad, set Width relatively high, Rate low (around 1 – 2), Shape to triangle, Mode = ON, and Smoothing = Soft. If you want a lead that jumps left-right on each note trigger, switch to Mode = Trig Once, set Attack short, Width high, Rate moderate, and tie the trigger to your note-on event for dramatic stereo hops.
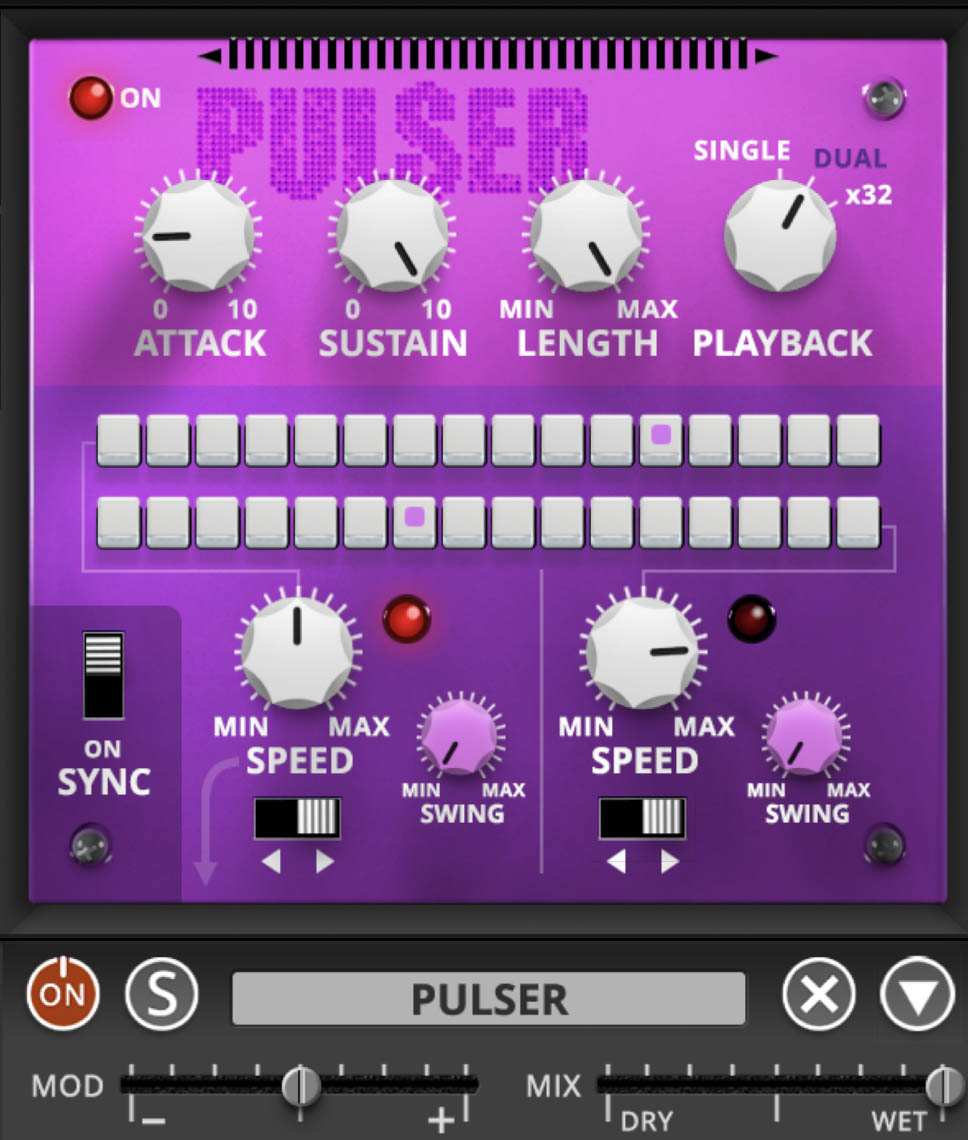
Pulser
The Pulser effect is a flexible 16-/32-step gate/sequencer built to inject rhythmic motion into sustained sounds or static patches. Think of it as a live, programmable tremolo, stutter or step-gate engine that sits on the end of your signal chain and chops or paces your synth voice, turning pads, leads or drones into patterns that rhythmically pulsate with life.
Controls:
Attack (0-10) — Determines how hard the gate opens at each step. Lower values give sharp, abrupt cuts. Higher values soften the entrances so the gating effect is smoother and less choppy.
Sustain (0-10) — Sets how long the gate stays open during each active step. At maximum sustain, the silence holds for the length of the step.
Length (Min → Max) — Sets the number of active steps in the sequencer. In Single mode this runs from 2–16 steps.In x32 mode the total length doubles (up to 32 steps).
Playback (Single / Dual / x32) —
Single: Runs one sequencer of up to 16 steps.
Dual: Enables two independent 16-step sequences running simultaneously (so you can layer or offset patterns).
x32: Runs a single sequence of up to 32 steps (essentially the 16-step engine doubled).
Speed (Min → Max) — Controls the rate at which the sequence advances. Higher values make faster step changes; lower values slow things down for broad rhythmic movement. This can be controlled by the Effect Modulator.
Direction switch (▶ / ◀) — Determines playback direction: forward (▶) or reverse (◀). Reverse mode can yield unexpected textures, especially when gating sustained patches.
Sync (Off / On) — When ON, the Speed parameter locks to your host tempo or internal clock; when OFF, Speed is free-running.
16 Step Buttons — Each button corresponds to one step in the sequence. Clicking a button toggles the gate on that step (active) or off (muted). A lit button means the signal passes; unlit means the gate is closed for that step.
Tip:
For a dramatic stutter effect, set Length to ~8, Speed moderate (so each step aligns with a 16th-note), Attack low for crisp gate opens, Sustain around mid for choppy rhythm. Use the forward direction. On the other hand, for evolving drone motion, try Length = 16, Speed = slow, Attack = high, Sustain = long, Direction = reverse, and use Sync = Off so the pattern drifts free of the tempo grid.
Power Tip: Rhythmic Crossfire
The Pulser becomes even more powerful when you use it across both layers. Try assigning different Pulser settings to the Upper and Lower panels with one running a short, percussive 8-step pattern, and the other a slower 16-step pulse. Set the Upper layer’s playback to forward and the Lower to reverse, then balance them with the Master Balance control.
The result is a hypnotic interplay of gated rhythms weaving in and out of each other. This is great for creating Berlin-school sequences, rhythmic ambient beds, or anything that needs motion without a drum track.
For bonus chaos, switch one Pulser to Dual mode and the other to x32, and let the overlapping cycles drift naturally out of sync.