Up to now, most of the controls we’ve covered shape the patch itself, its tone, and motion. The Performance Controls are different. These controls let you lean into a sound while you’re playing it. They add expression, movement, and the sense that the patch is responding to your hands.
On the DS-2, this section includes Pitch Bending, Bending Range, Mod. Wheel, and Glide. These become more powerful tools once you combine them with the synth’s modulation. A good patch can sound good on its own. A patch with well-set performance controls feels like an actual instrument.
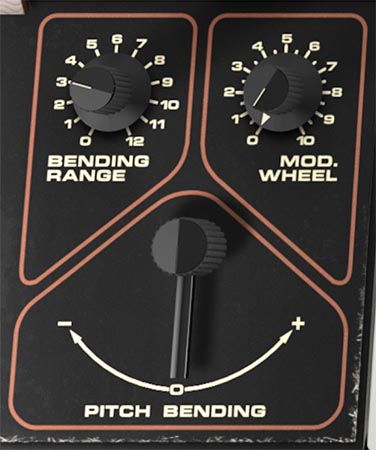
Pitch Bending
The Pitch Bending paddle bends pitch downward or upward in real time. Move it to the left for downward bend, or to the right for upward bend. The amount of bend in either direction is determined by the Bending Range control.
This is the main real-time pitch expression control for the DS-2, and it can be used for everything from subtle note inflection to dramatic octave dives and swoops. Because the paddle is centered at zero, it returns to the original pitch after a bend.
Musically, pitch bend can do very different jobs depending on the patch. On leads, it adds vocal-like expression and phrasing. On basses, it can create slippery funk inflections. On effects patches, it can turn a stable sound into something more animated.
Bending Range
The Bending Range knob sets the maximum bend interval for the Pitch Bending paddle. The range goes from 0 up to one octave in either direction.
This control matters more than people sometimes realize, because it determines how playable the bend paddle feels. A bend range that’s too wide can make precise phrasing harder. A bend range that’s too narrow can make the control feel timid.
Tip: For classic lead playing, start with a modest bend range and work upward only if the line really needs more travel.
Tip: Wider Bending Range settings are especially effective for leads, aggressive monosynth lines, and effects patches that are meant to sound more unpredictable.
Mod Wheel
The Mod Wheel knob sets the amount of modulation applied from the LFO’s Mixer — specifically from LFO 3. The original Crumar DS-2 didn't feature a Mod Wheel, making it necessary for players to use the sliders in the LFO's Mixer to add vibrato. This approach wasn't particular performance friendly, so Cherry Audio added a purpose-designed Mod Wheel of our own — along with a third LFO, which can be used as the source of the modulation applied by the Mod Wheel by setting LFO 3 to Wheel In.
In other words, while the LFO's Mixer lets you route LFO 1, LFO 2, and LFO 3 to various destinations, routings that use LFO 3 are controlled by the Mod Wheel when LFO 3 is set to Wheel In.
In this scenario, the Mod Wheel acts like a master modulation amount control for the LFO 3 routings you’ve created in the LFO’s Mixer. First, you choose a destination in one or more of the six LFO Mixer slots. Then you set the mod source to (LFO) 3 in those slots. And finally, you set the modulation amount for those slots. (Make sure to set LFO 3 to Wheel In.) After that, the Mod. Wheel knob determines how much of that programmed modulation is actually brought in by the wheel.
So if you’ve routed LFO modulation to VCO pitch, VCF cutoff, VCA level, Poly pitch, or other destinations, the Mod Wheel can act as the performance control that fades those modulations in and out while you play.
That makes it much more flexible than a basic wheel equals vibrato setup. It can still do classic vibrato, of course, but it can also bring in filter movement, tremolo, Poly animation, stepped pitch motion, or several things at once depending on how you’ve configured the LFO Mixer.
Tip: Think of the Mod Wheel as a performance fade-in for movement. Use it for the things you want to introduce gradually, not the things that should always be active.
Tip: One of the most musical uses is to keep a patch stable at first, then use the Mod Wheel to bring in vibrato, filter motion, or animated texture as the note sustains.
How Mod Wheel and LFO’s Mixer Work Together
The easiest way to think about it is this:
The LFO’s Mixer decides what gets modulated, which LFO does it, and how much modulation is available. The Mod. Wheel decides how much LFO 3 modulation is actually brought in during performance when LFO 3 is set to Wheel In.
That means the LFO's Mixer handles the programming, while the Mod Wheel handles the performance side of the same idea.
For example, you might:
route a slot so that LFO 3 controls VCO 1 & 2 Pitch for vibrato
route another slot so that LFO 3 controls VCF Cutoff for filter motion
set useful amounts for both
then use the Mod Wheel to introduce that motion gradually as you play
Or you might set up something stranger, like stepped LFO motion to pitch or VCA level, and only bring it in when the phrase needs to get unstable.
Tip: The Mod Wheel becomes much more interesting when it controls more than one thing at once. A little pitch vibrato plus a little filter motion often feels far more interesting than either one alone.
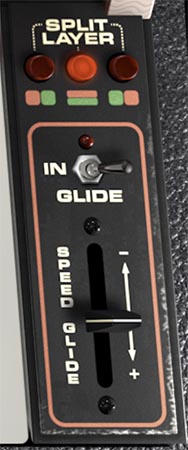
Glide
The Glide section controls portamento, the smooth sliding transition from one note to the next. The Glide IN switch turns glide on or off for the patch. The Glide Speed slider sets how quickly the pitch slides between notes. Lower settings produce a faster, tighter glide. Higher settings create a slower, more obvious pitch transition.
This is one of the classic synth performance controls, but on the DS-2 it can do more than just the expected solo-synth slur. Glide can make mono leads sound fluid and vocal, basses sound greasy and elastic, and even more experimental patches take on an unstable, sliding quality.
The right glide setting depends a lot on the role of the patch. A tiny bit of glide can make a lead feel smoother and more expressive without calling attention to itself. A larger amount can become a defining part of the sound.
Tip: For lead sounds, start with just a little Glide. Enough to smooth note transitions, not so much that every phrase sounds seasick.
Tip: For basses, glide works best when it feels intentional. Too much can blur the groove.
Practical Ways to Use the Performance Controls
A strong DS-2 lead patch often benefits from all three performance controls working together.
Use Pitch Bending for note inflection and expressive phrasing.
Use the Mod Wheel to bring in vibrato or filter motion via LFO 3 only when needed.
Use a little Glide to smooth the connection between notes.
That combination gives you a patch that feels more playable and musical than one that just sits there at full intensity all the time. For more dramatic sounds, try increasing Bending Range, enabling Glide, and assigning the Mod Wheel to more animated LFO Mixer routings. For more restrained playing, keep bend range smaller, use subtle glide, and let the Mod Wheel bring in only a little movement. That approach often works better for melodic parts, chord textures, and patches that need to sit naturally in a mix.
Creative Performance Ideas
For classic synth lead playing, set a moderate Bending Range, add a little Glide, and use the Mod Wheel to bring in pitch vibrato from one of the LFO Mixer slots.
For expressive bass patches, keep Glide fairly short, use a smaller bend range, and reserve the Mod Wheel for filter movement or subtle tremolo instead of obvious pitch modulation.
For dramatic electronic effects, increase Bending Range toward the upper end, assign a stepped LFO in the LFO’s Mixer, and use the Mod Wheel to fade in unstable motion while performing.
For layered Synth + Poly patches, use the Mod Wheel to animate the Synth side more aggressively while the Poly layer stays stable. That contrast can make a patch feel larger and more dimensional.
Tip: One of the best DS-2 tricks is to let the patch begin in a controlled state, then use the Mod Wheel to push it into more animated territory. It feels more expressive, and it keeps the sound from revealing its full expression at once.
Tip: Glide and Pitch Bend together can be very effective, but they can also step on each other if overused. Usually one should handle the phrase shape, while the other adds emphasis.
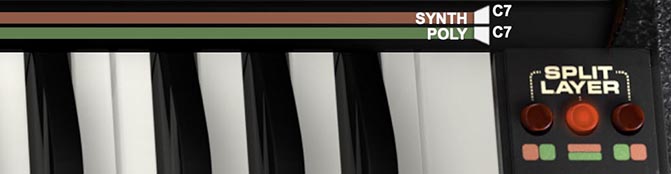
Splits and Layers
DS-2 lets you divide the keyboard between the Synth and Poly engines, or stack them together across the same range for layered sounds. These controls live directly above the keyboard, where two color-coded bars show the current key ranges: red for Synth and green for Poly.
To set the playable range for either engine, drag the white handles at the left and right ends of the bars. The left handle sets the lower note limit, and the right handle sets the upper note limit. As you drag, the note names update on screen, so you can see exactly where each zone begins and ends. It’s a fast, visual way to build anything from bass-and-lead splits to layered composite patches.
Split/Layer Selector
To the right of the keyboard is the Split/Layer selector, with three mode buttons that determine how the two engines are arranged across the keyboard. The left setting places Synth on the lower part of the keyboard and Poly on the upper part. The center setting layers both engines together across the same range, so each note can trigger both sections at once. The right setting flips the arrangement, placing Poly on the lower part of the keyboard and Synth on the upper part.
This makes DS-2 unusually flexible as a performance instrument. You can create classic split setups with a solid Synth bass in the left hand and a brighter Poly part on top, or build rich layered sounds that combine the character of both engines into one larger, more animated patch.
A useful thing to remember is that the red and green bars are the map. If something seems to be missing, sounding only in one register, or not layering the way you expected, check those range bars first. They tell you exactly where Synth and Poly are allowed to play.
Tip: Split mode is great for practical stage-style patches, like bass below and chords above. Layer mode is where things get thick. Stack Synth and Poly together, then use their separate tone controls, envelopes, and effects to create sounds with more width, motion, and complexity than either engine can deliver on its own.