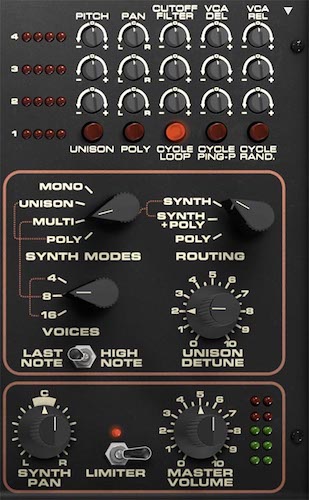
At this point, we’ve looked at the DS-2 in terms of tone and the way Synth and Poly can be layered together. This section is about something slightly different. It’s about behavior. In other words, how the DS-2 plays, how it assigns voices, how it stacks them, and how it can be made to sound tight, wide, orderly, unstable, or half-broken on purpose.
This is one of the sections that makes the DS-2 feel especially modern and flexible. The controls here determine whether the synth behaves as a mono instrument, a stacked unison monster, a more conventional polyphonic synth, or organic per-voice warmth in Multi mode. Add in note priority, unison detune, voice count, output limiting, and Synth panning, and this area becomes a big part of how the instrument feels under your fingers.
Synth Modes
The Synth Modes knob selects one of four operating modes for the Synth engine: Mono, Unison, Multi, or Poly.
In Mono mode, the Synth engine plays one note at a time. This is the classic mode for basses, leads, sequences, and any sound that should feel focused and immediate. Mono mode is also where note-priority behavior matters most, because when you play overlapping notes, the synth has to decide which note wins.
In Unison mode, multiple voices are stacked together on a single note. The number of stacked voices is determined by the Voices selector, so if Voices is set to 4, 8, or 16, that is how many voices are layered in the unison stack. This is where the DS-2 can become huge and dense.
In Multi mode, the synth still uses multiple voices, but instead of simply stacking them identically, it lets you introduce per-voice differences in pitch, pan, filter cutoff, VCA delay, and VCA release. This is one of the most distinctive features in the whole instrument. It lets the DS-2 behave less like a conventional polysynth and more like a collection of related but slightly different voices.
In Poly mode, the Synth engine behaves like a standard polyphonic instrument, with voices distributed across played notes in the usual way. This is the most straightforward mode for chords and more traditional multi-note playing.
Tip: Start with Mono when you want precision, Unison when you want size, Poly when you want normal chord behavior, and Multi when you want motion, spread, and note-to-note variation.
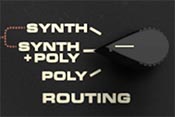
Routing
The Routing knob determines which engine architecture is active: Synth, Synth + Poly, or Poly.
In Synth mode, only the Synth engine is heard. In Poly mode, only the Poly engine is heard. In Synth + Poly, both engines are active together. We’ve covered the musical importance of this earlier, but it’s worth restating here because it works hand in hand with the Synth Modes control.
The key thing to remember is that Synth Modes determines how the Synth engine behaves, while Routing determines whether you’re hearing the Synth engine, the Poly engine, or both together.
Tip: If a patch seems confusing, check Routing first, then Synth Modes. Those two controls together explain a lot.
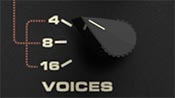
Voices
The Voices selector chooses the global voice count: 4, 8, or 16.
This setting applies globally to the instrument’s voice behavior. In Poly mode, it determines the maximum number of notes available. In Unison mode, it determines how many voices are stacked on each note. In Multi mode, it determines how many total voices are available for cycling, spreading, or per-voice variation.
The difference is not just about more notes. Higher voice counts can change how thick Unison feels, how elaborate Multi behavior becomes, and how much complexity the synth can sustain before notes begin stealing from one another.
Tip: Use 4 voices when you want a tighter, more constrained feel or a smaller unison stack. Use 8 as a flexible middle ground. Use 16 when you want the widest unison spreads, the richest Multi behavior, or plenty of room for sustained playing.
Last Note / High Note
The Last Note / High Note switch sets note priority behavior for monophonic playing.
In Last Note mode, the most recently played key takes priority. This is the most common and generally most fluid choice for leads and expressive mono playing, because it follows your hands naturally as you overlap notes.
In High Note mode, the highest note currently held takes priority. This can be useful for certain lead styles, especially when you want upper notes to cut through or you want a more vintage, performance-specific kind of response.
Tip: Last Note usually feels more natural for melodic playing. High Note can be great for aggressive solos, held drones with melodic top notes, or any part where you want the upper note total priority.
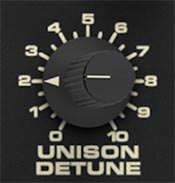
Unison Detune
The Unison Detune knob sets the amount of pitch spread between stacked voices in Unison mode.
At lower settings, the unison stack stays relatively tight and focused. As you increase the control, the stacked voices spread farther apart in pitch, producing a thicker, wider, more animated sound. Small amounts add subtle richness. Larger amounts create lush chorusing, orchestral thickness, or outright synth excess.
This control really comes alive when paired with higher voice counts. A small amount of detune across 8 or 16 stacked voices can sound impressively large. A big amount can turn the DS-2 into a wall of animated pitch smear, which can be wonderful or ridiculous depending on your intentions.
Tip: Start with less detune than you think you need. A little goes a long way once you’re stacking a lot of voices.
Tip: For wide unison sounds that still stay punchy, keep Detune moderate and let effects handle the extra width.
Multi Mode
Multi mode is where the DS-2 starts feeing organic and even unstable in a very appealing way. Instead of treating every voice as an identical copy, Multi mode lets you offset each voice in specific ways. You can introduce per-voice differences in Pitch, Pan, Cutoff Filter, VCA Del, and VCA Rel. This allows patches to feel more organic, more animated, more spatially distributed, or simply less uniform and static.
In plain English, Multi mode lets each voice of the Synth section have a bit of its own personality. That can be subtle, like slight detuning and panning differences that make a sound feel more alive. Or it can be dramatic, like intentionally offsetting pitch and filter settings so repeated notes cycle through clearly different tonal states.
Multi mode is one of the best ways to make the digital oscillators of the Synth section feel more organic, less locked-in, and less predictable.
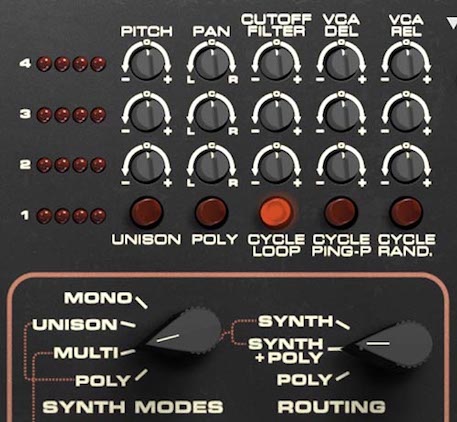
The Multi Controls
The visible Multi panel provides four voice rows, labeled 1, 2, 3, and 4. Row 1 has red LED buttons that designate the Multi Voice Assignments (see below). Rows 2, 3 and 4 include five "trimmer" controls that are for offsets for the settings reflected in the Synth section main panel:
Pitch - offsets the pitch of that voice up or down relative to the base patch pitch
Pan - places that voice left, center, or right in the stereo field
Cutoff Filter - offsets the filter cutoff for that voice, making it brighter or darker relative to the main filter setting
VCA Del - offsets the VCA delay for that voice, so some voices can begin slightly later than others
VCA Rel - offsets the VCA release for that voice, so some voices can fade faster or linger longer
Again, note that that the trimmers of rows 2-4 are offset controls, not absolute replacements for the main panel settings, including Synth Pan in the panel at the bottom right.
These offsets can be used gently for realism or aggressively for stylized movement and voice differentiation.
Tip: Small Pitch and Pan offsets are often enough to make a patch feel wider and more alive without sounding obviously effected.
Tip: Cutoff Filter offsets are especially useful for giving repeated notes a subtle analog-style inconsistency.
Tip: VCA Del and VCA Rel are great for making notes start and end unevenly, which can create a more natural or more haunted feel depending on how far you push them.
Four Visible Rows, More Total Voices
When the global Voices setting is 8 or 16, the four visible rows do not represent all voices at once. Instead, they represent the currently selected block of four voices.
In other words, the panel always shows four voice rows at a time, but those rows can address different groups of voices depending on the current voice count and selection state. This lets you edit large voice sets in manageable groups of four rather than trying to cram sixteen sets of controls into one screen and ruin everyone’s afternoon.
So in 8-voice mode, the display cycles through two groups of four voices. In 16-voice mode, it cycles through four groups of four voices.
Tip: When editing Multi mode in 8 or 16 voices, keep track of which voice block you’re changing. It’s easy to think you’re editing the sound when you’re really editing just one group of four voices.
Multi Voice Assignment Buttons
At the bottom of the Multi section are five mode buttons:
Unison - stacks voices together according to the current Voices setting. In this state, the synth behaves as a stacked voice instrument rather than cycling through separate voices.
Poly - uses normal polyphonic voice assignment with no special cycling pattern.
Cycle Loop - assigns voices in a round-robin loop, moving through them in order. This is useful when you want per-voice differences to repeat in a predictable sequence.
Cycle Ping-P - moves through voices forward and backward in a ping-pong pattern. This creates a slightly more varied repeating behavior than a straight loop.
Cycle Rand - assigns voices randomly, which makes per-voice differences feel less patterned and more unpredictable
These determine how the voices are assigned or cycled in Multi-related operation.
Tip: Cycle Loop is great when you want a repeating pattern of variation. Cycle Rand. is better when you want the patch to feel looser and less programmed.
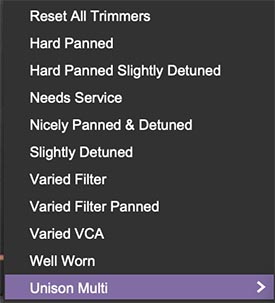
Multi Presets
The Multi section includes a preset menu, accessed by clicking the white triangle at the top right of the Multi controls.
This menu provides a number of useful preset configurations, including:
Reset All Trimmers
Hard Panned
Hard Panned Slightly Detuned
Needs Service
Nicely Panned & Detuned
Slightly Detuned
Varied Filter
Varied Filter Panned
Varied VCA
Well Worn
These presets are excellent starting points because they immediately set up the kind of per-voice variation that makes Multi mode shine. Some are subtle. Some are more exaggerated. And at least one, Needs Service, is quite extreme.
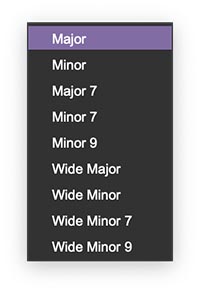
The menu also includes a Unison Multi submenu with preset interval structures such as:
Major
Minor
Major 7
Minor 7
Minor 9
Wide Major
Wide Minor
Wide Minor 7
Wide Minor 9
These are especially useful in stacked voice contexts, where Unison can become a harmonically structured chord stack rather than just a detuned pileup.
Tip: Don’t overlook the Multi presets. They’re one of the fastest ways to understand what this section can do.
Tip: Well Worn and Needs Service are perfect when a patch feels too pristine and needs some blatant instability.
Tip: The Unison Multi presets are great for instant chord stacks, cinematic intervals, and "one finger" patches.
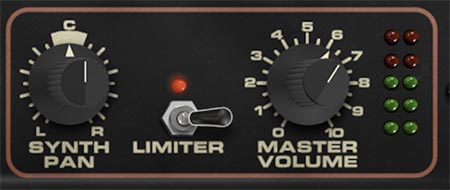
Synth Pan, Limiter, and Master Volume
Synth Pan
The Synth Pan knob places the Synth engine only in the stereo field, from left to center to right. This does not pan the Poly engine. It affects only the Synth side of the instrument, which makes it especially useful when you are working in Synth + Poly mode and want the two layers to occupy different spatial roles.
Tip: A small amount of Synth Pan can create more separation between Synth and Poly layers without making the patch feel lopsided.
Tip: If the Poly layer is broad and stable, nudging the Synth slightly off-center can help it sit more clearly in a dense mix.
Limiter
The Limiter switch turns the output limiter on or off. Its job is to help control peaks and keep louder patches from getting too unruly at the final output stage. This is especially useful with stacked Unison sounds, heavily modulated patches, bold effects settings, or anything else likely to produce sudden level jumps.
The limiter can also help patches feel a little more solid and controlled, particularly when you’re pushing the synth into bigger, denser territory.
Tip: If a patch gets unexpectedly jumpy or peak-heavy, especially in Unison or with aggressive effects, try enabling the Limiter before you start tearing the patch apart.
Master Volume
The Master Volume knob sets the overall output level of the instrument. This is the final level control for the patch as a whole. Simple, necessary, and refreshingly free of mystery. The LED meter beside it gives you a visual indication of output level, helping you keep an eye on how hard the synth is hitting the output stage.
Tip: When comparing patches, try to level-match them with Master Volume. Louder often sounds “better” for about five seconds, which is one of the oldest scams in audio.
Practical Ways to Use This Section
If you want a strong mono lead, start with Mono mode, Last Note priority, and Synth routing.
If you want a huge stacked lead or bass, switch to Unison, raise the Voices count, and add a little Unison Detune.
If you want animated repeated-note variation, use Multi mode with Cycle Loop or Cycle Rand., then introduce small offsets in Pitch, Pan, and Cutoff Filter.
If you want instant chord-stacked synth impact, explore the Unison Multi presets.
If you’re layering Synth + Poly, use Synth Pan to separate the Synth engine slightly from the Poly layer.
And if the whole thing starts sounding like it might take the roof off, that’s what the Limiter is for.