Before you shape a sound with filters, envelopes, modulation, and effects, you need something worth shaping. On the DS-2, that starts with two main Synth oscillators, a dedicated Noise source, and the separate Poly section. And as with much else on this instrument, these sound sources don’t always behave quite like other synths.
Part of the DS-2’s distinctive tone comes from the nature of its digital oscillator design. These aren’t silky, ultra-clean modern digital oscillators, and they don’t behave like classic free-running analog VCOs either. Their waveforms have a slightly stepped, harmonically edgy quality (particularly on the triangle and sine waves) that gives the DS-2 its unmistakable bite. There’s a grain to the sound. It’s one reason the synth can sound bold and unusual even before you touch the filters. Instead of trying to disguise that character, the best patches usually make use of it.
Here's what the oscillator's waveforms look like:
The Synth section gives you two oscillators, each with its own level, tuning, octave range, and waveform selection, plus a few tricks that help the DS-2 move from straightforward to bold. The Noise source adds everything from subtle breath and grit to full-on hiss, and synthetic percussion. The Poly section works differently, but it plays an equally important role, especially when you want width, weight, or a contrasting layer that complements the voice of the main Synth engine.
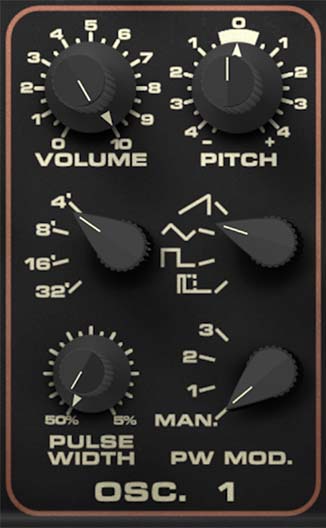
Oscillator 1
Oscillator 1 is the more fully featured of the two main Synth oscillators, and in many patches it acts as the core identity of the sound.
The Volume knob sets the output level of Oscillator 1. This is the simplest control on the panel, but it matters more than you might think. Because the DS-2 has two Synth oscillators, Noise, and the Poly layer all contributing to the overall patch, level balance is a big part of patch design. Turning Oscillator 1 up makes it more dominant in the sound. Pulling it back can make room for Oscillator 2, Noise, or the Poly section to take on a larger role.
The Pitch knob adjusts Oscillator 1’s tuning over a wide range, up to one octave above or below its current octave setting. Use this for coarse detuning, interval-based tuning, or for pushing Oscillator 1 into a very different register from Oscillator 2. Small adjustments can add thickness and motion. Larger adjustments can create octave spreads or more obviously tuned intervals.
The Octave selector chooses the oscillator’s base register: 32', 16', 8', or 4'. Lower settings produce deeper pitches, while higher settings shift the oscillator upward. This is the first place to set the oscillator’s general role in the sound. A lower setting is useful for bass foundations and heavier patches. Higher settings can add brightness, edge, or a more cutting lead character.
The Waveform selector chooses among sawtooth, triangle, square, and pulse. Each waveform has its own personality. Sawtooth is typically the boldest and richest, with plenty of upper harmonics for an assertive, harmonically busy sound. (It is interesting to note that although the original Crumar DS-2 hardware depicted a ramp icon for this waveshape, the synth actually generates a classic sawtooth wave. We have followed their precedent here with our DS-2.) The Triangle wave is softer and more restrained, making it useful when you want a rounder or less aggressive tone. (It also has some of the most noticeable harmonic artifacts.) Square has a hollow, woody quality that often feels a little more characterful and vocal. Pulse is where things get especially interesting, because its tone can change dramatically depending on pulse width.
The Pulse Width knob adjusts the width of the pulse waveform from 50% down to 5%. At wider settings, pulse sounds fuller and more square-like. As you narrow it, the tone becomes thinner, brighter, and more nasal, with a sharper, more animated edge. Narrow pulse widths can sound wonderfully wiry and strange on the DS-2, especially because of the synth’s already distinctive digital character.
The PW Mod. knob controls pulse-width modulation. This lets you animate the pulse shape rather than leaving it fixed in one position. On the DS-2, this control can select LFO 1, LFO 2, LFO 3, or Manual operation by turning the knob itself. In practice, that means you can either set a fixed pulse-width value or have one of the LFOs continuously modulate it. Pulse-width modulation is one of the easiest ways to make a patch feel alive. Slow modulation adds gentle movement and width. Faster modulation can sound edgy, nervous, or delightfully unstable. And because the DS-2’s oscillators already have such a distinctive texture, PWM here can sound especially vivid.
A good way to think about Oscillator 1 is as the sound source that defines the patch’s center of gravity. Start by choosing its octave and waveform, then use pulse width or pulse-width modulation to add complexity if the sound needs more motion.
Tip: If a patch feels static but already has enough harmonic content, try pulse-width modulation before reaching for effects. It often adds movement in a more organic, part-of-the-sound way.
Tip: Experiment with the Pulse Width knob and wave shape of the LFO selected you have selected with the PW Mod switch — especially the stepped ramp wave on LFO 2 and LFO 3. You can create some wonderfully weird harmonic effects you won't find on any other synth..
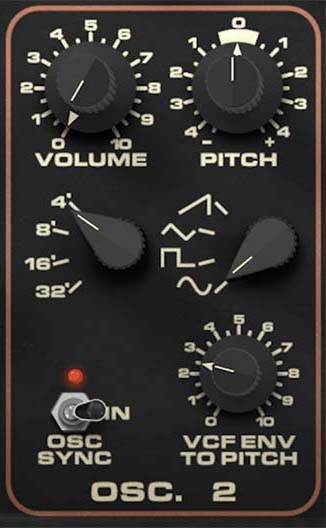
Oscillator 2
Oscillator 2 complements Oscillator 1, but it also brings a few special tricks of its own.
The Volume knob sets the output level of Oscillator 2. As with Oscillator 1, this is a major tone-shaping decision, not just a gain control. A quieter Oscillator 2 can add subtle depth or harmonic support. A louder one can create obvious layering, beating, or interval color against Oscillator 1.
The Pitch knob adjusts Oscillator 2 up or down by as much as one octave relative to its octave setting. Used subtly, this is perfect for slight detuning and thickening. Used more dramatically, it lets Oscillator 2 become a harmonic partner rather than just a double. Tuning it an octave apart from Oscillator 1 can create broad, commanding sounds. Setting it to an interval can make the synth feel almost paraphonic in spirit, even when it’s doing one-note business.
The Octave selector chooses the base register: 32', 16', 8', or 4'. As with Oscillator 1, this sets the oscillator’s general pitch range and role in the patch.
The Waveform selector chooses sawtooth, triangle, square, or sine. This gives Oscillator 2 a slightly different flavor palette from Oscillator 1. Our addition of a sine waveform here is especially useful, because it gives you a cleaner, more fundamental-heavy option that can either soften the overall sound or create stronger contrast with the more harmonically complex waveforms elsewhere. A sine mixed underneath a brighter Oscillator 1 waveform can reinforce pitch and low-end body without making the patch feel too busy. At the same time, like the triangle wave on Osc 1, the sine wave on Osc 2 has some pronounced harmonic artifacts that make it an interesting choice — especially when used with the Arpeggiator or OSC Sync when the octave-to-octave harmonic differences are easy to hear.
The OSC Sync switch has two positions: Off and In. When sync is enabled, Oscillator 2 is hard-synced to Oscillator 1. In practical terms, Oscillator 2 is forced to restart its waveform cycle in relation to Oscillator 1, which creates the bright, tearing, harmonically animated character associated with oscillator sync. This is classic synth trouble in the best sense. Once sync is engaged, changing Oscillator 2’s pitch no longer behaves like simple retuning. Instead, it changes the harmonic content of the synced sound, producing those sharp, expressive sync sweeps that can make leads and effects sound dramatic and alive. And again, the harmonic artifacts in Osc 2 produce some very interesting and unique sonics when its pitch is modulated with VCF Env to Pitch.
The VCF Env to Pitch knob routes the filter envelope to Oscillator 2 pitch. At modest settings, it can add a small pitch snap or attack transient at the start of a note. That’s useful for making basses, leads, and percussive sounds feel more immediate. At higher settings, it can create obvious pitch dives, blips, or synth-zap effects. Combined with oscillator sync, this can get nicely rude very quickly.
A useful way to think about Oscillator 2 is that it’s both a companion and a source of added character. Sometimes it supports Oscillator 1 with extra weight or detune. Sometimes it becomes the source of sync aggression, pitch-envelope attack, or harmonic complexity.
Using Oscillators 1 and 2 Together
If you want a thick, classic-style sound, start by choosing similar octave settings and slightly detuning one oscillator against the other. That creates gentle beating and width. If you want a brighter, more dramatic patch, try setting the oscillators an octave apart. If you want more edge, put a harmonically rich waveform like sawtooth or square on one oscillator and contrast it with a contrasting waveform on the other.
If a patch feels too static, try pulse-width modulation on Oscillator 1. If it feels too polite, try engaging sync on Oscillator 2 then using its Pitch control or VCF Env to Pitch amount to introduce movement and attack. And if the sound starts getting unruly, all the better.
Tip: One easy DS-2 trick is to let Oscillator 1 establish the main tone, then use Oscillator 2 for just a little detune, sync bite, or envelope-driven attack. It’s often more effective than making both oscillators equally busy.
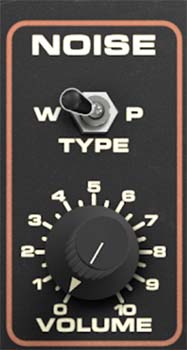
Noise
Cherry Audio's DS-2 also adds a dedicated Noise source, and it’s more useful than you might realize. Noise isn’t just there for explosions and wind effects. It can add breath, attack, texture, dirt, and realism to an otherwise too-clean patch.
The Volume knob sets the level of the Noise source. At low settings, noise can add just a hint of air or grit behind the pitched elements. At higher settings, it becomes a more obvious part of the sound, useful for percussion, harsh effects, aggressive synth brass, or washed-out atmospheric textures.
The Type switch selects between white noise and pink noise. These are labeled W and P. White noise is brighter and more hissy, with a more even spread of high-frequency energy. It’s useful when you want crisp attack, sharper edge, or obvious sizzle. Pink noise is softer and more weighted toward the lower and midrange spectrum, so it tends to sound rounder, fuller, and less abrasive. It often blends more naturally into a patch when you want texture without a lot of top-end.
The creative value of Noise is in how it interacts with the rest of the synth. A small amount of white noise can sharpen the front edge of a bass or lead patch. Pink noise can make a layered sound feel fuller and more diffuse. Either one can help a patch feel less sterile and more alive, especially when the main oscillators are doing something tuned or harmonically precise.
Tip: If a patch sounds too clean or pure, add a little Noise before doing anything drastic.
Tip: Use white noise when you want bite, fizz, or attack. Use pink noise when you want body, softness, or a more blended wash of texture.
The Poly Section
The Poly section isn't just an afterthought or a simple pad layer on the side. It’s a crucial part of the DS-2’s personality. When used on its own, it gives you a different kind of voice from the main Synth engine. When layered with the Synth side, it adds complexity, texture, and contrast in a way that can make patches feel much more sonically interesting.
The Octave selector sets the Poly section’s register to 16', 8', or 4'. This establishes the basic pitch range for the Poly sound. Lower settings are useful when you want the Poly layer to add body and support. Higher settings can help it sit above the Synth engine and add definition or a brighter harmonic cushion.
The Pitch knob fine-tunes the Poly section by up to a fourth in either direction (five semitones). It allows small detuning for width and chorus-like spread, but it also makes it easy to tune the Poly layer to meaningful intervals against the Synth engine. You can keep it nearly centered for subtle thickening, or push it farther for more obviously layered harmonic relationships.
The VCA Release knob (which was not present in the original hardware) sets the release time for the Poly section’s amplifier. This is independent of the main Synth VCA or VCF release settings, and that independence is a big deal. It means the Poly layer can continue trailing off after the Synth sound has already stopped, which is useful for building layered patches with depth. You can keep the Synth side short and punchy while allowing the Poly section to linger behind it like a tail of harmony or atmosphere. That kind of contrast is one of the DS-2’s best tricks.
The High Pass and Low Pass knobs are best thought of more like simple EQ controls than classic resonant high-pass and low-pass filters. They let you shape the tonal balance of the Poly section by trimming or emphasizing different frequency areas, but they aren’t intended as dramatic synthesizer filter sweeps in the usual sense. The High Pass control adjusts the brightness or upper-edge emphasis of the Poly sound, while the Low Pass control shapes the lower or fuller part of the spectrum. Together, they let you sculpt the Poly layer so it either blends smoothly with the Synth engine or contrasts with it.
That's important because the Poly section often works best when it occupies a complementary frequency role. If the Synth side is already bright and cutting, you might shape the Poly layer to be softer and fuller. If the Synth sound is heavy and dense, you might trim the Poly layer so it adds air and dimension without getting in the way.
The Volume knob sets the overall level of the Poly section. As with the oscillator level controls, this is really a role-setting parameter. Turning the Poly level up makes it a major part of the patch. Pulling it back lets it function as subtle support that's felt more than its heard.
Tip: One of the DS-2’s best layering tricks is to keep the Synth sound relatively dry and punchy, then let the Poly layer be softer, wider, and longer. This allows you to create depth without making the patch feel crowded.
How to Use the Poly Section Well
If the Synth engine gives you attack, edge, and definition, the Poly section can give you width, softness, and sustain. If the Synth patch feels too dry or narrow, a little Poly can make it grow. If the Synth sound is already busy, the Poly section can be shaped into a simpler, steadier layer that fills out the sound without competing for attention.
Its independent release control is especially powerful. One of the easiest and most effective DS-2 patch-building strategies is to keep the Synth engine relatively short and immediate, then let the Poly section hang on longer. That creates a natural front-to-back sense of depth, with the Synth sound defining the attack and the Poly voice providing the lingering afterglow.
Practical Sound Design Ideas
A strong starting point for a bold DS-2 patch is to build a focused Synth sound first, then bring in the Poly section as support. Set Oscillator 1 to a strong waveform, add Oscillator 2 for detune or sync character, then use the Poly section to widen the sound and soften the edges around it.
For bass patches, keep the Poly section restrained or tuned carefully so it supports the fundamental rather than muddying it. For leads, the Poly section can add a haunting or cinematic tail behind the main Synth voice. For pads and layered textures, the interaction between the edgy Synth oscillators and the smoother, broader Poly section is where the instrument starts sounding especially distinctive.
Noise also plays an important role here. A touch of white noise can help a lead cut. A little pink noise can make a pad feel more atmospheric. And when combined with the DS-2’s distinctive oscillator tone, noise can help push sounds from merely vintage-inspired into genuinely characterful territory.
And if you want the DS-2 to sound most like itself, don’t try to make every part of the patch perfectly smooth and polite. Let the oscillators keep some of their bite. Let the layers contrast. Let the Poly section do a different job from the Synth engine. Let noise add a little breath or grime where needed.