Arpeggiator and Sequencer
The Motion view is where ESQ-1 turns held notes, programmed steps, and modulation routings into musical movement. It contains two closely related tools: the Arpeggiator and the Sequencer.
The Motion view is where ESQ-1 turns held notes, programmed steps, and modulation routings into musical movement. It contains two closely related tools: the Arpeggiator and the Sequencer.
The Arpeggiator takes the notes you play and turns them into repeating patterns.
The Sequencer lets you program up to 16 steps (x 4 patterns) of notes, chords, rests, ties, or modulation changes. Together, they can create bass lines, pulsing chords, animated textures, evolving modulation patterns, and rhythmic phrases that can be played, transposed, reshaped, and performed in real time.
Think of the Motion view as ESQ-1’s movement engine. You can use it to generate ideas, drive patterns, animate modulation, or turn a simple sound into something that feels like a performance.

The Motion view is divided into two main areas.
The Arpeggio section is on the left. It creates arpeggiated patterns from notes you play or hold.
The Sequencer section occupies the center and right side of the page. It contains step buttons, playback controls, keyboard control options, Macro Motion, pattern selection, programming tools, timing controls, and layer start/stop buttons.
The basic difference is simple:
The Arpeggiator transforms notes you play into patterns.
The Sequencer stores step-based information and plays it back.
The Sequencer can also do something especially useful: it can function as a modulation sequencer instead of a note sequencer. That means it doesn’t always have to play notes. It can also create step-based changes in modulation amount, allowing a held sound to pulse, brighten, shift, or evolve rhythmically.
Tip: Use the Arpeggiator when you want played notes transformed into a pattern. Use the Sequencer when you want to program the pattern yourself, or when you want the pattern to control modulation instead of notes.
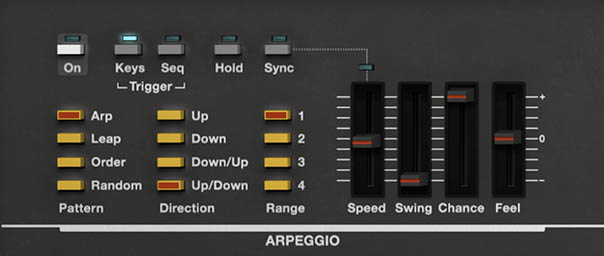
The Arpeggiator turns held notes into repeating patterns. Hold a chord, and the arpeggiator plays its notes one at a time according to the selected trigger, pattern, direction, range, speed, and groove settings.
This is useful for classic pulsing synth lines, bass patterns, rhythmic comping, cascading melodic figures, and happy musical accidents caused by one chord inspiring new ideas.
Controls:
• On – Turns the arpeggiator on or off. When enabled, played or held notes are processed by the arpeggiator. When disabled, notes play normally.
• Trigger: Keys / Seq – Determines what drives the arpeggiator. Keys means the arpeggiator is triggered by notes you play or hold. Seq means the arpeggiator is driven by the Sequencer.
• Hold – Keeps the arpeggiator running after you release the keys. Play a new chord or note group to change the held pattern.
• Sync – Locks arpeggiator timing to the master tempo. In plug-in use, this follows your DAW tempo. In standalone use, it follows ESQ-1’s internal tempo.
• Pattern: Arp / Leap / Order / Random – Chooses how the arpeggiator selects notes from the notes you’re holding. Arp provides classic arpeggiator behavior. Leap creates wider note movement. Order plays notes in the order you entered them. Random plays held notes in unpredictable order.
• Direction: Up / Down / Down-Up / Up-Down – Determines the movement direction of the arpeggio.
• Range: 1–4 – Sets how many octaves the arpeggiator spans. Lower ranges stay close to the notes you’re holding. Higher ranges create wider, more dramatic movement.
• Speed – Controls how fast the arpeggiator plays. When Sync is enabled, Speed follows tempo-based divisions.
• Swing – Adds groove by shifting the timing of alternating steps.
• Chance – Controls the probability that notes will play. Lower settings skip more notes, creating gaps and variation.
• Feel – Adjusts the timing character of the arpeggio, helping the pattern feel more relaxed, more urgent, or less rigid.
Tip: Start with Pattern: Arp, Direction: Up, Range: 1 or 2, Sync: On, and a steady Speed. Once the basic pattern feels good, add Swing, Chance, or a wider Range for movement.
The Trigger buttons determine whether the arpeggiator responds directly to your playing or follows the Sequencer.
Keys is the classic arpeggiator mode. Play or hold notes, and the arpeggiator cycles through them.
Seq lets the Sequencer drive the arpeggiator. This can create more complex rhythmic and melodic behavior because the sequencer provides structure while the arpeggiator adds pattern movement.
Tip: Use Keys when you want a traditional playable arpeggio. Use Seq when you want the sequencer and arpeggiator to interact.
Classic Synth Arp
Use Arp, Up, Range 1 or 2, Sync On, and a steady Speed. Add a little Swing if the pattern feels too stiff.
Cascading Digital Pattern
Use Leap, set Range to 3 or 4, lower Chance slightly, and add delay. This works beautifully with bright waves and moderate filter movement.
Generative Motion
Use Random with Chance below maximum. Add delay or reverb so skipped notes create space and the effects fill in the gaps.
Hands-Free Performance
Enable Hold, then adjust filter cutoff, Macros, or effects while the arpeggio runs. This lets the arpeggiator behave more like a living performance part than a static pattern Sequencer.
The Sequencer is a 16-step pattern and motion engine. It can record and play back notes or chords, but it can also be used as a modulation sequencer. This dual role is central to understanding the Motion view.
When Trigger Notes is selected, the Sequencer plays note events. Steps can contain notes, chords, rests, ties, and related musical step data.
When Mod Source is selected, note triggering is disabled, and the Sequencer acts as a modulation source instead. In this mode, the steps define modulation values rather than notes.
In other words:
Trigger Notes = the Sequencer plays notes.
Mod Source = the Sequencer animates modulation.
Tip: If a sequence is playing notes when you expected modulation, check whether Trigger Notes is selected. If nothing is triggering notes, check whether Mod Source is selected.

Controls:
• Trigger Notes / Mod Source – Selects whether the Sequencer plays note events or acts as a modulation source. Trigger Notes enables note sequencing. Mod Source disables note triggering and lets the Sequencer create step-based modulation values.
• Step Buttons 1–16 – Represent the steps in the pattern. In note sequencing, steps can contain notes, chords, rests, or ties. In modulation sequencing, steps can define modulation values.
• Step Length – Sets the active sequence length. Click the step number below a step button to set the sequence length. For example, clicking 12 creates a 12-step sequence.
• Playback: Once / Loop / Ping-Pong / Random – Determines how the sequence moves through its steps. Once plays the sequence one time. Loop repeats it. Ping-Pong plays forward and backward. Random plays steps unpredictably.
• Keyboard Control: Seq On / Seq Off / Step Adv / Transpose – Determines how the keyboard interacts with the Sequencer. Seq On starts playback from the keyboard. Seq Off stops playback from the keyboard. Step Adv advances one step at a time from key presses. Transpose lets you transpose the running sequence from the keyboard.
• Live Rec – Records performance into the Sequencer in real time.
• Step Program Mode: Erase / Note / Tie / Steps – Provides tools for entering and editing sequence data step by step.
• Pattern A / B / C / D – Selects one of four pattern slots. Each pattern can store its own sequence data.
• Sequence: Manual / x1 / x2 / x4 – Determines how patterns advance or repeat. Manual lets you select patterns manually. x1, x2, and x4 determine how many times a pattern repeats before moving to the next pattern.
• Sync – Locks sequencer timing to the master tempo. In plug-in use, this follows your DAW tempo. In standalone use, it follows ESQ-1’s internal tempo.
• Speed – Controls playback rate. When Sync is enabled, Speed follows tempo-based divisions.
• Swing – Adds groove by shifting alternating steps.
• Chance – Controls the probability that steps will play.
• Feel – Adjusts the timing character of the sequence.
• L1 Start / L2 Start / All Start / All Stop – Starts or stops Motion playback for Layer 1, Layer 2, or both layers together.
Tip: Don’t assume every sequence needs to be 16 steps. Odd lengths such as 5, 7, 11, or 13 can create patterns that shift against a 4/4 groove in interesting ways.
To use the Sequencer as a traditional note sequencer, select Trigger Notes. Then use Live Rec or Step Program Mode to enter notes, chords, rests, ties, and sequence behavior.
A simple note-sequencing workflow:
Select Trigger Notes.
Choose Pattern A.
Set the sequence length by clicking the step number below the desired final step.
Choose a playback mode, such as Loop.
Enable Sync if you want the sequence locked to tempo.
Use Live Rec to record a performance, or use Step Program Mode to enter notes manually.
Adjust Speed, Swing, Chance, and Feel until the pattern sits musically.
Tip: For bass lines, keep the sound tight and use shorter release times. For chords, try longer steps, ties, or slower speeds. For digital plucks, reduce Chance slightly and add delay for space.
The Keyboard Control buttons let you decide how the keyboard interacts with sequencer playback.
Seq On starts the sequence from the keyboard.
Seq Off stops sequencer playback from the keyboard.
Step Adv advances the sequence one step at a time with key presses. This is useful for experimental rhythms, manual sequencing, or triggering step changes without a steady clock.
Transpose lets you transpose the running sequence from the keyboard. This turns the sequence into something you can play harmonically. Program the pattern once, then move it through different keys in real time.
Tip: Transpose is excellent for bass lines, repeating riffs, and arpeggiated-style patterns. Instead of reprogramming the sequence for every chord change, use the keyboard to shift it.
The Sequencer includes four pattern slots: A, B, C, and D. Each pattern can store its own sequence data.
This lets you create variations within a preset. Pattern A might be the main idea, Pattern B a busier version, Pattern C a breakdown, and Pattern D the “maybe this is brilliant, maybe I need sleep” version.
The Sequence controls determine how these patterns advance or repeat. Manual lets you select patterns yourself. x1, x2, and x4 determine how many times a pattern repeats before moving to the next pattern.
Tip: Use Patterns A–D to create related variations instead of trying to make one pattern do everything.
Live Rec records performance into the Sequencer in real time. Use it when you want to capture a played idea rather than entering it step by step.
Step Program Mode is better when you want precision. It lets you build or edit a sequence one step at a time.
Step Program Mode tools:
• Erase – Removes step contents.
• Note – Enters or edits note information.
• Tie – Connects notes across steps for sustained notes.
• Steps – Supports step-based entry and sequence length behavior.
Tip: Use Live Rec when feel matters. Use Step Program Mode when accuracy matters. Use both when you’re pretending this was the plan all along.
The Sequencer has its own Speed, Swing, Chance, and Feel controls.
Speed controls the playback rate.
Swing adds groove by shifting alternating steps.
Chance controls whether steps play.
Feel adjusts timing character, helping the sequence sit more naturally or push/pull against the beat.
These controls make the Sequencer more musical than a rigid row of steps. Swing can make a pattern groove. Chance can create variation. Feel can make the timing less mechanical. Speed determines whether the pattern crawls, pulses, dances, or panics.
Tip: Chance is especially useful for modulation sequencing. A filter-motion pattern with less than 100 percent Chance can create unexpected accents, gaps, and variation.
Because ESQ-1 has two independent layers, Motion playback can be started independently for each layer.
Controls:
• L1 Start – Starts Motion playback for Layer 1.
• L2 Start – Starts Motion playback for Layer 2.
• All Start – Starts Motion playback for both layers.
• All Stop – Stops Motion playback for both layers.
This makes the Motion view feel more like a performance system. One layer might run a sequence while the other remains manually playable. Both layers might run related patterns. One layer might provide a rhythmic bass while the other supplies a sequenced texture or arpeggiated upper part.
Tip: Not every layer needs to move. A steady layer underneath a moving layer often works better than two layers competing for rhythmic attention.
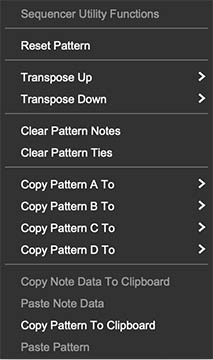
In addition to hands-on editing, the Sequencer features a dropdown menu (click the triangle in the upper-right corner of the Sequencer panel) with a set of utilities for managing your patterns quickly:
Reset Pattern – Clears the current pattern and returns all steps to their default state. This creates a clean slate when you want to start over.
Transpose Up / Transpose Down – Shifts the entire sequence up or down in pitch 1 semitone or 12 semitones (1 octave). Handy for re-keying a riff without re-entering every note.
Clear Pattern Notes – Removes all note values from the sequence while leaving ties and accents untouched.
Clear Pattern Ties – Deletes all tie information while keeping notes and accents intact.
Clear Pattern Accents – Strips away all accents, leaving note and tie data in place.
Copy Pattern A/B/C/D to– Duplicates one pattern bank into the other. Good for creating variations without starting from scratch.
Copy Note Data to Clipboard / Paste Note Data – Lets you copy just the note information from one pattern and paste it into another, even across different presets or incidents of Trident.
Copy Pattern to Clipboard / Paste Pattern – Copies or pastes the entire pattern (notes, ties, accents, the works) to or from the clipboard.
Macro Motion lets the Sequencer animate the modulation amount for one of the four Mod Matrix slots.
Normally, the four Macro sliders in the Mod view set static modulation amounts:
Macro 1 controls the amount for Mod Matrix slot 1.
Macro 2 controls the amount for Mod Matrix slot 2.
Macro 3 controls the amount for Mod Matrix slot 3.
Macro 4 controls the amount for Mod Matrix slot 4.
When Macro Motion is enabled, the Sequencer can vary one of those modulation amounts step by step. This turns a static modulation routing into rhythmic or evolving motion.
The important idea is:
The Mod Matrix defines what is being modulated.
Macro Motion defines how the modulation amount changes over time.
Controls:
• Macro Motion On – Enables Macro Motion behavior. When enabled, step values can sequence the modulation amount for the selected Macro slot.
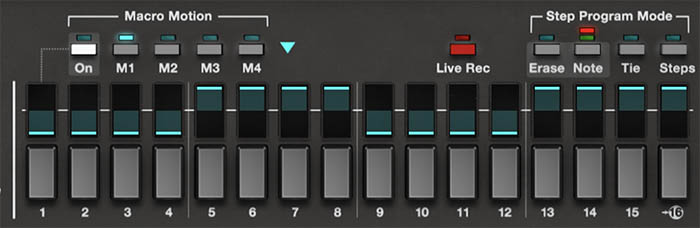
• M1 – Animates the amount for Mod Matrix slot 1 / Macro 1.
• M2 – Animates the amount for Mod Matrix slot 2 / Macro 2.
• M3 – Animates the amount for Mod Matrix slot 3 / Macro 3.
• M4 – Animates the amount for Mod Matrix slot 4 / Macro 4.
• Macro Motion Shape Menu – Opened by the turquoise triangle near the Macro Motion section. Provides preset motion shapes such as ramps, saws, alternating high/low shapes, waves, and rhythmic patterns.
Tip: Macro Motion doesn’t decide what the modulation means. The Mod Matrix does. If M1 controls filter movement, Macro Motion becomes a filter-motion sequencer. If M2 controls oscillator level, it becomes an oscillator-blend sequencer.
To use the Sequencer as a modulation tool, select Mod Source instead of Trigger Notes. In this mode, the Sequencer does not trigger notes. Instead, the steps define modulation values.
A simple Macro Motion workflow:
Go to Mod view.
Set up a modulation routing in the Mod Matrix. For example, route ENV 1 to Filter Cutoff, or LFO 1 to oscillator level.
Note which Mod Matrix slot you used: slot 1, 2, 3, or 4.
Go to Motion view.
Select Mod Source.
Enable Macro Motion On.
Choose the matching Macro Motion button: M1, M2, M3, or M4.
Adjust the step values to change the modulation amount over time.
For example, if Mod Matrix slot 1 routes ENV 1 to filter cutoff, selecting M1 lets the Sequencer vary the strength of that filter envelope movement on each step. Some steps can have a strong, bright filter sweep. Others can have little or none.
If Mod Matrix slot 2 routes LFO 1 to oscillator pitch, selecting M2 lets the Sequencer vary pitch modulation amount step by step. Vibrato might appear only on certain steps or become stronger across the pattern.
Tip: Macro Motion can make a sustained chord feel animated without triggering new notes. Hold a pad, sequence the modulation amount, and let the tone move underneath your fingers.
The turquoise triangle near the Macro Motion section opens a menu of preset motion shapes. These are useful when you want step-based modulation quickly without drawing every step manually.
Good uses:
• Ramp shapes – Gradually increase modulation across a pattern.
• Saw shapes – Create repeating rises or drops.
• Alternating high/low shapes – Create rhythmic pulsing.
• Wavy shapes – Create smoother motion.
• Rhythm patterns – Add more complex step emphasis.
Load a preset shape, listen, then edit individual steps if needed.
Tip: Preset shapes are starting points, not rules. Load one, then adjust it until it serves the patch instead of showing off the menu.

Enable the Arpeggiator, choose Keys trigger, select Arp or Order, set Direction to Up or Up/Down, enable Sync, and adjust Speed to match the track.
Tip: Add a little Swing if the part feels too stiff.
Use Leap, set Range to 3 or 4 octaves, lower Chance slightly, and add delay.
This works well with bright digital waves, moderate filter movement, and a tempo-synced delay.
Tip: If the pattern becomes too busy, reduce Range or increase Chance so fewer notes disappear unpredictably.
Program a sequence in Pattern A, enable Transpose under Keyboard Control, and use the keyboard to move the sequence through different keys.
Keep the sound tight and focused so the sequence stays clear.
Tip: Shorter release times help bass sequences stay punchy instead of blurring together.
Select Mod Source, assign M1 to a filter or oscillator-level modulation routing, enable Macro Motion, and create a slow ramp or wavy pattern.
Hold a chord and let the Sequencer animate the tone without triggering new notes.
Tip: This is one of the best uses of Macro Motion: the notes stay still, but the sound keeps changing.
Route an envelope or LFO to filter cutoff in the Mod Matrix, select the corresponding Macro Motion slot, then create a 16-step modulation pattern with higher values on accented steps.
Tip: Use lower modulation values on some steps instead of turning everything up. Contrast is what makes the accents work.
Run a note sequence on Layer 1 and use Layer 2 for a sustained pad with modulation sequencing. Or reverse the idea: let Layer 1 provide the pad while Layer 2 provides arpeggiated or sequenced detail.
Tip: Start one layer at a time with L1 Start or L2 Start. Once each layer works on its own, use All Start to hear the full motion setup.
The Motion view is powerful, so it’s easy to overbuild. If a patch feels too busy, simplify one element at a time.
Turn off the Arpeggiator and listen to the Sequencer alone. Disable Macro Motion and listen to the notes without sequenced modulation. Reduce Chance if the pattern is too dense, or raise it if too many notes are disappearing. Shorten releases if sequenced notes blur together. Reduce effects if the motion becomes cloudy.
Tip: Motion is most effective when there’s something stable for it to move against. A steady layer underneath a moving layer often works better than two layers both trying to lead the parade.
Here’s a quick way to learn the Motion view:
Start with a single-layer sound in Whole mode.
Go to Motion view and enable the Arpeggiator.
Set Trigger to Keys, Pattern to Arp, Direction to Up, Range to 2, and Sync to On.
Hold a chord and adjust Speed until the arpeggio sits comfortably.
Lower Chance slightly and add a little Swing.
Turn to the Sequencer, select Trigger Notes, choose Pattern A, and set a sequence length by clicking a step number.
Record or enter a simple pattern, then try Loop and Ping-Pong playback.
Switch from Trigger Notes to Mod Source.
Set up a Mod Matrix routing such as ENV 1 → Filter Cutoff or LFO 1 → Oscillator Level.
Enable Macro Motion, choose the corresponding M1–M4 slot, and adjust step values so the modulation amount changes as the sequence runs.
This exercise shows the heart of the Motion view: notes can move, modulation can move, and the two can work together.