The oscillators are where every ESQ-1 sound begins. They define the raw harmonic character of the patch before the filter, envelopes, modulation, and effects get involved. Those later stages are powerful, but they’re always working with whatever the oscillators give them.
On many analog synths, oscillator choices usually mean familiar shapes such as sawtooth, square, pulse, triangle, and maybe noise. ESQ-1 starts from a broader place. Its oscillators play digitally stored waveforms, including classic synth waves, sampled and multisampled waves, additive waves, formant waves, and band-limited waves.
That’s the first important ESQ-1 programming idea: don’t treat the waveform selector as a minor detail. On this instrument, the waveform is often the personality of the patch.
Where the Sound Begins
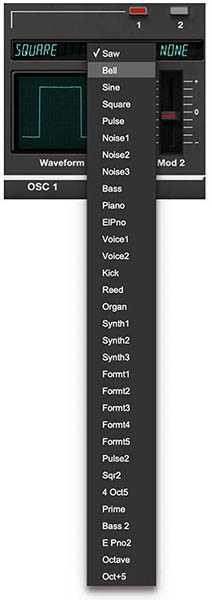
The original ESQ-1 was called a digital wave synthesizer because its oscillators used digitally stored waveforms rather than traditional analog oscillator circuits. Cherry Audio’s Ensoniq ESQ-1 uses the actual original 32 ESQ-1 waveforms, officially licensed for this instrument.
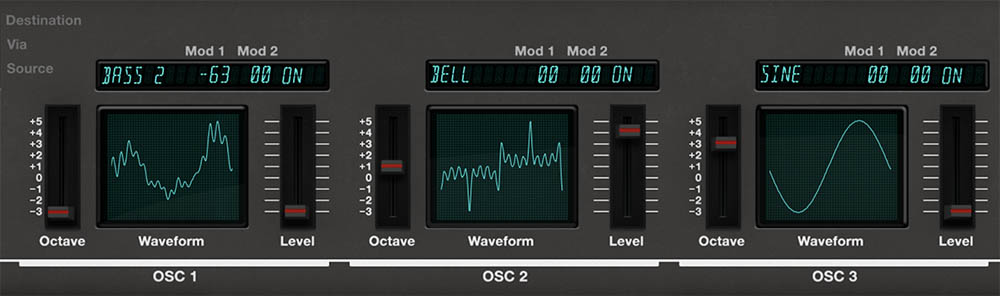
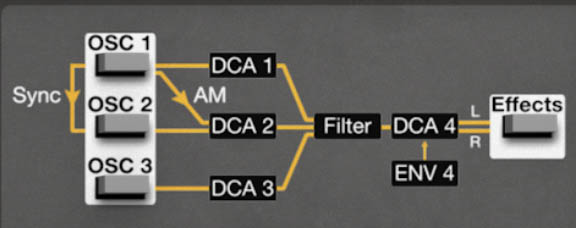
Every ESQ-1 voice begins with three Digital Wave Oscillators: OSC 1, OSC 2, and OSC 3.
Each oscillator plays one digital waveform, then passes through its own DCA before entering the filter:
OSC 1 → DCA 1 OSC 2 → DCA 2 OSC 3 → DCA 3
The three DCA outputs are then mixed together and sent into the filter, followed by DCA 4, and then effects.
This oscillator/DCA pairing is essential to understanding the ESQ-1. The oscillator chooses the waveform and pitch behavior. The DCA controls how much of that oscillator reaches the filter, and how that level can be modulated over time.
Selecting an Oscillator/DCA Pair
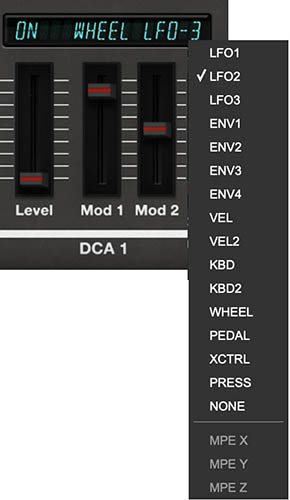
In Edit view, use the signal-flow display in the upper-right area of the panel to select the oscillator/DCA pair you want to edit.
Click OSC 1 / DCA 1 to edit OSC 1 and its related DCA 1 controls.
Click OSC 2 / DCA 2 to edit OSC 2 and DCA 2.
Click OSC 3 / DCA 3 to edit OSC 3 and DCA 3.
This means the signal-flow display isn’t just a diagram. It’s also a navigation tool. Select the oscillator/DCA block you want, then edit its waveform, tuning, level, and modulation controls.
OSC 1, OSC 2, and OSC 3
Each oscillator has its own waveform, pitch settings, and modulation controls. The three oscillators are similar in function, but their real power comes from how you combine them.
A useful approach is to give each oscillator a job. One oscillator might provide the body of the sound. Another might add brightness, weight, detuning, or interval tuning. A third might contribute texture, attack, motion, or unusual color.
For example, a pad might use a warm wave on OSC 1, a brighter detuned wave on OSC 2, and a formant or additive wave on OSC 3 at a lower level. A bass might use one oscillator for low-end weight, another for definition, and a third for a short attack layer.
You don’t have to use all three oscillators all the time. One well-chosen ESQ-1 waveform can be enough. But when you do use multiple oscillators, try to give each one a musical purpose.
Controls:
• Waveform – Selects the digital wave played by the oscillator. The waveform is the raw harmonic material of the sound, so this choice has a major effect on the patch’s character.
• Octave – Sets the oscillator’s octave range. Use this to place an oscillator in the right register, add low-end weight, create octave stacks, or add upper harmonic sparkle.
• Semi – Adjusts oscillator pitch in semitone steps. Use this for musical intervals such as octaves, fifths, fourths, or other harmonic relationships. A fifth above the main oscillator can add strength to leads, drones, and bold layered sounds.
• Fine – Provides small pitch adjustments for subtle detuning. Use Fine to thicken a sound, add gentle beating between oscillators, or create wider pads and leads. Small amounts add life. Larger amounts become more obviously unstable.
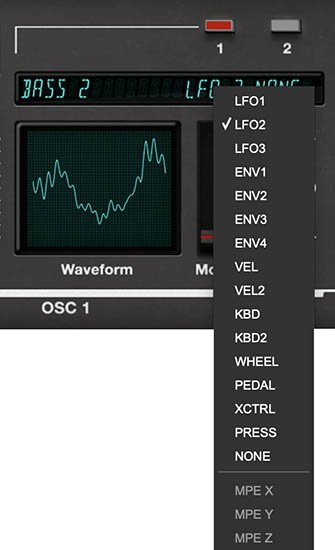
• Mod 1 / Mod 2 – Sets modulation sources and amounts for the oscillator. Click the modulation source field to choose a source, then use the Mod slider to set the amount. Oscillator pitch can be modulated by LFOs, envelopes, velocity, keyboard tracking, mod wheel, pedal, external control, pressure, MPE sources, and other available modulation sources.
Tip: Use Semi for intentional musical intervals, and Fine for subtle animation. If the sound feels too thin, detune one oscillator slightly. If it feels too messy, reduce Fine detuning or lower the level of the supporting oscillator.
Waveform Selection
The Waveform control selects the digital wave used by the oscillator. Cherry Audio’s ESQ-1 uses the original 32 ESQ-1 waveforms, officially licensed for this instrument.
Unlike a simple analog oscillator section, ESQ-1’s waveform library gives you a wide range of harmonic starting points. Some waves behave like classic synth sources. Others bring in sampled character, vocal color, metallic overtones, organ-like harmonics, noise-based textures, and deliberately constructed synthetic spectra.
When choosing a waveform, listen for its basic personality. Is it bright or dark? Smooth or buzzy? Hollow, nasal, metallic, vocal, noisy, or bell-like? Does it have a clear pitch center? Does it work best as the main sound, or as a subtle layer?
A waveform that sounds too strange by itself may be perfect underneath another oscillator. A bright metallic wave might be too much as the main body of a patch, but excellent as an attack layer. A simple wave may seem plain until it’s detuned, filtered, modulated, or combined with another wave.
Tip: Audition waves in context. The “wrong” waveform at full level may become exactly right at a lower DCA level.
Understanding the ESQ-1 Waveform Library
The original ESQ-1 waveforms fall into several broad families:
Understanding these families makes waveform selection more useful than simply scrolling until something sounds interesting, though that remains a perfectly honorable method of synthesis.
A waveform is the raw material of a sound. Technically, it’s a single cycle of a sound wave stored in digital memory and played repeatedly by the oscillator to create a continuous pitched tone. Some ESQ-1 waves are simple and familiar, while others contain complex harmonic combinations that would be difficult or impossible to create with a basic analog oscillator.
That’s why changing waveforms on ESQ-1 can feel more dramatic than switching from sawtooth to square on a traditional analog synth. You’re not just choosing a different shape. You’re choosing a different harmonic fingerprint.
Classic Synth Waveforms
The classic synth waves connect ESQ-1 to traditional subtractive synthesis. These include familiar sources such as SAW, SINE, SQUARE, and PULSE, along with noise-based waves and a bell wave.
SAW is bright and harmonically rich, making it a strong starting point for brass, strings, basses, and classic analog-style sounds.
SINE contains only the fundamental, giving it a pure tone that works well for flutes, organs, soft layers, and low-end reinforcement.
SQUARE has a hollow quality because it contains odd-numbered harmonics, making it useful for classic synth leads, basses, clarinet-like tones, and reedy colors.
PULSE is very bright and can add strong harmonic energy.
The noise waves are stored digital waveforms rather than continuously random analog noise. This means they repeat as pitched waves and can sound very metallic and clangorous depending on where you play them on the keyboard or transpose their pitch with the Oscillator's Octave control. NOISE 1,NOISE 2, and NOISE 3 each have their own unique character and can be useful for metallic, clangorous, unpredictable components, including attack transients and mallet-like pings.
Tip: Use classic synth waves when you want ESQ-1 to behave more like a subtractive synth, then bring in the more unusual waves when you want the digital character to step forward.
Sampled and Multisampled Waves
Some ESQ-1 waves are based on real musical sources, including BASS, PIANO, EL PNO, VOICE 1, VOICE 2, KICK, REED, and ORGAN.
These are not full-length samples in the modern sampler sense. They are single-cycle or multisampled waveform sources that capture part of the character of the original sound. The oscillator then plays them as pitched waveforms.
That distinction matters. The PIANO wave is not a modern sampled grand piano, and VOICE is not a replacement choir. These waves are more like concentrated timbral DNA. They give you recognizable acoustic character while still behaving like synth oscillator sources.
Don’t take the names too literally. BASS can become a clav-like tone. VOICE can become a pad, reed, or ghostly texture. ORGAN can work for bells or hollow layered sounds. The name is a hint, not a rule.
Some of these waves are multisampled, meaning different source waves are used across different keyboard ranges to preserve more natural tonal behavior. From the user’s point of view, they behave like regular waves, but internally they’re designed to play more musically across the keyboard.
Tip: Use sampled waves when you want a patch to suggest a real-world instrument without giving up synth-style control over filtering, envelopes, modulation, and effects.
Additive Synthesis Waves
The additive waves, including SYNTH 1, SYNTH 2, and SYNTH 3, were created by combining selected harmonics in specific amounts.
These waves are useful when you want tones that feel clearly synthetic but not generic. They can work well for animated pads, digital brass, hollow leads, layered keyboard sounds, and sounds that need a strong harmonic identity before the filter gets involved.
Because additive waves contain carefully chosen harmonic patterns, they often respond beautifully to filtering. A small cutoff movement may reveal one part of the wave while hiding another. Resonance can emphasize particular harmonic areas. Layering an additive wave with a simpler wave can create a sound with both stable body and unusual color.
Tip: Try additive waves as secondary oscillators. They can add harmonic interest without taking over the whole patch.
Formant Waves
The formant waves, labeled FORMT 1 through FORMT 5, are some of ESQ-1’s most distinctive sources. These waves have strong frequency peaks, similar to pushing one band of an equalizer very high. They tend to have a nasal, vocal-like quality and are excellent component waves for synthetic vocals, strings, reeds, and animated textures.
Each formant wave emphasizes a different frequency area, moving from lower to higher formant regions. This makes them useful for adding vowel-like color without using an actual voice sample.
Formant waves are often best used as part of a blend rather than as the entire sound. Try using one oscillator as a warm foundation, then bring in a formant wave at a lower DCA level to add human-like color or a slightly talking quality.
Tip: A quiet formant layer can make a pad feel more alive. It’s the difference between “nice synth pad” and “wait, is this thing trying to say something?”
Band-Limited Waves
The band-limited waves are designed with restricted harmonic content. Instead of containing a full, broad spectrum, they include selected harmonics or have certain harmonic regions removed.
Examples include PULSE 2, SQR 2, 4 OCTS, PRIME, BASS 2, E PNO 2, OCTAVE, and OCT+5.
These waves are useful when you want harmonic control. PULSE 2 and SQR 2 are reduced-harmonic versions of pulse and square-style waves, which can be useful when the full versions are too bright or dense. 4 OCTS contains octave-spaced harmonics and can work well for organ-like tones or hollow layered sounds. PRIME contains prime-numbered harmonics, giving it a more unusual structure. OCTAVE and OCT+5 provide specific interval-based harmonic content inside a single oscillator.
Tip: Use band-limited waves when a patch feels too crowded. Instead of choosing a bright full-spectrum wave and trying to tame it later, start with a wave that already leaves more room.
DCA 1, DCA 2, and DCA 3
Each oscillator passes through its own DCA before reaching the filter. These are not final volume controls for the whole sound. They control the individual oscillator levels before the three oscillator signals are mixed and filtered.
This is one of the most important parts of the ESQ-1 architecture. Because each oscillator has its own DCA, you can control how much of each waveform reaches the filter. You can also modulate those levels, which means the harmonic mix feeding the filter can change over time.
Controls:
• Level – Sets the oscillator’s level into the filter. Higher settings make that oscillator more prominent. Lower settings make it a supporting layer or subtle color.
• Mod 1 / Mod 2 – Sets modulation sources and amounts for the DCA level. Use these to animate the oscillator’s level before it reaches the filter.
Tip: Think of DCA 1, DCA 2, and DCA 3 as a programmable oscillator mixer. You’re not just balancing three waves. You’re deciding how much of each wave enters the filter, and whether those ingredients change as the note evolves.
Modulating DCA Level
Modulating DCA level is one of the best ESQ-1 sound-design techniques. Instead of using a static blend of three oscillators, you can make the oscillator mix change over time.
To access the DCA modulation controls, select Edit view, then click the desired oscillator/DCA block in the signal-flow display. For example, clicking OSC 1 / DCA 1 displays the controls for DCA 1, including Level, Mod 1, and Mod 2. The same approach applies to the other oscillator DCA stages.
Use an envelope to make a bright oscillator appear only at the beginning of a note. Use a slow envelope to fade in a digital texture behind a warm pad. Use velocity to bring in a sharper waveform when you play harder. Use an LFO to pulse one oscillator against another. Use pressure, pedal, or MPE to bring a hidden layer forward while holding a note.
This creates a different kind of motion than a normal filter sweep. The filter is not simply opening and closing over the same sound. The actual waveform mix entering the filter is changing.
Tip: Try using OSC 1 as the main body, OSC 2 as a bright attack layer controlled by a fast envelope, and OSC 3 as a slow fade-in texture. The result can feel like one sound with internal movement, not three oscillators stacked together.
Tuning and Detuning Oscillators
Oscillator tuning lets you create pitch relationships between the three oscillators. At the simplest level, all three oscillators can be tuned to the same pitch for a full, unified sound. This works well for pads, basses, leads, and classic polysynth-style patches.
You can also tune oscillators in octaves. For example, keep OSC 1 at the main pitch, tune OSC 2 one octave down for weight, and tune OSC 3 one octave up for brightness or definition. This adds size without making the patch feel harmonically complicated.
Use Semi for intentional musical intervals such as octaves, fifths, or fourths. Use Fine for subtle pitch differences, beating, width, and animation.
For pads, slow beating between slightly detuned oscillators can create movement before you add LFOs or effects. For leads, detuning can add size and presence. For basses, be careful. Too much detuning in the low register can make the bottom end feel unfocused.
Tip: For a solid bass, keep one oscillator stable and centered. Add only a small amount of detune to a supporting oscillator at a lower DCA level.
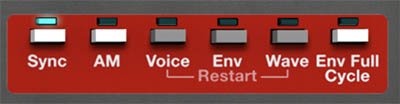
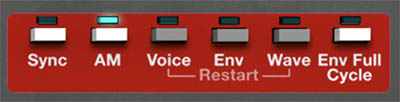
Mode Panel
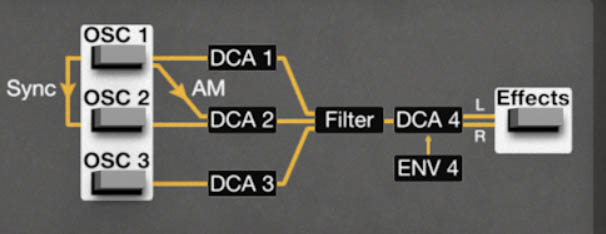
The Mode Panel on the right (red for Whole or Layer 1, green for Layer 2) groups optional functions related to the interaction between oscillators (Sync and Amplitude Modulation) and envelope behavior (Restart, Full Cycle).
Oscillator Sync
Sync lets Oscillators 1 and 2 interact in a more harmonically complex way. In oscillator sync, it syncs the phase of Oscillator 2 to Oscillator 1 forcing it to restart its waveform cycle each time Oscillator 1 restarts. This can create brighter, sharper, more animated harmonic content, especially when the synced oscillator’s pitch is changed or modulated.
Sync is useful for aggressive leads, bright sweeps, digital brass-style sounds, animated effects, and tones that need extra bite or motion.
Setting Up Oscillator Sync
To set up oscillator sync:
Go to the Keyboard view.
Enable Sync Click the Sync button in the Mode Panel beneath the signal-flow diagram at the upper right of the panel.
Turn on Oscillator 1 and 2 then set the oscillator's waves and tuning Start with relatively simple waveforms on Oscillator 1 and 2 such as saw or square while learning sync. Then adjust Octave, Semi, and Fine on Oscillator 1 and 2 to hear how tuning affects the synced tone. In general, setting Oscillator 2's pitch higher than Oscillator 1 creates a more pronounced sound character.
Modulate the synced oscillator’s pitch For classic sync sweeps, keep the main Oscillator 1 pitch stable and modulate Oscillator 2's pitch with an envelope, LFO, wheel, pressure, or another modulation source. This keeps the perceived note anchored while the harmonic content changes dramatically.
Musical Uses
A classic sync technique is to hold one oscillator steady while sweeping the pitch of the synced oscillator. The pitch of the note remains stable, but the tone becomes brighter, more animated, and more vocal-like as the synced oscillator moves.
Because ESQ-1’s oscillators use digital waves, sync can become especially colorful. Simple waves tend to produce cleaner, more predictable sync tones. More complex waves can produce sharper, stranger, and more characterful results.
Tip: Start with simple waveforms when learning sync. Once you understand how the controls interact, try more complex waves for extra digital edge, bite, and attitude.
AM: Amplitude Modulation
AM, or amplitude modulation, creates complex harmonic tones by using the amplitude of Oscillator 1 to modulate the amplitude of Oscillator 2. Instead of simply mixing oscillators together, AM generates additional harmonic content ("sideband frequencies") at the sum and differences of the frequencies of the two oscillators. This can produce FM-like metallic, bell-like, clangorous, sharp, glassy, or distinctly digital textures. AM can be subtle or dramatic. When the oscillators are tuned to more complex intervals the effects can be more extreme.
Setting Up AM
To set up amplitude modulation:
Go to the Keyboard view.
Enable AM Click the AM button in the Mode Panel beneath the signal-flow diagram at the upper right of the panel.
Turn on Oscillator 1 and 2 then set the oscillator's waves and tuning Start with simple waveforms while learning AM, such as SINE, SAW, SQUARE, or other basic waves. These make it easier to hear what AM is doing. Once you understand the behavior, try more complex ESQ-1 waves for sharper, stranger, and more animated tones.
Adjust oscillator tuning Use Octave, Semi, and Fine to change the pitch relationship between the oscillators. Small tuning changes can add edge or shimmer. Wider intervals can create bells, clangs, metallic attacks, and unusual digital textures.
Balance oscillator levels with the DCAs Use the oscillator DCA Level controls to balance the result. AM tones can become intense quickly, so try lowering the level of the more aggressive oscillator if the sound becomes too harsh or crowded.
Musical Uses
AM is especially useful for:
• Bell-like tones • Electric piano-style attacks • Metallic pads • Percussive digital sounds • Industrial textures • Sound effects • Sharper, more animated digital keys
A good starting technique is to use one oscillator as the stable body of the sound, then use AM to introduce harmonic edge from another oscillator. Adjust the tuning of the modulating oscillator slowly and listen for sweet spots. Small changes can make a big difference.
Tip: If you’re new to AM, start with a stable main oscillator and introduce AM carefully. It’s easy to go from “interesting color” to “robotic cookware accident,” which may or may not be exactly what you need.
Modulating Oscillator Pitch
Oscillator pitch can be modulated directly from the oscillator’s own panel controls or through the main Mod Matrix.
In each oscillator panel, the modulation source dropdown lets you choose what will modulate that oscillator’s pitch. This gives you a fast, local way to add pitch movement to a specific oscillator without leaving the oscillator section.
You can also create oscillator pitch modulation from the main Mod Matrix. This is useful when you want a central view of the patch’s modulation routings, or when you want to include oscillator pitch as part of a larger performance gesture using macros, controllers, or MPE.
Common uses:
• LFO to pitch – Adds vibrato, pitch drift, or animated movement. • Envelope to pitch – Creates pitch attacks, drops, risers, percussion, or sync-style sweeps. • Velocity to pitch amount – Lets harder playing add more pitch snap or movement. • Wheel, pressure, or pedal to pitch – Adds expressive performance control. • MPE X/Y/Z to pitch or timbre – Allows compatible MPE controllers to shape pitch or related behavior per note.
Tip: Small pitch modulation adds life. Large pitch modulation creates drums, lasers, risers, drops, unstable textures, and other useful studio misbehavior. For musical vibrato, keep the amount modest. For special effects, proceed with questionable judgment.
Using One, Two, or Three Oscillators
You don’t always need all three oscillators. Sometimes one strong waveform, shaped well, is enough.
One oscillator is useful for clean basses, simple plucks, bell-like tones, focused leads, digital keys, and sounds that need space in a mix. It’s also the best way to learn the waveforms, because you can hear each source clearly.
Two oscillators are perfect for contrast. Use them for detuned thickness, octave reinforcement, bright/dark layering, attack/body combinations, or interval sounds. Two oscillators are often easier to balance than three when you want richness without clutter.
Three oscillators create the biggest and most complex sounds. Use all three when you want a main tone, a support layer, and a special ingredient such as a transient, sub-octave, upper harmonic, formant color, or slowly fading texture.
Tip: If all three oscillators are loud and bright, the sound can become dense very quickly. Give each oscillator a job: primary, support, and color.
Practical Oscillator/DCA Recipes
Warm Hybrid Pad Use OSC 1 for a smooth body wave, OSC 2 for a slightly brighter detuned wave, and OSC 3 for a subtle formant or additive wave. Keep DCA 1 strongest, DCA 2 moderate, and DCA 3 lower. Add slow modulation to DCA 3 so the texture appears gradually.
Digital Bass With Bite Use OSC 1 as the main bass tone. Add OSC 2 at the same pitch or one octave down for support. Use OSC 3 as a bright attack component at a lower level. Keep detuning minimal, use a tight ENV 4 shape, and add a quick filter envelope movement for definition.
Glassy Digital Key Choose a bright or bell-like wave for OSC 1. Add OSC 2 with a complementary wave at a lower level. Tune OSC 2 slightly above or below OSC 1 for gentle motion, or an octave higher for sparkle. Keep the filter fairly open so the waveform character remains clear.
Sync Lead Use two oscillators with relatively simple waves to start. Enable sync, keep the master pitch stable, and modulate the synced oscillator’s pitch with an envelope. Add delay for width and drama. Once the basic patch works, try more complex waveforms.
Evolving Texture Use three different waveforms. Let OSC 1 provide the foundation, OSC 2 add subtle detuned support, and OSC 3 bring in a more unusual wave. Use an envelope, LFO, pressure, or Macro to fade OSC 3 in over time.
A Good Way to Learn the Oscillators
Start with a simple preset or initialized patch in Whole mode. Turn down OSC 2 and OSC 3 so only OSC 1 is heard. Open the filter so you can hear the waveform clearly, then step through the available waves.
Listen for brightness, body, attack, harmonic complexity, pitch center, and mood. Choose a waveform you like, then bring in OSC 2 at a lower level. Try tuning it an octave up, an octave down, or a fifth above OSC 1. Then bring in OSC 3 as a subtle texture or attack component.
Now close the filter slightly and listen again. Many ESQ-1 waves reveal their best qualities only once they’re filtered, blended, or modulated.
The important lesson is that ESQ-1’s tone is built from relationships. Waveform choice, tuning, DCA level, filtering, and modulation all interact. Change one piece, and the whole patch can shift. That’s the fun of it.