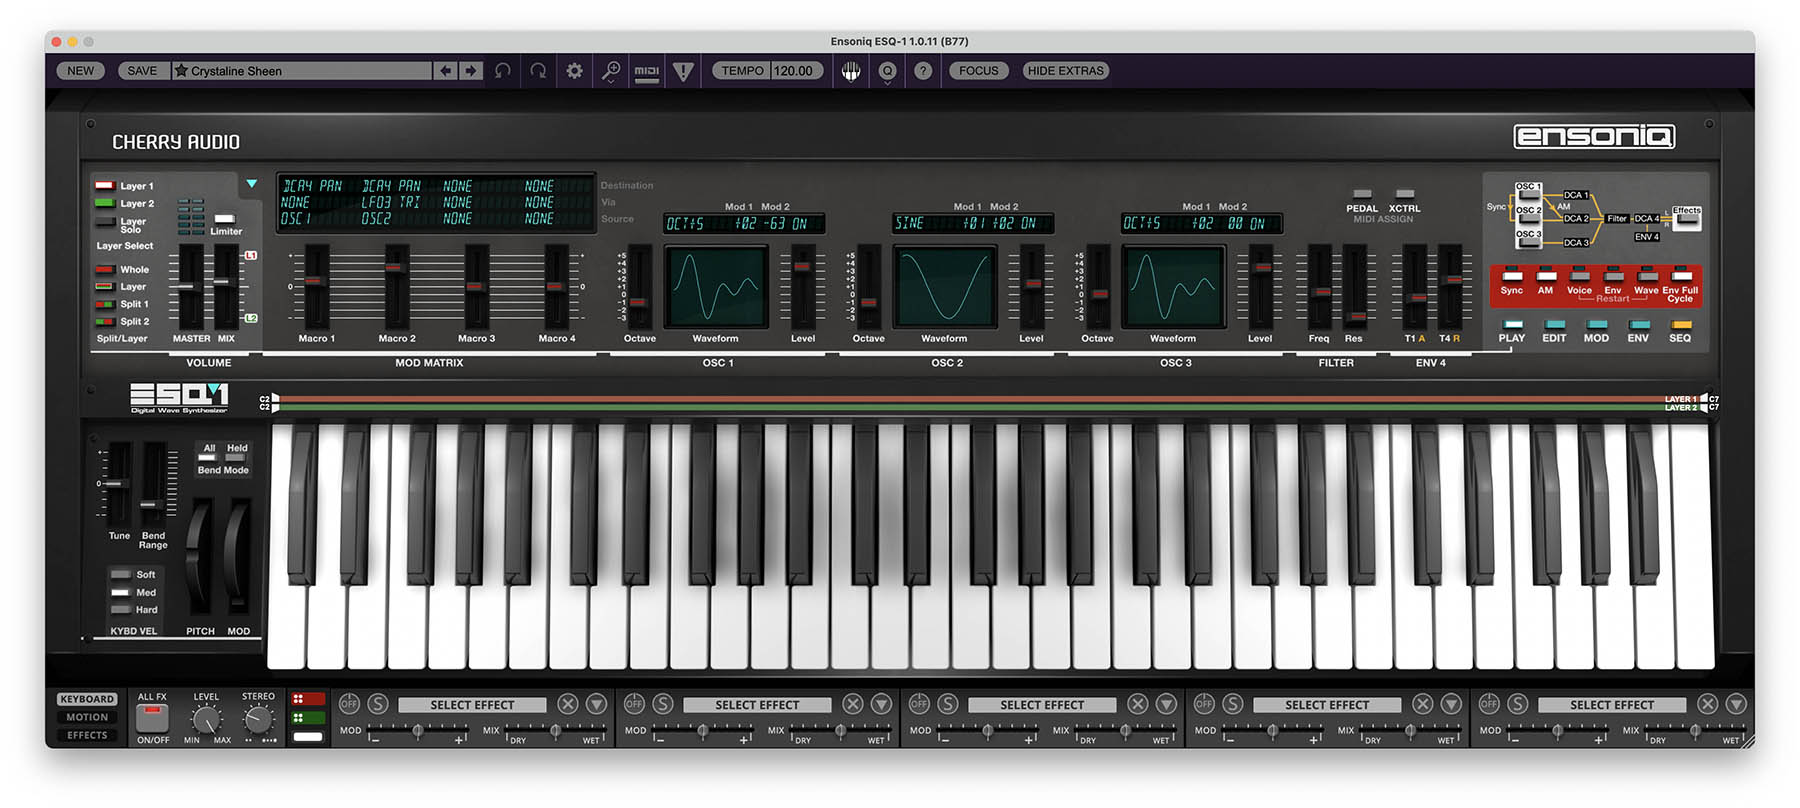
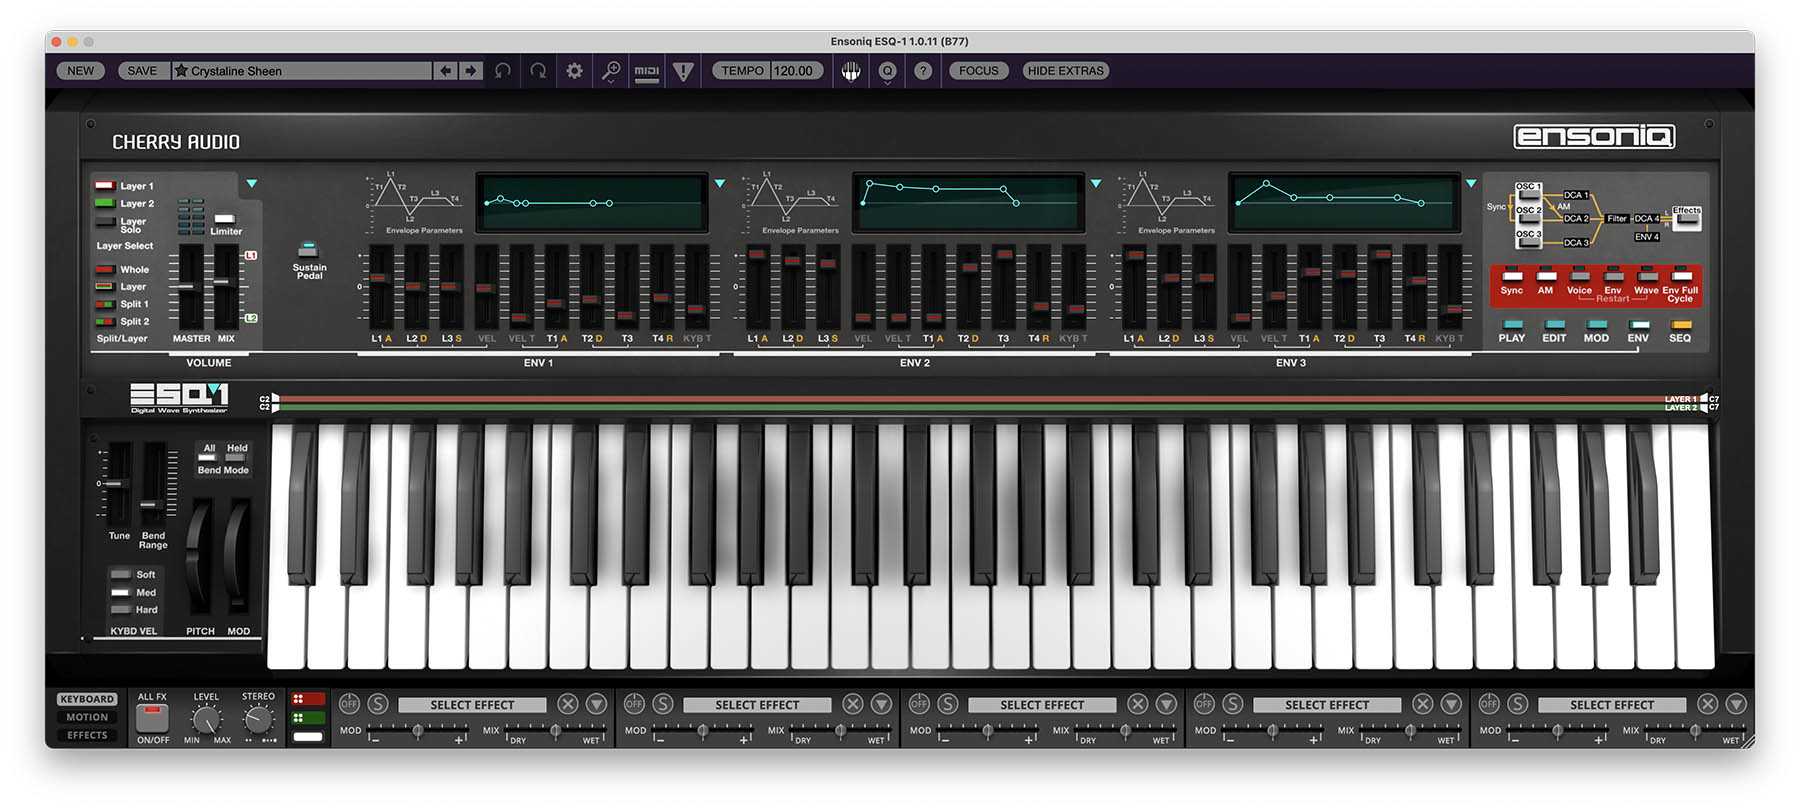
The Keyboard view is the main working area of Ensoniq ESQ-1. This is where you’ll spend most of your time playing sounds, selecting layers, editing core synthesis parameters, adjusting macros, checking modulation assignments, and getting a clear sense of how a preset is built.
At first glance, the Keyboard view looks like a front panel, but it’s more than a single static control surface. The center of the panel changes depending on which mode is selected: Play, Edit, Mod, Env, or Seq. These five mode buttons appear on the upper-right side of the panel and let you move between different groups of controls without leaving the Keyboard view.
This is Cherry Audio’s modern version of one of the original ESQ-1’s defining ideas. The hardware ESQ-1 was built around page-driven programming, with different buttons calling up different parameter pages on its display. Cherry Audio keeps that same “organized by function” approach, but presents it in a more visual, immediate way. Instead of peering into a small display and pushing soft buttons, you get large, clearly labeled controls that make the instrument much easier to explore.
A Quick Tour of the Keyboard View
The Keyboard view brings several important areas together when the Panel Mode is set to Play:
The Volume section lets you select Layer 1 or Layer 2, choose Whole, Layer, Split 1, or Split 2 mode, solo the selected layer, adjust the Master level, balance the two layers with the Mix slider, and enable the Limiter when needed.
The Macro sliders control the modulation amount for modulation slots 1–4. They provide quick, hands-on control over the depth of the modulation routings shown in the Mod Matrix. When Macro Motion is enabled in the Sequencer, these modulation amounts can also be sequenced step by step, creating rhythmic or evolving changes in the sound.
The Mod Matrix display is where you create and edit the four main modulation routings. Click the appropriate field to choose the Source, Destination, and Via settings for each slot. Modulation is essential when you want to make a preset move, shift, or responds expressively to velocity, pressure, macros, sequencer modulation, or MPE control.
The Oscillator, Filter, and ENV 4 areas provide direct access to the most immediate sound-shaping controls, especially in Play mode.
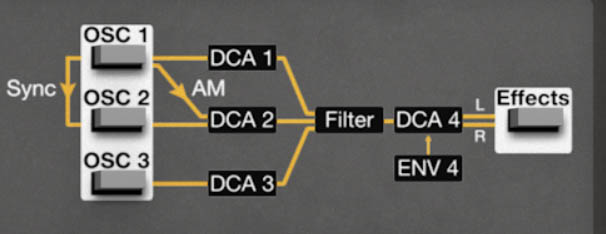
The signal-flow display on the upper-right side of the panel shows the basic architecture of the instrument: the three oscillators feed their individual DCA stages, then pass through the filter, DCA 4, and effects. In Edit mode, this display also works as a selector for choosing the oscillator/DCA section you want to edit.
The on-screen keyboard lets you play notes, view split and layer ranges, and audition sounds without an external controller.
Together, these areas make the Keyboard view a practical home base. You can play, edit, inspect, perform, and troubleshoot a sound from one place.
The Five Main Panel Modes
The Play, Edit, Mod, Env, and Seq buttons change the main control area of the Keyboard view. Each mode focuses on a different part of the instrument.
You don’t need to learn all five at once. A good starting workflow is to use Play mode for quick editing and performance, Edit mode for deeper sound shaping, Mod mode when you want movement, Env mode when you want to sculpt how a sound evolves over time, and Seq mode when you want patterns, arpeggiation, or rhythmic motion.
Think of them as five different workbenches. It's the same synth, but with different tools laid out in front of you.
Play Mode
Play mode is the main performance and quick-edit view. It gives you fast access to the controls you’re most likely to reach for while browsing presets, playing parts, or making broad sound adjustments.
In Play mode, you’ll find the layer controls, macro sliders, modulation display, oscillator waveform controls, filter controls, ENV 4 quick controls, and the signal-flow display. This makes Play mode the best place to begin with any preset.
Use Play mode when you want to:
Browse and audition sounds.
Check whether a preset uses one layer, two layers, or a split keyboard layout.
Adjust the broad character of a sound.
Change oscillator waveforms or levels quickly.
Brighten or darken the sound with the filter.
Shape the overall amplitude behavior with ENV 4 quick controls.
Use macros for expressive changes.
The beauty of Play mode is that it gives you enough control to make meaningful changes without forcing you to examine every internal parameter in the synth.
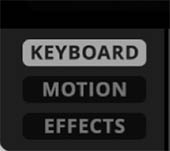
Edit Mode
Edit mode gives you deeper access to the core synthesis engine. This is where the ESQ-1’s architecture becomes more visible: oscillators, DCA stages, filter behavior, amplifier controls, glide, voice-related settings, and other detailed sound-shaping parameters.
This mode is especially useful when you want to understand how a sound is built.
The ESQ-1 voice structure is unusual enough that Edit mode deserves a little attention. Each of the three oscillators has its own DCA before the filter:
OSC 1 feeds DCA 1.
OSC 2 feeds DCA 2.
OSC 3 feeds DCA 3.
These DCA stages control how much of each oscillator enters the filter. They’re not the final volume control for the whole sound. They’re more like individual level gates for each oscillator before the combined signal reaches the filter.
After the filter, the signal passes through DCA 4, the final amplifier stage. ENV 4 is closely associated with DCA 4 and is typically used as the main volume envelope for the sound.
This distinction matters. If you’re adjusting DCA 1, DCA 2, or DCA 3, you’re shaping the balance and behavior of the individual oscillators before the filter. If you’re adjusting DCA 4 or ENV 4, you’re shaping the final output level of the complete filtered voice.
Use Edit mode when you want to:
Fine-tune oscillator behavior.
Balance the oscillators before the filter.
Work with DCA 1, DCA 2, and DCA 3.
Adjust the filter in more detail.
Shape the final amplifier behavior with DCA 4 and ENV 4.
Work with glide or other deeper voice controls.
Mod Mode
Mod mode is where you work with ESQ-1’s LFOs and modulation behavior. The original ESQ-1 was known for having a flexible modulation system, and Cherry Audio’s version continues that idea with a modern visual layout.
In Mod mode, you’ll find LFO 1, LFO 2, and LFO 3. Each LFO can generate repeating movement that can be routed to destinations such as oscillator pitch, oscillator level, filter cutoff, amplifier level, panning, effects parameters, and other modulation targets, depending on the available routing.
The ESQ-1 LFOs are more flexible than simple rate and depth LFOs. Each LFO includes controls such as L1, Delay, and L2, which shape how the LFO’s intensity changes over time after a note is played.
L1 sets the starting LFO level.
Delay controls how the LFO level moves from L1 toward L2.
L2 sets the final LFO level after that transition.
This means an LFO can fade in, fade out, stay constant, begin strongly and settle down, or grow more intense as a note is held. It’s excellent for delayed vibrato, evolving filter motion, animated pads, tremolo effects, and pitch movement that behaves more musically than a simple on/off pitch variation.
Mod mode also includes the Human option for the LFOs. On the original ESQ-1, Human introduced variation into the LFO frequency, making the modulation feel less rigid and mechanical. In musical terms, it helps movement feel a little more alive, especially on vibrato, filter motion, and slow evolving textures.
Use Mod mode when you want to:
Create vibrato, tremolo, or filter movement.
Add slow animation to pads and textures.
Make pitch or filter modulation fade in after a note begins.
Use LFO movement that feels less perfectly mechanical.
Build more expressive, evolving sounds.
Env Mode
Env mode displays the detailed envelope controls. Envelopes shape how a sound changes over time, and the ESQ-1 gives you multiple envelopes to work with.
On a basic synthesizer, an envelope might simply control volume. On ESQ-1, envelopes can be used much more creatively. They can shape oscillator pitch, oscillator levels, filter cutoff, amplitude, and other destinations through the modulation system.
In Env mode, you’ll find detailed controls for ENV 1, ENV 2, and ENV 3, along with graphical displays that show each envelope’s shape. ENV 4 is closely tied to the final amplifier stage, DCA 4, and is also accessible through the Play and Edit mode controls for quick shaping of the sound’s overall volume behavior.
Use Env mode when you want to:
Shape how a sound attacks, decays, sustains, or releases.
Create plucked, swelling, fading, or evolving sounds.
The envelopes are one of the reasons ESQ-1 can sound so animated. A static waveform becomes much more interesting when it changes over time, and ESQ-1 gives you several ways to make that happen.
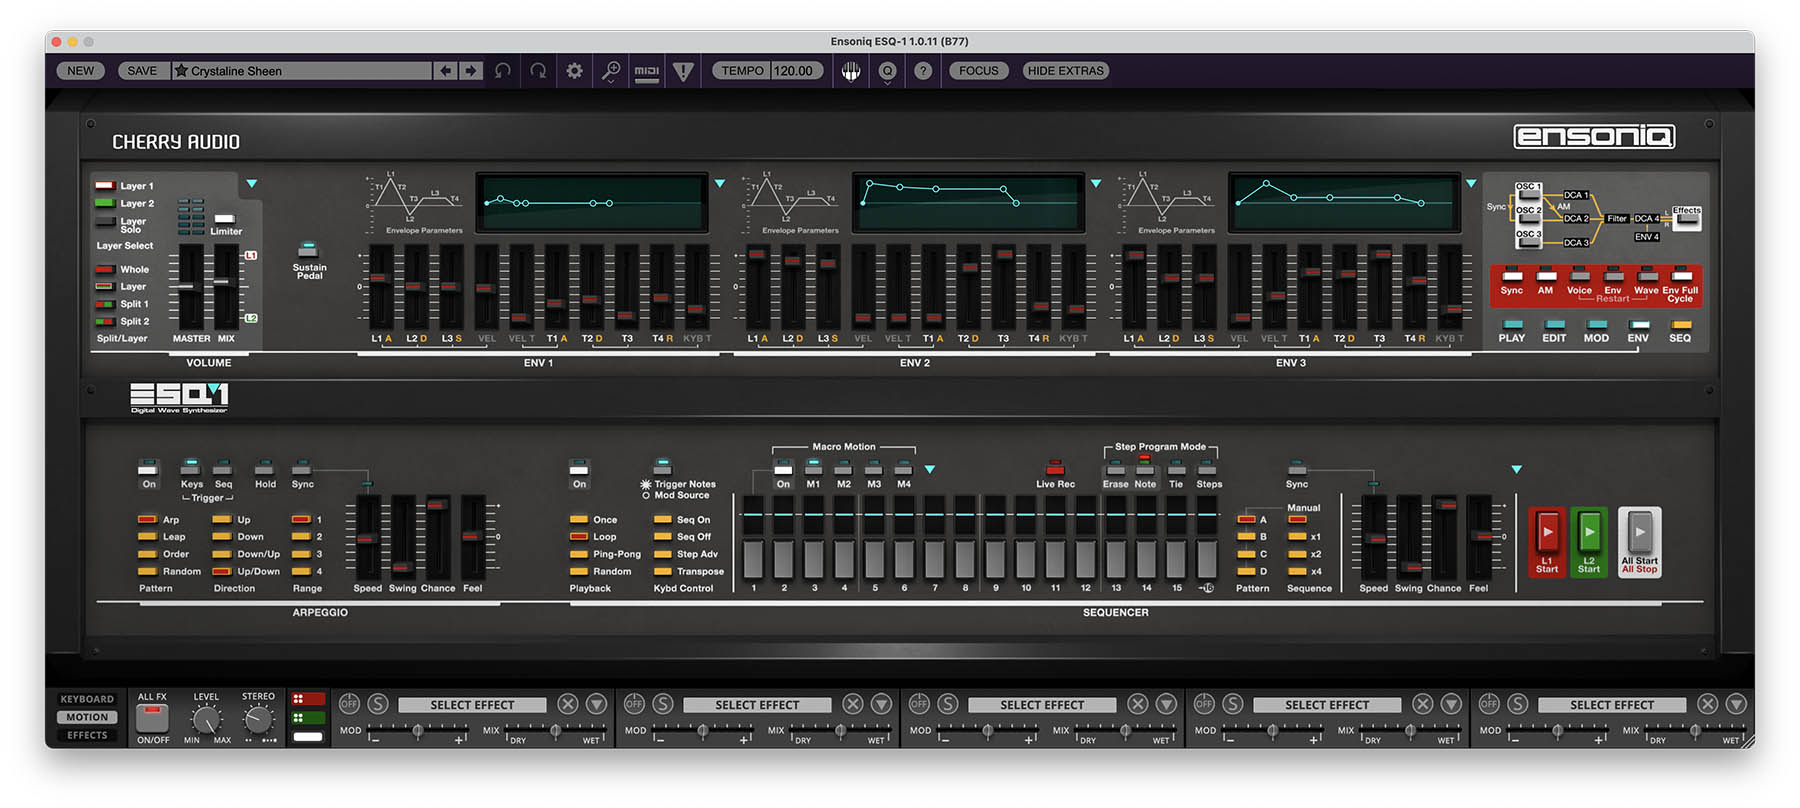
Seq Mode
Seq mode brings arpeggiator and sequencer controls into the Keyboard view. This mode is related to the larger Motion view, but it gives you quick access to sequence and arpeggiator functions while you’re still working from the main Keyboard page.
The original ESQ-1 was notable for combining a deep synth engine with a powerful onboard sequencer. Cherry Audio’s version continues the idea of the ESQ-1 as an instrument for motion, rhythm, and pattern-based creativity, while using a modern interface designed for software production.
In Seq mode, you’ll find controls for arpeggiator behavior, sequencing, patterns, macro motion, step programming, timing, sync, and transport-style functions. These controls let ESQ-1 generate repeating note patterns, rhythmic movement, evolving sequences, and performance gestures that can bring a sound to life.
Use Seq mode when you want to:
Create arpeggiated patterns.
Build rhythmic sequences.
Add motion to macros or other musical parameters.
Work with step-based programming.
Sync movement to tempo.
Turn a static patch into something that plays back with rhythmic personality.
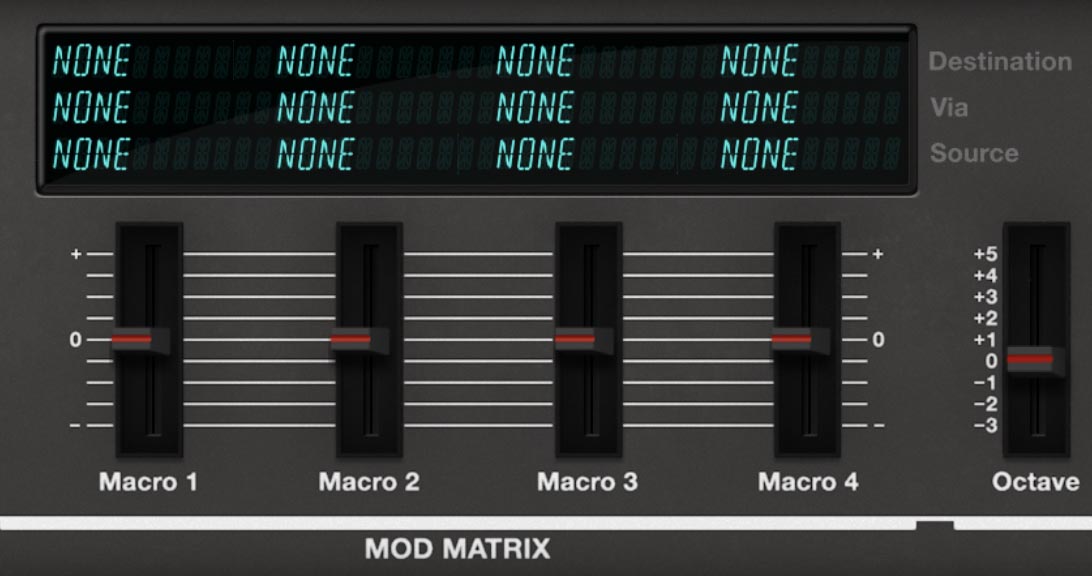
Macros and the Mod Matrix Display
The Keyboard view includes four Macro sliders and a Mod Matrix display. The Macro sliders control the modulation amount for modulation slots 1–4, giving you quick, hands-on control over how strongly each modulation routing affects the sound.
For example, if modulation slot 1 routes LFO 1 to oscillator pitch, Macro 1 controls the amount of that modulation. If modulation slot 2 routes an envelope to filter cutoff, Macro 2 controls how much of that envelope movement is applied. This makes the Macro sliders useful for broad musical changes, such as adding vibrato, increasing filter movement, bringing in more animation, or shaping expressive response without rebuilding the routing itself.
The Mod Matrix display is where you create and edit these modulation routings. Each of the four slots includes fields for Source, Destination, and Via. Click a field in the display to choose the desired modulation source, destination, or control path from the menu. Sources may include LFOs, envelopes, keyboard controls, pedal, pressure, MPE sources, sequencer sources, effects sources, and more, depending on the routing.
The Via field lets one control influence or scale another modulation assignment. For example, you might route an LFO to oscillator pitch, then use the mod wheel as the Via control so the wheel determines how much vibrato is applied.
The Macro sliders and Mod Matrix become even more powerful when used with Macro Motion in the Sequencer, where the modulation amount for a selected Macro can be sequenced step by step. We’ll cover that in more detail later. For now, think of the Mod Matrix as the place where you define the modulation routings, and the Macro sliders as the hands-on controls for adjusting how much of those routings are applied.
The Signal-Flow Display
The signal-flow display in the upper-right area of the Keyboard view is one of the best ways to understand ESQ-1’s architecture, but it isn’t simply a diagram. In Edit mode, it also functions as a selector for choosing which oscillator/DCA section you want to edit.
At the beginning of the chain are OSC 1, OSC 2, and OSC 3. Each oscillator passes through its own DCA: DCA 1, DCA 2, and DCA 3. These signals are then combined and sent through the Filter, followed by DCA 4, and then into the effects.
This diagram shows the basic order of operations that defines the instrument’s sound.
First, the oscillators generate the raw digital wave material.
Next, DCA 1, DCA 2, and DCA 3 shape the level of each oscillator before filtering.
Then the filter shapes the combined tone.
After that, DCA 4 controls the final voice level, usually shaped by ENV 4.
Finally, the effects add space, movement, and color. Clicking the Effects button here toggles the view to the Effects section.
In Edit mode, click the desired oscillator/DCA block in the signal-flow display to bring up its related controls. For example, clicking the OSC 1 / DCA 1 area displays the editing controls for OSC 1 and DCA 1, including oscillator settings and DCA level/modulation controls. This makes the signal-flow display both a visual map and a practical navigation tool.
Once you understand this flow, the panel makes much more sense. DCA 1, DCA 2, and DCA 3 shape the individual oscillator levels before the filter, while DCA 4 controls the final level of the complete filtered voice. The filter in Play mode and Edit mode is the same filter, just presented with different levels of access. ENV 4 isn’t just another envelope floating around with no job. It’s tied to the final amplifier stage, which makes it central to how the sound begins, sustains, and ends.
Using the Keyboard View Musically
The Keyboard view is designed to let you move between broad performance control and deeper programming.
A useful workflow is:
Start in Play mode.
Choose the layer you want to edit.
Use Layer Solo if you need to isolate it.
Adjust the oscillator, filter, ENV 4, Macro, and Mix controls.
Switch to Edit mode for deeper voice and DCA shaping.
Use Env mode to refine envelope behavior.
Use Mod mode to add movement.
Use Seq mode to add rhythmic or patterned motion.
Open the Effects view when the raw patch is working and you’re ready to add polish, depth, width, or damage.
You don’t have to edit in that exact order, but it’s a good way to avoid getting lost. Build the sound first, animate it second, dress it up last. Unless you’re making experimental noise, in which case dressing it up first and dissecting it later is also valid.
Tip: A number of views display turquoise triangles. Click on these for context-sensitive pop-up utility menus that offer functions like copy and swap, as explained later in this user guide.
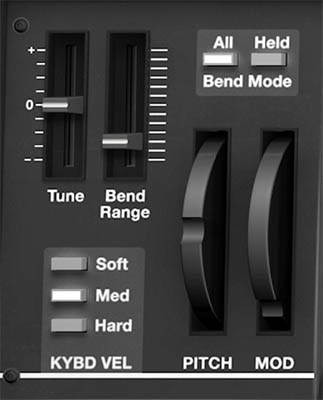
Performance Controls
The performance controls in the left “wheel box” are where ESQ-1 handles several important real-time playing behaviors: master tuning, pitch bend range, pitch-bend response, keyboard velocity response, and modulation-wheel performance.
These controls may look simple, but they have a big effect on how the instrument feels under your hands. Use them to match ESQ-1 to your controller, your playing style, and the musical role of the patch.
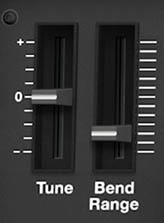
Tune
Tune adjusts the overall tuning of the instrument up or down by one semitone. This is useful when you need to fine-tune ESQ-1 against other instruments, match a track that isn’t perfectly tuned, or create intentional pitch offsets for special effects or layered setups.
Control:
• Tune – Adjusts master tuning up or down, with a range of approximately -1 semitone to +1 semitone.
Tip: For normal use, leave Tune centered. If a preset suddenly sounds slightly sharp or flat compared to the rest of your session, check Tune before diving into oscillator settings.
Bend Range
Bend Range sets how far the pitch wheel bends notes up or down. At lower settings, the pitch wheel creates smaller, more subtle pitch changes. At higher settings, it can bend notes by as much as one octave up or down.
Control:
• Bend Range – Sets the pitch wheel range, from subtle bends up to ±1 octave.
Tip: For expressive leads, try a bend range of a whole step or a few semitones. For dramatic synth effects, octave jumps, or sound-design mayhem, increase the range.
Bend Mode
Bend Mode determines which notes are affected by the pitch wheel.
This is especially important when using long releases, sustained notes, layered patches, or performance gestures where some notes are still sounding after you’ve released the keys.
Options:
• All – Pitch bend affects all notes currently sounding, including notes that are still fading out because of long release times or sustain behavior.
• Held – Pitch bend affects only the notes that are currently being held on the keyboard or MIDI controller. Notes that are still sounding but no longer held are not bent.
Tip: Use All for traditional pitch-bend behavior, where the whole sounding patch bends together. Use Held when you want to bend only the notes under your fingers while released notes continue fading naturally. This can be especially useful for long-release pads, layered sounds, and more expressive solo playing.
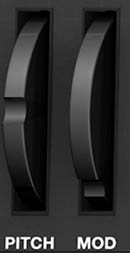
Pitch Wheel
The Pitch wheel bends notes up or down according to the current Bend Range and Bend Mode settings. Move the wheel upward to bend pitch up. Move it downward to bend pitch down. The amount of bend depends on how far you move the wheel and how wide the Bend Range is set.
Related controls:
• Bend Range – Determines how far the wheel bends pitch. • Bend Mode – Determines whether the bend affects all sounding notes or only held notes.
Tip: For leads and basses, a smaller bend range usually feels more controllable. For effects, transitions, and dramatic gestures, wider bend ranges can be much more fun.
Mod Wheel
The Mod wheel provides real-time modulation control. What it does depends on how the current patch is programmed. In many presets, the Mod wheel may add vibrato, open the filter, increase LFO depth, bring in effects, or intensify some other modulation assignment. Because ESQ-1 has a flexible Mod Matrix, the Mod wheel can be used as a performance source for many different destinations.
Control:
• Mod Wheel – Sends modulation-wheel performance data to any patch routings that use the wheel as a modulation source.
Tip: If moving the Mod wheel doesn’t seem to do anything, check the patch’s modulation assignments. The wheel needs to be routed to a destination, such as LFO depth, filter cutoff, oscillator pitch, oscillator level, or an effects parameter.
Keyboard Velocity
Keyboard Velocity controls how ESQ-1 responds to how hard or softly you play. This lets you adjust the feel of the instrument to match your MIDI controller and playing style. A patch that feels too jumpy, too flat, or too hard to control may simply need a different velocity response setting.
Options:
• Soft – Makes ESQ-1 respond more easily to lighter playing. Use this if your controller feels stiff, or if you want softer playing to produce more expressive response.
• Med – Provides a balanced velocity response. This is a good general-purpose setting for most playing styles and controllers.
• Hard – Requires stronger playing to produce higher velocity response. Use this if the patch feels too sensitive, too bright, or too dynamic with normal playing.
Tip: If a patch feels lifeless, try Soft or Med before changing the sound itself. If a patch gets too bright or aggressive when you play normally, try Hard. Velocity response is often the difference between “this preset is fine” and “this preset actually feels good.”