Cherry Audio’s Ensoniq ESQ-1 gives you two fully independent synth layers: Layer 1 and Layer 2. Each layer has its own complete synth engine, including oscillators, DCAs, filter, envelopes, modulation, macros, Motion settings, voice behavior, and effects.
This is one of Cherry Audio’s biggest expansions of the ESQ-1 concept. A preset can be a single focused sound, two sounds stacked together, or two different sounds split across the keyboard. Each layer can also have up to 32 voices, giving ESQ-1 generous room for long releases, dense chords, layered pads, sequenced patterns, and expressive performance setups.
Layer 1 and Layer 2
The interface uses color to make the layer structure easy to follow. Layer 1 is shown in red, and Layer 2 is shown in green. This color coding appears throughout the instrument, including the layer controls, keyboard range display, and effects section.
When you select a layer, you’re choosing which layer is currently being edited. In a layered or split preset, you may hear both layers at the same time, but the front-panel controls affect the selected layer.
Controls:
• Layer 1 – Selects Layer 1 for editing. Layer 1 is color-coded red.
• Layer 2 – Selects Layer 2 for editing. Layer 2 is color-coded green.
• Layer Solo – Solos the currently selected layer, making it easier to hear and edit one layer at a time.
Tip: If you move a filter slider, change an oscillator wave, or adjust an envelope and don’t hear the expected change, check which layer is selected. You may simply be editing the other layer.
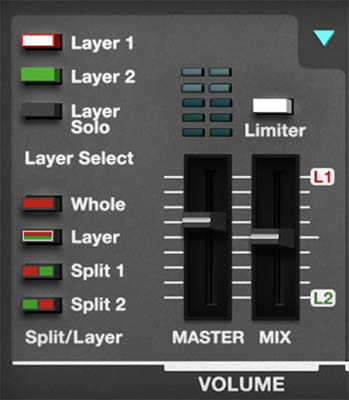
The Volume Section
The Volume section controls how the layers are used and balanced. It lets you select the active layer, choose Whole, Layer, Split 1, or Split 2 mode, solo the selected layer, adjust the master output level, and balance Layer 1 against Layer 2.
This section answers one of the most important performance questions in the instrument: “Am I playing one sound, two stacked sounds, or two sounds split across the keyboard?”
Controls:
• Whole – Plays the selected layer across the full keyboard.
• Layer – Stacks Layer 1 and Layer 2 across the full keyboard.
• Split 1 – Places Layer 1 on the lower keyboard range and Layer 2 on the upper range.
• Split 2 – Places Layer 2 on the lower keyboard range and Layer 1 on the upper range.
• Master – Controls the overall output level of the instrument.
• Mix – Balances Layer 1 and Layer 2. Move toward L1 to emphasize Layer 1, or toward L2 to emphasize Layer 2.
• Limiter – Helps control peaks and keeps louder layered sounds from becoming too unruly at the output.
Tip: In a layered patch, the Mix slider is one of the fastest ways to reshape the sound without editing either layer. If Layer 1 provides a warm pad and Layer 2 adds a bright digital shimmer, Mix decides whether the patch feels soft and rounded or more open and sparkling.
Whole Mode
Whole mode plays the selected layer across the full keyboard. This is the simplest way to use ESQ-1 when you want to focus on one sound.
Whole mode is especially useful when building a patch from scratch, exploring oscillator waves, adjusting the filter, shaping envelopes, or troubleshooting modulation. It keeps the signal path clear and lets you hear exactly what the selected layer is doing.
Tip: Start in Whole mode when designing a new sound. Once one layer feels good on its own, switch to Layer or Split mode and build around it.
Layer Mode
Layer mode stacks Layer 1 and Layer 2 across the full keyboard. When you play a note, both layers sound together.
This is where ESQ-1 can become especially lush, wide, and animated. One layer might provide the attack while the other supplies the sustain. One might be bright and digital while the other is darker and filtered. One might use slow modulation while the other remains steady.
Layer mode is excellent for pads, keys, leads, soundscapes, hybrid brass, animated textures, and large performance sounds.
Tip: A good layered patch usually gives each layer a clear job. Try using Layer 1 for body and Layer 2 for attack, shimmer, motion, width, or edge. If both layers are trying to be the whole sound, they may fight each other.
Split 1 and Split 2
Split 1 divides the keyboard so Layer 1 plays on the lower range and Layer 2 plays on the upper range.
Split 2 reverses that arrangement: Layer 2 plays on the lower range, and Layer 1 plays on the upper range.
Splits are useful for performance setups such as bass on the left hand and lead on the right, pad below and keys above, or a sequenced lower part with a manually played upper sound.
Tip: Use Split 1 if Layer 1 is your lower sound and Layer 2 is your upper sound. Use Split 2 if those roles are reversed. It’s much faster than rebuilding the patch.
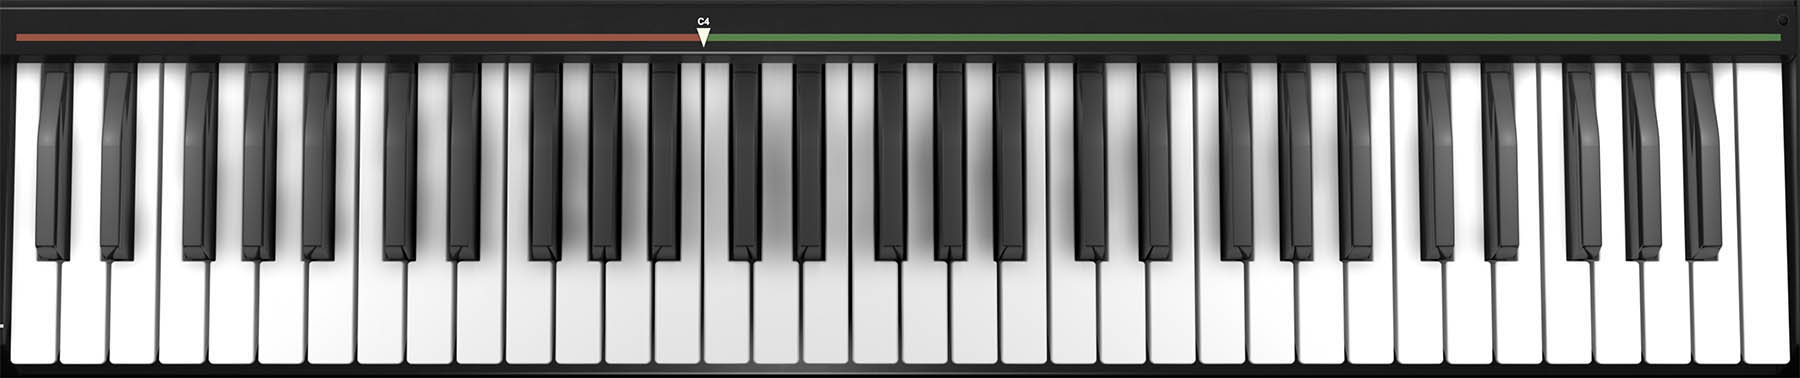
Keyboard Range Controls
In Layer and Split modes, the keyboard range controls above the on-screen keyboard show where each layer is assigned. Drag the range handles to define each layer’s playable area.
In Layer mode, the two layers can cover the full keyboard or overlap in specific ranges. In Split modes, the range display shows the lower and upper zones, making it easy to adjust the split point.
Tip: Choose the split point based on the part you intend to play. A left-hand bass may need more lower range than a simple drone, while a right-hand lead may need enough room for bends, expressive playing, and the occasional dramatic flourish.
Layer Solo
Layer Solo lets you hear only the currently selected layer. This is one of the most useful controls when working with layered or split sounds.
A preset may sound like one unified patch, but underneath, the two layers may be doing very different things. Soloing each layer lets you hear what each one contributes.
Use Layer Solo when balancing oscillator levels, adjusting envelopes, editing modulation, setting effects, or diagnosing a patch that sounds muddy, too bright, too slow, or too busy.
Tip: After editing a layer in solo, turn Layer Solo off and listen again in context. The goal is not for each layer to sound perfect by itself. The goal is for the two layers to work together.
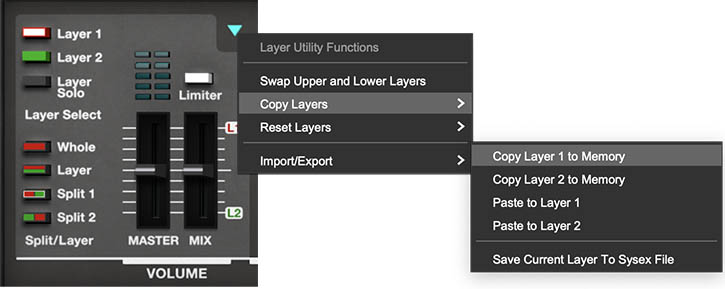
Copying and Managing Layers
The turquoise triangle in the Volume section opens layer utility options. These let you copy, paste, reset, swap, import, or export layer data.
This is very useful when building layered sounds. You can copy a layer, paste it to the other layer, then modify the copy to create a wider, brighter, darker, slower, or more animated version of the original.
Common uses:
• Copy Layer 1 to Layer 2, then detune or filter Layer 2 for width. • Copy a finished sound to the other layer and give it a slower attack. • Save a layer as a SysEx file for reuse or archiving. • Reset one layer without disturbing the other. • Swap upper and lower layers when reworking a split.
Tip: Try copying a strong single-layer sound to the second layer, then change only the waveform, filter mode, envelope attack, or effects. It’s a quick way to create a richer patch while keeping both layers musically related.
Editing Layers
Layer editing is straightforward once you remember the rule: the selected layer is the layer you’re editing.
If Layer 1 is selected, the panel controls affect Layer 1. If Layer 2 is selected, they affect Layer 2. This applies to oscillator settings, filter, envelopes, modulation assignments, macros, Motion settings, effects, and voice behavior.
Also note that Layer 2 becomes available for editing when Layer mode is enabled in the Split/Layer section. If you’re in Whole mode, the interface focuses on the selected single-layer setup. Switch to Layer, Split 1, or Split 2 when you want access to both layers as part of a combined preset.
Tip: Program each layer separately first. Use Whole mode or Layer Solo to get one layer working musically, then combine the layers and adjust Mix, effects, and modulation.
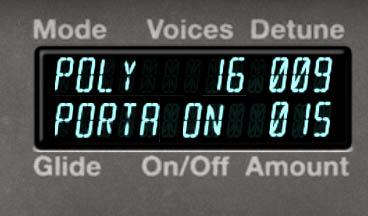
Voice Mode Parameters
The Voice display, found in Edit view, controls how ESQ-1 responds to the notes you play. This includes playing mode, maximum polyphony, detune amount, and glide behavior.
These settings have a major effect on the feel of a patch. The same oscillator, filter, and envelope settings can behave very differently as a polyphonic pad, monophonic bass, detuned unison lead, or MPE performance sound.
To edit a Voice parameter, click the appropriate field in the display. Some fields open a menu, such as Mode. Others can be adjusted by clicking and dragging, such as Voices, Detune, and Glide Amount. The Glide On/Off field toggles glide behavior.
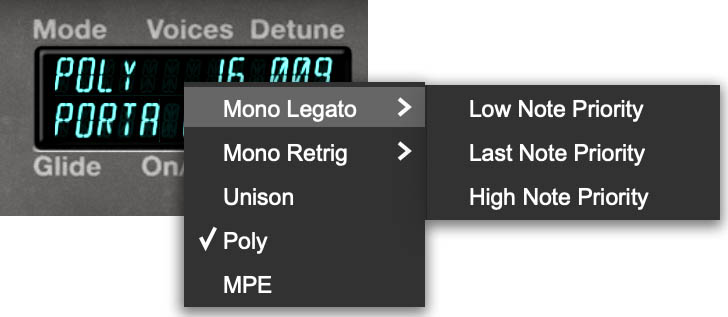
Mode
Mode selects how ESQ-1 assigns voices when you play.
Options:
• Poly – Standard polyphonic mode. Use this for chords, pads, keys, layered textures, and most general-purpose playing.
• Unison – Stacks voices together for a thicker, more powerful sound. Use this for leads, basses, aggressive digital brass, and big synth hooks.
• Mono Legato – Plays one note at a time with connected behavior when notes overlap. Useful for smooth leads, basses, and expressive solo patches.
• Mono Retrig – Plays one note at a time and retriggers notes more explicitly. Useful for punchy basses, plucks, and leads where each note should have a clear new attack.
• MPE – Enables MIDI Polyphonic Expression for compatible controllers.
Both Mono Legato and Mono Retrig include note-priority choices: Low Note Priority, Last Note Priority, and High Note Priority. Low priority favors the lowest held note, high priority favors the highest held note, and last priority plays the most recently pressed note.
Tip: Use Mono Legato for smooth connected lines and Mono Retrig when every note needs a fresh attack. For basses, Low Note Priority can feel classic and stable. For modern lead playing, Last Note Priority often feels most natural.
Voices
Voices sets the maximum number of voices available for the selected layer, up to 32 voices.
This is unusually generous polyphony. A single layer can support large chords, long releases, sequenced parts, and dense textures without quickly running out of voices. In layered patches, each layer has its own voice allocation.
In Unison mode, the Voices setting also affects how many voices are stacked together. Higher settings create a bigger, thicker sound, but use more polyphony per note.
Tip: Use higher voice counts for pads, keys, long releases, and layered textures. Use lower or more focused settings for basses, leads, and sounds that need to stay tight.
Detune
Detune spreads stacked voices slightly apart in pitch, creating thickness, width, and motion.
At low settings, Detune adds subtle richness. At higher settings, it creates stronger beating and a wider, more animated sound. Detune is especially useful for unison leads, huge pads, wide digital brass, and bold synth textures.
Use it carefully on bass sounds, where too much pitch spread can weaken the low end. For leads and pads, you can usually push it further.
Tip: Decide where the width should come from: oscillator detuning, voice detuning, layer differences, stereo effects, or modulation. You don’t always need all of them at once.
Glide: Portamento and Glissando
The lower row of the Voice display controls glide behavior. Depending on the selected setting, glide can create smooth portamento-style pitch transitions or stepped glissando-style movement between notes.
Controls:
• Glide On/Off – Enables or disables glide.
• Amount – Controls how strongly or slowly the pitch moves from one note to the next. Lower amounts create faster, subtler transitions. Higher amounts create longer, more obvious slides.
Glide is especially useful in mono modes. In Mono Legato, glide can make connected notes slide smoothly into each other, which is excellent for expressive leads, bass lines, and solo parts. In Mono Retrig, glide can still provide pitch movement, but with a more clearly articulated retriggered feel.
Tip: For classic synth leads, use Mono Legato with a modest glide amount. For basses, keep glide short unless you want obvious slides. For sci-fi effects or dramatic transitions, increase the amount and let the notes travel.
MPE
MPE, short for MIDI Polyphonic Expression, allows compatible controllers to send expressive data for individual notes rather than applying the same pitch bend, pressure, or controller movement to the entire instrument at once.
To use ESQ-1 with an MPE-capable controller, you must select MPE from the Mode parameter in the Voice display. This is essential. If MPE is not selected here, ESQ-1 will not respond to MPE performance data from your controller, even if the controller is transmitting MPE correctly.
Once MPE mode is enabled, you can use MPE X, MPE Y, and MPE Z as modulation sources in the Mod Matrix. The exact physical behavior depends on your controller, but in general:
• MPE X is commonly used for left/right pitch-style movement. • MPE Y is commonly used for forward/backward or vertical touch-position movement. • MPE Z is commonly used for pressure.
Tip: For expressive pads, route MPE Z to filter cutoff or oscillator level so individual notes bloom as you press into them. For leads, route MPE X to pitch and MPE Z to vibrato depth or filter brightness.
Using Effects With Layers
The Effects view supports the two-layer architecture with separate effects chains for Layer 1 and Layer 2, plus a Global chain that processes both layers together.
This means each layer can have its own processing before both layers pass through the shared Global effects.
Example:
Layer 1 might use chorus to create a wide pad. Layer 2 might use compression and delay for a defined key or lead. The Global chain might add reverb to place both layers in the same space.
Tip: Use layer effects for identity. Use Global effects for shared polish, ambience, and glue.
Practical Layering Ideas
A strong layered patch usually begins with contrast.
Try these approaches:
• Pair a bright digital attack layer with a darker sustained layer. • Use one layer as the main harmonic bed and the other as shimmer or motion. • Use one layer for the core key sound and another for transient brightness or octave reinforcement. • Use one layer as a stable lead center and the other as a slightly detuned support layer. • Use one layer as a slow pad and the other as a texture that fades in later.
Tip: The best layered sounds often feel like one instrument, not two presets playing at once. Use Mix, envelopes, filter settings, and effects to make the layers cooperate.
Practical Split Ideas
Splits are ideal for performance and composition. A classic setup is bass on the lower keys and lead on the upper keys. Another useful setup is pad below and keys above, with the lower range holding sustained harmony while the upper range plays rhythmic or melodic parts.
You can also create a split where one layer is sequenced or arpeggiated while the other remains manually playable. This can make a single preset feel like a small arrangement.
Tip: In split patches, watch envelope release times. A long-release lower layer can blur fast left-hand changes, while an upper layer with too short a release may feel abrupt if it’s meant to float.
Avoiding Layer Overload
Two independent layers, 32 voices per layer, three oscillators per voice, modulation, Motion tools, and effects give you a lot of power. They also give you many opportunities to overbuild.
If a layered preset sounds too dense, solo each layer and listen separately. Check for overlapping frequency ranges, similar envelopes, excessive release times, too much low end, or too many bright oscillators competing for attention.
Common fixes:
• Reduce one layer with the Mix slider. • Darken one layer’s filter. • Shorten the release on one layer. • Reduce low-end content from the upper layer. • Use different envelope attacks so both layers don’t speak at exactly the same moment. • Move some depth or space to the Global effects rather than both layer effects.
Tip: Layering works best when each part has a job. If one layer provides body and the other adds color, motion, attack, or space, the patch will usually feel intentional.
Quick Layering Exercise
Start with a single-layer sound in Whole mode. Choose a warm waveform blend and shape it with the filter and ENV 4. This will be the body layer.
Switch to Layer mode and select the second layer. Use Layer Solo so you can hear it by itself. Create a brighter or more textured sound with a faster attack and a slightly shorter release.
Turn Layer Solo off and use the Mix slider to blend the two layers. The first layer should provide the foundation. The second should add definition, shimmer, or motion.
Now open the Effects view. Add a subtle effect to only one layer, such as chorus on the body layer or delay on the brighter layer. Then add a small amount of Global reverb to place both layers together.
Quick Split Exercise
Create or load a bass sound on Layer 1. Keep the envelope tight and the low end focused.
Create or load a lead, key, or pad sound on Layer 2. Give it enough brightness and release to work in the upper range.
Select Split 1 so Layer 1 plays on the lower part of the keyboard and Layer 2 plays on the upper part. Adjust the keyboard range controls until the split point feels natural.
Play a left-hand bass part and a right-hand melody or chord part. Then adjust the Mix slider until the two layers feel balanced.
Tip: If the bass feels too roomy, reduce its release or effects. If the upper layer feels too dry, add delay or reverb to Layer 2 or the Global chain.