Cherry Audio’s Ensoniq ESQ-1 gives you a lot of synthesis power, but the basic idea is easy to grasp. Choose a preset, play the keyboard, select the layer or page you want to work with, then start shaping the sound to make it your own. Easy stuff, and a perfect way to dip into the considerable depths this synth offers.
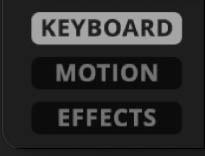
As explained earlier, the synth is organized around three main views: Keyboard, Motion, and Effects. These are selected from the view buttons on the lower left side of the interface. Each view focuses on a different part of the instrument.
The Three Main Views
The Keyboard view is the main performance and sound-design page. This is where you’ll find the core synth engine, including the layer controls, macro sliders, modulation display, oscillators, filter, ENV 4 controls, performance controls, and on-screen keyboard. If you want to play, edit, shape, or understand the basic sound of a patch, start here.
The Motion view contains the arpeggiator and sequencer tools. This is where ESQ-1 becomes more than a playable synth and starts becoming a source of rhythmic patterns, evolving phrases, animated movement, and controlled musical mischief.
The Effects view provides access to the full effects section. ESQ-1 includes separate effects chains for Layer 1 and Layer 2, plus a Global effects chain that processes both layers together. This lets you treat each layer differently, then use shared global effects to pull everything into the same sonic room.
The Five Keyboard View Modes
The Keyboard view also includes five mode buttons on the upper-right side of the panel: Play, Edit, Mod, Env, and Seq. These buttons change the main control area of the Keyboard view, allowing you to access different parts of the instrument without leaving the main page.
This is Cherry Audio’s modern take on one of the original ESQ-1’s defining ideas. The hardware ESQ-1 used page-driven programming, where different front-panel buttons called up different parameter pages on the display. Cherry Audio’s version keeps that spirit, but makes it much more visual and immediate.
Play mode shows the main performance and quick-edit controls, including the layer section, macros, modulation display, oscillator waveform controls, filter controls, ENV 4 quick controls, and the signal-flow display.
Edit mode provides deeper access to voice and synthesis controls, including oscillator tuning, waveform, DCA, filter, amplifier, glide, and related sound-shaping parameters.
Mod mode displays the LFO and modulation controls, including LFO 1, LFO 2, and LFO 3.
Env mode displays the envelope controls, including the detailed editing controls for ENV 1, ENV 2, and ENV 3.
Seq mode displays the arpeggiator and sequencer controls, including pattern, playback, macro motion, step programming, timing, and transport controls.
You don’t need to master all five modes immediately. Start in Play mode, get comfortable selecting layers and browsing presets, then explore the other modes as you begin editing sounds in more detail.
Playing Presets
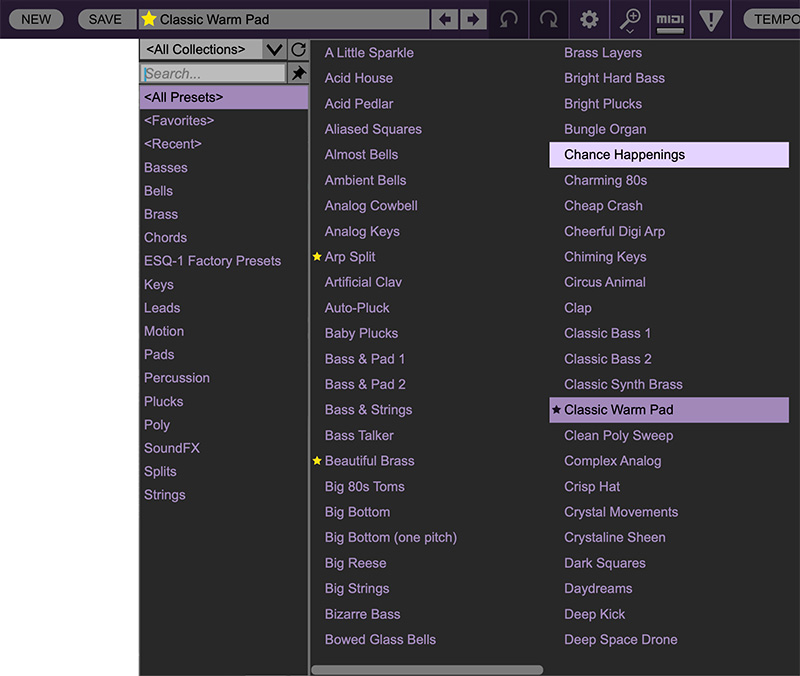
The fastest way to begin is by loading a preset from the Preset Browser and playing a few notes. Presets are useful not only as finished sounds, but also as starting points for your own patches.
As you browse, pay attention to whether a sound uses one layer, two stacked layers, or a split keyboard layout. ESQ-1’s two-layer design means a preset may be doing more than it first appears. A pad might have a soft digital choir on one layer and a darker filtered wave on the other. A bass might occupy the lower keyboard while a lead sits above it.
Understanding Layers
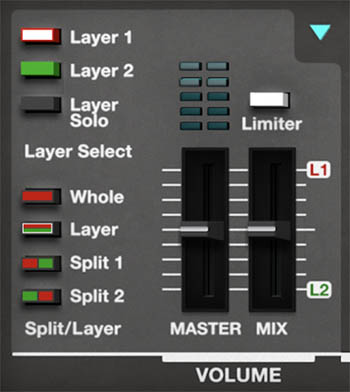
ESQ-1 has two fully independent synth layers: Layer 1 and Layer 2. Each layer can have its own sound, settings, modulation, sequencer behavior, and effects.
The layers are color coded to make it clear which layer is being viewed or edited. Layer 1 has its controls shown in red, and Layer 2 has its controls shown in green.
Layer 2 becomes available for editing when Layer mode is enabled in the Split/Layer section of the Volume panel. In Whole mode, ESQ-1 operates as a single-layer sound, and only the currently active layer is shown for editing. When you select Layer, the interface expands to show both Layer 1 and Layer 2, along with the Mix slider, which balances the two layers.
This is an important distinction. Whole mode is ideal when you want to work on one focused sound across the full keyboard. Layer mode activates the two-layer structure, allowing both layers to be edited and played together across the keyboard. From there, you can also use Split 1 or Split 2 to place the two layers in different keyboard ranges.
When editing a layered or split preset, make sure you’ve selected the layer you want to adjust. If you move a control and don’t hear the expected change, check whether Layer 1 or Layer 2 is selected, and confirm that the appropriate Split/Layer mode is active. You may simply be editing the other layer, or working in Whole mode when you meant to build a two-layer sound.
Whole, Layer, Split 1, and Split 2
The Volume section lets you choose how Layer 1 and Layer 2 are used across the keyboard.
Whole plays the selected layer across the full keyboard. Use this when you want a single-layer sound or when you want to focus on editing one layer at a time.
Layer stacks Layer 1 and Layer 2 across the full keyboard. This is ideal for big pads, complex hybrid sounds, doubled basses, wide leads, and any patch that benefits from two independent sounds playing together.
Split 1 places Layer 1 on the lower part of the keyboard and Layer 2 on the upper part. This is useful for classic performance setups such as bass on the left hand and lead, pad, or keys on the right.
Split 2 reverses that arrangement, placing Layer 2 on the lower part of the keyboard and Layer 1 on the upper part.
In Layer and Split modes, the keyboard range controls above the on-screen keyboard let you adjust how the layers are assigned across the keyboard. This makes it easy to create performance-ready sounds without opening a separate setup page.
Using Layer Solo
Layer Solo lets you hear only the currently selected layer. This is especially useful when editing layered sounds. For example, if a preset uses a bright digital attack on Layer 1 and a warm pad body on Layer 2, soloing each layer lets you hear exactly what each one contributes. You can adjust the oscillator levels, filter, envelopes, modulation, and effects for one layer without the other one clouding the patch.
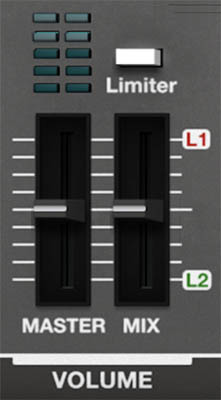
Master Level, Layer Mix, and Limiter
The Master slider controls the overall output level of the instrument.
When Layer mode is enabled, the Mix slider balances the level relationship between Layer 1 and Layer 2. Move it toward L1 to emphasize Layer 1, or toward L2 to emphasize Layer 2. In layered and split sounds, this is one of the quickest ways to rebalance a patch without changing the individual programming of either layer.
For example, if you’ve created a layered sound with a bright plucked attack on one layer and a darker sustained body on the other, the Mix slider lets you decide which Layer you want to emphasize (if at all).
The Limiter button helps keep the instrument’s output under control, especially when you’re using layered sounds, high resonance, stacked voices, long releases, Motion features, or effects that add gain. This can be particularly useful on ESQ-1 because a single preset can contain two independent layers, each with its own oscillators, modulation, sequencing behavior, and effects. It doesn’t take much for a big layered patch to become, as audio engineers put it, “enthusiastic.”
Musically, the Limiter is useful when you want to preserve a bold, energetic sound without sudden peaks jumping out too aggressively. It can help tame sharp attacks, resonant filter peaks, dense layered pads, or sequences with strong accents. For sound design, it lets you push the instrument harder while keeping the final output more manageable.
As always, use your ears. If a patch feels dynamic and controlled without the Limiter, you may not need it. If a sound is exciting but producing sudden level spikes, turn the Limiter on and adjust the Master level as needed.
The Basic Signal Path
At the heart of ESQ-1 is a classic hybrid signal path. Each voice begins with three Digital Wave Oscillators: OSC 1, OSC 2, and OSC 3. These oscillators provide the raw tone, using the original ESQ-1 digital waveforms as their source.
Each oscillator then passes through its own DCA, or digitally controlled amplifier: DCA 1, DCA 2, and DCA 3. These stages control the level of each oscillator before the signals are combined and sent into the filter.
From there, the sound passes through the Filter, which shapes the brightness and harmonic character of the combined oscillator signal. After the filter, the sound passes through DCA 4, the final amplifier stage. ENV 4 is closely associated with DCA 4 and is typically used to shape the overall volume contour of the sound.
Finally, the signal passes into the effects section, where Layer 1 and Layer 2 can each have their own effects chain before being processed by the Global effects chain.
In plain English: choose waves, balance them, filter them, shape their volume, animate everything, then add effects. That’s the ESQ-1 recipe. The rest is experimentation that often turns into something uniquely interesting and expressive.
Editing a Sound
A good way to begin editing is to start with a preset that’s close to what you want, then make small changes.
Try this:
Select a preset.
Choose Whole mode if you want to focus on one layer.
Use Layer Solo if the preset has two layers and you want to hear one at a time.
Use the Play, Edit, Mod, Env, and Seq buttons to move between different control areas in the Keyboard view.
Adjust oscillator levels to change the balance of the raw sound.
Use the filter controls to make the sound brighter, darker, softer, sharper, or more animated.
Adjust ENV 4 to change the overall shape of the sound.
Use the macro sliders to make broad musical changes.
Visit the Effects view to add polish, space, width, or movement.
Once you understand which layer you’re editing, which mode you’re viewing, and how the signal flows, ESQ-1 becomes much easier to explore.
A Useful First Experiment
Load a layered preset, then turn on Layer Solo and listen to Layer 1 by itself.
Switch to Layer 2 and listen again. Notice how each layer contributes something different: attack, body, motion, brightness, weight, atmosphere, or texture.
Then turn Layer Solo off and adjust the Mix slider. This gives you a quick feel for how ESQ-1 builds larger sounds from two independent layers.
Next, stay in the Keyboard view and try switching between Play, Edit, Mod, Env, and Seq. Notice how the main panel changes to reveal different parts of the instrument. This is a useful habit to build early, because many of ESQ-1’s deeper controls live behind these mode buttons.
Finally, open the Effects view and look at the red, green, and gray tabs. The red tab contains effects for Layer 1, the green tab contains effects for Layer 2, and the gray tab contains Global effects that process both layers together. This three-chain structure is a big part of what makes Cherry Audio’s ESQ-1 flexible, especially for layered and split sounds.
Where to Go Next
Once you’re comfortable loading presets, selecting layers, switching between the Keyboard, Motion, and Effects views, and using the Play, Edit, Mod, Env, and Seq modes, the rest of the instrument becomes much easier to understand.
The next chapters explain the toolbar and preset system, then take a closer look at the Keyboard view and the ESQ-1 voice architecture. From there, we’ll dig into the oscillators, filter, envelopes, modulation, Motion tools, and effects.