A static sound can be beautiful. But on a synthesizer as deep as the Ensoniq ESQ-1, the real magic often begins when the sound starts evolving and changing.
Modulation is how you make that happen. It lets one part of the instrument control another part. An envelope can open the filter. An LFO can add vibrato. Velocity can make harder-played notes brighter. Polyphonic aftertouch and MIDI Polyphonic Expression (MPE) allows supported controllers add expressive per-note movement. This is how the ESQ-1 shines at being a real performance instrument.
The original ESQ-1 was known for its unusually flexible modulation system, especially for its era. Cherry Audio’s ESQ-1 keeps that spirit intact while giving you a clearer, more visual way to work. Instead of thinking of modulation as something hidden in a tiny display, you can see assignments, use Macro sliders, work with three LFOs, and connect performance gestures to meaningful musical changes.
What Is Modulation?
A modulation system has two basic parts: sources and destinations.
A source creates movement or control. Examples include LFOs, envelopes, velocity, aftertouch, Macro sliders, pedals, and MPE gestures.
A destination is the parameter being controlled. Examples might include oscillator pitch, oscillator level, filter frequency, amplifier level, pan, effect amount, or another assignable parameter.
A simple modulation assignment might be:
LFO 1 → Oscillator Pitch. This creates vibrato.
Another might be:
Velocity → Filter Frequency. This makes harder-played notes brighter.
A more performance-oriented assignment might be:
Mod Wheel→ Filter Frequency. This lets the Mod Wheel open or close the filter to brighten or darken a sound.
This is the basic idea behind modulation: use one musical action or movement to control another part of the sound.
Tip: Start with one obvious modulation assignment before building complex patches. A single well-chosen routing is often more musical than five routings all fighting for the same spotlight.
The Mod Page
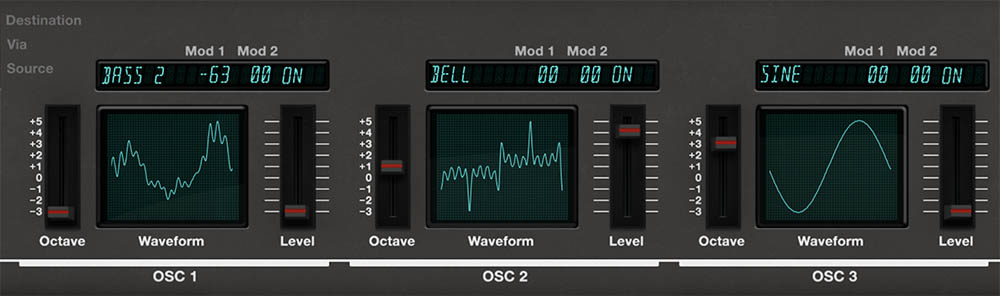
Click the Mod mode button in the Keyboard view to open the main modulation/LFO panel. This page contains the Mod Matrix, four Macro sliders, and LFO 1, LFO 2, and LFO 3.
The LFOs are repeating modulation sources. They can create vibrato, tremolo, filter movement, rhythmic pulsing, pitch drift, animated textures, and other repeating changes.
ESQ-1’s LFOs are more flexible than basic LFOs because each one includes its own level contour. This means an LFO doesn’t have to start at full strength and stay there. It can fade in gradually, fade out, begin subtly and grow stronger, or start boldly and settle down.
Tip: Think of the Mod page as the place where you give the patch behavior. The oscillators create tone. The modulation system makes it move.
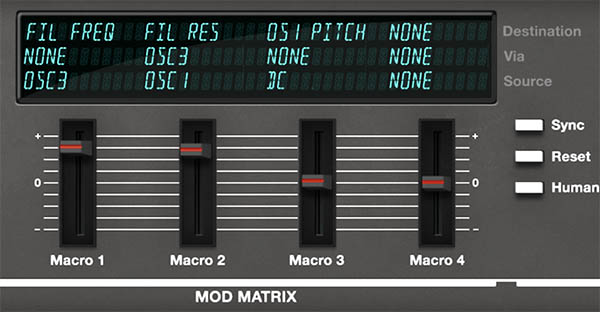
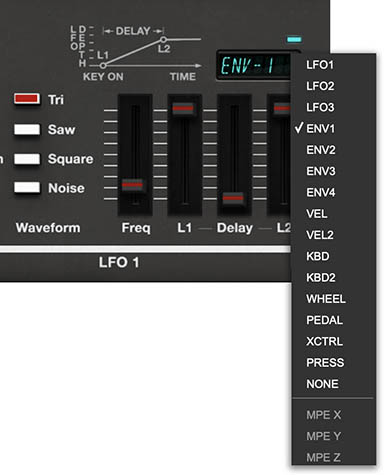
The Mod Matrix
The Mod Matrix display shows modulation assignments for the current layer. This is where you connect modulation sources to destinations and control how strongly those sources affect the sound.
Each Mod Matrix row includes:
• Destination – The parameter being controlled. • Via – An optional controller or source that scales the modulation. • Source – The modulation source creating the movement or control.
The four Macro sliders beneath the display correspond to the four Mod Matrix rows. Each Macro sets the amount for its matching modulation slot.
For example:
Macro 1 controls the modulation amount for Mod Matrix slot 1. Macro 2 controls the modulation amount for Mod Matrix slot 2. Macro 3 controls the modulation amount for Mod Matrix slot 3. Macro 4 controls the modulation amount for Mod Matrix slot 4.
This makes the Macro sliders less like generic “performance knobs” and more like direct modulation amount controls. They determine how much each Mod Matrix assignment affects the sound.
Tip: If a preset changes when you move a Macro slider, check the matching Mod Matrix row. That row tells you what the Macro is actually controlling.
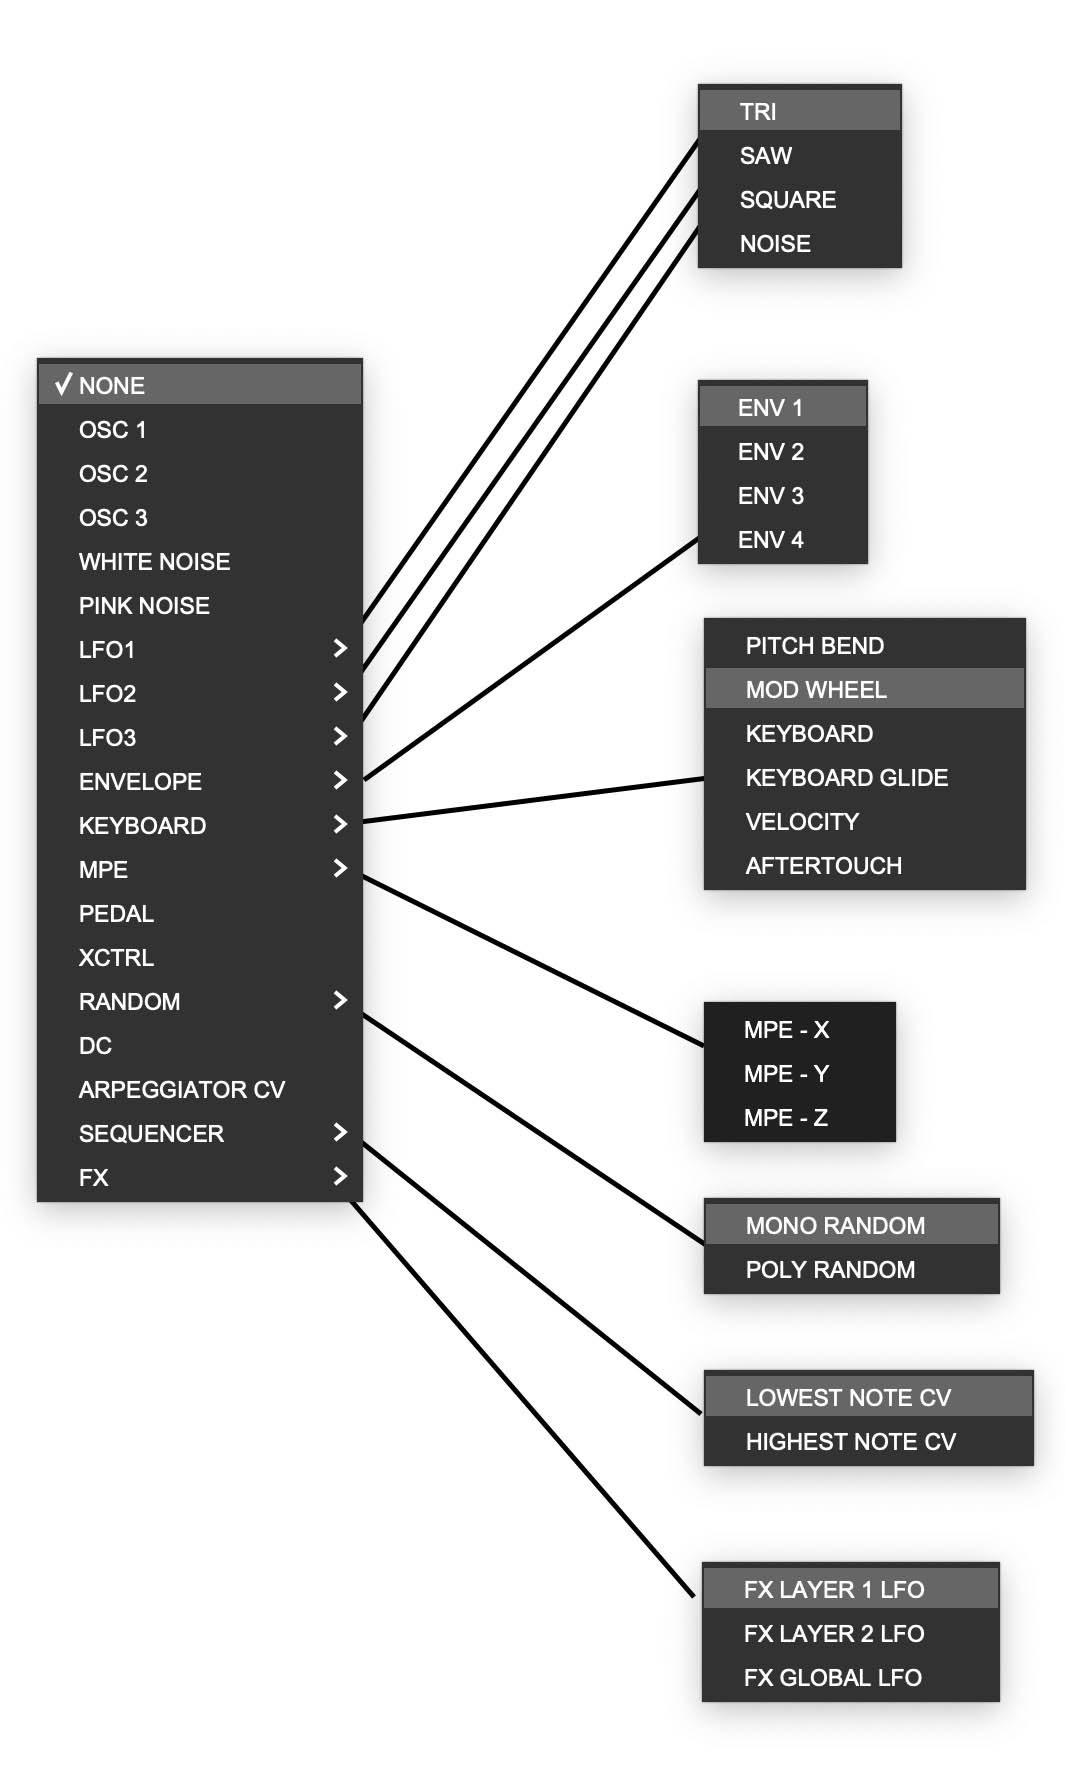
Here are the mod sources found in the Mod Matrix
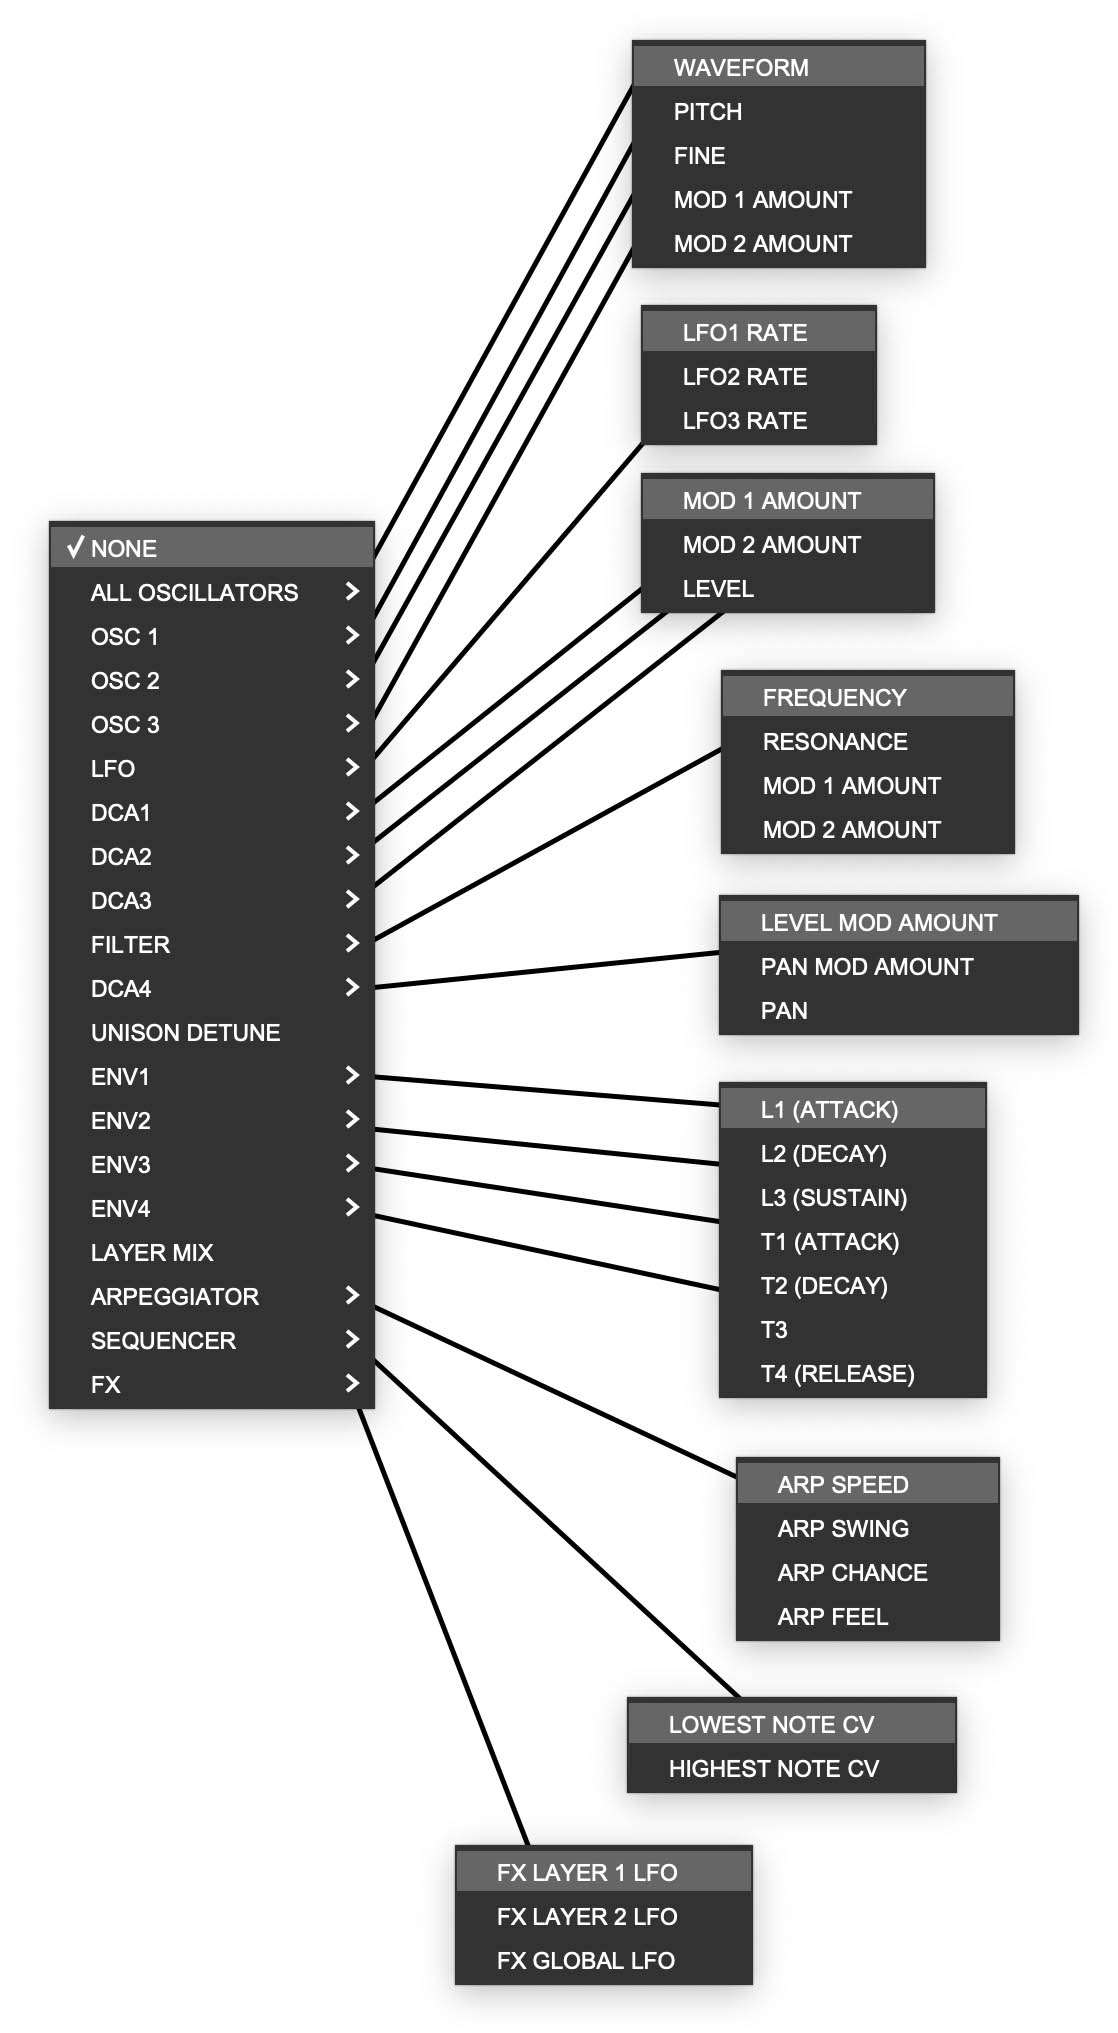
Here are the mode destinations found in the Mod Matrix
Modulation Amount and Polarity
Most modulation assignments include an amount, and that amount can often be positive or negative.
A positive amount moves the destination in one direction. A negative amount moves it in the opposite direction.
For example, positive envelope modulation to filter cutoff usually opens the filter as the envelope rises. Negative modulation can pull the cutoff in the opposite direction.
Positive velocity-to-filter modulation can make harder-played notes brighter. Negative velocity-to-filter modulation can make harder-played notes darker.
Tip: Negative modulation is easy to overlook, but it’s extremely useful. It lets one source push different destinations in opposite directions, which can make a patch feel more intentional and expressive.
The Three LFOs
ESQ-1 includes three independent LFOs: LFO 1, LFO 2, and LFO 3.
Each LFO can be used as a modulation source. One might provide delayed vibrato, another might move the filter, and a third might add rhythmic or random motion to oscillator level, pan, or another destination.
A useful programming approach is to give each LFO a job:
• Use one LFO for pitch or vibrato. • Use one LFO for filter or timbral movement. • Use one LFO for rhythmic, random, or special-effect motion.
Tip: Naming the job in your head helps keep complex patches sane. “LFO 1 is vibrato, LFO 2 is filter motion, LFO 3 is weirdness” is a surprisingly effective filing system.
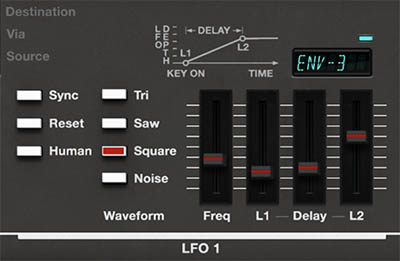
LFO Controls
Each of ESQ-1’s three LFOs has its own controls for waveform, speed, sync, reset behavior, human variation, level contour, and modulation depth.
Controls:
• Sync – Locks the LFO timing to the instrument or host tempo. When Sync is off, the LFO runs freely according to the Freq control. When Sync is on, the LFO follows tempo-based timing divisions.
• Reset – Determines whether the LFO restarts its cycle when a new note is played. Enable Reset for consistent note-to-note behavior. Turn it off when you want freer, more organic movement.
• Human – Adds variation to the LFO behavior. On the original ESQ-1, Human added a random element to LFO frequency, making the modulation feel less rigid and mechanical.
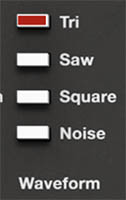
• Waveform – Selects the LFO shape: Tri, Saw, Square, or Noise.
• Freq – Sets the LFO speed. Lower settings create slow movement. Higher settings create faster vibrato, tremolo, pulsing, or special effects.
• L1 – Sets the starting LFO level when a note begins.
• Delay – Controls how quickly the LFO level moves from L1 to L2.
• L2 – Sets the final LFO level after the Delay transition. The LFO remains at this level while the key is held.
• Mod Source Display – Selects a modulation source that can further control the LFO output level. This is useful for mod wheel vibrato, pressure-controlled modulation, or more complex motion.
Tip: The LFO waveform creates the movement shape. L1, Delay, and L2 shape how much of that movement is heard over time.
LFO Waveforms
The LFO waveform determines the shape of the modulation movement.
• Tri – Creates smooth rising and falling motion. Useful for vibrato, tremolo, panning, filter sweeps, and gentle animation.
• Saw – Creates ramp-style movement. Useful for repeating rises, filter ramps, pitch sweeps, pulsing effects, and directional motion. For a falling saw effect, use a negative modulation amount at the destination.
• Square – Jumps between values. Useful for trills, stepped filter movement, rhythmic gating, abrupt tremolo, and obvious electronic effects.
• Noise – Creates random modulation. Useful for pitch instability, filter flicker, noisy attacks, chaotic motion, and animated textures that shouldn’t feel predictable.
Tip: For musical vibrato, start with Tri. For rhythmic jumps, try Square. For unpredictable movement, try Noise.
Modulating an LFO
Each LFO can have its output level controlled by another modulation source. The selected modulation source is shown in the small display near the LFO controls.
This modulation is added to the depth created by L1, Delay, and L2. In other words, L1, Delay, and L2 define the LFO’s own level contour, and the selected source can further increase or shape the LFO’s output.
This is especially useful for performance control.
Example: Mod Wheel Vibrato
Route an LFO to oscillator pitch.
Choose a smooth waveform, such as Tri.
Set the LFO to a musical vibrato speed.
Set L1 low so vibrato doesn’t start automatically.
Select Wheel as the LFO’s modulation source.
Move the mod wheel to bring in vibrato while playing.
Tip: This is a more expressive approach than permanent vibrato. The note can begin clean, then the player decides when to add movement.
LFO Modulation Examples
Delayed Vibrato
Delayed vibrato is one of the most useful LFO techniques on ESQ-1. It lets a note begin cleanly, then adds vibrato after the sound has started.
Try this:
Assign LFO 1 to oscillator pitch.
Choose Tri as the LFO waveform.
Set Freq to a moderate vibrato rate.
Set L1 low.
Set L2 to the desired vibrato depth.
Adjust Delay so the vibrato fades in after the note begins.
This works well for leads, flute-like sounds, vocal-style patches, strings, and expressive solo lines.
Tip: If the vibrato feels too obvious, lower L2. If it arrives too soon, adjust Delay for a slower transition. If it feels too mechanical, try enabling Human.
Tremolo and Level Movement
An LFO routed to amplifier level or oscillator level can create tremolo or pulsing motion. For smooth tremolo, use a triangle waveform and a moderate speed. For choppier motion, use square. For rhythmic pulsing, enable Sync and use a tempo-based rate.
On ESQ-1, level modulation can be especially interesting when applied to individual oscillator DCAs. Modulating DCA 1, DCA 2, or DCA 3 changes the level of one oscillator before the filter. This means the harmonic blend feeding the filter changes over time.
Tip: Use modulation to move the ingredients, not just the finished sound. A bright oscillator can shimmer in and out while the rest of the patch stays steady.
Filter Movement
LFOs are excellent for moving the filter. Slow filter movement can make pads and textures breathe. Moderate movement can add groove to chord parts. Synced movement can create rhythmic patterns. Noise movement can add grit and instability.
Try this:
Set the filter cutoff slightly darker than you want the final sound to be.
Route an LFO to filter cutoff.
Use a slow or moderate LFO speed.
Set a modest modulation amount.
Increase depth or enable Sync for more obvious rhythmic movement.
Tip: Give the filter room to move. If cutoff is already fully open or nearly closed, LFO movement may have little useful effect.
Pitch Modulation
Pitch modulation can be subtle, expressive, or completely unhinged. ESQ-1 is happy to help either way.
Small pitch modulation creates vibrato, drift, and ensemble-like motion. Larger amounts can create sirens, risers, drops, trills, special effects, unstable digital textures, and animated sync-style tones.
Good uses:
• Triangle LFO to pitch for vibrato • Slow LFO to pitch for drift • Square LFO to pitch for trills • Saw LFO to pitch for ramps • Noise LFO to pitch for instability • Subtle pitch modulation on one oscillator for pad movement
Tip: For musical vibrato, use small amounts. For basses, be careful: pitch movement in the low register can quickly make the sound feel unfocused.
Pedal and XCtrl
The Keyboard view includes Pedal and XCtrl MIDI assignment controls. These allow external performance controls to become modulation sources.
A pedal can be excellent for expressive changes while both hands remain on the keyboard. Use it to open the filter, fade in a layer, increase reverb, control volume, or bring in modulation.
XCtrl can be used as an additional external controller source. Depending on your MIDI setup, this might be assigned to a knob, slider, wheel, or other continuous controller.
Tip: A strong performance setup might use velocity for brightness, aftertouch for vibrato, a pedal for filter opening, and a Macro for effects intensity. That gives you several expressive dimensions without making the patch feel complicated.
Velocity as Modulation
Velocity is one of the most useful modulation sources because it responds directly to how hard you play.
A simple velocity-to-filter assignment can make a sound brighter when played harder. This works well for keys, plucks, basses, brass-like sounds, and leads.
Velocity can also control oscillator levels. For example, a bright waveform can become more prominent only when you play harder. This gives the patch a sharper attack at higher velocities while keeping softer notes warmer.
Good uses for velocity:
• Brightness response • Oscillator level changes • Sharper attacks • More expressive keys and plucks • Dynamic filter movement • Louder or more intense effects response
Tip: If velocity only makes the sound louder, the patch may still feel flat. Try using velocity to change brightness, oscillator mix, or attack character.
Aftertouch and Pressure
Aftertouch, or pressure, lets you add expression after a note is already held. Depending on your controller, this may be channel aftertouch or polyphonic/MPE-style pressure.
Pressure is excellent for vibrato, filter opening, brightness, level swells, oscillator mix changes, and effects intensity. It works especially well on sustained sounds such as leads, pads, strings, choirs, and drones.
Good uses for pressure:
• Pressure to vibrato depth • Pressure to filter cutoff • Pressure to oscillator level • Pressure to LFO depth • Pressure to delay or reverb mix • Pressure to layer intensity
Tip: A good pressure assignment feels like expression, not a sound explosion. Use enough to make the patch respond, but not so much that every sustained note turns into a dramatic incident.
KYBD and KYBD 2 Mod Sources
The KYBD and KYBD 2 modulation sources use keyboard position as a modulation source. In other words, the note you play determines the modulation value. Lower notes produce one value, higher notes produce another.
This is useful when you want a parameter to change gradually across the keyboard. For example, you might make higher notes brighter, reduce the level of a waveform in the lower register, or make modulation depth increase as you play up the keyboard.
KYBD provides a positive-going keyboard tracking signal. As you play higher notes, the modulation value increases. This is useful for classic keyboard tracking behavior, such as opening the filter more on higher notes.
KYBD 2 uses a different curve that moves from negative values in the lower keyboard range to positive values in the upper range. Around the middle of the keyboard, the modulation effect is near zero. This makes it useful for creating behavior that changes around a center point: lower notes can reduce a parameter, while higher notes increase it.
Tip: Use KYBD when you want a parameter to increase as you play higher notes. Use KYBD 2 when you want the lower and upper keyboard ranges to push a parameter in opposite directions. For example, KYBD 2 can make low notes darker while high notes become brighter, or reduce oscillator level below middle C while increasing it above middle C.
DC Mod Source
DC is a constant modulation source. It doesn’t cycle like an LFO, change over time like an envelope, or respond to your playing like velocity or pressure. Instead, it provides a steady value that can be used to offset a destination.
The amount setting determines how much offset is applied. A positive amount pushes the destination in one direction. A negative amount pulls it in the opposite direction.
This can be useful when you want to nudge a parameter through the modulation system rather than changing its main control directly. For example, DC can be used to raise or lower an oscillator level, bias a filter cutoff, shift a modulation depth, or create a fixed offset before another modulation source does its work.
Good uses for DC:
• Adding a fixed offset to a modulation destination • Biasing filter cutoff through the Mod Matrix • Raising or lowering an oscillator DCA level • Creating a static modulation amount for testing a routing • Pushing a parameter in the opposite direction with negative modulation • Setting up a “baseline” value before adding moving modulation
Tip: Think of DC as a steady hand on a control. It doesn’t move by itself, but it can push a destination up or down by a fixed amount. If an LFO is motion and an envelope is shape, DC is offset.
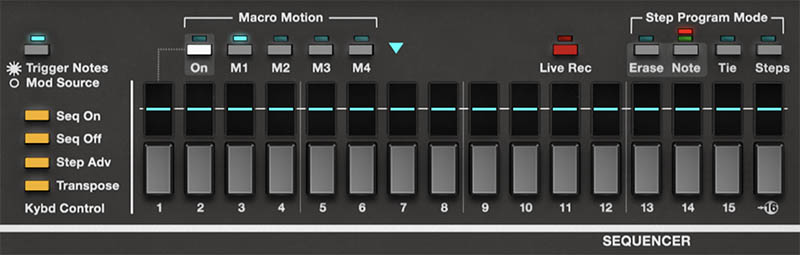
Macro Motion and Sequenced Modulation
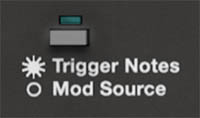
The four Macro sliders normally set the modulation amounts for the four Mod Matrix slots. Macro Motion takes that idea further by letting the Sequencer change those modulation amounts step by step.
When Macro Motion is enabled in the Sequencer and Mod Source is selected, the Sequencer no longer has to trigger notes. Instead, it can act as a modulation sequencer, varying the amount of modulation applied by one of the four Mod Matrix slots.
Controls:
• M1 – Animates the amount for Mod Matrix slot 1. • M2 – Animates the amount for Mod Matrix slot 2. • M3 – Animates the amount for Mod Matrix slot 3. • M4 – Animates the amount for Mod Matrix slot 4.
For example, if Mod Matrix slot 1 routes ENV 1 to filter cutoff, enabling Macro Motion for M1 lets the Sequencer vary the strength of that filter envelope movement on each step. Some steps can have a sharp, bright filter sweep, while others have little or none.
Refer to the "Arpeggiator and Sequencer" chapter for details on how to use the Sequencer to control Macro Modulation.
Tip: The Mod Matrix defines what is being modulated. Macro Motion defines how the modulation amount changes over time.
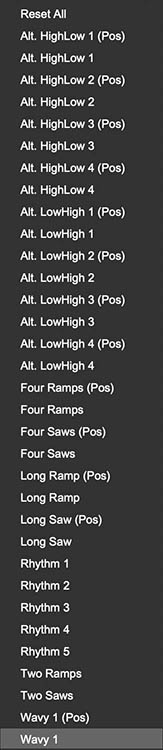
Macro Motion Shape Menu
The turquoise triangle near the Macro Motion section opens a menu of preset motion shapes. These can quickly create step-based modulation patterns such as ramps, saws, alternating high/low shapes, waves, and rhythmic patterns.
Use these as starting points, then adjust individual steps by hand if needed.
Good uses:
• Ramp shapes for gradual builds • Saw shapes for repeating rises or drops • Alternating high/low shapes for pulsing motion • Wavy shapes for smoother movement • Rhythm shapes for more complex step emphasis
Tip: Load a preset shape, listen, then edit. The shapes are starting points. Refer to the "Arpeggiator and Sequencer" chapter for details on how to use the Sequencer to control Macro Modulation.
MPE
MPE, short for MIDI Polyphonic Expression, allows compatible controllers to send continuous, expressive touch control for individual notes instead of applying the same pitch bend, pressure, or controller movement to the entire instrument (generally known as channel aftertouch). That means one note in a chord can bend, brighten, or respond to pressure while the other notes remain unchanged.
To leverage the expanded potential of MPE, you need an MPE-compatible controller such as those from companies like Expressive E, Roli, Roger Linn Design, Haken Audio, Ableton, and others.
In previous Cherry Audio instruments such as Dreamsynth, Sines, Miniverse, DCO-106 and others, the MPE implementation required the user to change to MPE mode in Settings, then map the controls in the MIDI MPE Control Tab.
In ESQ-1, MPE is now more integrated into the modulation system. To use MPE, select MPE as the current Voice Mode. If MPE is not selected in the Voice Mode display, ESQ-1 won’t respond to MPE performance data from your controller, even if the controller is transmitting MPE correctly.
In MPE mode, ESQ-1 responds to up to 15 polyphonic voices per layer (one MIDI channel is reserved for control information). Note that MPE mode is individually configured and assigned on a per layer basis.
Once MPE is enabled, the Mod Matrix and the Modulation Panels for OSC, DCA, LFO, and Filter allow you to freely assign MPE X, MPE Y, and MPE Z as modulation sources.
Typical MPE sources:
• MPE X – Often associated with left/right movement, commonly used for per-note pitch bends.
• MPE Y – Often associated with forward/backward or vertical touch-position movement, commonly used for timbral control.
• MPE Z – Usually associated with pressure.
Tip: Voice Mode enables MPE. Assignments in Mod Matrix and/or the Modulation Panels for OSC, DCA, LFO, and Filter determine what those MPE gestures actually do.
Note: Other MPE dimensions such as strike and release are not directly supported in ESQ-1.
Using MPE Musically
MPE is most powerful when used musically rather than as a technical demonstration.
Try these approaches:
• For pads, route MPE Z to filter cutoff or oscillator level so individual notes bloom inside a chord.
• For leads, route MPE X to pitch and MPE Z to vibrato depth or filter brightness.
• For digital keys, use MPE pressure or slide to add brightness, tremolo, or subtle pitch movement.
• For evolving textures, assign MPE gestures to filter cutoff, oscillator mix, formant-wave level, LFO depth, or effects mix.
Tip: The most musical MPE assignments usually feel like natural gestures: slide to bend or brighten, press to intensify, move along the playing surface to change tone.
A Note on MPE Controllers
Cherry Audio's ESQ-1 includes several MPE presets, which were designed using the 2026 Osmose CE controller by Expressive E. Consider the MPE presets included with ESQ-1 as practical examples and starting points.
As MPE technology is still in its early stages, we've noticed that different manufacturers like Roli, Keith McMillan, Haken, and Expressive E have varying default implementations and interpretations of how MPE should function with their hardware. Some presets may require fine-tuning to align with your hardware or to suit your personal preferences for expressive performance.
For example, when using MPE to express filter frequency or pitch more effectively with certain controllers, you may need to increase some parameter values in the preset. Some controllers automatically map the MPE X dimension to pitch, so you might have to disable this mapping in the presets and save (overwrite) them to work better with your gear. Additionally, you may find you need to adjust the settings for the lower and upper ranges in the controller's configuration software. Consult your controller documentation for further details.
Practical Modulation Recipes
Delayed Vibrato Lead Route an LFO to oscillator pitch. Use a smooth waveform, moderate frequency, low L1, higher L2, and adjust Delay so vibrato fades in after the note begins. Add pressure or a Macro to control overall vibrato amount.
Expressive Filter Pad Route velocity lightly to filter cutoff so harder notes start brighter. Route pressure to filter cutoff or LFO depth so held notes can bloom. Add a slow LFO to the filter with Human enabled for gentle variation.
Moving Digital Texture Use one LFO for slow filter motion, another for subtle oscillator pitch drift, and an envelope to fade in the level of a complex digital wave. The sound begins clearly, then develops harmonic motion as it sustains.
Rhythmic Sequence Patch Use synced LFOs for filter or level movement, plus Macro Motion for step-based modulation intensity. Enable Reset if you want each note or step to behave predictably.
Velocity-Layered Key Route velocity to the level of a brighter oscillator. Soft playing produces a round tone, while harder playing adds attack and sparkle.
MPE Pad Route per-note pressure to filter cutoff and subtle oscillator level. Individual notes within a chord can brighten or shift independently, creating expressive movement that would be dif
Avoiding Modulation Clutter
Because ESQ-1 offers many modulation possibilities, it’s easy to overdo it. A patch with too much modulation can feel unfocused, especially if several sources are moving the same destination at once.
When a sound feels chaotic, simplify. Turn down one modulation amount at a time. Check whether multiple LFOs are moving the filter. Check whether envelopes and Macros are fighting over the same parameter. Check whether oscillator levels are changing so much that the filter never receives a stable tone.
Tip: A good patch often has one or two main movements, plus a few subtle supporting gestures. Not everything needs to move. Stillness gives motion something to contrast against.
Building Expressive Patches
When designing a patch, think in terms of performance questions:
• What should happen when you play harder? • What should happen when you hold a note? • What should happen when you move a Macro? • What should happen when you press into the keyboard? • What should happen over time without touching anything?
A bass might need velocity brightness, tight envelope response, and very little LFO movement. A pad might need slow LFO drift, pressure-controlled brightness, and a Macro for adding shimmer. A lead might need delayed vibrato, aftertouch control, and a filter Macro. A sequence might need synced modulation and predictable LFO reset behavior.
Tip: Start with the musical role, then build the modulation around it. The result will feel intentional rather than busy.
Simple Modulation Exercise
Here’s a quick way to learn the basic modulation workflow:
Start with a simple single-layer patch in Whole mode.
Choose one oscillator waveform, set a comfortable filter position, and shape the sound with ENV 4.
Go to Mod mode and set LFO 1 to a smooth waveform such as a sine wave.
Assign LFO 1 lightly to oscillator pitch for vibrato.
Set L1 low, L2 slightly higher, and adjust Delay so the vibrato fades in after the note begins.
Assign velocity to filter cutoff. Play softly, then harder, and listen to how the sound responds.
Assign a Macro to filter cutoff or effects mix. Move the Macro while playing and listen for a useful performance gesture.
Try enabling Human on the LFO and listen to whether the modulation feels less rigid.
This exercise covers the heart of ESQ-1 modulation: repeating motion, performance response, and hands-on control. Once those ideas are clear, deeper routings become much easier to explore.