Envelopes are one of the main reasons a synthesizer feels musical instead of mechanical. They determine how a sound changes from the moment you press a key to the moment it fades away. A waveform by itself is just raw tone. An envelope gives it character that evolves over time. They’re the difference between a digital wave sitting there like a static object, and a playable instrument that responds, moves, and behaves to your playing like a genuine instrument should.
On Ensoniq ESQ-1, envelopes are especially important because they can do much more than shape volume. They can animate oscillator pitch, oscillator level, filter cutoff, amplifier level, and other modulation destinations. This means an envelope can make a sound pluck, swell, brighten, darken, bend, strike, fade, bloom, or shift from one tonal personality to another while a note is held.
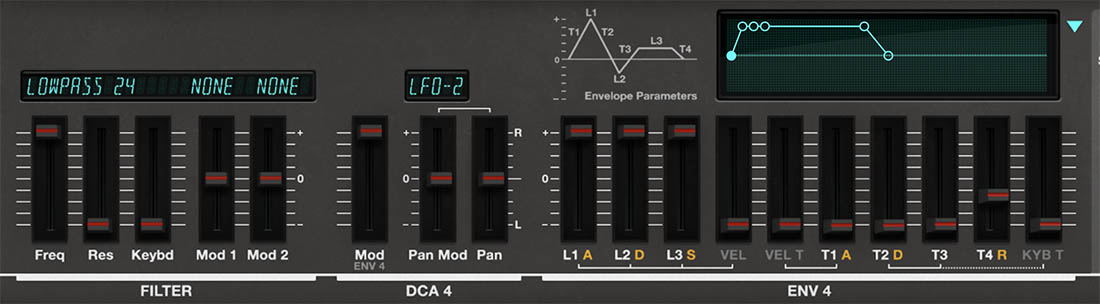
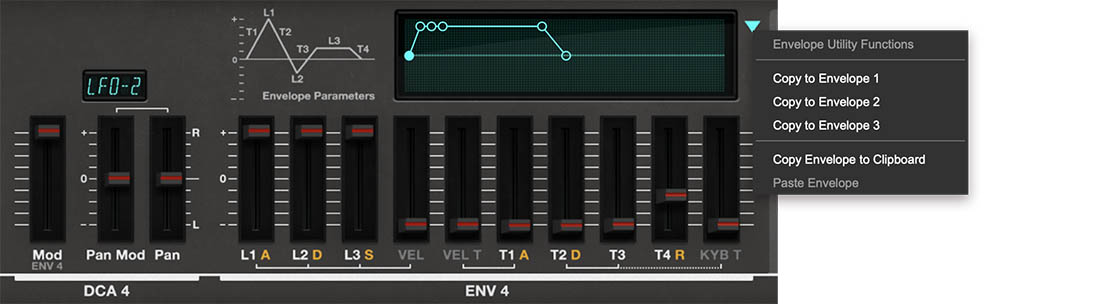
The ESQ-1 includes four envelopes: ENV 1, ENV 2, ENV 3, and ENV 4. The first three are shown together in Env mode, where you can edit their shapes in detail. ENV 4 is closely tied to DCA 4, the final amplifier stage, and is shown prominently in Play and Edit modes because it controls the overall volume behavior of the voice.
Not Just ADSR
Many synthesizers use a familiar ADSR envelope: Attack, Decay, Sustain, and Release. The ESQ-1 envelope design is a little more flexible. Instead of a simple ADSR layout, each ESQ-style envelope uses multiple levels and times. The levels define target points in the envelope shape, while the times define how long it takes to move from one point to the next.
The basic idea is simple. The envelope starts when a key is played, rises or falls toward one level, moves to another level, then settles at a sustain level until the key is released. After release, it moves back down according to the release time.
This gives you more detailed control than a basic ADSR envelope. You can create shapes that behave like familiar ADSR envelopes, but you can also create more unusual contours: rising envelopes, falling envelopes, stepped-feeling shapes, slow transitions, sharp attacks, or shapes that begin one way and then settle somewhere unexpected.
In other words, the ESQ-1 envelope isn't simply a gate. It’s a programmable contour.
ENV 1, ENV 2, and ENV 3
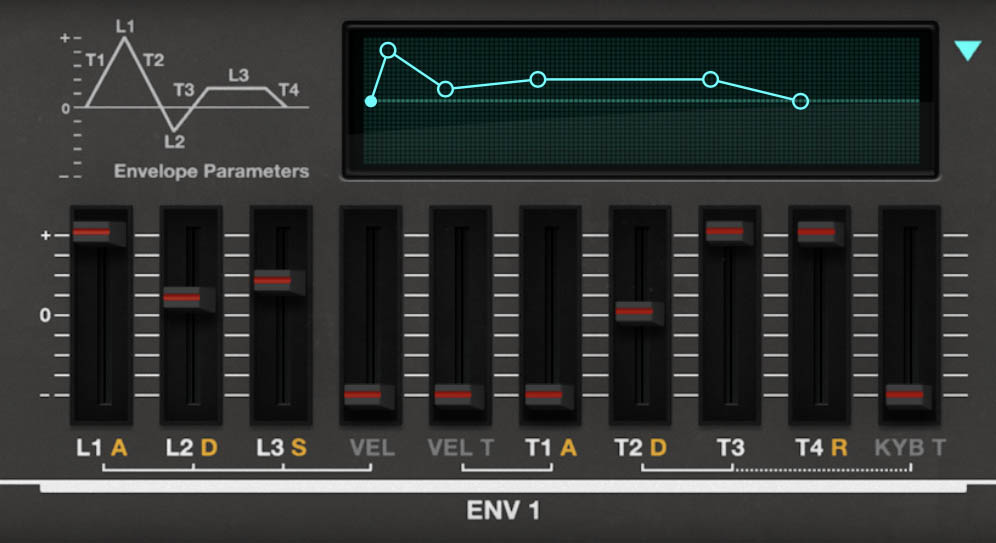
In Env mode, the main panel displays ENV 1, ENV 2, and ENV 3. Each envelope has its own graphical display, making it much easier to understand the shape you’re creating. As you adjust the level and time controls, the display shows how the envelope rises, falls, sustains, and releases.
ENV 1, ENV 2, and ENV 3 are general-purpose modulation envelopes. They can be used to shape many parts of the sound, depending on how they’re assigned in the modulation system. For example, one envelope might control filter cutoff, another might shape oscillator pitch, and another might fade in the level of a particular oscillator through its DCA.
This is where ESQ-1 sound design gets interesting. You’re not limited to one envelope for volume and one for filter. You can use envelopes as independent motion sources, each with its own shape and musical purpose.
A classic use would be assigning an envelope to the filter so the sound starts bright and then settles into a darker tone. A more distinctly ESQ-style use would be assigning an envelope to one oscillator’s DCA, causing a bright or metallic wave to appear only at the beginning of a note, while the other oscillators provide the sustained body. The listener hears one sound, but inside the patch, several things are moving.
ENV 4 and the Final Amplifier
ENV 4 has a special role. It is closely associated with DCA 4, the final amplifier stage after the filter. In most everyday programming, ENV 4 functions as the main volume envelope for the complete voice. This means ENV 4 determines how the finished sound begins, sustains, and ends. It controls whether a patch has an immediate attack, a slow fade-in, a short pluck, a long release, or a smooth pad-like tail.
Because ENV 4 is so central to the final sound, Cherry Audio’s ESQ-1 gives you quick access to ENV 4 controls from the main panel. That makes sense. Even a small change to ENV 4 can completely alter how a patch feels under your fingers.
Take the same oscillator and filter settings and give them a fast attack, short decay, low sustain, and short release. Now the sound behaves like a pluck. Give it a slow attack, high sustain, and long release, and it becomes a pad. The raw tone may be identical, but the musical role has changed completely. That’s why ENV 4 is one of the most important controls on the synth.
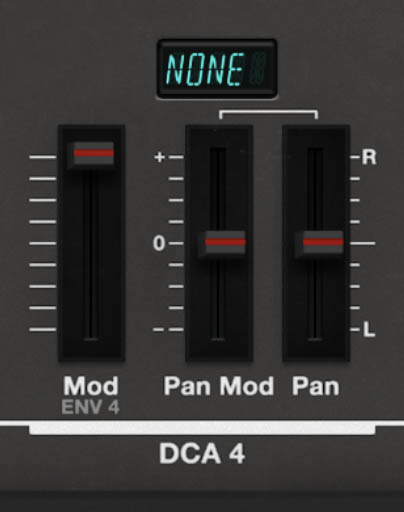
DCA 4 Level and Pan Controls
The DCA 4 section also includes additional modulation and pan controls, so the final voice level and stereo position can respond to envelopes, LFOs, velocity, keyboard position, wheel, pedal, pressure, or other modulation sources.
Controls:
• Mod – Sets the amount of level modulation applied to DCA 4 from Envelope 4. This is where ENV 4 controls the final volume shape of the voice. Higher amounts allow the modulation source to have a stronger effect on the final level.
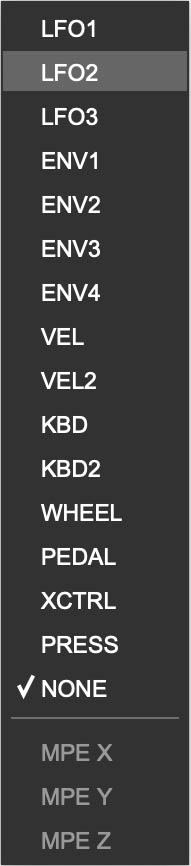
• Pan Mod Source Display – Click the small display above the Pan Mod slider to choose a pan modulation source. Available sources include LFO 1, LFO 2, LFO 3, ENV 1, ENV 2, ENV 3, ENV 4, VEL, VEL 2, KBD, KBD 2, WHEEL, PEDAL, XCTRL, PRESS, and NONE. MPE sources may also appear when MPE is available/enabled.
• Pan Mod – Sets how strongly the selected modulation source moves the voice in the stereo field. Positive and negative values determine the direction and depth of the pan movement.
• Pan – Sets the base stereo position of the voice, from left to right. Use this to place the selected layer in the stereo field before adding modulation.
Tip: Think of Pan as the starting position, and Pan Mod as the movement around that position. For a stable sound, keep Pan centered and Pan Mod low or off. For animated stereo movement, choose an LFO as the Pan Mod source and raise Pan Mod until the sound starts moving across the stereo field.
Using Pan Mod Musically
Pan modulation can make a sound feel wider, more animated, or more spatially alive. It works especially well on pads, arpeggios, bells, digital keys, and evolving textures.
Good uses:
• LFO to Pan – Creates automatic stereo movement. Slow LFOs work well for pads and textures; faster LFOs can create tremolo-like stereo effects.
• Velocity to Pan – Lets harder-played notes appear in a slightly different stereo position. Use subtly for a more dynamic, less static feel.
• Keyboard tracking to Pan – Can spread notes across the keyboard, with lower notes leaning one way and higher notes leaning the other.
• Pressure or Pedal to Pan – Allows real-time performance control over stereo placement.
• Envelope to Pan – Moves the sound during the note, such as starting slightly left and settling toward center, or creating a quick stereo gesture at the attack.
Tip: Stereo motion is powerful, but it can get seasick quickly. For basses and leads, keep Pan Mod subtle or centered. For pads, arpeggios, and sound-design patches, a little movement can make the sound feel much more alive.
Envelope Levels: L1, L2, and L3
Each envelope includes three main level targets: L1, L2, and L3.
L1 is the first level the envelope reaches after a note is played. In a typical volume-style envelope, this often acts like the peak attack level.
L2 is the next level the envelope moves toward. This is often used like a decay target.
L3 is the level where the envelope settles while the key is held. In a familiar ADSR-style shape, this behaves like the sustain level.
The important thing to understand is that these are target levels. The envelope doesn’t simply turn on and off. It travels from one level to another over time.
For a simple pluck, L1 might be high, L2 lower, and L3 very low or zero. The sound jumps quickly to a strong attack, then falls away. For a sustained pad, L1, L2, and L3 might all remain fairly high, with the times adjusted to create a slow, smooth shape. For a more unusual modulation contour, the levels can be set so the envelope rises, falls, and rises again.
When ENV 1, ENV 2, or ENV 3 are used as modulation sources, these levels determine the strength and direction of the modulation contour. When ENV 4 is shaping DCA 4, the levels define the loudness contour of the finished voice.
Envelope Times: T1, T2, T3, and T4
The T controls set how long the envelope takes to move from one level stage to the next. If the L controls define where the envelope goes, the T controls define how quickly it gets there.
Controls:
• T1 – Sets the time it takes the envelope to move from silence to L1 after a note is played. This is the envelope’s attack stage. Shorter settings create an immediate start; longer settings create a slower fade-in.
• T2 – Sets the time it takes the envelope to move from L1 to L2. This can create a quick drop after the attack, a smoother transition into the body of the sound, or a more gradual tonal or volume change.
• T3 – Sets the time it takes the envelope to move from L2 to L3. This lets the sound continue changing while the key is held.
• T4 – Sets the release time, or how long the envelope takes to fade after the key is released. Shorter settings make notes stop tightly; longer settings let them linger.
Because ESQ-1 envelopes include multiple level targets and multiple time stages, they can create more sculpted shapes than a basic ADSR envelope. A sound can have one behavior at the attack, another during the body of the note, and another after key release.
Tip: Fast times create sharp, percussive behavior. Slow times create fades, swells, and evolving transitions. For plucks, start with fast T1 and shorter T2/T3 settings. For pads, try a slower T1 and longer T4.
Reading and Editing the Envelope Display
The graphical envelope displays in Env mode show each envelope as a contour, making it much easier to understand how the levels and times relate to each other. This is especially helpful because ESQ-1 envelopes are more flexible than a simple ADSR layout. The display lets you see whether the envelope is rising quickly, falling gradually, sustaining high, dipping low, or releasing slowly.
The display is also editable. Click and drag the circular handles on the envelope graph to reshape the envelope directly. Dragging a handle changes the related level and time values, giving you a fast, visual way to shape the envelope without thinking only in terms of individual parameter sliders. This is often the quickest way to rough in a musical envelope, especially for sounds with more complex contours.
When programming your own sounds, use your ears first, but let the display help you understand what’s happening. If a sound has a slow fade-in, you’ll see a longer T1 slope. If it has a quick attack and short decay, you’ll see a fast rise followed by a quick move toward a lower level. If a modulation envelope is doing something unexpected, the graphic can help you spot whether one of the level or time settings is causing it.
The turquoise triangle at the right side of the envelope display opens the Envelope Utility Functions menu. This menu lets you copy the current envelope shape to another envelope, copy the envelope to the clipboard, or paste a copied envelope shape when available. This is a very useful shortcut when you want two envelopes to start from the same contour, then customize one of them for a different purpose.
For example, you might create a filter envelope you like, copy it to another envelope, and then adjust the copy so it fades in an oscillator level or shapes another modulation destination in a related way. Or you might copy a carefully tuned envelope from ENV 1 to ENV 2, then make ENV 2 slightly slower, sharper, or deeper. It’s a quick way to create coordinated movement without rebuilding the same shape by hand.
The envelope display is there to make the envelope easier to see, easier to edit, and easier to reuse. For a synth with this much modulation potential, that’s not just a convenience. It’s a sanity-preservation feature.
Velocity and Envelope Attack Response
The envelope sections include a velocity-related timing control labeled VEL T. This is Cherry Audio’s version of the original ESQ-1’s T1V parameter, which stood for velocity attack control.
VEL T makes the envelope’s first time stage respond to how hard you play. More specifically, it affects T1, the envelope’s attack time. As VEL T is increased, harder keystrokes shorten T1, causing the envelope to reach its first level more quickly.
This is a very useful performance feature because it lets the same sound respond with different attack behavior depending on your touch. Play softly, and the envelope can rise more slowly and gently. Play harder, and the attack can become sharper, faster, and more immediate.
For a string-like or pad sound, VEL T can let soft notes bloom gradually while harder notes speak with more definition. For a pluck, key, or mallet-style sound, it can make accented notes feel more crisp and percussive. For a filter envelope, harder playing can make the brightness arrive more quickly, giving the impression of stronger articulation.
The important distinction is that VEL T does not simply make the envelope “more intense.” It changes how velocity affects the attack time of the envelope. If T1 is already set to zero, VEL T won’t have any audible effect, because there’s no attack time left to shorten. But when T1 has some length to it, VEL T can make a patch feel much more responsive and playable.
Keyboard Decay Scaling
The envelope sections also include a keyboard-based timing control labeled KYB T. This is Cherry Audio’s version of the original ESQ-1’s TK parameter, which stood for keyboard decay scaling.
KYB T changes the envelope’s decay timing depending on where you play on the keyboard. As KYB T is increased, higher notes shorten T2 and T3, making them decay faster than lower notes. The higher the KYB T setting, the greater the difference in decay time between the low and high ends of the keyboard.
This is useful because many acoustic instruments don’t decay evenly across their entire range. Piano is the classic example: low notes tend to ring longer, while higher notes decay more quickly. KYB T lets you bring some of that range-sensitive behavior into an ESQ-1 patch.
For plucked, keyed, mallet, piano-like, or bell-like sounds, KYB T can make the envelope feel more natural across the keyboard. Lower notes can remain fuller and longer, while higher notes become tighter and more articulate. It can also be useful for synth basses, digital keys, and percussive sounds where the upper register feels too smeared or the lower register feels too short.
Like VEL T, KYB T only affects timing stages that have time to change. If T2 and T3 are both set to zero, KYB T won’t have any audible effect. But with meaningful T2 and T3 values, it’s a subtle and powerful way to make the envelope feel less static and more instrument-like across the keyboard.
Sustain Pedal
The Sustain Pedal control in Env mode determines how the envelopes respond to sustain pedal behavior. This is especially important for performance sounds such as pads, keys, layered textures, and split setups. The sustain pedal may seem like a basic performance feature, but in a layered synth like ESQ-1, it can become an important part of a sound's character.
With sustain behavior enabled, held notes can continue according to pedal input, allowing you to sustain chords while changing hand position, layering phrases, or playing over the top. This is useful for broad pads, cinematic textures, sustained keys, and performance patches where the sound needs to linger naturally.
For shorter sounds, sustain pedal behavior can also be creatively useful. A pluck or digital key can become more atmospheric when sustained into delay or reverb. A split patch can hold a lower layer while you play an upper lead. A layered pad can become a harmonic bed that supports additional movement from the sequencer or arpeggiator.
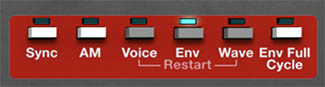
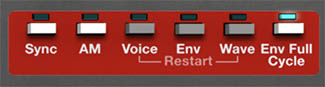
Env Restart
The Env Restart button in the Mode Panel controls whether envelopes restart when new notes are played. When envelope restart is enabled, a newly played note starts its envelope from the beginning. This gives each note a clear and consistent attack. It’s useful for plucks, basses, keys, sequenced parts, and any sound where the beginning of each note needs to be well defined.
When envelope restart is not enabled, envelopes may continue from their current state instead of restarting from the beginning, depending on the voice behavior and playing style. This can create smoother transitions, especially for legato lines, pads, and sounds where repeated hard retriggering would feel too abrupt.
Musically, this is really a feel control. A bass line often benefits from clear envelope restarting because each note needs punch and definition. A slow pad may feel more natural when transitions are smoother. A lead may go either way: restart for precise articulation, or smoother behavior for connected phrases.
If a sound feels too choppy, check Env Restart. If it feels too soft or indistinct at the start of each note, check it again.
Env Full Cycle
The Env Full Cycle button in the Mode Panel determines whether envelopes are allowed to complete their full programmed shape once triggered. This can be useful for sounds where the envelope contour is an important part of the patch, even if the key is released quickly. For example, a percussive envelope, pitch sweep, filter motion, or evolving modulation shape may need to play through its full movement to create the intended effect.
With Full Cycle behavior enabled, an envelope can behave more like a triggered event. This is useful for percussion, sound effects, sequenced patterns, rhythmic modulation, and sounds where the contour itself is part of the musical gesture.
With Full Cycle disabled, envelope behavior is more directly tied to how long you hold the key. Release the key sooner, and the envelope moves into its release behavior sooner. This is often what you want for expressive playing, pads, leads, and traditional keyboard parts.
The choice depends on the sound. If the envelope is shaping normal musical articulation, you may want it to respond closely to note length. If the envelope is creating a specific motion or event, Full Cycle can help preserve that gesture.
Envelopes and Oscillator Levels
One of the most powerful uses of envelopes in ESQ-1 is controlling the levels of individual oscillators through DCA 1, DCA 2, and DCA 3. This lets the harmonic makeup of a sound change over time before it reaches the filter.
For example, imagine a patch where OSC 1 provides the main sustained tone, OSC 2 adds a bright attack, and OSC 3 provides a slow-moving digital texture. An envelope can make OSC 2 appear only at the beginning of the note, giving the sound a sharp front edge. Another envelope can fade OSC 3 in gradually, so the sound becomes more complex as it sustains.
This kind of programming is very different from simply filtering a static oscillator mix. The filter is receiving a changing blend of waveforms, so the whole sound evolves from the inside. For ESQ-1 programming, this is one of the best tricks. It’s how you can make digital waves become more animated and expressive.
Envelopes and the Filter
Using an envelope to control filter cutoff is a classic subtractive synthesis techniques, and it works well on ESQ-1. A fast filter envelope can create bright attacks for basses, plucks, keys, and brass-like sounds. A slower envelope can make a pad develop gradually. A more dramatic envelope can create sweeps, effects, and animated digital textures.
Because the ESQ-1 uses digital waveforms, filter envelopes can reveal different parts of a wave over time. A bright, complex wave may begin with a sharp attack, then settle into a warm body. A darker wave may open gradually into something more vocal or brassy. A metallic wave may become more playable when the filter envelope controls how much of its edge appears.
For musical programming, set the filter cutoff first so the sustained tone feels right. Then add envelope modulation to create the movement into or away from that tone. This usually works better than opening the filter all the way and wondering why the envelope isn’t doing anything dramatic. A filter needs room to move.
Envelopes and Pitch
Envelopes can also be used to modulate oscillator pitch. This is useful for both musical and special-effect purposes. A small, fast pitch envelope can add a subtle attack transient, making a sound feel more percussive or expressive. A downward pitch movement can give drums, basses, and effects a stronger impact. A larger pitch sweep can create sci-fi effects, risers, drops, or classic sync-style motion when used with oscillator sync.
For musical sounds, keep pitch envelope amounts small unless you want the pitch movement to be obvious. A tiny pitch snap at the beginning of a note can add life without making the sound feel out of tune. Larger movements are better for effects, percussion, and experimental textures.
Envelopes and Layered Sounds
Because Cherry Audio’s ESQ-1 has two fully independent layers, envelope programming becomes even more useful. Each layer can have its own envelope behavior. One layer might have a fast, percussive attack, while the other fades in slowly. One might release quickly, while the other lingers. One might use a filter envelope for brightness, while the other stays darker and steady.
This is a powerful way to build sounds that feel larger than a single patch. A layered key can have a bright digital attack on one layer and a warm sustained body on the other. A split patch can use tight envelopes for a left-hand bass and smoother envelopes for a right-hand pad or lead. A Motion-based preset can use envelopes to make rhythmic parts more articulate while sustained layers provide atmosphere.
When a layered preset sounds too busy, solo each layer and check the envelopes. Often the problem is not the waveform or the effects. It’s that both layers are trying to speak at the same time, in the same way, with the same shape. Give each layer a different envelope role and the sound usually opens up.
Practical Envelope Examples
For a warm pad, use ENV 4 with a slower attack, a high sustain level, and a longer release. Add a slow filter envelope if you want the sound to brighten gradually as it fades in. If the pad feels too static, use another envelope to slowly introduce the level of a brighter oscillator.
For a digital pluck, use a fast attack, quick decay, low sustain, and short-to-medium release. A filter envelope can create the bright initial snap, while ENV 4 controls how quickly the note falls away. This works especially well with delay, where the envelope keeps the original note tidy and lets the echoes provide space.
For a hybrid bass, keep ENV 4 tight and controlled. Use a fast attack and a release that suits the tempo of the part. Then use a filter envelope to add a quick brightness burst at the beginning of each note. If the bass needs more definition, use an envelope to briefly raise the level of a brighter oscillator.
For a brass-like patch, use an envelope that opens the filter quickly but not instantly. Real brass doesn’t usually appear out of nowhere like a light switch. Give the attack a little shape, let the filter settle, and use ENV 4 to support the phrase with a strong sustain.
For an evolving texture, think beyond volume. Use ENV 4 to create the overall fade-in and release, but use ENV 1, ENV 2, or ENV 3 to change oscillator levels, filter cutoff, or pitch over time. The goal is a sound that continues revealing new color after the note begins.
An Envelope Exercise
Start with a single-layer sound in Whole mode. Use one oscillator and choose a waveform with a clear tone. Open the filter enough to hear the wave clearly.
Now adjust ENV 4. Start with a fast attack, medium sustain, and short release. Play a few notes. Then lengthen the attack and notice how the sound becomes softer. Lengthen the release and notice how the sound begins to linger. Lower the sustain and shorten the decay stages to create a more plucked shape.
Next, assign or adjust an envelope to control the filter. Set the filter cutoff to a moderately low position, then use the envelope to open it at the start of the note. Listen to how the brightness changes independently from the volume.
Finally, use an envelope to bring in another oscillator through its DCA. Let the second oscillator appear only at the attack, or fade in slowly after the note begins. This shows how envelopes can shape not only volume and brightness, but the actual harmonic ingredients of the sound.
Once you hear that, the ESQ-1 envelope system starts to make much more sense. You’re not just drawing volume shapes. You’re composing the internal motion of the patch.