Filter and Amplifier
Shaping the Sound After the Oscillators
After OSC 1, OSC 2, and OSC 3 pass through DCA 1, DCA 2, and DCA 3, their signals are combined and sent into the Filter. This is where the raw digital wave material starts becoming a finished musical sound.
The basic post-oscillator signal path is: DCA 1 / DCA 2 / DCA 3 → Filter → DCA 4 → Effects
In plain English: the oscillator DCAs balance the ingredients, the filter shapes the tone, and the final amplifier shapes how the finished sound begins, sustains, and fades away.
The Filter
The ESQ-1 filter shapes the combined output of the three oscillators. It controls brightness, focus, and harmonic balance. Because ESQ-1 begins with digital waveforms, the filter has a particularly important job. Some waves are bright, glassy, buzzy, metallic, vocal-like, or harmonically dense. The filter lets you tame them, focus them, smooth them, animate them, or push them into more expressive territory.
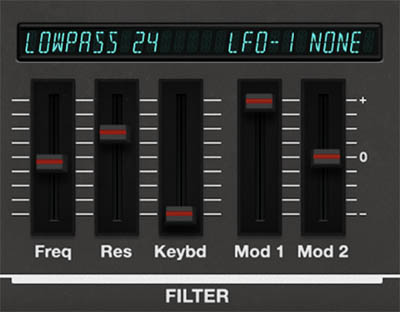
One Filter, Two Views
The filter appears in both Play view and Edit view, but it’s the same filter. They are not separate filters.
Play view gives you quick access to the most immediate filter controls, including Freq and Res. This is useful when you’re browsing presets, making fast tone adjustments, or shaping a sound while playing.
Edit view shows the full filter section, including Freq, Res, Keybd, Mod 1, and Mod 2. Use Edit view when you want deeper control over filter behavior, keyboard tracking, or filter modulation.
Tip: Use Play view when you just want to brighten or darken a sound quickly. Use Edit view when you want the filter to respond to envelopes, LFOs, velocity, keyboard position, performance controls, or MPE.
• Lowpass 12 – A gentler lowpass filter that reduces high frequencies more gradually. Use it when you want to soften a sound without making it too dark. It works well for pads, strings, digital keys, brass-like sounds, and patches where you want warmth while preserving some upper harmonic air.
• Lowpass 24 – A steeper lowpass filter that removes high frequencies more aggressively. Use it for round basses, punchy plucks, darker pads, classic synth leads, and sounds where you want the cutoff and resonance to make a stronger statement.
• Highpass – Removes lower frequencies while allowing higher frequencies through. This is useful for thinning a layer, creating airy textures, reducing low-end buildup, or making one layer sit above another in a mix.
• Bandpass – Emphasizes a narrower range of frequencies around the cutoff point while reducing material above and below it. This can create nasal, vocal-like, reedy, telephone-like, resonant, or special-effect tones. It’s especially useful with formant waves, reed-like waves, and complex digital textures.
Tip: In a layered patch, try Lowpass 24 on one layer for body and Highpass or Bandpass on the other for air, edge, or vocal-like color. This can make a sound feel bigger without becoming muddy.Filter Controls:
• Filter Mode Display – Shows the currently selected filter mode. Click the filter name display above the Res and Keybd sliders to choose the filter type: Lowpass 12, Lowpass 24, Highpass, or Bandpass.
• Freq – Sets the filter cutoff frequency. Higher settings let more brightness through. Lower settings reduce high-frequency content for a darker or rounder sound.
• Res – Controls resonance, emphasizing frequencies around the cutoff point. Low settings add subtle focus. Higher settings create more bite, edge, and synthetic character.
• Keybd – Sets keyboard tracking for the filter cutoff. Higher settings make the filter follow the keyboard more strongly, so higher notes can stay brighter and lower notes can stay warmer.
• Mod 1 / Mod 2 – Let you assign modulation sources to the filter cutoff and set their modulation amounts. Click the source field in the display to choose a source, then adjust the corresponding Mod slider to set how strongly it affects the filter. Positive and negative amounts move the cutoff in opposite directions.
Tip: If a sound feels dull in the upper register, increase Keybd so the filter opens more as you play higher notes. If the sound gets too bright or thin at the top of the keyboard, reduce it.
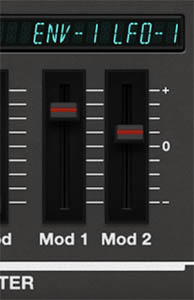
Mod 1 and Mod 2: Filter Modulation
Mod 1 and Mod 2 let you animate the filter cutoff from within the Filter section. This is the easiest place to create filter movement without going to the main Mod Matrix.
Click the modulation source field above the Mod slider to choose a source, then adjust the corresponding Mod 1 or Mod 2 amount. The amount can be positive or negative, allowing the modulation to move the cutoff in either direction.
Common uses:
• Envelope to filter cutoff – Creates plucks, brass-like attacks, swells, and filter sweeps.
• LFO to filter cutoff – Creates slow motion, rhythmic pulsing, wah-like movement, or tempo-synced animation.
• Velocity to filter cutoff – Makes harder-played notes brighter and more articulate.
• Pressure or MPE to filter cutoff – Lets you open the filter expressively while holding notes.
• Pedal or Wheel to filter cutoff – Gives hands-on performance control over brightness.
Tip: If filter modulation seems weak, check the base Freq setting. If the filter is already fully open or nearly closed, modulation may not have enough useful room to move.
Filter Envelope Movement
Unlike many synthesizers, ESQ-1 does not have a dedicated Filter Envelope Amount knob sitting next to the cutoff and resonance controls. Instead, filter envelope movement is created through modulation.
The quickest method is to go to Edit view, find the Filter section, and use Mod 1 or Mod 2 to assign an envelope to the filter. Choose ENV 1, ENV 2, or ENV 3 as the modulation source, then set the Mod amount to determine how strongly the envelope moves the cutoff.
Positive amounts generally open the filter as the envelope rises. Negative amounts can make the envelope pull the cutoff in the opposite direction. You can also route an envelope to filter cutoff from the main Mod Matrix, which is useful when you want the filter movement to be part of a larger modulation setup.
Tip: Set the basic Freq value first, so the sustained tone feels right. Then add envelope modulation to create the attack, sweep, swell, or movement around that base tone.
Filter Plucks
A classic filter pluck starts bright, then quickly becomes darker. To create this, start with a bright waveform or oscillator blend, set the filter cutoff moderately low, then use an envelope to open the filter briefly at the start of the note.
This works well for synth basses, digital plucks, sequenced patterns, short comping sounds, and percussive keys.
Try this:
• Set Freq low enough that the sustained tone is warm.
• Use Mod 1 or Mod 2 to assign an envelope to filter cutoff.
• Set a positive modulation amount.
• Use a fast envelope attack and a quick decay.
• Adjust Res for more bite if needed.
Tip: If the pluck isn’t bright enough, increase the envelope modulation amount or raise Freq slightly. If the body of the sound stays too bright, lower Freq and let the envelope create the attack.
Filter Swells
Filter swells are useful for pads, strings, atmospheres, and cinematic textures. Start with the filter somewhat closed, then use a slow envelope or LFO to open it gradually as the note sustains.
This works beautifully with ESQ-1’s digital waves. A complex waveform can begin dark and mysterious, then slowly reveal its upper harmonics as the filter opens.
Tip: For swelling pads, pair a slow filter opening with a slow ENV 4 attack. The volume fades in while the tone brightens, making the sound feel more natural and less like someone simply turned up a knob.
Filter Motion With LFOs
LFO modulation creates repeating filter movement. Depending on rate, depth, waveform, and sync, this can produce subtle drift, rhythmic pulsing, wah effects, tremolo-like movement, or tempo-locked patterns.
The ESQ-1 LFOs include L1, Delay, and L2, so filter motion can fade in or change intensity over time. This is especially useful for sounds that start stable, then become more animated as they sustain.
Tip: For a pad that gradually comes alive, route an LFO to filter cutoff, set the LFO movement subtly, then use the LFO’s L1 / Delay / L2 behavior so the motion develops after the note begins.
Velocity and Filter Response
Velocity can make the filter respond to how hard you play. This is one of the simplest ways to make a patch feel more expressive.
A soft note can remain darker and warmer, while a harder note opens the filter for more brightness and attack. This works especially well for keys, basses, plucks, brass-like patches, and expressive layered sounds.
Tip: If a patch sounds good but feels flat, try adding velocity-to-filter modulation before adding more effects. Sometimes the sound doesn’t need to be bigger. It just needs to respond to your hands.
The Filter and Digital Waves
The ESQ-1’s filter behaves differently depending on which waveforms are feeding it. Simple waves respond in familiar subtractive-synth ways: lower the cutoff and they get darker, add resonance and they get more focused.
Complex digital waves can be more surprising. As the filter moves, different harmonic regions may appear or disappear. A wave that sounds harsh with the filter wide open may become warm and useful when filtered. A wave that sounds plain at one cutoff setting may become interesting at another.
Tip: Don’t judge a waveform with the filter wide open only. Many ESQ-1 waves reveal their best musical use when partially filtered.
Pre-Filter DCAs and the Filter
DCA 1, DCA 2, and DCA 3 determine how much of each oscillator enters the filter. This affects how the filter behaves. If a bright oscillator is loud, the filter has more high-frequency content to shape. If that oscillator is quiet, the filter response may be dominated by a darker or simpler wave.
That means filter movement and oscillator-level movement can work together. A pad might fade in a bright oscillator while the filter gradually opens. The result is more animated than a simple filter sweep over a fixed oscillator mix.
Tip: For evolving sounds, don’t rely only on filter cutoff. Modulate oscillator DCA levels too. Movement before the filter plus movement at the filter is one of the ESQ-1’s best tricks.
DCA 4: Final Amplifier
After the filter, the signal passes through DCA 4, the final amplifier stage. DCA 4 controls the overall level of the complete filtered voice.
A simple way to remember it:
DCA 1, DCA 2, and DCA 3 control the oscillator ingredients.
DCA 4 controls the finished voice.
DCA 4 is where the sound’s final loudness behavior is shaped. It determines how the complete sound comes in, holds, and fades away.
ENV 4 and DCA 4
ENV 4 is closely tied to DCA 4 and functions as the main final volume envelope. This makes ENV 4 one of the most important parts of the instrument. Even if the oscillator and filter settings stay exactly the same, changing ENV 4 can make the patch behave like a completely different kind of sound.
Envelopes are covered in greater detail in the Envelopes chapter.
Common ENV 4 uses:
• Fast attack for immediate notes
• Slow attack for pads and swells
• Short decay and low sustain for plucks
• High sustain for held tones
• Long release for smooth fades
• Short release for tight, clean note endings
Tip: If a sound feels too abrupt, too slow, too long, or too short, check ENV 4 first. It’s often the fastest way to change the musical role of a patch.
Sound Design Recipes
Warm Pad
Use a rich oscillator blend, set the filter cutoff moderately low, use Lowpass 12 or Lowpass 24, and set ENV 4 with a slow attack and long release. Add slow filter modulation from an envelope or LFO.
Punchy Hybrid Bass
Choose a strong waveform for OSC 1, add a second oscillator for weight or definition, and use Lowpass 24 for a stronger subtractive character. Add a short filter envelope movement for attack and keep ENV 4 tight.
Digital Pluck
Use a bright or complex waveform, set the filter cutoff moderately low, and use envelope modulation to open the filter quickly at the start of the note. Set ENV 4 for a fast attack, quick decay, low sustain, and release that suits the tempo.
Expressive Lead
Use one or two strong oscillator waves, keep the filter open enough for presence, and add resonance for focus. Route mod wheel, pressure, or MPE to filter cutoff or vibrato for performance expression.
Evolving Texture
Use three different waveforms, set the filter cutoff lower than expected, and use slow LFO or envelope modulation to move the cutoff. Fade in one oscillator through its DCA for internal harmonic motion, then add delay or reverb.