Getting Started
Top Toolbar and Preset Browser
Bass Section
Strings Section
Poly Synthesizer Section
Lead Synthesizer Section
Output Mixer
Master Controls
LFO Section
Effects
Bender Controls
Arpeggiator
Touch Sensor
Using Quadra Multi Out Version
MIDI Controllers Setup and The MIDI Tab
QWERTY Musical Typing Keyboard (MTK)
Settings
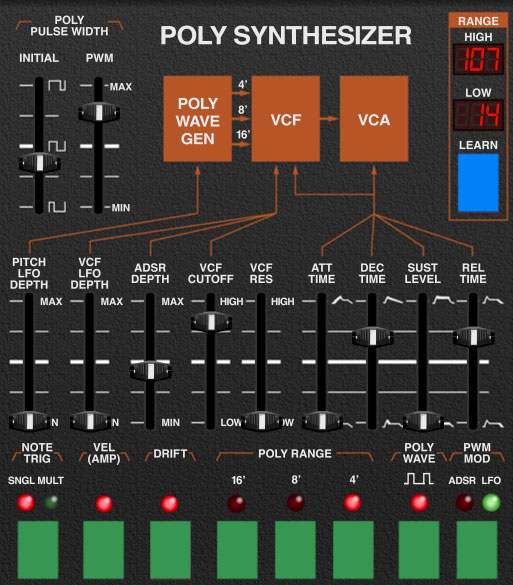
Though the original Quadra Poly Synthesizer section features its own filter and envelope sections, it actually uses the Strings section's top-octave divide tone generation circuitry. This isn't immediately obvious, because the Poly Synth section lacks the great-sounding, always-on String Chorus Generator effect. Specifically, the Poly section "Poly Wave Generator" outputted the non-chorused, string section "spike" or "hollow" waveform only, severely limiting its tonal options. It's one of the original Quadra's biggest shortcomings, so we seriously improved it by adding ramp, sine, triangle, and a pulse wave with manual variable pulse width, or pulse-width modulation, with mod controlled via the Poly Synthesizer envelope generator or LFO. Take our word, it's much better-er!

Range
On the original instrument, the Poly Synthesizer section was playable across the entire keyboard, but if you turned on the Bass section, it could only be played in the top three octaves. The Cherry Audio Quadra Poly Synthesizer section is playable in any keyboard region selected with the Range settings.
Key Range specifies the MIDI note range the Poly Synthesizer section will respond to. When combined with the Bass, Poly Synthesizer, and Lead Synthesizer sections, the split and layer options are endless.
Learn button and Low/High displays- There are two ways to set the keyboard range. The quickest way is via the Learn button:
Click the Learn button; the number in the Low display flashes. Hit the lowest keyboard note you'd like the voice to respond to. The number in the High display will now flash; hit the highest note you'd like the voice to respond to. The key range is now set and learn mode is disabled. If you make a mistake, simply repeat the process.
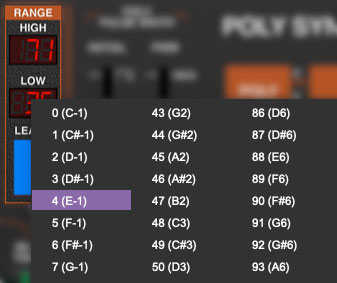
Key range can also be set by clicking on the Low or High LED numeral displays and selecting the desired note number.
When in the flashing learn mode, the high note can also be selected by clicking the High LED numeral display and selecting a MIDI note number; once a note is selected, Quadra will exit learn mode. This can be useful if you'd like to set a top note that's higher than your MIDI controller's highest note.
Poly Pulse Width / Initial- Manually sets the width or "duty-cycle" of the pulse wave (the green pulse wave button must be selected to hear it). This control has no effect on the saw wave. This defaults to 50%, i.e., a perfect square wave. Moving the slider up or down from center position narrows its width as well as the thickness of sound until it almost disappears at its extremes.
Poly Pulse Width / PWM- Depending on the setting of the green PWM Mod button, Pulse width is modulated either by the Poly Synthesizer ADSR envelope generator or by the global LFO. The PWM slider sets modulation depth.
Pitch LFO Depth- Sets the depth of global LFO modulation for the Poly Synthesizer, from zero up to a maximum of three octaves. This is useful for vibrato, sirens, rising/falling pitches, etc., depending on the currently selected LFO waveform. Slider resolution is finer at lower settings to make it easier to set up useful vibrato depths
The original ARP Quadra had no provision for pitch mod for the Strings or Poly Synthesizer section, because they shared the same oscillator bank (thus mod applied to one would have affected the other). Cherry Audio Quadra uses separate oscillator banks for each; this means LFO pitch mod will not affect the Strings section.
VCF LFO Depth- Sets the amount of global LFO filter mod to the Poly Synthesizer VCF.
ADSR Depth- Sets the amount of the Poly Synthesizer ADSR envelope generator VCF mod.
VCF Freq- Sets the frequency where attenuation of high-frequency attenuation begins, from 20 Hz up to 24,000 Hz.
VCF Res- Short for “resonance,” this emphasizes sound energy at and around the current cutoff frequency by adding feedback from the filter's output back to its input. At lower settings, this can be used to create mild resonances such as those heard in acoustic instruments; at higher settings, you'll hear the familiar analog synthesizer "weeooww" sound.
Poly Synthesizer Envelope Generator
In case you're not familiar with the operation of ADSR envelope generators, here's an exciting and educational speed bump primer:
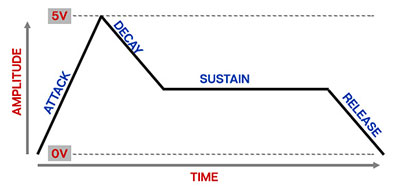
When the Poly Synthesizer section sees a gate voltage from a note, the envelope generator outputs a dynamically changing voltage, according to the settings of its four stages. The attack stage defines how long it takes for the amplitude to rise from silence to max volume. Once the attack stage reaches max volume, it moves to the decay phase, which defines how long it takes to fall from max to the level of the Sustain phase. Unlike the attack, decay, and release phases, which define times, sustain simply sets the held volume level following the attack and decay phases as long as the key is held. Finally, the release slider defines the the length of time it takes for the volume to fall back to silence when when the key is released.
Like the Strings section envelopes, the Poly Synthesizer envelope has a single attack phase applied to all notes, but it has independent release phases for all individual notes.
For example, if the Attack Time is set to a slow rise time, and a single note is played, its amplitude will slowly increase. If an additional note is playing while the first note’s volume is rising, the volume of the second note will follow the first. If an additional note is played while an earlier note is held at full volume, new notes will immediately be heard at max volume.
However, if notes are released, each one will "correctly" fade out according to the Release Time slider setting. If all notes are released but still fading out, and a new note is hit, any notes still fading out will be abruptly cut off and the newly struck notes' attack phase begins.
Attack- Defines the length of time for voltage to rise from zero to maximum volume when a key is played.
Decay- Defines the length of time for voltage to fall from the attack stage max volume to sustain stage setting.
Sustain- Sets the voltage level following attack and decay phases while a note is held.
Release- Defines the length of time for voltage to fall from sustain level to silence when a key is released.
Buttons
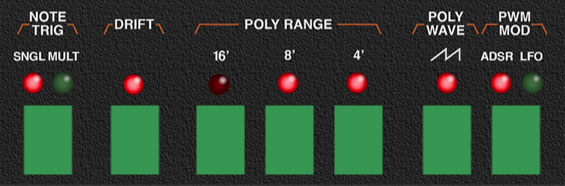
Note Trig / Single/Multi- As discussed in the Big Wordy Paragraph above, the Poly Synthesizer section has a single envelope generator. The Note Trig setting affects how the envelope responds when keys are played.
Single- If a note is currently playing and an additional note is played, any new notes play from whatever phase the envelope generator is currently at.
Multiple- If a note is currently playing and an additional note is played, any new notes played reset the envelope to the beginning of the attack phase, affecting all currently held notes.
Though this isn’t as realistic as the individual note articulations of having separate envelope generators for each note, it’s usually fine for sustained sounds. It also lets you do one really nifty rhythmic trick: with the envelope is set to a percussive curve (fast attack, relatively short decay, low sustain level), hold a chord with your right hand and repeatedly stab at a single note with your left. Fun, right?
Drift- Adds some natural pitch randomness to individual Poly Synthesizer notes. This is really helpful for adding some life and movement. (The divide-down oscillators of the original were VERY in tune, which can sound pretty dull).
Poly Range- These select the octave range, displayed in standard organ footages. Any combination of the 16', 8', and 4' settings may be active at any time.
Poly Wave- Click the button repeatedly to cycle through ramp, pulse, triangle, sine, string, spike (or "hollow wave"). The width of the pulse wave is adjusted by the Poly Pulse Width controls described above. Only one waveform may be active at any time.
PWM Mod- Toggles the mod source for the Poly Pulse Width/PWM slider (at top). ADSR sets the envelope generator as the mod source; LFO uses the global LFO.