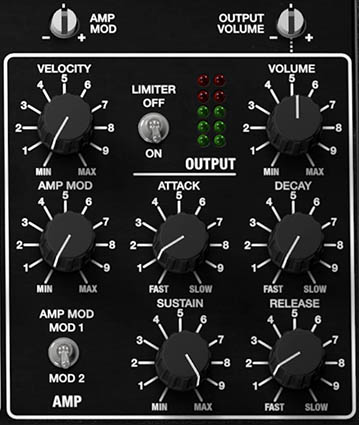
Amp, Amp Envelope, and Output
After the oscillators have generated the sound and the Filter has shaped its harmonic content, Pentaphonic’s AMP section determines how that sound behaves in volume over time.
The Amp includes its own ADSR envelope, along with velocity response and modulation. This makes it possible to create everything from sharp plucks and percussive attacks to sustained organs, swelling pads, and long atmospheric fades. The adjacent OUTPUT section then controls the final level leaving Pentaphonic and includes a switchable Limiter for keeping unexpected peaks under control.
The original Gleeman Pentaphonic also used a dedicated amplifier envelope for each voice. Cherry Audio retains that fundamental architecture while extending its timing range considerably and adding velocity, modulation, modern output metering, and limiting.
Amp
The Amp is essentially Pentaphonic’s final level-control stage before effects and output processing. Its envelope determines when a note becomes audible, how its volume changes while the key is held, and how quickly it disappears after the key is released.
This makes the Amp envelope one of the strongest influences on how a patch feels to play. The same oscillator and Filter settings can behave like a plucked string, organ, brass instrument, or slow pad simply by changing the Amp envelope.
Velocity
VELOCITY: (0 to 100%) Sets how strongly MIDI note velocity affects the amplitude of played notes.
At minimum, notes play at a more consistent level regardless of how hard or softly they’re struck. Increasing Velocity makes playing dynamics have a greater influence on volume, so softer notes become quieter and harder notes become louder. This can make a patch considerably more expressive, particularly for piano-like sounds, plucks, leads, and other sounds where performance dynamics matter. For pads and sustained textures, lower Velocity settings can be useful when you want the sound to remain relatively even as chords are played.
Tip: Velocity doesn’t have to do all of the expressive work. Pentaphonic also allows keyboard pressure and other modulation sources to influence the sound after the note has begun, while velocity captures the force of the initial key strike.
Amp Mod
AMP MOD: (0 to 100%) Sets how strongly the selected modulation source affects amplitude.
The switch beneath the control selects either MOD 1 or MOD 2 as the modulation source.
AMP MOD SOURCE: (MOD 1, MOD 2) Selects Modulation 1 or Modulation 2 as the source for Amp Mod.
At low settings, Amp Mod can add subtle movement to sustained sounds. Increasing the amount produces increasingly obvious changes in volume. With a repeating modulation waveform, this produces the classic amplitude-modulation effect commonly known as tremolo. Slow modulation can create gentle swells or pulses. Faster modulation produces more pronounced rhythmic movement and, at sufficiently high rates, can move into more complex tonal territory.
Creating a Simple Tremolo
To add tremolo to a sound:
Select MOD 1 or MOD 2 beneath AMP MOD.
Raise AMP MOD gradually.
Set the selected modulation section to a smooth repeating Shape.
Adjust its RATE to set the speed of the tremolo.
Adjust AMP MOD to control the intensity.
Fine-tune the modulation section’s Rate and Shape until the movement fits the sound.
A relatively low Amp Mod setting often works best for pads, electric-piano-style sounds, and sustained chords. Higher values can create deliberately exaggerated pulsing effects.
Amp Envelope
Pentaphonic’s Amp envelope determines how the volume of each note develops from the moment it begins until it finally fades away.
The envelope follows the familiar ADSR structure:
Attack controls how quickly the note reaches full level after being triggered.
Decay determines how quickly the volume falls from the Attack peak toward the Sustain level.
Sustain sets the level maintained while the note remains held.
Release determines how long the sound takes to fade after the note is released.
Unlike the Filter envelope, which changes timbre, the Amp envelope directly controls whether and how loudly the sound can be heard.
Attack
ATTACK: (5 ms to 7715 ms) Sets how long the Amp envelope takes to rise from silence to its maximum level after a note is triggered.
Very short Attack settings produce an immediate onset and are useful for plucks, basses, percussion, keyboard sounds, and sharply articulated leads. Increasing Attack causes the sound to fade in more gradually. Longer settings are useful for pads, strings, atmospheric layers, and other sounds that should emerge rather than strike.
Creating a Slow Volume Swell
To create a gradually fading-in sound:
Increase Amp ATTACK.
Set SUSTAIN relatively high.
Use enough RELEASE to allow notes to fade naturally when released.
Play and hold a chord.
Adjust Attack until the sound reaches full level at the desired rate.
For an evolving pad, try giving the Filter envelope a different Attack time. The volume and brightness can then develop independently.
Decay
DECAY: (8 ms to 19,727 ms) Sets how long the Amp envelope takes to fall from its maximum Attack level to the Sustain level.
Short Decay settings create a rapid drop after the beginning of the note. Longer settings allow the initial peak to linger before settling. The audible effect of Decay depends on the Sustain setting. With Sustain at 100%, there is effectively no lower level for the envelope to decay toward, so changing Decay may have little audible effect. Lower Sustain values make Decay increasingly important.
Sustain
SUSTAIN: (0 to 100%) Sets the volume level maintained while a note remains held after the Attack and Decay stages are complete.
At 100%, the sound remains at full level while the key is held. Lower values allow the sound to fall from its Attack peak to a quieter held level. At 0%, the envelope falls all the way to silence after the Decay stage, even if the key remains held. This is particularly useful for plucked and percussive sounds. Unlike Attack, Decay, and Release, Sustain controls a level, not a length of time.
Release
RELEASE: (8 ms to 19,727 ms) Sets how long the Amp envelope takes to fade to silence after a note is released.
Short Release settings stop notes quickly and produce tighter articulation. Longer settings allow notes to linger after the keys are released, making them useful for pads, strings, ambient textures, and sounds intended to overlap. Pentaphonic’s extended Release range allows extremely long fades compared with the original hardware, making it possible to create slowly dissolving textures and substantial overlaps between successive notes.
Tip: Long Release times can build level quickly when several notes overlap. Keep an eye on the Output meters, particularly when playing dense chords or using additional effects.
Using the Filter and Amp Envelopes
Pentaphonic’s Filter and Amp envelopes are independent, and some of the instrument’s most interesting sounds come from letting them do different things. If both envelopes use similar settings, brightness and volume tend to evolve together. This can produce natural, cohesive articulation.
Different settings create more complex behavior.
For example:
A fast Amp Attack with a slow Filter Attack produces a note that begins immediately but gradually becomes brighter.
A slow Amp Attack with a fast Filter Attack allows the bright portion of the sound to appear before the volume fully develops.
A long Amp Release with a shorter Filter Release causes the sound to become darker as it fades.
A short Amp envelope combined with a dramatic Filter envelope can create highly percussive plucks and synth percussion.
Creating a Basic Pluck
To create a short, percussive amplitude shape:
Set Amp ATTACK close to minimum.
Use a relatively short DECAY.
Set SUSTAIN to 0% or a low value.
Use a short RELEASE.
Adjust the Filter envelope separately to shape the brightness of the attack.
The Amp envelope determines how long the sound exists, while the Filter envelope determines how its harmonic content changes during that time.
Creating a Sustained Pad
To create a smooth pad envelope:
Increase Amp ATTACK for a gradual fade-in.
Set DECAY relatively long.
Set SUSTAIN high.
Increase RELEASE so notes continue after the keys are released.
Adjust the Filter envelope independently to add tonal movement.
Long Amp Release settings are particularly effective when combined with Pentaphonic’s polyphony and effects, but they can also cause several released notes to overlap. Adjust overall level accordingly.
Output
The Output section controls Pentaphonic’s final signal level and provides visual monitoring and peak protection.
Volume
VOLUME: (0 to 100%) Sets Pentaphonic’s overall output level.
This control affects the complete instrument rather than the level of an individual oscillator or voice. Use the oscillator Gain controls to balance sound sources within the patch, the Amp envelope to shape individual notes, and VOLUME to set the final level delivered by Pentaphonic.
Avoid using Output Volume to compensate for an unnecessarily loud internal patch. If a sound is excessively hot because all three oscillator Gains, resonance, effects, and overlapping release tails are contributing large amounts of level, it’s generally better to balance those elements first.
OUTPUT METERS
The LED meters display Pentaphonic’s stereo output level. Use them to keep an eye on the combined result of the synthesizer voices and effects, particularly when playing dense chords, using Unison, applying heavy resonance, or programming long Release times. A patch that appears comfortably quiet while playing a single note may become substantially louder when several voices and effects overlap.
Limiter
LIMITER: (On/Off) Enables Pentaphonic’s output limiter.
The Limiter helps control excessive signal peaks before they reach the final output. This is particularly useful with sounds that can produce sudden increases in level, such as resonant filter patches, heavily stacked voices, aggressive modulation, high effect levels, or long overlapping envelope releases. A limiter works by restraining peaks that would otherwise exceed its operating threshold, helping keep the output under control without requiring you to anticipate every possible combination of notes and modulation.
For routine sound design, leaving the Limiter enabled provides a useful measure of protection against unexpected peaks. It can be especially helpful while experimenting with unfamiliar presets or making substantial parameter changes. However, the Limiter shouldn’t be used as a substitute for sensible gain staging. If it’s working constantly because the patch is excessively loud internally, reduce oscillator Gains, effects levels, resonance, or Output Volume as appropriate.
The aim is for the Limiter to catch occasional peaks, not constantly wrestle the patch into submission.
When the Limiter Is Especially Useful
The Limiter can be particularly helpful when:
using UNISON or other voice-stacking behavior
playing dense polyphonic chords
using high Filter RESONANCE
programming long Amp RELEASE times that cause many voices to overlap
adding effects that substantially increase level
using strong amplitude or filter modulation
experimenting with unfamiliar presets or extreme parameter settings
If you’re deliberately testing dynamics, gain structure, or downstream processing, you may occasionally choose to disable the Limiter. In most everyday playing and sound-design situations, however, it provides a useful final safeguard.
Making Creative Use of the Amp Envelope
The Amp envelope does more than determine whether a sound is short or long. Small changes can dramatically alter the musical role of a patch.
Fast Attack + high Sustain produces immediate sustained sounds suitable for organs, many leads, and straightforward synth tones.
Fast Attack + short Decay + low Sustain creates plucks, mallets, and percussive sounds.
Medium Attack + medium Sustain can produce softer brass and ensemble-style articulation.
Long Attack + high Sustain + long Release creates pads and swelling textures.
Low Sustain + very long Decay creates sounds that gradually fade while a key remains held, useful for bells, plucks, and evolving synthetic percussion.
Different Filter and Amp envelopes create movement that feels more organic than simply copying the same ADSR settings between the two sections.
Amp and Output Programming Tips
Start with the Amp envelope when defining articulation. Decide whether the patch should pluck, sustain, swell, or fade before fine-tuning modulation and effects.
Use Velocity to keep static patches expressive. Even modest velocity response can make repeated notes feel less mechanical.
Use Amp Mod after the basic envelope works. The envelope establishes the note shape; modulation can then add continuing motion.
Let Filter and Amp Release differ. A sound can darken as it fades, brighten during its release, or maintain its timbre throughout.
Watch overlapping tails. Long Release values can produce beautiful textures, but eight fading voices are considerably louder than one.
Use Output Volume as the final level control. Balance the synthesis architecture first, then set the overall patch level.
Treat the Limiter as insurance, not a mixing strategy. It’s there to catch unexpected peaks rather than permanently flatten an overdriven patch.