Click MOTION at the lower-left corner of the Pentaphonic interface to replace the keyboard with the complete Motion view. Click KEYBOARD to return to the performance controls, or EFFECTS to open the expanded effects view.
The Motion Controls are where inspiration meets automation. They combine an Arpeggiator, a polyphonic 16-step Sequencer with four pattern memories, and a Parameter Animator capable of changing synthesis parameters step by step. Pentaphonic has one Motion engine. That makes the workflow especially immediate: one Arpeggiator, one Sequencer, one Parameter Animator, and one START/STOP control.
The three systems serve different but complementary purposes:
The Arpeggiator turns notes you play, or notes supplied by the Sequencer, into repeating patterns.
The Sequencer stores notes, chords, rests, ties, and complete musical patterns.
The Parameter Animator changes synthesis parameters independently at each sequence step, allowing the sound itself to move along with, or independently from, the notes.
A sequence can contain notes and Parameter Animator data simultaneously. It can also operate purely as a modulation sequence by disabling NOTES TRIGGER, allowing a held sound to evolve rhythmically without the Sequencer retriggering notes.
Arpeggiator
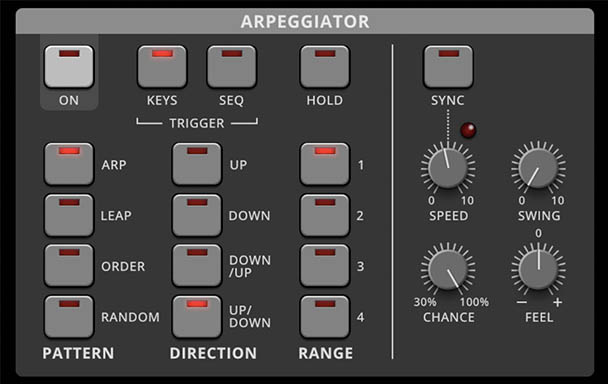
The Arpeggiator turns played or sequenced notes into repeating patterns. Hold a chord and Pentaphonic reorganizes its notes according to the selected Pattern, Direction, Range, Speed, and groove settings. At its simplest, the Arpeggiator can produce a familiar rising or falling synth pattern. With Leap, Random, Chance, a wider Range, and Sequencer triggering, it can produce much more elaborate melodic movement.
On
ON: (Off/On) Turns the Arpeggiator on or off. With On disabled, incoming notes play normally. With On enabled, the selected note source is processed by the Arpeggiator.
Trigger: Keys and Seq
The KEYS and SEQ buttons determine where the Arpeggiator receives its note material.
Keys
KEYS: Uses notes played from the keyboard or an external MIDI controller. This is the traditional arpeggiator workflow. Hold a chord and Pentaphonic reorganizes its notes according to the selected Pattern, Direction, Range, and timing settings.
Seq
SEQ: Uses notes and chords stored in the Sequencer. The Sequencer provides the harmonic or melodic material while the Arpeggiator creates additional movement from it. If a sequence step contains a chord, for example, the Arpeggiator can break that chord into individual notes according to its Pattern and Direction settings.
Tip: Use KEYS when you want to perform the Arpeggiator directly. Use SEQ when you want the Sequencer to provide the structure while the Arpeggiator adds another layer of activity.
Hold
HOLD: (Off/On) Keeps the Arpeggiator running after played keys are released.
Play another note or chord to replace the currently held note set.
Hold is especially useful when you want both hands free for Filter sweeps, Action Stick gestures, effects changes, or other sound-design adjustments.
Sync
SYNC: (Off/On) Synchronizes the Arpeggiator to musical tempo. With Sync off, SPEED operates freely. With Sync on, Speed selects musically related timing divisions. In the standalone version of Pentaphonic, Sync follows Pentaphonic’s internal Tempo setting. When Pentaphonic is used as a plug-in, synchronization follows the host DAW session tempo. This makes it easy to keep arpeggiated patterns rhythmically locked to a track.
Speed
SPEED: Sets the Arpeggiator playback rate. Slower settings create spacious, deliberate patterns. Faster settings turn held notes into rapid streams. The LED above the control flashes at the current playback rate, providing a useful visual reference. When Sync is enabled, Speed selects tempo-related divisions rather than a freely running rate.
Pattern
Pentaphonic provides four Arpeggiator pattern behaviors.
Arp
ARP plays the available notes as a conventional arpeggio. Notes are sorted and played according to the selected Direction and Range. Use it for classic synth arpeggios, bass patterns, rolling chords, and steady repeating figures.
Leap
LEAP moves the notes through a wider octave pattern rather than simply stepping through the chord in conventional order. The result is a more animated, jumping figure with larger melodic intervals than a standard arpeggio. Leap becomes especially effective with Range 3 or 4.
Tip: Try Leap with a seventh chord, a wide octave range, and tempo-synchronized delay. Pentaphonic usually requires very little encouragement before things become cinematic.
Order
ORDER plays notes according to the order in which they were originally entered rather than sorting them by pitch. This turns the keyboard into a simple phrase-entry device. Play several notes in a particular order, enable Hold, and Pentaphonic preserves that ordering as the basis of the Arpeggiator pattern. Selecting the opposite Direction reverses the entered order.
Random
RANDOM selects notes unpredictably from the available note set. Unlike a conventional repeating arpeggio, the melodic order changes from cycle to cycle. Random works particularly well with moderate Chance settings and delay or reverb, where omitted or rearranged notes leave space for the effects to fill.
Direction
Direction determines how the selected Pattern moves through its note order.
UP: Plays from the lowest note toward the highest.
DOWN: Plays from the highest note toward the lowest. In Order mode, this reverses the note-entry order.
DOWN/UP: Moves downward through the pattern and then upward.
UP/DOWN: Moves upward through the pattern and then downward.
The two alternating directions can produce slightly different accents at their turning points depending on how the pattern interacts with its available notes and Range.
Range
RANGE: (1 to 4 octaves) Sets how many octaves the Arpeggiator spans. 1 keeps the pattern close to the notes originally played. Higher values extend the pattern through additional octaves, producing progressively wider melodic movement. Range can dramatically change the character of even a simple chord. A three-note triad at Range 1 may become a long cascading pattern at Range 4.
Tip: Wider isn’t automatically better. Range 1 or 2 often works best for basses and focused patterns. Range 3 or 4 is excellent for leads, pads, and more expansive textures.
Swing
SWING: Adds shuffle by delaying alternating arpeggiated events. At minimum, notes play with even spacing. Increasing Swing creates a progressively stronger long-short rhythmic feel. Add Swing after establishing the basic Pattern and Speed. It’s generally easier to hear what the control contributes once the notes themselves are already working.
Chance
CHANCE: (30% to 100%) Sets the probability that each Arpeggiator event will play. At 100%, all events sound. Lower values introduce skipped notes and rhythmic gaps. Moderate Chance settings can add subtle variation to a repeating pattern. Lower settings create increasingly sparse and unpredictable results.
Tip: Chance and delay make good partners. The missing notes create openings, while delay repeats can preserve a sense of rhythmic continuity.
Feel
FEEL: (Pull to Push) shifts the Arpeggiator timing slightly behind or ahead of the beat. Turn toward the negative side to relax the pattern slightly behind the beat. Turn toward the positive side to push it slightly forward. Unlike Swing, which changes the timing relationship between alternating notes, Feel shifts the overall rhythmic attitude of the pattern. Small adjustments usually work best. Feel is a nudge, not an eviction notice for the drummer.
Arpeggiator Ideas
Classic Analog Arpeggio
Select ARP, choose UP or UP/DOWN, set Range to 1 or 2, enable Sync, then choose a suitable Speed. Add a modest amount of Swing if the pattern feels overly rigid.
Cascading Pattern
Select LEAP, set Range to 3 or 4, and lower Chance slightly. Bright Ramp, Pulse, or COMP oscillator combinations work especially well. Add a synchronized delay for additional movement.
Ordered Phrase
Select ORDER and play several notes in the desired sequence. Enable Hold, then use the Direction buttons to play the entered phrase forward, backward, or in alternating directions.
Generative Pattern
Select RANDOM, reduce Chance moderately, and use a wide Range. Add a long delay or reverb and let the missing and reordered notes create space.
Polyphonic Sequencer
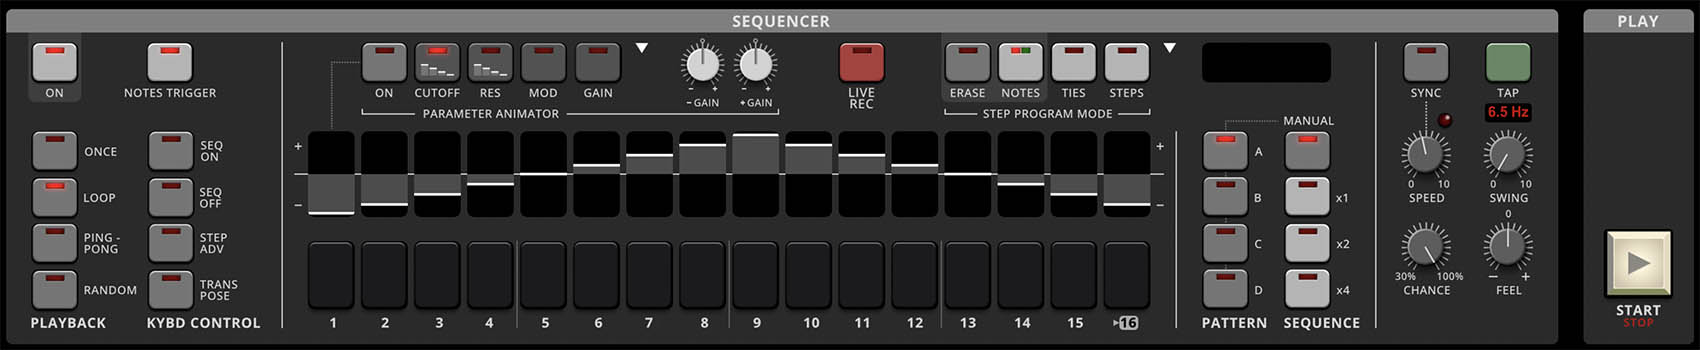
Pentaphonic’s Sequencer is a 16-step polyphonic pattern engine with four independent pattern memories labeled A, B, C, and D.
Each step can contain:
a single note
a chord
a rest
tied note information
Unlike many classic step sequencers, Pentaphonic isn’t restricted to monophonic lines. Entire chords can be stored on individual steps, making it equally useful for bass lines, melodic phrases, rhythmic chord progressions, and evolving harmonic patterns.
The Sequencer is a major evolution of the original Gleeman Pentaphonic’s real-time polyphonic recorder. The 1982 hardware could record and loop polyphonic keyboard performances while leaving the keyboard available for live playing. Cherry Audio expands that basic concept with step programming, four patterns, multiple playback modes, pattern chaining, groove controls, live recording, transposition, and parameter animation.
Sequencer On
ON: (Off/On) Turns Sequencer playback on or off. When disabled, stored sequence data doesn’t play. When enabled, playback follows the selected Playback and Keyboard Control settings.
Notes Trigger
NOTES TRIGGER: (Off/On) Determines whether the Sequencer triggers its stored notes. With Notes Trigger enabled, stored notes and chords play normally. With Notes Trigger disabled, the note portion of the sequence is suppressed while the Parameter Animator can continue running. This turns the Sequencer into a dedicated modulation source. It’s one of Motion’s most useful tricks: hold a sustained note or chord manually and allow the Parameter Animator to reshape the sound underneath it.
Step Buttons 1–16
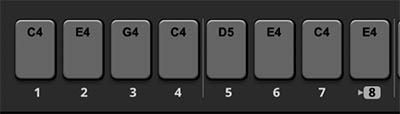
The 16 lower buttons represent the Sequencer steps.
The illuminated step indicates the current playback or editing position.
Each step can contain an individual note or a complete chord. Empty steps act as rests, and ties can extend material from earlier steps.
Setting the Pattern Length
Click the number beneath a step to make it the final active step in the pattern.
For example:
Click 8 for an eight-step pattern.
Click 12 for a 12-step pattern.
Click 16 to use all sixteen steps.
Shorter and odd-numbered patterns can produce especially interesting movement when synchronized to conventional 4/4 music.
Tip: Try pattern lengths of 5, 7, 11, or 13 steps. As the sequence repeats against the bar line, the accents continually shift without requiring any additional programming.
Playback Modes
Four Playback buttons determine how Pentaphonic moves through the active pattern.
Once
ONCE plays the pattern once and then stops. Use it for triggered phrases, fills, transitions, one-shot effects, or sequences that should behave like individual musical events rather than continuous loops.
Loop
LOOP repeats the pattern continuously. Use it for bass lines, ostinatos, repeating chord progressions, rhythmic modulation, and most conventional sequencing.
Ping-Pong
PING-PONG plays forward through the active pattern and then backward. This is useful for symmetrical melodies, reversing chord motion, and Parameter Animator shapes that should change direction without jumping directly from the last step back to the first.
Random
RANDOM selects active sequence steps unpredictably. Use it for generative textures, irregular note movement, unpredictable chord changes, and Parameter Animator patterns that should avoid obvious repetition. Random playback combined with reduced Chance can become extremely sparse, which may be exactly what a heavily reverberated or delayed patch needs.
Keyboard controls
The KYBD CONTROL buttons determine how played notes interact with Sequencer playback.
Seq On
SEQ ON causes keyboard playing to start the Sequencer. Use it when a sequence should begin as part of the performance.
Seq Off
SEQ OFF prevents keyboard notes from starting the Sequencer. Playback can instead be controlled with the Motion START/STOP control. Use this when the sequence should operate independently from manual keyboard performance.
Step Adv
STEP ADV causes each key press to advance the Sequencer by one step. This removes the Sequencer from its normal clocked behavior and makes your playing determine the timing. Use it for manually paced phrases, irregular rhythms, stuttering effects, or performances where the sequence should breathe with the player rather than obey a steady clock.
Transpose
TRANSPOSE lets played keyboard notes transpose the running sequence. A single programmed riff, bass line, or chord progression can therefore be moved through different keys without rewriting its note data.
Tip: Program the sequence around a convenient tonal center, then use Transpose to perform the pattern harmonically. This is particularly effective for bass riffs and repeating melodic figures.
Live Record
LIVE REC records a keyboard performance into the current pattern in real time. Use Live Record when the shape and feel of a performance matter more than entering every event step by step.
Recording a Sequence in Real Time
To record a sequence using Live Record:
Select Pattern A, B, C, or D.
Set the desired pattern length.
Choose a Playback mode.
Enable Sync and select the desired Speed if the sequence should follow musical tempo.
Click LIVE REC.
Play the desired notes or chords on Pentaphonic’s keyboard or an external MIDI controller.
Disengage Live Record when recording is complete.
Play the sequence and make any necessary edits using the Step Program controls.
Tip: Establish the tempo and pattern length before recording. It’s considerably easier to perform into a known rhythmic framework than to discover halfway through that your magnificent seven-note phrase is being captured by a four-step loop.
Step Program Mode
Step Program Mode provides precise tools for entering and editing the sequence one step at a time. The four modes are ERASE, NOTES, TIES, and STEPS.
Notes
NOTES enters or replaces note data on a selected step.
Programming a Note or Chord
To enter notes step by step:
Select NOTES.
Click the desired destination step.
Play a note or chord on your MIDI Controller or the on-screen keyboard.
Select another step.
Continue until the pattern contains the desired material.
Because each step can store several notes, Pentaphonic can sequence complete chord progressions rather than just monophonic melodies.
Erase
ERASE removes stored note information from the selected step. Use it to create a rest, remove an unwanted chord, or clear an event without resetting the entire pattern.
Erasing a Step
Select the step that you want to clear.
Click the ERASE button. The step is cleared.
Ties
TIES extends the note or chord from the preceding step through one or more following steps. Instead of retriggering the note at each step, Pentaphonic sustains the existing note or chord, making Ties useful for legato melodies, held chords, syncopated bass lines, and phrases containing a mixture of short and long notes.
The important thing to remember is that the Tie is placed on the step that extends the preceding note, not on the step containing the original note.
To tie a note or chord across steps:
Use NOTES mode to enter a note or chord on the step where you want the sound to begin. For example, enter a note on Step 1.
Select TIES in the Step Program Mode section.
Click the next step through which you want the note to continue. For example, click Step 2.
Step 2 now acts as a Tie, extending the note or chord from Step 1 instead of triggering a new note.
To extend the note farther, click additional consecutive steps while TIES remains selected. For example, clicking Steps 2, 3, and 4 causes the note entered on Step 1 to sustain across all four steps.
Start the Sequencer and listen to the result. The original note or chord should sound once and remain held through the tied steps.
Example: To make a chord entered on Step 5 sustain for three steps, enter the chord on Step 5, select TIES, then click Steps 6 and 7.
Tip: Think of a Tie step as saying, “keep holding whatever the previous step was playing.” A Tie therefore needs valid note or chord data immediately before it, either from a normal note step or from an existing chain of tied steps.
Steps
STEPS sets the total number of active steps in the currently selected Sequencer pattern, whether A, B, C, or D. A pattern doesn’t have to use all 16 steps. You can shorten it to 12, 8, 6, 5, or any other length that suits the musical phrase.
Each of the four patterns can have its own step length. This can be creatively useful when chaining patterns, since different lengths can make the sequence feel less repetitive and can shift accents in interesting ways as one pattern gives way to another.
To set the Sequencer pattern length:
Select the desired pattern: A, B, C, or D.
Select STEPS in the Step Program Mode section.
Click the step you want to use as the final active step in that pattern.
Pentaphonic sets the pattern length to that step number.
The selected step number appears with a rectangle around it, indicating the end of the active pattern.
You can also set the pattern length directly by clicking the number beneath the desired final step, without first selecting STEPS.
For example, clicking 8 creates an eight-step pattern.
Tip: Try giving Patterns A, B, C, and D different lengths. An 8-step pattern followed by a 7-step or 11-step variation can create subtle rhythmic displacement and keep a chained sequence from feeling overly predictable.
Programming a Sequencer from Scratch
The following workflow provides a reliable way to build a pattern without trying to solve every Motion parameter at once.
To create a basic sequence:
Select a Pattern. Start with Pattern A. Patterns B, C, and D can later become variations.
Set the Length. Eight steps make a good starting point because the pattern is short enough to hear and edit quickly.
Choose Playback. Select Loop so the pattern repeats continuously while you work.
Set Timing. Enable Sync and choose an appropriate Speed. Leave Swing, Chance, and Feel near their neutral settings initially.
Enter Notes. Select Notes, click Step 1, and play a note or chord. Continue through the pattern.
Leave Rests. Empty steps often make a sequence more musical than filling all sixteen.
Add Ties. Extend selected notes or chords across following steps when the sequence feels too clipped.
Adjust Groove. Add Swing, Chance, or Feel only after the basic note pattern works.
Create a Variation. Copy Pattern A to B and change only a few elements.
Add Parameter Animation. Once the musical pattern works, use the Parameter Animator to introduce step-based changes to the sound.
Tip: Program with modest effects at first. Reverb and long delays have an admirable ability to make almost anything sound profound, including timing problems.
Patterns A, B, C, and D
Pentaphonic provides four independent sequence patterns.
Each pattern stores its own notes, chords, rests, ties, pattern length, and corresponding Parameter Animator sequence.
A useful organizational approach is:
Pattern A: Main phrase Pattern B: Variation Pattern C: Alternate harmony or breakdown Pattern D: Fill or transition
The four patterns can be selected manually or chained into longer arrangements.
Sequence: Manual, x1, x2, x4
The SEQUENCE controls determine how the A–D patterns are selected and repeated.
Manual
MANUAL plays the currently selected pattern.
Use the A, B, C, or D buttons to switch patterns manually.
x1
x1 chains the selected A–D patterns and plays each once before advancing to the next.
Select the patterns you want to include by enabling their A, B, C, or D buttons.
After the last selected pattern plays, the sequence returns to the first.
x2
x2 plays each selected pattern twice before advancing.
x4
x4 plays each selected pattern four times before advancing.
Tip: Use Pattern A for the principal idea and B for a busier variation. Select x4 to let the main pattern establish itself for several passes before the variation appears.
Sequencer Timing and Groove
The Sequencer has its own SYNC, SPEED, SWING, CHANCE, and FEEL controls independent of the Arpeggiator.
Sync
SYNC: (Off/On) locks Sequencer timing to musical tempo.
In standalone operation, Sync follows Pentaphonic’s internal Tempo.
When Pentaphonic is used as a plug-in, Sync follows the host DAW session tempo.
With Sync disabled, the sequence runs at a freely adjustable rate.
Swing
SWING delays alternating sequence events to create shuffle.
Add it after the basic pattern is working.
Chance
CHANCE: (30% to 100%) sets the probability that programmed note events will play.
At 100%, all notes are triggered.
Lower values introduce missing events and rhythmic variation without altering the stored pattern.
Feel
FEEL: (-100% to 100%) shifts Sequencer timing slightly behind the beat toward Pull or ahead toward Push.
As with the Arpeggiator, small adjustments usually produce the most musical results.
Tip: Establish the notes first, then introduce one groove control at a time. Swing, Chance, and Feel can each add life. Aggressively applying all three at once can also cause the sequence to develop opinions of its own.
Parameter Animator
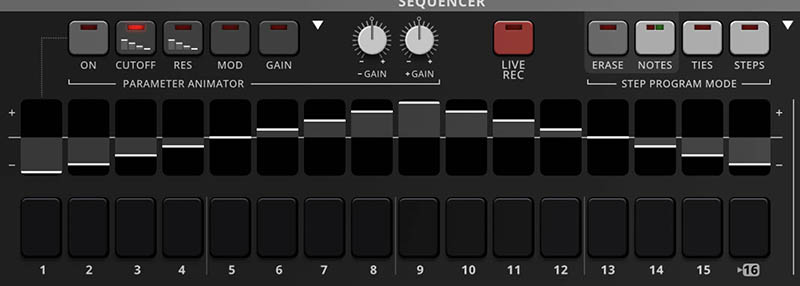
The PARAMETER ANIMATOR turns the Sequencer into a 16-step modulation system. Where the Sequencer controls which notes play, the Parameter Animator controls how selected synthesis parameters change from step to step.
Pentaphonic provides four directly selectable Parameter Animator targets:
CUTOFF
RES
MOD
GAIN
Only one Animator lane is displayed for editing at a time, but each target can store its own animation data. Whenever a target contains an assigned animation pattern, a small step-pattern icon appears on its target button. This provides an immediate visual reminder that animation data exists for that parameter, even when another Animator lane is currently selected.
The horizontal indicator inside each of the sixteen upper step areas represents that step’s Parameter Animator value. Values above the center line represent positive movement, while values below the center line represent negative movement.
This makes it possible to create rhythmic filter patterns, alternating accents, gradual ramps, waves, and other modulation shapes directly within the sequence. The step-pattern icons also make it easy to see at a glance which of the four Animator targets are already contributing movement to the sound..
Parameter Animator On
ON: (Off/On) enables or disables Parameter Animator playback. When disabled, the stored Parameter Animator values remain in the pattern but don’t affect the sound.
Cutoff
CUTOFF selects Filter Cutoff as the Parameter Animator target. Each step can therefore make the sound brighter or darker independently of the note sequence. This is particularly effective for rhythmic bass lines, repeating chords, and sustained sounds that need evolving tonal movement.
Res
RES selects Filter Resonance as the Parameter Animator destination. Each step can raise or lower Resonance relative to the setting that was in place when the Sequencer began playing.
Small changes can add useful accents and make selected steps feel more pronounced without dramatically changing the patch. Larger values can push certain steps into sharper, more resonant territory, which is useful for rhythmic emphasis and more animated filter patterns.
Mod
MOD animates the three oscillator PITCH MOD controls together. As the Sequencer moves from step to step, the Parameter Animator raises or lowers all three Pitch Mod amounts relative to the positions they were in when playback started.
This makes MOD especially useful for changing the intensity of pitch modulation rhythmically. A sequence can move from nearly steady oscillator pitch on one step to stronger vibrato or more pronounced pitch movement on the next, without changing the underlying Modulation 1 or Modulation 2 settings. Because the movement is relative, the three Pitch Mod controls retain the balance you established before starting the Sequencer. The Animator simply pushes them higher or lower from those starting positions.
Gain
GAIN animates the three oscillator GAIN controls together. Each step raises or lowers their levels relative to the Gain settings that were in place when the Sequencer began playing.
This can add rhythmic emphasis, create pulsing dynamics, or make selected steps feel heavier or lighter without changing the programmed notes themselves. Because the movement is relative, the oscillator mix you created remains the reference point. If Oscillator 1 is louder than Oscillators 2 and 3 before playback begins, Parameter Animation changes the three Gain controls from those starting positions rather than forcing them to the same absolute value.
This makes GAIN particularly useful for adding motion to an already balanced three-oscillator patch without undoing the mix that gives the sound its character.
- Gain and + Gain
Two controls labeled - GAIN and + GAIN appear beside the Parameter Animator. They provide separate scaling for the negative and positive portions of Parameter Animator movement respectively. Their control range is +1% - 500%.
This architecture is useful because a bipolar animation shape doesn’t necessarily need equal movement in both directions. You may want a Filter pattern to open dramatically above its base setting while dipping only slightly below it, for example.
Editing Parameter Animator Values
Drag the horizontal indicator for an individual step vertically to change its value.
Move upward for positive modulation.
Move downward for negative modulation.
The center position represents a neutral value.
Creating a Rhythmic Filter Pattern
To animate Filter Cutoff:
Turn Parameter Animator ON.
Select CUTOFF.
Set several step values above and below the center line.
Start the Sequencer.
Adjust the values while the pattern repeats.
Use the Parameter Animator Gain controls to establish an appropriate modulation range.
Fine-tune individual steps until the filter movement complements the notes rather than simply repeating them.
The visual relationship between the sequence steps below and Parameter Animator values above makes rhythmic modulation particularly easy to understand.
Using Parameter Animation without Sequenced Notes
The Parameter Animator doesn’t require the Sequencer to trigger notes.
To use the Parameter Animator as a modulation sequencer:
Turn the Sequencer ON.
Turn Parameter Animator ON.
Select a parameter such as CUTOFF.
Draw or load the desired Parameter Animator pattern.
Turn NOTES TRIGGER off.
Start Motion playback.
Hold a note or chord manually.
The held sound now remains continuous while the Parameter Animator changes its timbre step by step.
This is especially effective for pads, drones, and sustained chords because the rhythm comes from the changing sound rather than repeated note attacks.
Parameter Animator Preset Menu
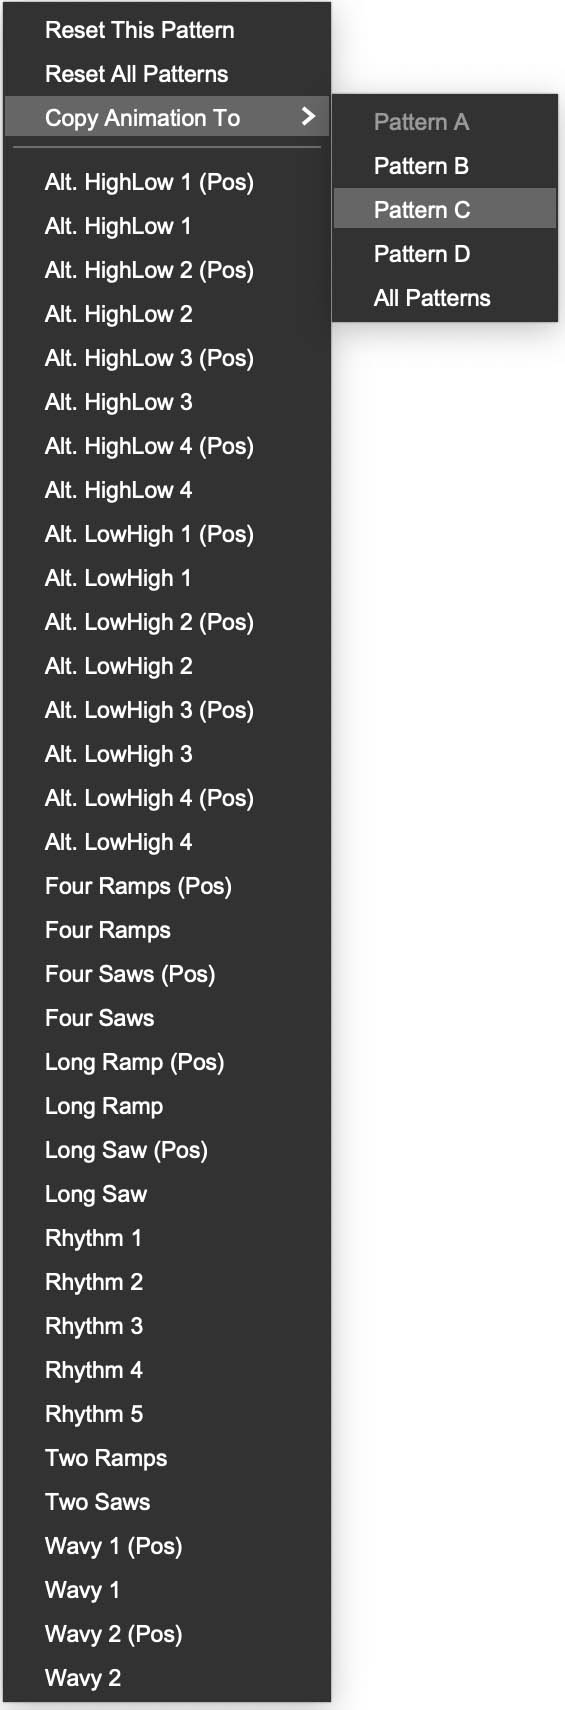
Click the small triangle above the Parameter Animator to open its preset and utility menu. The menu contains both management commands and ready-made animation shapes.
Reset This Pattern
Reset This Pattern clears the Parameter Animator values for the currently selected pattern and returns them to neutral.
Reset All Patterns
Reset All Patterns clears Parameter Animator data for all four patterns.
Copy Animation To
Copy Animation To > copies the current animation pattern to another Pattern destination, A, B, C, D, or All. Use it to create related variations without redrawing the modulation shape from scratch.
Parameter Animator Shapes
The menu contains several families of ready-made shapes.
Alternating High/Low and Low/High
The Alt. HighLow and Alt. LowHigh presets create alternating step values.
Versions 1 through 4 provide different repeating relationships.
Use them for rhythmic Filter Cutoff changes, Resonance accents, amplitude variation, and other alternating effects.
Ramps and Saws
The menu includes:
Two Ramps Four Ramps Long Ramp Two Saws Four Saws Long Saw
Ramp shapes create gradual movement across part or all of the pattern. Saw shapes move progressively and then reset sharply. Use them for filter sweeps, evolving gain changes, repeating modulation cycles, and patterns that should build or fall across several steps rather than alternate immediately.
Wavy 1 and Wavy 2
Wavy 1 and Wavy 2 create smoother rising and falling contours. These are excellent for pads and modulation that should feel more fluid than an obviously stepped sequence.
Rhythm 1–5
The five Rhythm presets provide more complex step patterns with varied accents. Use these when you want a useful rhythmic animation quickly without drawing every step manually.
Positive-Only Shapes
Preset names ending in (Pos) use positive values only. The corresponding versions without (Pos) use both positive and negative values. Positive-only shapes are useful when a parameter should move away from its base setting in only one direction. Bipolar versions move above and below the center value, creating more balanced or dramatic movement.
Tip: Load a preset shape, listen to it in context, then edit individual steps. A preset is a starting point, not a binding legal agreement.
Sequencer utility Menu
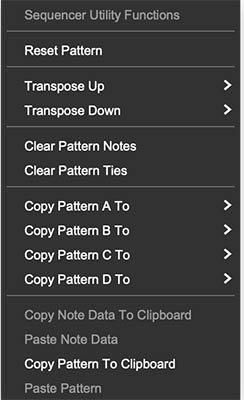
Click the small triangle near the STEP PROGRAM MODE controls to open the Sequencer Utility Functions menu. These commands provide quick ways to clear, transpose, duplicate, and transfer sequence material without having to edit the pattern one step at a time.
The Sequencer utilities operate on the note-sequencing portion of Motion. Parameter Animator data is managed separately from its own menu, so resetting or copying Sequencer material doesn’t automatically reset the corresponding Parameter Animation.
Reset Pattern
Reset Pattern clears the current Sequencer pattern and returns its sequence data to the default state. Use it when you want to start over with a clean note pattern without disturbing the Parameter Animator data associated with that pattern.
To clear Parameter Animator values as well, use Reset This Pattern from the Parameter Animator menu.
This separation can be useful. You can completely replace the musical sequence while keeping an existing filter, resonance, modulation, or gain animation intact.
Transpose Up / Transpose Down
Transpose Up and Transpose Down shift all stored notes in the current pattern by a fixed musical interval. This provides a fast way to move an entire riff, bass line, melody, or chord progression into another key or register without re-entering its notes.
Transpose Up opens a submenu with:
+1 semitone
+12 semitones
Transpose Down opens a submenu with:
-1 semitone
-12 semitones
Use the one-semitone commands for chromatic key changes and the 12-semitone commands to move the entire pattern up or down by one octave.
Tip: This is particularly useful after creating a pattern variation. Copy a pattern to another slot, transpose the copy, then switch or chain the two patterns for an instant harmonic change.
Clear Pattern Notes
Clear Pattern Notes removes all stored notes and chords from the current pattern.
Use it when you want to rebuild the musical content from scratch while retaining other Sequencer information, or when you want the Motion system to function primarily as a Parameter Animator.
Because note data and tie data are managed separately, use Clear Pattern Ties as well if you want to remove any stored ties from the pattern.
Clear Pattern Ties
Clear Pattern Ties removes all ties from the current pattern while leaving its stored notes and chords in place.
This is useful when a sequence has become too legato or when you want each programmed note or chord to retrigger independently.
It’s also a quick way to change the articulation of an existing pattern without altering its pitches.
Copy Pattern A/B/C/D To
The four Copy Pattern A To, Copy Pattern B To, Copy Pattern C To, and Copy Pattern D To commands duplicate an entire Sequencer pattern into another pattern slot.
Select the command corresponding to the pattern you want to copy, then choose the destination from its submenu. This is one of the fastest ways to create variations because you can begin with an existing musical idea rather than rebuilding it from scratch.
Creating a Pattern Variation
Program the main musical idea in Pattern A.
Choose Copy Pattern A To > Pattern B.
Switch to Pattern B.
Change a few notes, chords, ties, or the pattern length.
Switch between A and B manually or include both in a pattern sequence.
Because Pattern B begins as an exact copy, even fairly substantial edits tend to retain a recognizable relationship to the original phrase.
Copy Note Data to Clipboard
Copy Note Data To Clipboard copies the note or chord data from the currently selected Sequencer step. First select the step whose musical content you want to copy, then choose this command. This is useful when several steps should contain the same note or chord, or when you want to reuse a particular voicing elsewhere in the pattern without playing it again.
Paste Note Data
Paste Note Data places the previously copied note or chord data into the currently selected Sequencer step. Select the destination step first, then choose Paste Note Data. This allows individual musical events to be duplicated without replacing the rest of the pattern.
Copy Pattern to Clipboard
Copy Pattern To Clipboard copies the complete current Sequencer pattern to the clipboard. Use this when you want to transfer an entire pattern rather than a single step’s note data.
Paste Pattern
Paste Pattern replaces the current Sequencer pattern with the complete pattern stored in the clipboard.
Together, Copy Pattern To Clipboard and Paste Pattern make it easy to reuse complete sequence ideas without rebuilding them manually.
The distinction between the clipboard commands is worth remembering:
Copy/Paste Note Data works with the musical content of an individual step.
Copy/Paste Pattern works with the complete Sequencer pattern.
Parameter Animator data is managed independently using the Parameter Animator menu.
Start/Stop
The large START/STOP button at the far right controls Motion playback. Press START to begin Motion playback. Press STOP to halt it. The behavior of the Arpeggiator and Sequencer still depends on their individual On, Trigger, and Keyboard Control settings.
Practical Motion Ideas
Transposable Bass Line
Program a short bass phrase into Pattern A and select TRANSPOSE under Keyboard Control. Use the keyboard to move the running pattern through different keys. Keep Amp Release fairly short so successive notes remain distinct.
Sequenced Chord Progression
Enter complete chords rather than individual notes. Use Ties to hold selected chords longer than others, then copy Pattern A to B and alter the final few steps. Chain A and B to create a longer repeating progression.
Rhythmic Filter Sequence
Select CUTOFF in the Parameter Animator and load one of the alternating or Rhythm presets. Edit individual steps until the filter accents reinforce the note pattern. Try disabling Notes Trigger afterward and holding a sustained chord manually. The same animation suddenly becomes a rhythmic timbral pattern rather than a note sequence.
Arpeggiated Sequence
Program chords into the Sequencer. Set the Arpeggiator Trigger to SEQ and choose LEAP, ARP, or ORDER. The Sequencer determines when the harmony changes while the Arpeggiator generates movement within each chord. This can produce surprisingly elaborate results from very little note data.
Evolving Pad
Disable Notes Trigger and use Parameter Animator CUTOFF to create a slowly changing modulation pattern. Hold a sustained chord manually while the Animator changes the filter underneath it. Add a synchronized delay or reverb and use a non-16-step pattern length to keep the modulation cycle moving against the bar line.
Controlled Randomness
Use Random Sequencer playback with Chance below 100%. If the result becomes too sparse, raise Chance rather than immediately adding more notes. Randomness usually works best when given boundaries.
Avoiding Motion Overload
Pentaphonic’s Motion Controls can generate a remarkable amount of activity. The difficult part is often knowing when the patch already has enough.
If a pattern becomes crowded:
Turn off the Arpeggiator and listen to the Sequencer by itself.
Disable the Parameter Animator and evaluate the notes.
Shorten Amp Release if successive events blur together.
Increase Chance if too many notes are disappearing.
Reduce the Arpeggiator Range if it covers too much pitch territory.
Simplify the Parameter Animator shape.
Reduce delay or reverb if rhythmic definition begins to disappear.
Try disabling Notes Trigger and letting modulation provide the movement instead of adding more notes.
Motion is usually most effective when it moves against something stable.
A held chord beneath an animated filter pattern can sound larger than sixteen notes, an arpeggio, four patterns, random playback, maximum Swing, three echoes, and a small constitutional crisis all happening simultaneously.