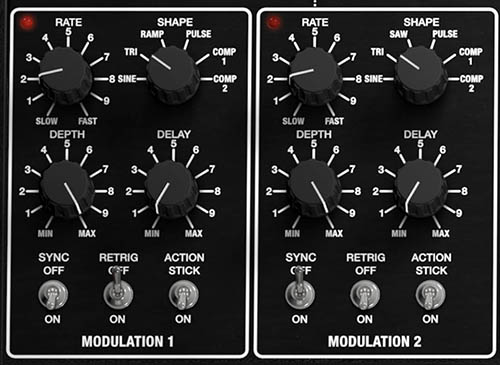
Pentaphonic’s two Modulation sections are the main sources of repeating and delayed movement within the instrument. They can animate oscillator pitch and pulse width, sweep the Filter, modulate amplitude, and interact with several other destinations throughout the synth.
The original Gleeman Pentaphonic used a single low-frequency triangle-wave modulation source with Rate, Depth, and Destination controls. Cherry Audio expands that idea considerably by providing two independent modulation generators, each with multiple wave shapes, delay, tempo synchronization, retriggering, and performance control from the MOD Action Stick.
At their simplest, Modulation 1 and Modulation 2 behave like conventional LFOs. Choose a waveform, set its speed and depth, then route it to a destination such as oscillator Pitch Mod, Filter Mod, or Amp Mod. Because the two modulation sections operate independently, however, they can perform very different jobs at the same time. Modulation 1 might provide a slow filter sweep while Modulation 2 adds vibrato, or one can animate oscillator pulse width while the other creates tremolo. That independence is where much of Pentaphonic’s sonic movement begins.
Modulation 1 and Modulation 2
The two sections share the same basic control layout:
RATE
SHAPE
DEPTH
DELAY
SYNC
RETRIG
ACTION STICK
The principal visible difference is the ramp direction available from the Shape control. Modulation 1 includes a rising RAMP, while Modulation 2 provides a falling SAW shape. This gives the two sections naturally complementary directional modulation options.
Rate
RATE: (0.10 Hz to 30 Hz) Sets the speed of the modulation cycle when the modulation section is running freely.
At the low end of the range, modulation unfolds slowly and is useful for gradual filter sweeps, evolving oscillator movement, or gentle amplitude changes. Increasing Rate produces progressively faster modulation. Moderate settings are useful for vibrato and tremolo, while faster values can create more intense pitch, filter, and amplitude effects.
The audible result depends heavily on the destination. A Rate that produces a natural vibrato when applied to pitch may create a very different effect when routed to Filter Cutoff or Amp level.
Tip: When learning a modulation routing, start with a relatively slow Rate. Once you can clearly hear what is changing, increase the speed until the movement suits the sound.
Shape
SHAPE: (varies by modulation section) Selects the waveform used to create the modulation pattern.
The waveform determines how the modulation value changes over each cycle.
Modulation 1 Shapes
RAMP creates a repeating upward-moving modulation shape.
PULSE alternates abruptly between two modulation levels, making it useful for rhythmic switching and stepped effects.
COMP 1 and COMP 2 provide more complex modulation patterns derived from Pentaphonic’s distinctive Gleeman-inspired waveform vocabulary.
SINE produces a smooth, rounded modulation cycle.
TRI creates a linear rise and fall.
Modulation 2 Shapes
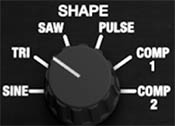
Modulation 2 provides the same general selection except that its directional waveform is SAW rather than Ramp.
SAW produces a repeating downward-moving modulation shape. This makes Modulation 1 and Modulation 2 especially useful as complementary sources. One can rise while the other falls, or each can be routed to a different destination for opposing movement.
Choosing a Shape
For conventional vibrato and tremolo, SINE or TRI are usually the most natural starting points.
Use RAMP or SAW when you want modulation to move persistently in one direction before restarting. Use PULSE for abrupt rhythmic changes. Use COMP 1 and COMP 2 when you want less predictable or more characterful movement.
Depth
DEPTH: (0 to 100%) Sets the amount of continuously applied modulation generated by the selected Modulation section when ACTION STICK is off.
At 0%, no continuous modulation is applied. Increasing Depth produces progressively stronger modulation at destinations using that source.
Depth works together with the modulation amount at the destination. For example, an oscillator’s PITCH MOD control determines how strongly the selected modulation source affects pitch, while the modulation section’s DEPTH establishes the strength of the modulation signal being sent to it. This two-stage relationship provides useful control over a patch.
You can think of it this way: DEPTH determines how much continuous modulation the source generates, while the destination’s modulation control determines how strongly that modulation affects the parameter.
When Action Stick is on, modulation can instead be brought in manually with the MOD Action Stick. In this mode, the stick position and MOD AMOUNT TRIMMER determine the performed modulation amount, allowing Depth to remain at minimum when no continuous modulation is desired.
Setting Continuous Modulation Amount
When ACTION STICK is off, the DEPTH control determines how much modulation is continuously generated by the selected Modulation section. The destination control then determines how strongly that modulation affects the parameter.
To set a continuous modulation amount:
Turn ACTION STICKoff for the Modulation section you want to use.
Choose MOD 1 or MOD 2 at the desired modulation destination.
Raise the destination’s modulation amount. For example, increase an oscillator’s PITCH MOD, the Filter’s FILTER MOD, or the Amp’s AMP MOD.
Set the Modulation section’s DEPTH to a moderate value.
Adjust RATE and SHAPE until the modulation is easy to hear.
Fine-tune DEPTH and the destination amount together until the modulation has the desired intensity.
The two controls perform different jobs: DEPTH sets how much continuous modulation the source generates, while the destination amount determines how strongly that modulation affects the selected parameter.
TIP: If you want modulation to remain absent until you introduce it manually, turn ACTION STICK on instead and leave DEPTH at minimum. You can then bring the modulation in with the MOD Action Stick and set its maximum range with the MOD AMOUNT TRIMMER.
Delay
DELAY: (0 ms to 5000 ms) Sets how long Pentaphonic waits before the modulation is applied after a note is triggered.
At 0 ms, modulation begins immediately. Increasing Delay postpones the onset of modulation by as much as five seconds.
Delay is especially useful for performance-oriented sounds because it allows the beginning of a note to remain stable before modulation gradually enters. A classic example is delayed vibrato. The note begins with a steady pitch, then vibrato appears after the note has been held for a short time.
Creating Delayed Vibrato
To create delayed vibrato:
Turn ACTION STICK off.
Select MOD 1 or MOD 2 as an oscillator PITCH MOD source.
Set the modulation SHAPE to SINE or TRI.
Choose a moderate RATE appropriate for vibrato.
Raise DEPTH.
Increase the oscillator’s PITCH MOD amount slightly.
Raise DELAY until the note begins cleanly before the vibrato appears.
Fine-tune Pitch Mod and Depth so the vibrato remains musical rather than exaggerated.
Delayed vibrato can make lead sounds feel much more natural because the modulation enters after the initial pitch has been clearly established.
Sync
SYNC: (Off/On) Synchronizes the modulation rate to tempo rather than allowing it to run freely in Hertz.
With SYNC off, RATE operates over its normal 0.10 Hz to 30 Hz range. With SYNC on, the modulation rate is expressed in musical note divisions and follows tempo. In the standalone version of Pentaphonic, this timing follows Pentaphonic’s own tempo setting. When Pentaphonic is used as a plug-in inside a DAW, synchronization follows the DAW session tempo instead.
This is especially useful for rhythmic modulation such as tempo-locked filter movement, tremolo, pulse-width animation, or other repeating patterns that should remain aligned with the music.
Retrig
RETRIG: (Off/On) Determines whether the modulation waveform restarts when a new note is triggered.
With Retrig enabled, the modulation cycle begins again from its starting point when a note is played. This produces more predictable modulation because each note begins at the same part of the waveform. With Retrig disabled, the modulation runs continuously. New notes enter wherever the modulation cycle happens to be at that moment. Both behaviors are musically useful.
Use Retrig when you want repeated notes to produce consistent movement. Leave it off when you want modulation to feel less mechanically tied to note attacks.
Retriggered vs. Free-Running Modulation
A retriggered Ramp applied to Filter Cutoff might cause every note to begin dark and brighten in the same way. With Retrig off, each note may begin at a different point in that sweep, creating more continuously evolving movement.
For pads and sustained textures, free-running modulation often feels more organic. For rhythmic patches and sound effects, retriggering can provide greater precision.
Action Stick
ACTION STICK: (Off/On) Enables control of the Modulation section from the MOD Action Stick in the Performance Controls section.
With ACTION STICK off, modulation is applied continuously according to the Modulation section’s DEPTH setting.
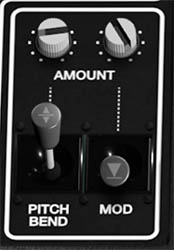
With ACTION STICK on, the MOD Action Stick provides real-time control over the modulation. The stick operates like a conventional modulation wheel, with a range of 0 to 100%. At its fully lowered position, no Action Stick modulation is applied. Push the stick upward to progressively increase modulation.
The MOD AMOUNT TRIMMER directly above the Action Stick sets how much modulation is available at the top of the stick’s travel. This allows you to establish a comfortable maximum amount, then bring modulation in expressively while playing.
If you want modulation to be introduced entirely from the Action Stick rather than applied continuously, leave DEPTH at minimum. This is especially useful for vibrato: a lead sound can begin with a steady pitch, then gradually introduce vibrato by raising the Action Stick during a sustained note.
Adding Vibrato with the Action Stick
To create manually controlled vibrato:
Select MOD 1 or MOD 2 as the desired oscillator PITCH MOD source.
Choose SINE or TRI as the modulation Shape.
Set a moderate RATE.
Set the oscillator PITCH MOD amount to establish the desired sensitivity.
Switch ACTION STICK to ON.
Leave DEPTH at minimum if you want no continuous vibrato while the Action Stick is down.
Set the MOD AMOUNT TRIMMER to establish the maximum amount of vibrato available from the stick.
Play a sustained note.
Push the MOD Action Stick upward to gradually introduce vibrato.
Fine-tune Rate, Pitch Mod, and Mod Amount until the response feels natural..
This is useful for expressive lead playing because vibrato can be added selectively rather than affecting every note automatically.
Routing Modulation
Modulation 1 and Modulation 2 become useful only when they’re assigned to something. Several controls throughout Pentaphonic provide dedicated Mod 1/Mod 2 source switches. These currently include:
Oscillator PITCH MOD
Oscillator PW MOD
Filter FILTER MOD
Amp AMP MOD
Each destination has its own amount control, allowing the same modulation source to affect several parameters at different depths.
For example, Modulation 1 could simultaneously:
add a small amount of vibrato
animate pulse width
move Filter Cutoff
introduce gentle tremolo
Because each destination has an independent amount, the effects don’t have to be equally strong. That makes a single modulation source capable of creating coordinated movement across the entire patch.
Using MOD 1 and MOD 2 Independently
One of the greatest advantages of Pentaphonic’s dual-modulation architecture is that movement doesn’t have to come from a single repeating cycle.
Example: Slow Filter Movement with Faster Vibrato
To use the two modulation sections for different jobs:
Turn ACTION STICK off.
Set Modulation 1 to a slow Rate.
Choose SINE or TRI.
Select MOD 1 as the Filter Mod source.
Raise FILTER MOD until a gentle sweep is audible.
Set Modulation 2 to a faster Rate.
Choose SINE or TRI.
Select MOD 2 as an oscillator Pitch Mod source.
Raise PITCH MOD slightly.
Balance the two modulation Depth settings.
The Filter now moves slowly while pitch vibrato operates at a completely different rate.
This type of independent movement can make sustained sounds feel considerably more alive than routing everything from a single LFO.
Creating Tremolo
Amplitude modulation creates repeating changes in volume.
To create tremolo:
Turn ACTION STICK off.
Select MOD 1 or MOD 2 beneath AMP MOD.
Choose SINE or TRI as the modulation Shape.
Set a moderate RATE.
Raise the modulation section’s DEPTH.
Increase AMP MOD until the desired amount of volume movement is audible.
Adjust Rate for the desired speed.
Use low amounts for subtle movement and higher values for obvious rhythmic pulsing. For sharper amplitude switching, try the PULSE Shape instead.
Creating Filter Modulation
Modulating Cutoff is one of the most musically useful applications of the modulation system.
To create a repeating filter sweep:
Turn ACTION STICK off.
Lower Filter CUTOFF so there is room for the filter to open.
Select MOD 1 or MOD 2 as the FILTER MOD source.
Raise FILTER MOD.
Set the selected Modulation section to SINE or TRI.
Choose a relatively slow RATE.
Raise DEPTH until the sweep becomes clearly audible.
Adjust Cutoff and Filter Mod together to establish the desired range.
Try RAMP, SAW, or PULSE once the basic modulation is working.
A repeating Ramp or Saw creates directional sweeps, while Pulse creates abrupt alternation between two filter states.
Pulse-Width Modulation
Pentaphonic’s pulse-width modulation applies specifically to the 50% PULSE waveform. The other oscillator shapes, including the 3% and 12% Pulse waveforms, are fixed and aren’t affected by PW Mod.
To create pulse-width movement:
Set the desired oscillator SHAPE to 50% PULSE.
Choose MOD 1 or MOD 2 as the oscillator’s PW MOD source.
Raise PW MOD gradually.
Set the selected modulation Shape to SINE or TRI.
Use a relatively slow RATE.
Increase modulation DEPTH until the pulse width begins to animate noticeably.
Pulse-width modulation changes the harmonic content of the 50% Pulse waveform without altering the fundamental played pitch. This is especially effective for pads, strings, and ensemble-style sounds, where slow PW modulation can add continuous internal movement. Combined with Pentaphonic’s CHORUSING, it can produce a particularly rich, animated texture.
Using the Two Directional Shapes
The directional shapes in Modulation 1 and Modulation 2 are especially useful when you want movement that doesn’t simply travel back and forth.
RAMP in Modulation 1 repeatedly rises before returning to its starting point.
SAW in Modulation 2 repeatedly falls before returning.
Try routing them to different destinations at the same Rate.
For example:
Ramp can open the Filter while Saw modulates oscillator pitch downward.
Ramp can increase amplitude while Saw reduces Filter brightness.
Opposing movement can be applied to different oscillators for complex animated textures.
Because the cycles can operate independently, even relatively simple routings can produce surprisingly elaborate results.
Making Creative Use of Modulation
Pentaphonic’s dual modulation system is most effective when it’s used with some restraint. A small amount of motion applied in several places often sounds more interesting than extreme modulation applied everywhere.
Use one Modulation section for motion and the other for performance. Let Mod 1 run continuously while Mod 2 is controlled by the Action Stick.
Use different rates. Slow Filter movement combined with faster vibrato keeps a patch evolving at more than one timescale.
Use different Shapes. A smooth Sine on one destination and Pulse on another creates a mixture of fluid and rhythmic motion.
Delay only one modulation source. A patch can begin with one type of movement and introduce another after the note has been held.
Leave one oscillator stable. Modulating every oscillator equally can blur the pitch center. Keeping one relatively steady often makes the result stronger.
Use Retrig selectively. A retriggered rhythmic modulation can coexist with a free-running modulation source for a useful mixture of precision and variation.
Use the Action Stick musically. Vibrato, Filter movement, or tremolo can become gestures rather than permanent properties of the patch.
Try very slow modulation. Movement doesn’t always need to call attention to itself. Long, slow cycles can keep pads and drones from feeling static.
Modulation Programming Tips
When a modulation routing isn’t behaving as expected, check both the modulation source and its destination. If ACTION STICK is off, make sure the Modulation section is generating enough DEPTH. If ACTION STICK is on, make sure the MOD AMOUNT TRIMMER is raised and push the MOD Action Stick upward. In either case, the destination must also have sufficient modulation amount.
If nothing seems to be happening:
Check that the correct MOD 1 / MOD 2 source is selected.
Increase the destination modulation control.
If ACTION STICK is off, increase modulation DEPTH.
If ACTION STICK is on, raise the MOD AMOUNT TRIMMER and push the MOD Action Stick upward.
Slow RATE enough that the movement is easy to identify.
Use a simple Shape such as Sine or Triangle.
Check DELAY, since a long Delay may make the modulation appear inactive immediately after a note begins.
Once the connection is working, reduce the amounts and refine the Rate, Shape, Delay, and triggering behavior musically.
Pentaphonic’s core audio path is deliberately straightforward. Its two Modulation sections are where that static architecture begins to breathe.
The next chapter, Performance Controls, takes that movement out of the purely automatic realm and puts more of it under the player’s hands, including voice modes, note priority, tuning, glide, Pitch Bend, the MOD Action Stick, and Pentaphonic’s extensive Keyboard Pressure controls.