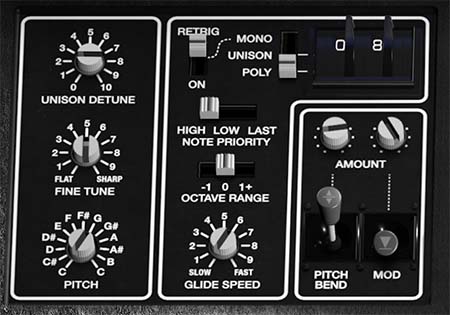
Performance Controls
Pentaphonic’s Performance Controls determine how the synth responds to the notes you play and what happens when you lean into a performance with pitch bend, modulation, glide, unison, or keyboard pressure.
This part of the instrument has strong roots in the original Gleeman Pentaphonic. The original hardware included Mono and Poly keyboard modes, high-note priority, glide, chromatic transposition, fine tuning, and a spring-loaded performance joystick. Cherry Audio builds considerably on those ideas with Unison operation, selectable note priority, up to 16 voices of polyphony, adjustable pitch-bend range, a dedicated Pitch Bend Stick, a dedicated Mod Action Stick, and an extensive Keyboard Pressure system capable of reaching numerous synthesis parameters.
The controls can be divided into three general areas:
Voice and keyboard behavior, including Mono/Unison/Poly modes, polyphony, note priority, Retrig, and Glide.
Tuning and transposition, including Unison Detune, Fine Tune, Pitch, and Octave Range.
Real-time expression, including Pitch Bend, the Mod Action Stick, and Keyboard Pressure.
Voice Mode
The three-position voice mode selector determines how Pentaphonic allocates its available voices when notes are played.
VOICE MODE: (Mono, Unison, Poly) Selects Pentaphonic’s basic voice behavior.
Mono
MONO restricts the instrument to one played note at a time.
This is ideal for basses, leads, solos, and other sounds where single-note articulation, note priority, glide, and expressive pitch movement are important.
Mono operation also makes oscillator intervals particularly useful. Because one key produces one complete three-oscillator voice structure, Oscillators 2 and 3 can be transposed to musical intervals without the harmonic density that can result when the same interval structure is repeated across a full chord.
Unison
UNISON stacks multiple voices together on the same played note, creating a larger, denser sound.
The UNISON DETUNE control spreads the tuning of the stacked voices, allowing Unison to range from a relatively focused reinforcement to a much heavier ensemble-style sound. Unison is particularly effective for basses, leads, drones, and large single-note textures. Because several voices can sound simultaneously for every played note, Unison can produce substantially more level and harmonic density than ordinary Mono operation. Keep an eye on the Output meters, especially when using high Resonance, long Release times, or effects.
Poly
POLY allows multiple notes to sound simultaneously, making it the normal choice for chords, pads, strings, keyboard sounds, and polyphonic sequences. The number of simultaneously available voices is determined by Pentaphonic’s Polyphony setting. The original Gleeman was limited to five voices. Cherry Audio Pentaphonic expands this substantially, providing as many as 16 voices for modern polyphonic playing.
Polyphony
POLYPHONY: (1 to 16 voices) Sets the maximum number of voices Pentaphonic can play simultaneously.
The two lever controls at the upper-right of the voice-mode area adjust the voice count: The right lever increments the number of available voices. The left lever decrements it. The current value appears in the numerical display between them. Increasing polyphony allows more simultaneously held and releasing notes to overlap. This is particularly useful for sustained pads, long Amp Release settings, arpeggiated material, and passages using the Sustain pedal. Reducing polyphony can be musically useful as well. Artificially limiting the voice count can create more vintage-style voice stealing and force phrases to behave more like early polyphonic hardware.
NOTE: You can also access and easily change the number of voices for POLY and UNISON from a pop-up menu by right-clicking (CTRL+click on Mac) within the black lever area.
Choosing a Polyphony Setting
For ordinary playing, there’s generally no harm in using enough voices to accommodate the musical part. A 16-voice setting is useful for pads and passages with long Release times, while lower values can make a patch behave more tightly and economically.
Tip: A sound with a two-second Release may continue using voices long after the keys have been released. If chords unexpectedly cut each other off, increase Polyphony before assuming something is wrong with the envelope.
Retrig
RETRIG: (Off/On) Determines whether a newly played note retriggers the envelopes during monophonic-style playing.
With Retrig enabled, playing a new note causes the envelopes to begin again, giving each note a newly articulated attack. With Retrig disabled, overlapping or legato notes can transition without restarting the envelopes, producing smoother connected phrases. This distinction is particularly important for Mono and Unison leads.
For a sharply articulated synth bass, enable Retrig so every note receives a fresh envelope attack. For a fluid lead line, turn Retrig off and play legato. The pitch can move between notes while the envelope continues from its existing state.
Creating a Legato Lead
To create a smooth monophonic lead:
Select MONO.
Turn RETRIG off.
Increase GLIDE SPEED slightly.
Select LAST Note Priority.
Use a moderate Amp Sustain level.
Play overlapping notes rather than releasing each key before playing the next.
The result is a fluid line in which pitch changes can connect naturally instead of every note behaving like a completely new musical event.
Note Priority
NOTE PRIORITY: (High, Low, Last) Determines which note Pentaphonic gives priority when more than one key is held in a monophonic-style voice mode.
HIGH gives priority to the highest held note. LOW gives priority to the lowest held note. LAST gives priority to the most recently played note. The original Gleeman Pentaphonic used high-note priority in Mono mode. Cherry Audio adds Low and Last options, giving you much more control over articulation.
Making Musical Use of Note Priority
HIGH is useful for lead playing where a held lower note can act as an anchor while higher notes are articulated above it. LOW works particularly well for bass lines, allowing a low held note to dominate while higher notes are briefly played above it. LAST behaves most like many modern monosynths and is often the most natural choice for conventional melodic playing.
Try all three with Glide enabled. Note priority can change the phrasing of the same keyboard performance much more dramatically than its small switch might suggest.
Tuning and Transposition
The left side of the Performance section provides global controls for tuning, transposition, and unison spread.
Unison Detune
UNISON DETUNE: (0 to 100%) Sets the amount of pitch spread between voices when Pentaphonic is operating in Unison mode.
At low settings, stacked voices remain closely tuned and primarily increase weight and density. Increasing Unison Detune spreads the voices progressively farther apart, creating a wider and more animated ensemble effect. Small amounts are excellent for thick basses and focused leads. Larger values work well for intentionally broad leads, drones, and more exaggerated stacked textures.
Remember that Unison Detune and Chorusing serve related but different purposes. Unison Detune spreads stacked voices in Unison mode, while Pentaphonic’s CHORUSING creates beating through the pitch relationships of the oscillators themselves.
Creating a Large Unison Lead
To create a broad Unison sound:
Select UNISON mode.
Begin with UNISON DETUNE at a low setting.
Play a sustained note.
Increase Detune until individual voices begin to spread audibly.
Stop before the pitch center becomes less focused than the musical part requires.
Add SLOW CHORUSING if additional oscillator movement is desired.
Reduce Output level if the stacked voices substantially increase overall volume.
Often the most impressive Unison setting isn’t the maximum one. A little disagreement among voices can sound enormous, but too much can make them sound overwhelming.
Fine Tune
FINE TUNE: (-100% to +100%) Adjusts Pentaphonic’s overall tuning slightly flat or sharp relative to its standard pitch.
The center position leaves the instrument at normal tuning. Turn the control toward FLAT to lower the tuning or toward SHARP to raise it. Fine Tune is useful for matching Pentaphonic to another instrument, compensating for nonstandard tuning in a recording, or deliberately shifting the entire synth slightly away from concert pitch.
Unlike the oscillator INTERVAL controls, Fine Tune isn’t intended to create fixed musical intervals. It adjusts the overall tuning of the complete instrument.
Pitch
PITCH: (0 to 12 semitones) Transposes Pentaphonic upward in discrete semitone steps across a one-octave range.
The control is labeled chromatically from C through C, making musical transposition quick and straightforward. At the starting C position, no transposition is applied. Turning clockwise moves the instrument upward through C#, D, D#, and so on until the upper C, which transposes the instrument by one octave. This is useful when a sound needs to be shifted into another key or register without changing the notes being played or sequenced.
The original Gleeman included a similar chromatic transpose function, one of the more unusual conveniences on a compact analog-era polysynth.
Octave Range
OCTAVE RANGE: (-1, 0, +1 octave) Transposes the keyboard range by whole octaves.
The center setting is the standard range. Move the switch left to transpose one octave down. Move it right to transpose one octave up. Use Octave Range for broad register changes and the Pitch control for chromatic transposition within the octave.
Together they make it easy to put Pentaphonic exactly where it belongs in an arrangement.
Glide Speed
GLIDE SPEED: (0 to 100%) Sets how quickly pitch moves from one played note to the next when glide is used.
Lower settings produce quicker transitions. Higher settings produce slower, more obvious pitch glides.
Glide is most useful for monophonic and Unison leads, basses, and special effects, where notes can slide into one another rather than jumping immediately to their new pitches. Small amounts can make melodic playing feel more fluid without producing an obvious portamento effect. Higher settings create the familiar long synth glide between widely separated notes.
Creating an Expressive Glide Lead
To add controlled glide to a lead:
Select MONO or UNISON.
Choose LAST Note Priority.
Turn RETRIG off for smoother legato phrasing.
Set GLIDE SPEED to a low or moderate value.
Play overlapping notes.
Gradually increase Glide Speed until the transitions become as obvious as desired.
Try wide intervals when setting Glide. A small pitch interval may make even a substantial Glide setting difficult to judge.
Pitch Bend and Mod Action Sticks
Pentaphonic provides separate performance levers for pitch bending and modulation. This expands on the original Gleeman’s two-axis joystick while preserving the idea that expressive control should be immediately available from the performance panel.
Pitch Bend
PITCH BEND STICK: (-100% to +100%; default 0%) Provides real-time control over pitch bend. The center position is 0%. Moving the stick upward bends the pitch upward, while moving it downward bends the pitch downward.
PITCH BEND AMOUNT TRIMMER: (0 to 12 semitones; default 2 semitones) Sets the maximum pitch-bend range in either direction.
Move the PITCH BEND STICK upward or downward to bend played notes above or below their normal pitch. The Amount Trimmer determines how far the pitch can travel. Small ranges are useful for subtle performance inflections. A setting of two semitones works well for conventional lead playing and guitar-like bends, while larger ranges can produce octave dives, dramatic sweeps, and sound effects.
Setting Up a Conventional Pitch Bend
To create a whole-step pitch bend:
Set PITCH BEND AMOUNT TRIMMER to 2 semitones.
Play and hold a note.
Move the PITCH BEND STICK upward or downward.
Release the stick to return to the original pitch.
For more extreme whammy-bar-style effects, increase the PITCH BEND AMOUNT TRIMMER toward 12 semitones.
Mod
MOD ACTION STICK: (0 to 100%; default 0%) Provides real-time control over modulation from Modulation 1 and/or Modulation 2 when their ACTION STICK switches are enabled.
MOD AMOUNT TRIMMER: (0 to 100%) Sets the maximum amount of modulation available from the Mod Action Stick. Lower settings keep the Action Stick response subtle, while higher settings allow greater modulation depth as the stick is raised.
The Action Stick works together with the ACTION STICK switches in Modulation 1 and Modulation 2. Enable ACTION STICK for the modulation source you want to control, then use the stick to bring that modulation into the performance as needed.
This makes the Action Stick especially useful for gestures such as introducing vibrato only after a note has begun, rather than having vibrato present continuously.
Adding Vibrato with the Action Stick
To use the MOD Action Stick for expressive vibrato:
Select MOD 1 or MOD 2 as the desired oscillator PITCH MOD source.
Choose SINE or TRI as the modulation Shape.
Set a suitable modulation RATE.
Set the oscillator PITCH MOD amount to establish the desired sensitivity.
Turn the modulation section’s ACTION STICK switch ON.
Leave DEPTH at minimum if you want no continuous vibrato when the Action Stick is down.
Set the MOD AMOUNT TRIMMER to establish the maximum amount of vibrato available from the stick.
Play and hold a note.
Push the MOD Action Stick upward to gradually introduce vibrato.
Fine-tune Rate, Pitch Mod, and Mod Amount until the response feels natural.
This allows the beginning of the note to remain stable while vibrato is introduced as an expressive gesture.
Keyboard Pressure
Across the top of Pentaphonic’s main synthesis panel is the KEYBOARD PRESSURE strip.
