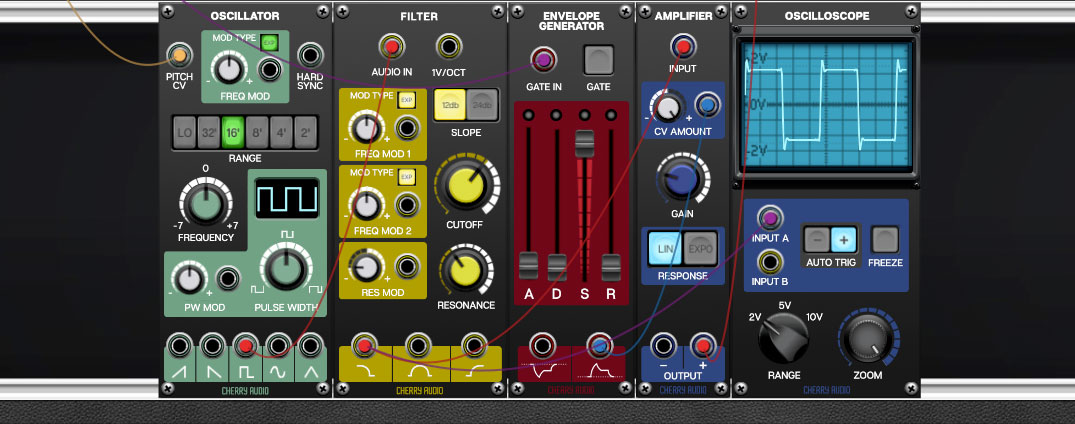
A "cabinet" refers to a horizontal row of modules. Cabinets have no width limitations; you’re free to add as many modules as you like. If the number of viewable modules exceeds the width of the Voltage Modular window, a scroll bar appears at the bottom of the window. Optimally, you’ll want to see as much of a patch on-screen as possible, so it makes sense to organize modules into additional cabinets, stacked vertically. (It also makes sense to "borrow" your rich brother's 120" flat-panel TV and use that as a computer display, but you didn't hear that from us.)
The Cabinets Library Tab
This is a useful Voltage feature that many users aren't aware of. Any cabinet (i.e. a single row of horizontal modules) can be saved independently of a Voltage preset. Not only is this is nice for creating patch templates, it's really useful for moving parts of patches to a different patch (you may need to do some fancy shuffling of modules into a single cabinet row first).
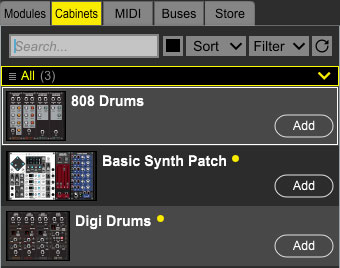
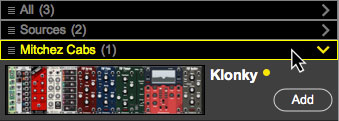
All stored saved cabinets are visible in the Library tab regardless of the currently selected patch.
Loading Cabinets- Cabinets can be added to the current preset by clicking the Add button, dragging to the module area, or by double-clicking. Newly added cabinets always appear beneath existing cabinets, but once a cabinet is added, modules can be freely dragged between cabinets.

Saving Cabinets- To save a cab, right-click either on the left-edge of a cabinet, in open area of the cab (i.e., an open space without a module), or on one of the “aluminum” rails and select Save Cabinet.
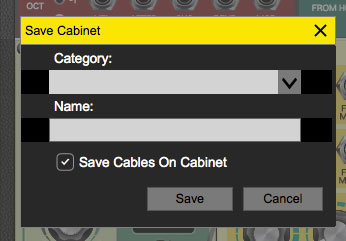
Choose an existing category by clicking the downward arrow, or type in the text field to create a custom category, then type a name in the Name field. The Save With Cables box is on by default and will save all cable routings. Disabling it will save the module layout only, without cables.
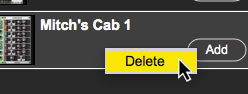
Deleting Cabinets- To permanently delete a cabinet from the library, right-click it in the library tab and click Delete. Be careful with this (though you can hit the Undo button).
Like the Modules tab, cabinets can be saved in user-named categories, but unlike modules, which are “pre-assigned” to one of Voltage Modular’s five module categories, there are no limitations on the naming convention or number of cabinet categories.
Search- This super-handy field lets you search for modules by typing a few letters of the module name. For example, typing “LFO” would display the LFO and MiniLFO modules. The search field can be initialized by clicking the X icon.

Graphic/List View Select- This little guy is easy to miss, but clicking it toggles between graphic+name or name-only display in the cabinet list.

Sort- This drop-down menu allows sorting of the module list by name, category (more on this below), date acquired (as in, “show me my new stuff!”), or the company that made the module.
Filter- Allows filtering of which modules are displayed using descriptive headings.
None- Shows all currently owned modules with no separate headings.
Categories- Divides up modules by "stock" and user-created categories.
Name- Sorts categories alphabetically.
Creating Cabinets
The easiest way to create cabinet is to drag a module from the library or an existing cabinet onto the gray area next to the library. Cabinets can also be added by right-clicking anywhere in the empty gray area and clicking Add Cabinet.
Cabinet Right-Click Menu
The contextual menus that appear when you right-click in a "blank" (i.e., no modules) area of the cabinet.
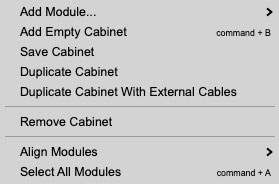
Add Module...- Allows modules to be added quickly without using the Library tab. The submenu displays Favorites, then the five module type categories.
Add Empty Cabinet- Adds a new blank cabinet. The new cabinet will appear beneath if there are any existing cabinets.
Save Cabinet- Saves the cabinet that’s being right-clicked to the library Cabinet tab.
Duplicate Cabinet- Creates a copy of the cabinet with all modules directly beneath. All cables within the cabinet only remain intact.
Duplicate Cabinet With External Cables- Creates a copy of the cabinet with all modules directly beneath. All cables will be intact, including cables patched to destinations not within the cabinet. (e.g., I/O panel connections).
Remove Cabinet- Clears the entire cabinet and its cables. Be careful with this one, as it’s easy to mess up patches (you can always hit the Undo button).

Align Modules- These functions allow rapid tidying up by moving all of a cabinet's modules left or right while simultaneously closing up gaps.
Left- Moves all modules of the current cabinet all the way to the left and closes gaps between modules.
Right- Moves all modules of the current cabinet all the way to the left and closes gaps between modules. Align Modules/Right will only move modules to the farthest currently visible right-side border.
Auto Align Left- This is an on/off parameter- when Auto Align Left is enabled, modules automatically slide to the left, with no gaps. If modules are moved or deleted, any existing modules to the right will slide left to close the gap. Auto Align Left is a per-cabinet setting. The default on/off setting of Auto Align Left can be set in Settings>Interface>Auto Align New Cabinets To The Left.
Select All Modules- Highlights all modules in the cabinet. You’d typically use this to move or delete all modules in a cabinet simultaneously.
Moving Cabinets
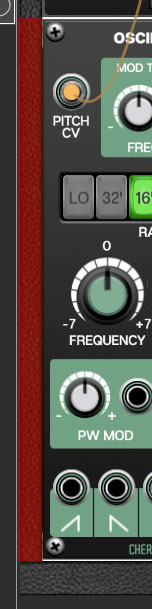
Cabinets can be vertically relocated. You can swap positions of multiple cabinets, or move cabinets above or below the I/O Panel or Performance Controls panel. To move a cabinet, click and drag on the left edge of the cabinet frame. It can be little hard to tell where you’re supposed to grab, so we’ve highlighted the "grab" area in red In the screenshot below. It isn’t actually red in Voltage Modular, but it the left and right edges of the currently selected cabinet re shaded a little darker. This works exactly the same for moving the I/O Panel and Performance Controls pane.