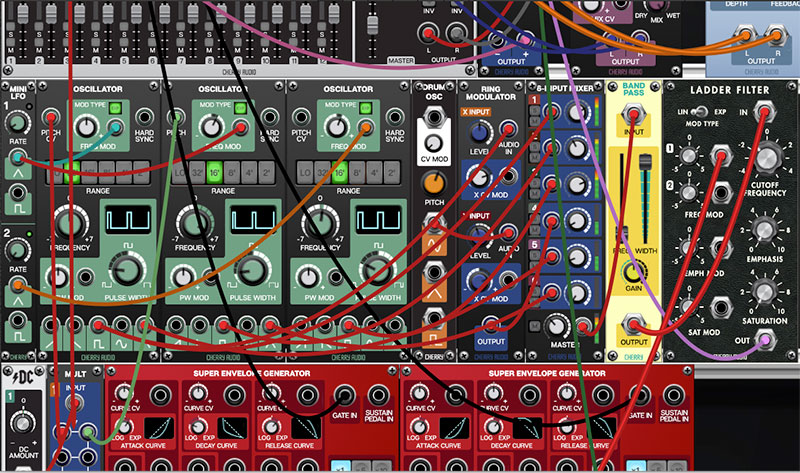
Patching A Cable- Simply click on a jack, drag the cable to the desired destination jack and release the mouse button, but there’s one very important thing to be aware of:
Unlike a hardware modular synth, where some jacks can be used as inputs or outputs, all Voltage Modular jacks are exclusively an input or an output. To help clarify this, when a jack is clicked and held to patch a cable, jacks not available as destinations are grayed out. For example, if you’re patching a cable from an output jack, all other output jacks are temporarily grayed out. The same applies if you’re patching a cable from an input jack- all other input jacks are grayed out.
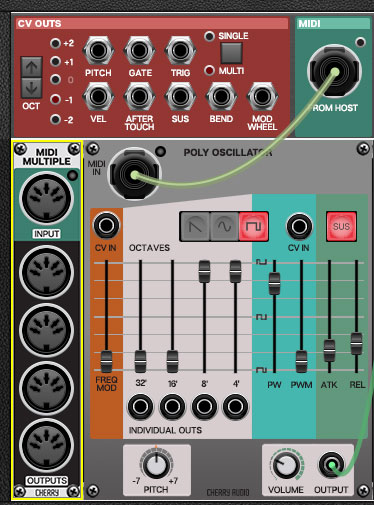
In the screenshot above, the Pitch CV output is being patched, causing all of the oscillator output jacks to become grayed out, while all of the oscillator inputs are potential destinations.
Disconnecting A Cable- Cables can be disconnected by grabbing one end of a jack and dragging it to any area that isn’t a jack, or by right-clicking on a jack and selecting Disconnect Cables.
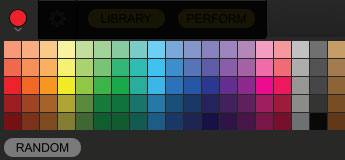
Selecting Cable Colors- There are a couple of ways to select cable colors. The most obvious way is to click the colored dot in the top menu bar to reveal the color picker palette and select a global color. By "global," this means all newly patched cables will be the chosen color (or a random color, if Random is selected). Existing cables are not affected.
To change the color of an existing patched cable, right-click on one of the jacks it’s connected to, then click a new color. This changes only that cable, and won’t affect the global cable color in the top menu bar.
Super Handy "Pre-Patching" Cable Color Selection- Right-clicking a jack that doesn’t have a cable plugged in opens the color palette and changes the global color; the same as clicking the color selector in the top menu bar. This is convenient for specifying a cable color right before patching a new cable.
Adjust Cable Transparency- Clicking the checkerboard icon in the top toolbar displays the cable transparency horizontal slider. Slide this to the left for more transparent cables, or to the right for more opaque cables.
Show/Hide Cables- Clicking this hides or shows all cables. It has no effect on sounds, and its status does not save with patches. Cables visibility can also be toggled with the key shortcuts [CTRL-D] (PC) or [⌘-D] (Mac).
Cable Buses
Cable buses offer an ingenious new way to build complex patches and eliminate excessive cabling. Cables buses allow an unlimited number of "invisible" cables to be routed to and from multiple sources and destinations. There is no limit on the total number of cable buses that can be created. In addition to adding tremendous flexibility, cable buses go a long way toward cleaning up the appearance of patches, due to their invisible nature. Cable buses can be created for mono CV jacks, poly jacks, or MIDI jacks.
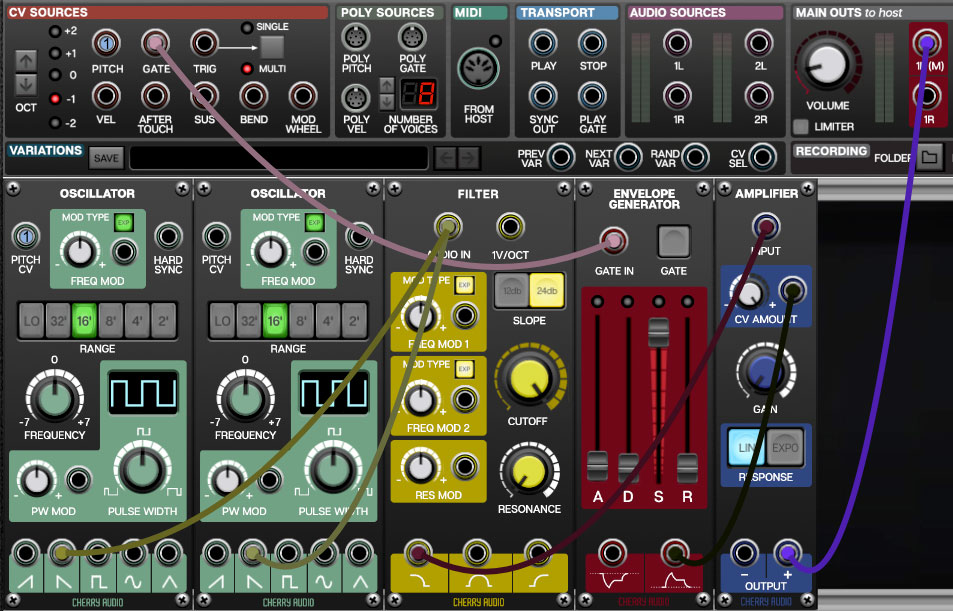
In the following example we'll use a mono cable bus to simplify routing a pitch CV from the I/O Panel to multiple oscillators. Begin by setting up the basic two-oscillator patch shown below. Notice that we haven't connected the IO Panel CV Sources Pitch output.
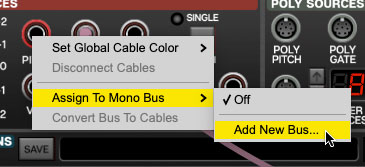
Right-click the I/O Panel Pitch jack, move down to Assign To Mono Bus, and click Add New Bus...
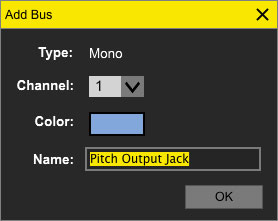
The following window opens. The name field defaults to the jack name, or a custom name can be added. The bus color can also be customized by clicking on the color swatch. Click the OK button.
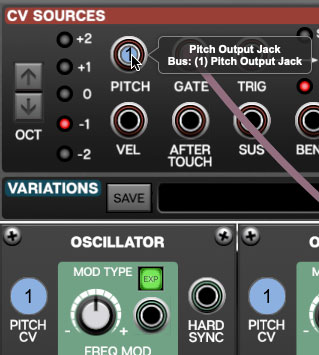
The jack will now be "filled in" with a number and color; this is the bus number.
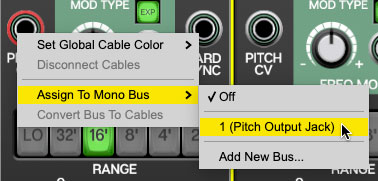
Now we'll assign (fancy word for "connect") our pitch cable bus to the oscillator pitch CV inputs. Right-click on the first oscillator's Pitch CV inputs, select Assign To Mono Bus, and choose (1) Pitch Output Jack.
The jack will have the same bus number and "filled" appearance as the I/O Panel Pitch jack.
Right-click the second oscillator's Pitch CV jack and click (1) Pitch Output Jack. The I/O Panel Pitch CV output is now routed to both oscillators' Pitch CV inputs. In this way, the cable bus can be routed to as many destinations as desired. Be aware that a single jack can only be connected to one cable bus at a time. Jacks can be disconnected from a bus by right-clicking and selecting Off.
Cable buses can also be configured as a single destination with unlimited inputs. In fact, cable buses may be configured to combine multiple sources and destinations, allowing the creation of elaborate modulation matrixes such as those in classic and pin- and switch-matrix analog synthesizers such as the EMS VCS3 and ARP 2500.
Convert Bus To Cables- Exactly as its name implies, this converts all connections for a bus to mono, poly, or MIDI cables, dependent upon the bus type. The cables will inherit the color originally assigned to the bus.
Show Bus Connections- Hovering over any jack with a cable bus temporarily enlarges the colored circles for all other jacks currently assigned to the bus. This makes it easy to see jacks on the selected cable bus.
Combining Standard Cables and Cable Buses- Cable buses have no effect on standard jack connections. In other words, in addition to cable buses, you're free to connect as many strandard cables as desired to jacks.
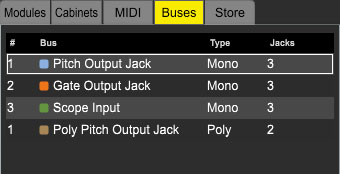
Buses Library Tab-The Library tab includes a tab dedicated to cable buses. It mostly serves as a convenient way to view all cable buses in the current patch. It displays the bus number, bus name, connection type, total number of connections for each bus. (If they let me have my way, it would be called the "bus schedule.") Individual bus parameters can be edited, and buses can be deleted or converted to cables by right-clicking in the list.
Advanced Cable Shortcuts and Tricks
Following are some not-so-obvious shortcuts that seriously speed up patching operations.
The Unlimited Mult Hiding Beneath Every Jack
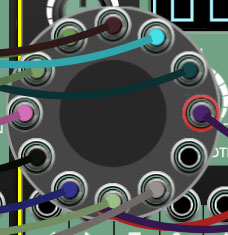
If you look closely at the I/O Panel Gate CV out, you can see we’ve routed two cables from this jack to control both envelope generators. Single-clicking on any Voltage Modular input or output jack reveals a six-way multiple jack (aka, a "mult"), which is super convenient for routing (or mixing) multiple sources. The mult stays visible until a cable is routed, at which point it disappears.
Built-in jack mults initially display six jacks, but if more than six connections are added, the "ring" grows and additional jacks appear. Here't the nifty part: there's no limit to the number of mult jacks that can be added to a connection. (We can't wait for some wiseacre to attempt to connect 1500 cables to one jack.) You'll likely take this for granted after working with Voltage for a bit, but if you happen to use a hardware modular synth, you'll desperately long for unlimited built-in multiples!
As an aside, a few standard Mult modules (Multiple and Micro Mult) are included with Voltage, because sometimes seeing all connections is advantageous; the mult modules also let you use Voltage's labeling feature (right-click+"Add Label").
Move or Unplug Multiple Cables Plugged Into A Single Jack
Multiple cables plugged into a single jack can be moved at the same time by holding the [SHIFT] key and clicking and dragging to a new destination. This is also a very handy way to unplug multiple cables from a jack if the mouse button is released in an "empty" area (i.e., not on a jack).
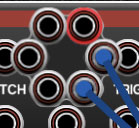
Rapidly Routing A Cable To Multiple Destinations This one’s not so obvious, but it’s really handy. To patch cables from a single jack to multiple destinations, press and hold the [CTRL] key in Windows or the [⌘] key on Mac , click the source jack, then click as many destination jacks as desired and release the modifier key when you’re done. This works with input or output jacks, and is particularly useful for patching pitch and gate CV’s from the I/O panel to multiple oscillators or envelope generators.
Poly Cables
Poly cables are a special cable for use with poly modules from Cherry Audio and other developers. Recognizable by their D-shaped connector and striped cables, a poly jack and cable can transmit up to sixteen separate channels, or "lanes," of CV or audio, which drastically simplifies polyphonic patch creation. Poly CV, gate, and velocity signals are available in the I/O Panel Poly Sources section.
Voltage Modular’s virtual MIDI cables behave much like standard cables, but instead of carrying a single audio or control voltage signal, they carry 16 channels of note and control data just like a good ol' MIDI cable. Though virtual MIDI cables have been somewhat superceded by our Poly jacks, they're handy for certain applications, particularly when MIDI controller data is being transmitted or received from hardware instruments.
You’ll notice that virtual MIDI cables are a bit fatter than standard cables; this is done to make them easy to recognize on-screen (and to fit all that extra data). Virtual MIDI jacks also contain the previously discussed built-in unlimited mult, and if that’s not enough, there’s a MIDI Multiple module as well. If you're using Voltage Modular Core edition, you'll find numerous MIDI input, output, drum trigger modules and more for transmitting and receiving MIDI data with external instruments and other useful functions.