Here we’ll cover the nuts and bolts of working with modules (but unlike a hardware modular synth, no actual nuts or bolts are involved). Before we discuss the big Library tab on the left (or right, if you changed it in Settings), we'll take a short detour to discuss module categories.
Module Categories
All modules are assigned to one of the categories below when programmed. Note that the number of categories has been expanded considerably from Voltage version 1.0.
Controllers- keyboards, sequencers
CV Processors- modules that perform operations that alter CV
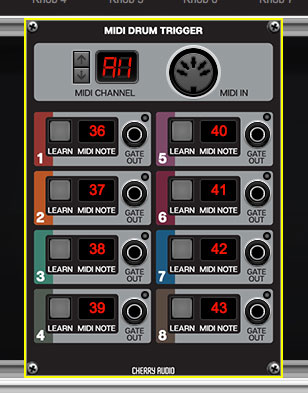
Drums- drums and percussion modules
Effects- traditional audio effects such as reverb, delay, chorus, distortion.
Envelope Generators- modules that shape CV over time
Filters- audio filters such as lowpass, bandpass, highpass, etc.
Instruments- modules that contain complete synth instruments
I/O- audio, CV, or MIDI modules that transmit or receive signals to external hardware
Logic- modules that perform mathematical CV operations
Metering- audio level meters, oscilloscopes, etc.
Mixers- modules that mix audio or CV signals
Oscillators- modules that generate audio or control signals
Polyphonic Utilities- modules for combining or breaking out poly audio and control signals
Processors- filters, waveshapers, EQ's, things that alter sound.
Sequencers- modules that create melodic or rhythmic repeating CV patterns
Sources- oscillators, noise generators, anything that makes a sound.
Switches- modules that enable, disable, or redirect signals
Utilities- general category for modules that control signals or simplify patching
Visualizers- modules that display signals graphically
These categories affect how Voltage Modular handles processing internally. Modules may be sorted according to their category (see all the sort criteria below).
Module Tab Controls and Fields
These are the fields and buttons directly above the module list.
Search... - This field lets you search for modules by typing a few letters of the module name. For example, typing “LFO” would display the LFO and MiniLFO modules. The search field can be initialized by clicking the X icon and can be immediately accessed at any time with the keyboard shortcut [CTRL-F] (PC) or [⌘-F] (Mac). If currently hidden, the Library tab automatically opens when the Find keyboard shortcut is used.
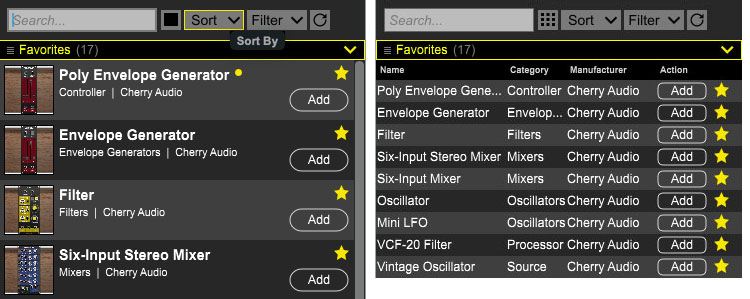
Graphic/List View Select- This little guy is easy to miss, but clicking it toggles between graphic+name or name-only in the module list as shown in the images below:
Sort- This drop-down menu allows sorting of the module list by name, category (more on this below), date acquired (as in, “show me my new stuff!”), or the company that made the module.
Name- Sorts all modules alphabetically from A-Z or Z-A.
Category- Sorts categories alphabetically
Date Acquired- Signal modules according to date of purchase.
Manufacturer- Sorts alphabetically by the company that made the module.
Tags- Sorts according to user-added tags.
Filter- Allows filtering of which modules are displayed using descriptive headings.
None- Shows all currently owned modules with no separate headings.
Category- Divides up modules by their categories. This is the default filter setting.
Manufacturer- Sorts alphabetically by the company that made the module.
Name- Sorts modules alphabetically.
Module view filters can also be selected by clicking on individual categories.
Refresh- Voltage Modular automatically downloads new modules or presets each time it’s launched. The Refresh button checks for new content while Voltage Modular is running; this is particularly useful for developers who are frequently revising modules.
One of Voltage's most powerful module search and organization features is the Tag Editor right-click command described in the following section, so don't miss it!
Modules List
The Modules tab in the Library displays all modules currently owned by the logged-in user. This is where you'll go to add new modules to patch, either by clicking Add, or by dragging and dropping to a cabinet.
Each module in the library displays the following:
Thumbnail Image
Module Name
Category
Manufacturer
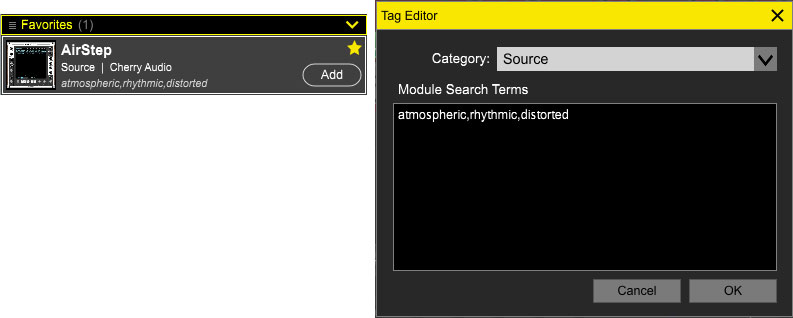
Favorite Star- The star above the Add button turns yellow when a module is favorited. The Favorites tag can be enabled or disabled by clicking on the star and can be used as a sort criteria (see following section for more info).
Add to cabinet button
User entered search terms (if any have been added by user)
Module Library Right-Click Functions
Add To Cabinet- This adds a module to a cabinet (though it's usually easier to drag and drop the module).
Favorite- Adds a module to the Favorites category. This is the same as clicking the the ✭ next to a module name.
Info... - Contains general information, links to modules in the online Voltage Modular store, reviews, etc. For some modules, this also contains operational information.
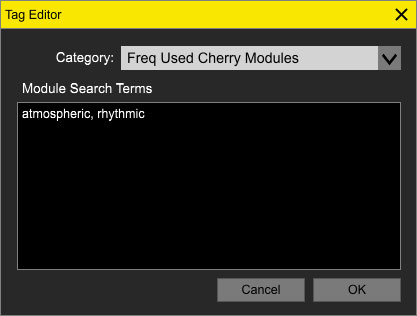
Tag Editor... - The Tag Editor is a powerful, user-customizable resource for searching and cataloging modules. Fortunately, it's also real easy to use. Here's what it contains:
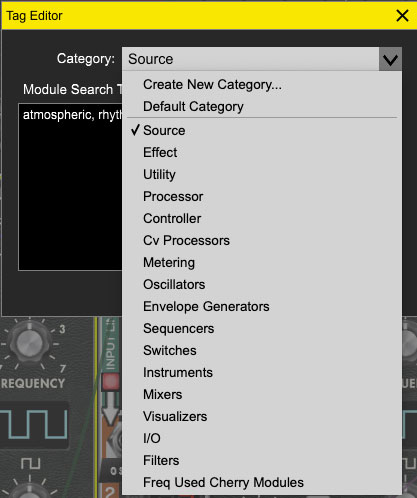
Category- All modules are assigned to a category during the programming process, however module categories can be reassigned in this window. Additionally, users can create their own custom categories and assign them to modules.
To reassign a module to an existing category, click the Category menu, select a category, and click OK.
To create and assign a module to a new, user-created category, click the Category menu, choose Create New Category..., type the desired category name at in the text prompt, and click OK.
To return a module to its original category, click the Category menu, choose Default Category, and click OK.
Module Search Terms- This window lets you add custom search terms for modules. Typing the search term in the Voltage Library Tab Search... fields displays modules with matching search terms. To add a search term, type the word in the Module Search Terms field and click OK.
To add multiple search terms, use commas between words (spacing doesn't matter). User search terms are displayed in the module tab header beneath the category and manufacturer name.
Working With Modules In Cabinets
Clicking any non-control area (i.e., jack, knob, switch, etc.) of a module selects it - the currently selected module will be outlined in yellow. Single or multiple modules can also be selected by clicking in an empty cabinet region (i.e. no module present) and dragging a square over them. Depending upon cable behavior preferences, cables connected to selected module(s) may display differently from unselected modules. Selected modules are affected by move, delete, and other commands.
To select multiple non-adjacent modules, [CTRL]-click modules in Windows or [⌘]-click on Macs. Multiple modules in different cabinets can be simultaneously selected.
Moving Modules
To move a module or a group of currently selected modules, click and drag at the very top of the module. The cursor will change to a hand, and a shaded gray rectangle appears in the top area. Neighboring modules will instantly scoot out of the way, and all cable connections stay intact, because Voltage Modular is magical, but you knew that.
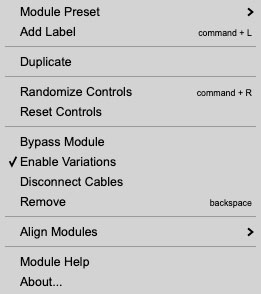
Module Right-Click Commands
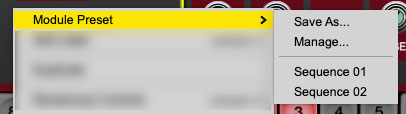
Module Preset- This allows all control settings to be saved for specific modules. It can be useful for recalling complex modules settings (such as sequencers) when using a module in different patches. They are module-specific (i.e. presets for a given module are only visible and recallable for that module), but they are not specific to patches. In other words, the currently opened Voltage patch has no effect on a module's presets.
The Module Preset menus are as follows:
Save As...- Click this to save the current module settings.
Manage...- Displays the preset folder for the current module. Each module has its own folder; for PC's these are located at %appdata%\Voltage\Presets\ModulePresets. On Macs, they're located at Users\ <username>\Library\Application Support\Voltage\Presets\ModulePresets.
Saved Module Presets- At the bottom of the list are the saved presets for the module. Select names to open them.
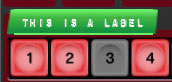
Add Label- Creates an editable text label that can be freely positioned within the boundaries of the module. These can be very helpful when creating elaborate patches, especially for "relabeling" controls to more accurately describe their function in a given patch. Labels may also be creating with the keyboard shortcut [CTRL-L] (PC) or [⌘-L] (Mac).
Newly added labels will appear in edit mode; type in the desired text and click to exit edit mode. Labels can be moved anywhere on a module by grabbing them (cursor turns into a hand). Labels may also be horizontally resized by grabbing clicking and dragging on the left or right edges (cursor turns into an arrow). Be careful with placement, as labels can freely be set upon controls. It won't hurt anything, but it might make it hard to use a control!
Edit- Allows editing of label text. You can also edit the text by double-clicking a label.
Color- Selects the font style and "tape" background color. Note that new labels will appear in the most recently used font/color style.
Remove- Deletes the current label.
Remove All- Deletes all labels in the current module. (Does not delete labels in other modules.)
Duplicate- Creates a copy of the selected module with its current control settings at the nearest available open cabinet space. Modules or groups of selected modules can also be duplicated by [ALT]-dragging (PC) or ⌥-dragging (Mac).
Randomize Controls- Sets all of a module's controls to a random value. This includes knobs, sliders, switches, etc. This is a great way to create aleatory music with sequencer modules, but more importantly, check out how smart I sound using big words like "aleatory."
Reset Controls- Initializes all controls of a module.
Bypass Module- Disables a module. For modules where an audio or control signal originates, this disables all signal output. For modules that process signals (such as filters or audio effects), signals generally pass through the module unaltered. Note that Bypass Module may or may not appear depending on the programming of a module, so you or may not see it in the right-click menu for all modules.
Enable Variations- Enables or disables control changes from variations on a per-module basis. Control positions are still stored for variations, but unchecking Enable Variations effectively "bypasses" them, leaving current control positions intact. Enable Variations is enabled for modules by default. For more information about variations, check out Variations in the I/O Panel section.
Disconnect Cables- Removes all cable connections for the currently selected module or modules.
Remove- Deletes a module or group of modules. Modules can also be deleted by highlighting them and hitting the [DEL] key (PC) or the backspace key on Mac (the little DEL key in Windows and the big one above the backslash key on Mac).
Align Modules- These functions allow rapid tidying up by moving all of a cabinet's modules left or right while simultaneously closing up gaps.
Left- Moves all modules of the current cabinet all the way to the left and closes gaps between modules.
Right- Moves all modules of the current cabinet all the way to the left and closes gaps between modules. Align Modules/Right will only move modules to the farthest currently visible right-side border.
Auto Align Left- This is an on/off parameter- when Auto Align Left is enabled, modules automatically slide to the left, with no gaps. If modules are moved or deleted, any existing modules to the right will slide left to close the gap.
Auto Align Left is a per-cabinet setting. The default on/off setting of Auto Align Left can be set in Settings>Interface>Auto Align New Cabinets To The Left.
Module Help- Opens a web browser link to the user guide for a module (provided the manufacturer has created one).
About... - Displays a window with module information including its name, build revision, author, copyright information, a brief description, and a link to its Cherry Audio Store web page. For third-party modules, this box sometimes contains important information about controls, so have a look here if you're confused by an itty-bitty switch that's labeled "א."
Module Control Right-Click Commands
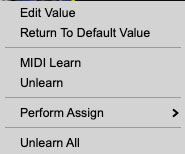
Right-clicking any knob, slider, switch, or button reveals the following right-click menu:
Edit Value- Opens a field where exact values can be entered.
Return To Default Value- Returns any control (i.e. knobs, sliders, buttons, switches, etc.) to their default value. It will be grayed out if the control is already at its default setting.
MIDI Learn/Unlearn- These are used for assigning external MIDI hardware controls. Check out the MIDI Continuous Controller Setup section for more information.
Perform Assign- Allows knobs or buttons to be assigned to the Perform controls panel (that strip of knobs and buttons directly above the cabinets). It may not look too exciting, but it's a super easy and powerful way to simultaneously control multiple parameters in all kinds of ways. Read all about it in the Perform Controls Panel section.
Unlearn All- Cancels all MIDI CC, DAW, and Perform control assignments.