Perhaps the simplest module that we could build would be a simple Volume module. This module will take an input signal, modify its volume, and output the new modified signal.
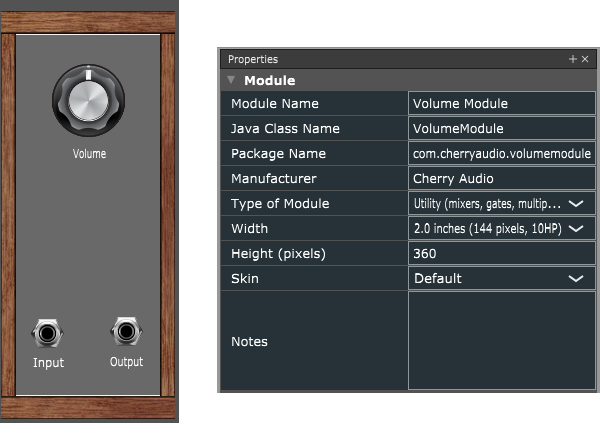
To create this simple module, we will start by setting the module’s properties. We will give the module a name (“Volume Module”), a Java Class Name (“VolumeModule”), a package name (“com.cherryaudio.volumemodule” in our case -- but you would want to use your own package name), and set its width (10 HP, or 2.0 inches). If you want to add a custom background skin, you can, but for this example we’ll just use the default grey background.
We will drag in a knob, an input jack, and an output jack. We’ve also added three text labels, which read “Volume”, “Input”, and “Output”:
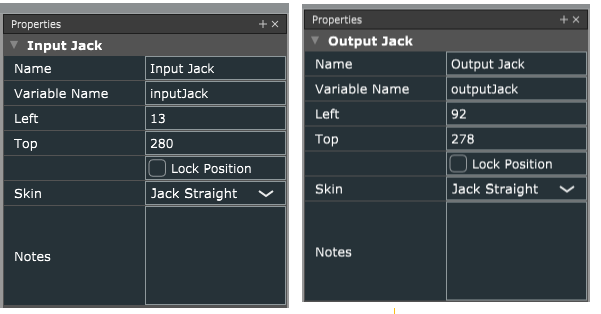
Next, we’ll set up the properties for the Input Jack and the Output Jack. We’ll want to name the jacks (“Input Jack” and “Output Jack”) and give them proper variable names (“inputJack” and “outputJack”) as shown:
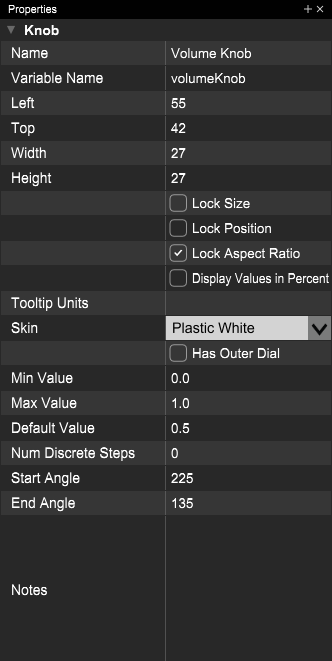
Likewise, we’ll configure the volume knob. We’ll name it (“Volume Knob”) and give it a variable name (“volumeKnob”). We’ll choose a skin for it, too (we’ve chosen “Cosmo Large”).
Now, we’ll want our volume module to go from 0 to 200%, so we’ll set the Min Value to 0.0 and the Max Value to 2.0. We’ll also check the “Display Values In Percent” checkbox so that tooltips will multiply the number by 100 and display the volume in percent (0 to 200%):
In the User Variables & Functions section of the Source Code, we’ll create a private variable called volumeValue, of type double, to store the current volume value:
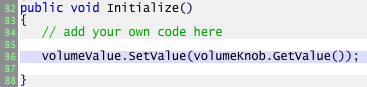
Next, we’ll modify the Initialize function. We want the volumeValue variable to be set to the volume knob’s default value when the module is first created. We can call the GetValue() function on the knob to get its current value:
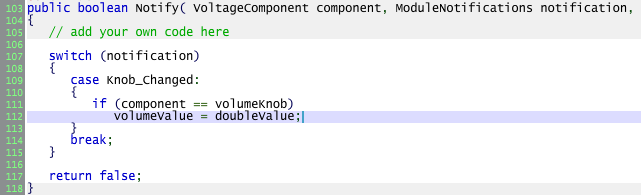
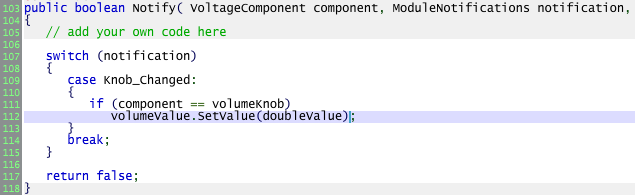
Now, when the user turns the Volume Knob, our module’s Notify() function will get called. The notification will be Knob_Changed, the specific component (volumeKnob) that changed will be passed in to the Notify() function’s component variable, and the new value will be passed in to the Notify() function’s doubleValue parameter.
We’ll modify the Notify() function to check for a Knob_Changed message coming from our knob with the variable name of volumeKnob. If this notification comes in, we’ll store the new volume value, which will be between 0 and 2.0, in our volumeValue variable.
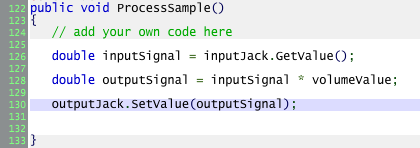
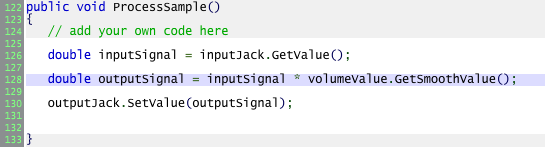
Now that all of the elements are in place, we just need to write our ProcessSample() function! This function needs to read a signal from the input jack, adjust the signal’s volume, and write the modified signal to the output jack. Since adjusting a signal’s volume is just a matter of multiplying the signal by the volume, this can be very easily accomplished with just a few lines of simple code:
At this point, we should have a fully functioning Volume module. Let’s compile it to make sure our code is correct. To compile the module, we’ll click on the Build menu and select the “Build” menu option. If everything worked correctly, we should see something like this in the Output Pane:
However, if there’s an error, the output pane will show you exactly what’s wrong. If you don’t see any output at all, then there is an issue with your Java Development Kit installation. Please follow the instructions in the “Installing the Module Designer” section to resolve this issue.
Once the module builds correctly, we’ll want to test it. To do this, click on the Build menu and select “Run without Debugger”. This will compile the module and then actually load and run your module in a test environment. This will allow you to instantly test your module to make sure it works. Pretty cool, right?
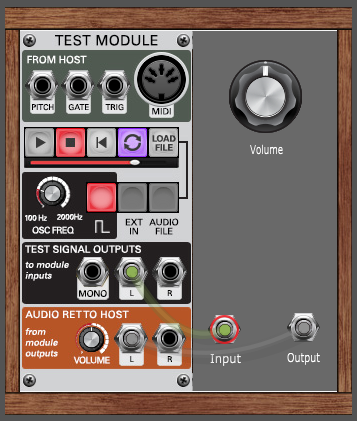
If the module builds correctly, it should show up next to the Module Design’s Test Module, which creates test signals that you can use to test your module. Connect the “L” or “Mono” Test Signal Output to your Volume Module’s input jack, and connect your Volume Module’s output jack to the “Audio Ret To Host” L jack, as shown below. Make sure the Square Wave output is selected, and adjust the Oscillator Frequency knob to something audio, perhaps around 100 Hz.
If you’ve done everything correctly, you should now be hear a square wave. And, you should be able to turn your Volume knob to increase or decrease its volume, or to silence it altogether.
When you’re done, click on the Build menu and select “Stop Running” to end test mode.
Improving Our Design
Now that we have a functional module, let’s discuss two ways that we can improve the design of this module.
When running this module in Test Mode, you may notice that the volume can jump from one value to another pretty quickly, especially if you turn the volume knob very fast. Quick changes in volume can create unpleasant distortion in the sound, and the module might not feel as professional as it could be.
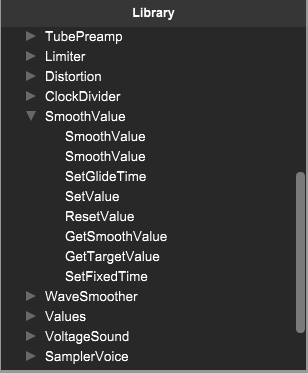
To correct this, we’re going to use a SmoothValue object, one of the many helpful tools that you’ll find in Voltage’s Audio Processing library. You’ll find SmoothValue and many other tools listed in the “Library” section of the Source Code Pane, as shown:
SmoothValue is a very useful tool. We call SetValue() to change the SmoothValue’s value, and GetSmoothValue() to read its value. The SmoothValue class will then glide quickly from one value to another. The glide is, by default, very fast (25 milliseconds), but it will ensure smooth changes from one value to another.
To use SmoothValue, we’ll replace our volumeValue variable, which was a double, with a SmoothValue object:
Next, we’ll change our Initialize() function to call SetValue() on the new SmoothValue object:
Likewise, we’ll modify the Notify() function to do the same thing:
And finally, we’ll modify our ProcessSample() function to call GetSmoothValue() on our SmoothValue object:
With these changes made, we can select “Build and Run” in the Build menu and test our module. No matter how quickly we move the Volume knob, volume adjustments will always be smooth.
For our second improvement, let’s make the ProcessSample() function more efficient. There are two key improvements we can make:
We can eliminate our inputSignal and outputSignal variables entirely.
We can avoid doing any of the processing if nothing is plugged into our output jack.
#2 is particularly interesting. If there’s no cable plugged into the Output jack, then there’s no reason to perform any calculations at all in this module. We can save valuable CPU resources by checking to see if anything is connected to the output jack, and skipping our signal processing if there’s nothing there. The new code looks like this:
It’s always a good idea to write efficient ProcessSample() code. Remember, your module will be sharing the CPU with dozens, or maybe hundreds, of other modules in a patch. There’s no reason to use CPU resources if the module isn’t doing anything useful.
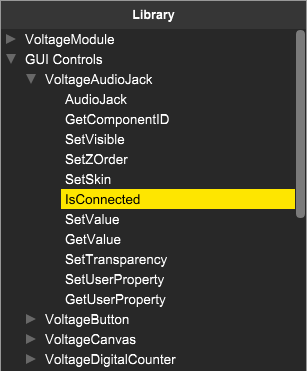
Functions like IsConnected() can be found in the “Library” section of the Source Code Pane, under GUI Controls, VoltageAudioJack:
There are all sorts of useful functions available that you can call on various components. In fact, you can even drag these functions from the library directly into your code. You can also hover the cursor over any function name in the library to see a tooltip listing its return and argument types.