Cherry Audio’s Memorymode 2 gives you two fully independent synth layers: Upper and Lower. Each layer has its own complete synth engine, including oscillators, filter, envelopes, modulation, and effects.
This is one of Cherry Audio’s biggest expansions of the Memorymode concept. A preset can be a single focused sound, two sounds stacked together, or two different sounds split across the keyboard. Each layer can also have up to 16 voices, giving Memorymode 2 generous room for long releases, dense chords, layered pads, sequenced patterns, and expressive performance setups.
Layer Controls
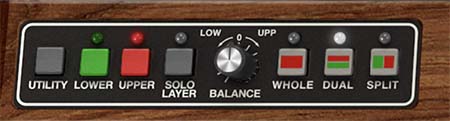
These controls determine how the layers are used and balanced. They let you select the active layer, choose Whole, Dual, or Split mode, solo the selected layer, adjust the master output level, and balance Upper layer against Lower layer. This section answers one of the most important performance questions in the instrument: “Am I playing one sound, two stacked sounds, or two sounds split across the keyboard?”
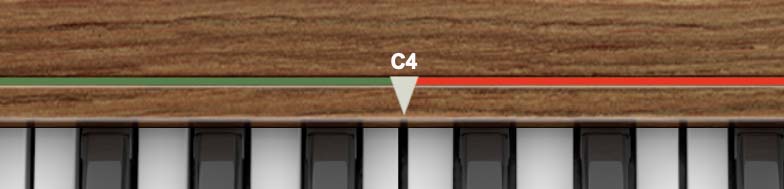
The interface uses color to make the layer structure easy to follow. Upper layer is shown in red, and Lower layeris shown in green. This color coding appears throughout the instrument, including the layer controls, keyboard range display, and effects section.
When you select a layer, you’re choosing which layer is currently being edited. In a layered or split preset, you may hear both layers at the same time, but the front-panel controls affect the selected layer.
Controls:
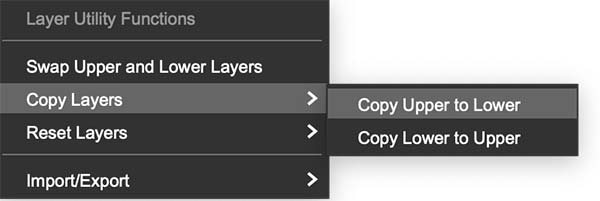
• Utility – Displays a utility menu for swapping, copying, resetting, or importing and exporting layer settings.
• Lower – Selects Lower layer for editing. Lower layer is color-coded green.
• Upper – Selects the Upper layer for editing. Upper layer is color-coded red.
• Solo Layer – Solos the currently selected layer, making it easier to hear and edit one layer at a time.
• Balance – Balances Upper and Lower layers. Turn the knob toward Low to emphasize Lower layer, or toward Upper to emphasize Upper layer.
• Whole – Plays the Upper layer across the full keyboard.
• Dual – Stacks Upper and lower layers across the full keyboard.
• Split – Places Lower layer on the lower keyboard range and Upper layer on the upper range.
Tip 1: If you move a filter slider, change an oscillator wave, or adjust an envelope and don’t hear the expected change, check which layer is selected. You may simply be editing the other layer.
Tip 2: In a layered patch, the Balance knob is one of the fastest ways to reshape the sound without editing either layer. If Upper provides a warm pad and Lower adds a bright digital shimmer, Balance decides whether the patch feels soft and rounded or more open and sparkling.
Whole Mode
Whole mode plays the selected layer across the full keyboard. This is the simplest way to use Memorymode 2 when you want to focus on one sound.
Whole mode is especially useful when building a patch from scratch, exploring oscillator waves, adjusting the filter, shaping envelopes, or troubleshooting modulation. It keeps the signal path clear and lets you hear exactly what the selected layer is doing.
Tip: Start in Whole mode when designing a new sound. Once one layer feels good on its own, switch to Dual or Split mode and build around it.
Dual Mode
Dual mode stacks Upper and Lower across the full keyboard. When you play a note, both layers sound together.
This is where Memorymode 2 can become especially lush, wide, and animated. One layer might provide the attack while the other supplies the sustain. One might be bright and digital while the other is darker and filtered. One might use slow modulation while the other remains steady.
Dual mode is excellent for pads, keys, leads, soundscapes, hybrid brass, animated textures, and large performance sounds.
Tip: A good layered patch usually gives each layer a clear job. Try using Upper for body and Lower for attack, shimmer, motion, width, or edge. If both layers are trying to be the whole sound, they may fight each other.
Split
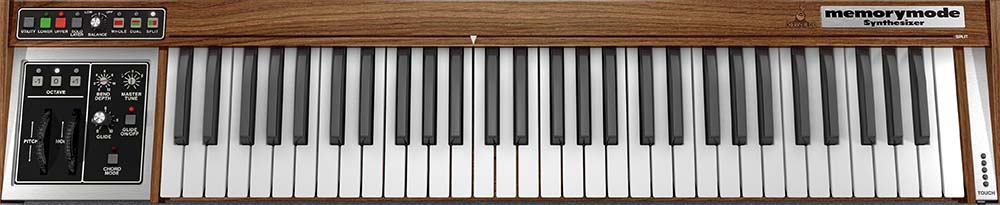
Split divides the keyboard so Lower plays on the lower range and Upper plays on the upper range. Split is useful for performance setups such as bass on the left hand and lead on the right, pad below and keys above, or a sequenced lower part with a manually played upper sound.
Keyboard Range Controls
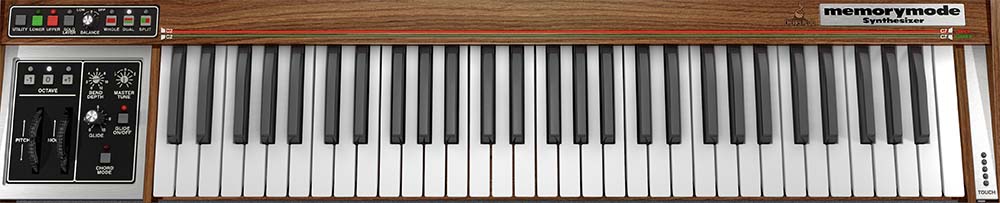
In Dual and Split modes, the keyboard range controls above the on-screen keyboard show where each layer is assigned. Drag the range handles to define each layer’s playable area.
In Dual mode, the two layers can cover the full keyboard or overlap in specific ranges. In Split modes, the range display shows the lower and upper zones, making it easy to adjust the split point.
Tip: Choose the split point based on the part you intend to play. A left-hand bass may need more lower range than a simple drone, while a right-hand lead may need enough room for bends, expressive playing, and the occasional dramatic flourish.
Solo Layer
Solo Layer lets you hear only the currently selected layer. This is one of the most useful controls when working with layered or split sounds.
A preset may sound like one unified patch, but underneath, the two layers may be doing very different things. Soloing each layer lets you hear what each one contributes.
Use Solo Layer when balancing oscillator levels, adjusting envelopes, editing modulation, setting effects, or diagnosing a patch that sounds muddy, too bright, too slow, or too busy.
Tip: After editing a layer in solo, turn Solo Layer off and listen again in context. The goal is not for each layer to sound perfect by itself. The goal is for the two layers to work together.
Copying and Managing Layers
The Utility button opens layer utility options. These let you copy, paste, reset, swap, import, or export layer data. This is very useful when building layered sounds. You can copy a layer, paste it to the other layer, then modify the copy to create a wider, brighter, darker, slower, or more animated version of the original.
Common uses:
Copy Upper to Lower, then detune or filter Lower for width.
Create a Dual layer or Split layer preset from two other preset layers.
Copy a finished sound to the other layer and give it a slower attack.
Reset one layer without disturbing the other.
Swap Upper and Lower layers when reworking a split.
Tip: Try copying a strong single-layer sound to the second layer, then change only the waveform, filter mode, envelope attack, or effects. It’s a quick way to create a richer patch while keeping both layers musically related.
Example: If you want to create a new Dual or Split preset by combining two existing presets from the library, you can use the Import/Export feature. This allows you to copy a layer to memory and then paste it into a new or existing preset. Keep in mind that, depending on your source, you may need to switch from Whole to Split or Dual mode at some point to ensure there is a suitable destination for the layer you have in memory.
Let's say you like a preset called Ambient EP, and it's a single Whole layer preset. But you want to split it, and put some strings in the Lower layer to play with your left hand.
Change Ambient EP to Split mode, and save it with a new name, like Ambient Split. Now you can switch to the Lower layer; it is now an INIT tone. Now you can create your string from scratch, or you can go find another tone to import. Let's do the latter...
You find a tone you like called Low Strings, and it's another Whole preset. Go to Utility / Import/Export and choose Copy to Upper Memory.
Go back to your Ambient Split preset. Click Utility, and Import/Export and select Paste to Lower.
Your preset now has a split that is made up of the parameters of Low Strings on the Lower split, and Ambient EP on the Upper. Re-save Ambient Split so as not to lose your work. At this point, you may want to go in and adjust each layer individually for level, panning, change the split point, and so on.
This is the same method by which you would combine presets for a Dual layer patch, but you don't have to deal with the split point. Don't forget: depending on your sources, you may need to switch between layers, or from Whole to Split or Dual mode, to ensure you are copying the correct layer to memory, and making available a destination to paste the layer you have in memory.
Editing Layers
Layer editing is straightforward once you remember the rule: the selected layer is the layer you’re editing.
If Upper is selected, the panel controls affect Upper layer. If Lower is selected, they affect Lower layer. This applies to oscillator settings, filter, envelopes, modulation assignments, effects, and voice behavior.
Also note that Lower layer becomes available for editing when Dual mode is enabled. If you’re in Whole mode, the interface focuses on the selected single-layer setup. Switch to Dual or Split when you want access to both layers as part of a combined preset.
Tip: Program each layer separately first. Use Whole mode or Solo Layer to get one layer working musically, then combine the layers and adjust Balance, effects, and modulation.
Practical Layering Ideas
A strong layered patch usually begins with contrast.
Try these approaches:
• Pair a bright attack layer with a darker sustained layer. • Use one layer as the main harmonic bed and the other as shimmer or motion. • Use one layer for the core key sound and another for transient brightness or octave reinforcement. • Use one layer as a stable lead center and the other as a slightly detuned support layer. • Use one layer as a slow pad and the other as a texture that fades in later.
Tip: The best layered sounds often feel like one instrument, not two presets playing at once. Use Balance, envelopes, filter settings, and effects to make the layers cooperate.
Practical Split Ideas
Splits are ideal for performance and composition. A classic setup is bass on the lower keys and lead on the upper keys. Another useful setup is pad below and keys above, with the lower range holding sustained harmony while the upper range plays rhythmic or melodic parts.
You can also create a split where one layer is sequenced or arpeggiated while the other remains manually playable. This can make a single preset feel like a small arrangement.
Tip: In split patches, watch envelope release times. A long-release lower layer can blur fast left-hand changes, while an upper layer with too short a release may feel abrupt if it’s meant to float.
Avoiding Layer Overload
Two independent layers, 16 voices per layer, three oscillators per voice, modulation, Motion tools, and effects give you a lot of power. They also give you many opportunities to overbuild.
If a layered preset sounds too dense, solo each layer and listen separately. Check for overlapping frequency ranges, similar envelopes, excessive release times, too much low end, or too many bright oscillators competing for attention.
Common fixes:
• Reduce one layer with the Balance knob. • Darken one layer’s filter. • Shorten the release on one layer. • Reduce low-end content from the upper layer. • Use different envelope attacks so both layers don’t speak at exactly the same moment. • Move some depth or space to the Global effects rather than both layer effects.
Tip: Layering works best when each part has a job. If one layer provides body and the other adds color, motion, attack, or space, the patch will usually feel intentional.
Quick Layering Exercise
Start with a single-layer sound in Whole mode. Choose a saw waveform and shape it with the filter and filter envelope. This will be the body layer.
Switch to Dual mode and select the Lower layer. Use Solo Layer so you can hear it by itself. Create a brighter or more textured sound with a faster attack and a slightly shorter release.
Turn Solo Layer off and use the Balance knob to blend the two layers. The first layer should provide the foundation. The second should add definition, shimmer, or motion.
Now open the Effects view. Add a subtle effect to only one layer, such as chorus on the body layer or delay on the brighter layer. Then add a small amount of Global reverb to place both layers together.
Quick Split Exercise
Create or load a bass sound on Upper layer. Keep the envelope tight and the low end focused.
Create or load a lead, key, or pad sound on Lower layer. Give it enough brightness and release to work in the upper range.
Select Split so Upper layer plays on the lower part of the keyboard and Lower layer plays on the upper part. Adjust the keyboard range controls until the split point feels natural.
Play a left-hand bass part and a right-hand melody or chord part. Then adjust the Balance knob until the two layers feel balanced.
Tip: If the bass feels too roomy, reduce its release or effects. If the upper layer feels too dry, add delay or reverb to Lower layer or the Global chain.