To access the Arpeggiator, Sequencer, and Touch Animator, click the Motion tab at the bottom-left corner of the Memorymode 2 interface. The main panel switches from the Keyboard controls to the complete Motion Controls view. Click Keyboard to return to the primary synthesis and performance controls, or Effects to open the expanded effects view.
The Motion Controls are where inspiration meets automation. They combine an Arpeggiator, a polyphonic 16-step Sequencer with up to four chained patterns, and four lanes of Touch Animator modulation, giving Memorymode 2 a substantial vocabulary for creating movement.
The Arpeggiator transforms notes you play into repeating patterns.
The Sequencer stores notes, chords, rests, ties, and performance patterns across four pattern memories.
Touch Animator changes the four Touch modulation amounts step by step, allowing a sequence to animate filters, oscillators, effects, layer balance, and many other destinations.
A sequence can contain notes and Touch Animator data at the same time. It can also operate purely as a modulation sequencer by clearing its note data while retaining the Touch Animator values.
Together, these tools can create bass lines, pulsing chords, cascading arpeggios, evolving pads, rhythmic filter movement, and patterns that can be transposed or reshaped during performance. Each layer has its own independent polyphonic Sequencer and Touch Animator, so the Upper and Lower layers can perform entirely different roles within the same preset.
Tip: Use the Arpeggiator when you want your playing turned into a pattern. Use the Sequencer when you want to program the notes yourself. Use Touch Animator when the notes should remain steady while the sound moves around them.
Arpeggio
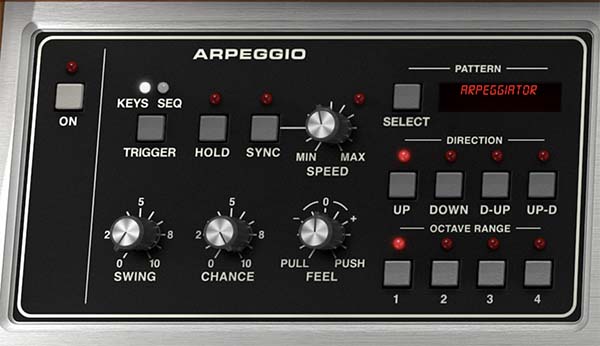
The Arpeggiator turns played or sequenced notes into repeating patterns. Hold a chord, and Memorymode 2 plays its notes according to the selected Pattern, Direction, Octave Range, Speed, and groove settings.
At its simplest, it can produce a familiar rising or falling synth pattern. With Leap, Random, Chance, and a wider Octave Range, it can create tumbling melodic figures that would be difficult to play manually and possibly inadvisable to attempt before coffee.
On
Function: Turns the Arpeggiator on or off.
With On disabled, notes play normally. With On enabled, the selected note source is processed by the Arpeggiator.
Trigger: Keys and Seq
The Trigger buttons determine where the Arpeggiator gets its notes.
Keys
Function: Uses notes played or held from the keyboard.
Musical result: This is the traditional arpeggiator workflow. Hold a chord, and its notes are reorganized according to the selected Arpeggiator settings.
Seq
Function: Uses notes or chords stored in the Sequencer.
Musical result: The Sequencer provides the harmonic and rhythmic material, while the Arpeggiator breaks that material into additional movement. When a sequence step contains a chord, the Arpeggiator processes its notes according to the selected Pattern, Direction, and Octave Range.
Tip: Use Keys when you want to play the Arpeggiator directly. Use Seq when you want the Sequencer to provide structure while the Arpeggiator adds another layer of activity.
Hold
Function: Keeps the Arpeggiator running after the keys are released. Play another note or chord to replace the currently held note set.
Tip: Enable Hold when you want both hands free for filter sweeps, modulation changes, or effect adjustments.
Sync
Function: Locks Arpeggiator timing to the master tempo. In the standalone version, Sync follows Memorymode 2’s internal tempo. When used as a plug-in, it follows the host DAW tempo. With Sync disabled, Speed runs freely. With Sync enabled, Speed selects musical note divisions.
Speed
Function: Sets the Arpeggiator playback rate.
Sound: Slower settings create spacious, deliberate patterns. Faster settings turn held notes into rapid rhythmic streams. The LED above the control flashes at the current playback rate.
Pattern Select
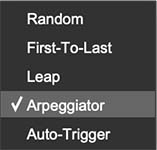
Click Select to open the Arpeggiator Pattern menu. The display shows the currently selected mode.
Arpeggiator
Function: Plays the available notes as a conventional arpeggio.
Musical result: Notes are sorted and played according to the selected Direction and Octave Range.
Use it for: Classic synth arpeggios, bass patterns, rolling chords, and steady rhythmic figures.
First-To-Last
Function: Plays notes in the order they were originally pressed.
Selecting Down reverses the entered order.
Musical result: The keyboard becomes a simple phrase-entry tool. Instead of automatically sorting notes by pitch, Memorymode 2 remembers the sequence in which you played them.
Tip: Enter a short melodic phrase one note at a time, then use Hold to keep it repeating while you adjust the sound.
Leap
Function: Moves each note through a repeating octave pattern: original octave, one octave above, then one octave below.
Musical result: Held chords turn into tumbling, wide-ranging figures with much larger melodic jumps than a conventional arpeggio.
Tip: Hold a minor-seventh chord, select Leap, set Octave Range to 3 or 4, and add a tempo-synced delay. The result can become cinematic with very little encouragement.
Random
Function: Selects notes from the available note set in an unpredictable order.
Musical result: Patterns vary from cycle to cycle rather than repeating in a fixed melodic sequence.
Tip: Lower Chance slightly and add reverb or delay. The missing notes leave openings for the effects to fill, creating a more spacious generative texture.
Auto-Trigger
Function: Repeatedly retriggers the complete held chord rather than playing its notes individually.
Tip: Use a short VCA envelope for clipped chord pulses, or increase Release for overlapping washes. Auto-Trigger is particularly effective with layered brass, pads, and sync-heavy chord stabs.
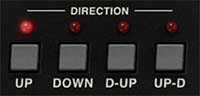
Direction
Direction determines how the selected Pattern moves through its note order.
Up - Plays from the lowest note toward the highest.
Down - Plays from the highest note toward the lowest. In First-To-Last mode, Down reverses the original note-entry order.
D-Up - Plays downward and then upward.
Up-D - Plays upward and then downward. The two alternating directions can sound slightly different at their turning points, depending on whether the highest and lowest notes are repeated when the direction changes.
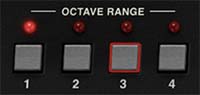
Octave Range: 1–4
Function: Sets how many octaves the Arpeggiator spans.
Sound: A range of 1 stays close to the played notes. Higher settings extend the pattern through additional octaves, producing wider melodic movement.
Interactions: Octave Range can alter the character of the selected Pattern significantly. A simple three-note chord at Range 1 may become a long cascading phrase at Range 4.
Tip: Wider isn’t always better. Range 1 or 2 often works best for basses and tightly focused patterns. Range 3 or 4 is useful for pads, leads, and more expansive textures.
Swing
Function: Delays alternating notes to create a shuffled rhythmic feel.
Sound: At minimum, the pattern plays evenly. Increasing Swing creates progressively stronger long-short timing.
Tip: Add Swing after establishing the basic pattern and Speed.
Chance
Function: Sets the probability that each arpeggiated event will play.
At maximum, all events sound. Lower settings introduce skipped notes and rests.
Sound: Moderate Chance settings create variation and syncopation. Lower values produce increasingly sparse and unpredictable patterns.
Tip: Chance becomes especially useful with delay. Skipped notes create space, while the delay repeats preserve rhythmic continuity.
Feel: Pull and Push
Function: Moves the Arpeggiator timing slightly behind or ahead of the beat.
Turning toward Pull relaxes the timing. Turning toward Push makes the pattern feel more urgent. Unlike Swing, which changes the relationship between alternating events, Feel shifts the overall timing character.
Tip: Use small adjustments. Feel works best as a musical nudge.
Arpeggiator Ideas
Classic Analog Arpeggio
Select Arpeggiator, choose Up or Up-D, set Octave Range to 1 or 2, enable Sync, and adjust Speed to suit the track. Add a small amount of Swing if the result feels too rigid.
Cascading Pattern
Select Leap, set Octave Range to 3 or 4, and lower Chance slightly. This works well with bright ramp or pulse waves, moderate filter-envelope movement, and tempo-synchronized delay.
Ordered Phrase
Select First-To-Last and play a short sequence of notes in the desired order. Enable Hold, then use the Direction buttons to play the phrase forward, backward, or in alternating directions.
Pulsing Chords
Select Auto-Trigger and play a chord. Use a short VCA Decay and low Sustain for sharp stabs, or a high Sustain and longer Release for overlapping pulses. Touch Animator can add a different filter or effect value to each repeated chord.
Polyphonic Sequencer
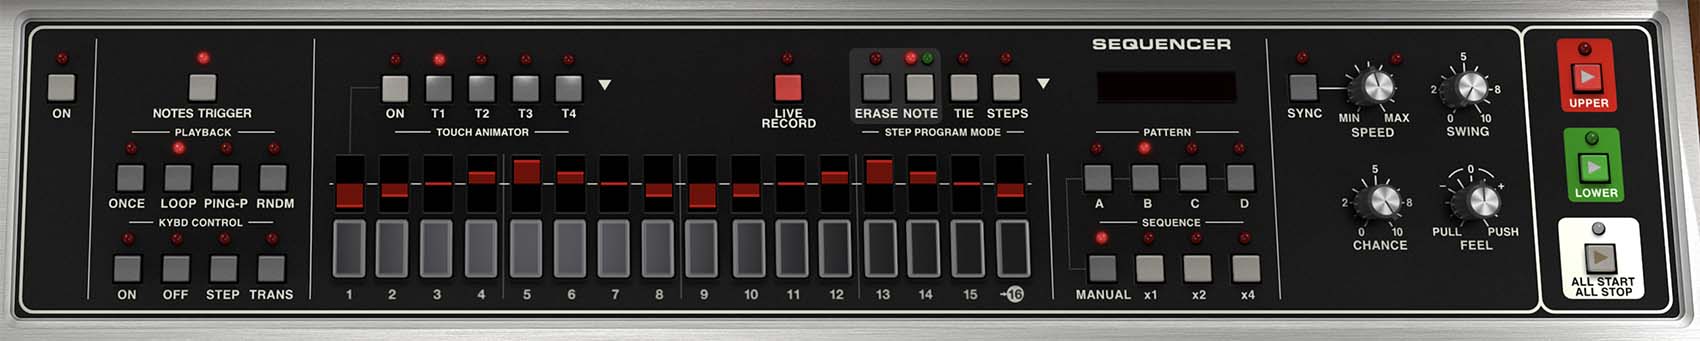
The Sequencer is a 16-step, four-pattern polyphonic pattern engine per layer. Each step can contain a single note, a complete chord, a rest, or tied note information.
Each layer contains four independent pattern memories, labeled A, B, C, and D. These can be selected manually or chained to play as an automated sequence of patterns.
The Sequencer also works with Touch Animator, an additional 16-step, four-pattern sequencer to drive modulation based on the Touch controls. This means a step can play a chord while simultaneously changing filter cutoff, oscillator balance, effect depth, layer balance, or any other destination assigned in the Touch section.
Sequencer On
Function: Turns the current layer’s Sequencer on or off. When disabled, stored pattern data doesn’t play. When enabled, playback follows the selected Playback and Keyboard Control settings.
Step Buttons 1–16
The 16 lower buttons represent the pattern steps.
Each step can contain:
A single note
A chord
A rest
A tie extending previous note data
The illuminated step indicates the current playback or editing position.
Setting the Pattern Length
Click the number beneath a step to make it the final active step in the pattern.
For example:
Clicking 8 creates an eight-step pattern.
Clicking 12 creates a 12-step pattern.
Clicking 16 uses the complete pattern length.
Short and odd-numbered patterns can produce useful rhythmic movement against conventional 4/4 arrangements.
Tip: Try lengths of 5, 7, 11, or 13 steps. As the pattern repeats against the bar line, its accents shift into new positions without requiring any additional programming.
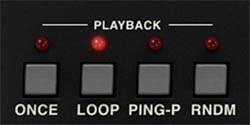
Playback Modes
Once
Plays the pattern one time and then stops.
Use it for: Triggered phrases, one-shot effects, transitions, and patterns that should behave like a musical event rather than a continuous loop.
Loop
Repeats the pattern continuously.
Use it for: Bass lines, repeating chord progressions, ostinatos, rhythmic modulation, and most conventional sequencing.
Ping-P
Plays forward through the pattern and then backward.
Use it for: Symmetrical melodic movement, evolving modulation shapes, and phrases that reverse without jumping immediately from the final step back to the first.
Random
Selects pattern steps in an unpredictable order.
Use it for: Generative textures, irregular note patterns, unpredictable chord movement, and modulation sequences that avoid obvious repetition.
Tip: Random playback combined with reduced Chance can become extremely sparse.
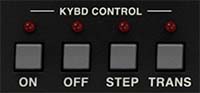
Keyboard Control
The Keyboard Control buttons determine how played notes interact with Sequencer playback.
On
Playing the keyboard starts Sequencer playback.
Use it for: Patterns that should begin when you start performing.
Off
Playing the keyboard doesn't start the Sequencer. Playback is controlled from the Motion start controls instead.
Use it for: Patterns that should run independently from manual keyboard performance.
Step
Each key press advances the Sequencer by one step.
Use it for: Manually paced sequences, unusual rhythms, stuttering effects, and performances in which the step timing should follow your playing rather than a steady clock.
Trans
Keyboard notes transpose the running sequence.
Musical result: A single programmed riff, bass line, or chord progression can be moved through different keys without rewriting the pattern.
Tip: Program the sequence around a convenient tonal center, then use Trans to perform it harmonically. This is especially effective for bass patterns and repeating melodic figures.
Live Record
Live Record captures a keyboard performance into the current pattern in real time.
Use it when the musical shape and performance feel matter more than entering every step individually.
A basic workflow:
Select Pattern A, B, C, or D.
Set the desired pattern length.
Choose a Playback mode.
Enable Sync and set Speed if the sequence should follow tempo.
Click the Live Record button.
Play the desired notes or chords on the keyboard or an external controller.
Disengage Live Record when recording is complete.
Live Record captures note performance. It doesn’t record aftertouch or MPE gestures into Touch Animator. Touch Animator values are programmed separately by dragging the sliders above the sequencer step buttons.
Tip: Establish the tempo and pattern length before recording. A clear rhythmic framework makes it much easier to play a useful phrase than discovering halfway through that your inspired seven-note idea is being recorded into a four-step loop.
Step Program Mode
Step Program Mode provides precise tools for building and editing the sequence one step at a time.
Note
Function: Enters or replaces note information on a selected step.
To program a note or chord:
Select Note.
Select the destination step.
Play the desired note or chord.
Repeat for the remaining steps.
A step can contain several notes, allowing complete chord progressions to be programmed rather than only monophonic lines.
Erase
Function: Removes the stored note contents from the selected step. Use Erase when you want to create a rest or replace unwanted material without resetting the entire pattern.
Select the step you want to clear.
Press the Erase button. The step is cleared.
TIES
TIES extends the note or chord from the preceding step through one or more following steps. Instead of retriggering the note at each step, Pentaphonic sustains the existing note or chord, making Ties useful for legato melodies, held chords, syncopated bass lines, and phrases containing a mixture of short and long notes.
The important thing to remember is that the Tie is placed on the step that extends the preceding note, not on the step containing the original note.
To tie a note or chord across steps:
Use NOTES mode to enter a note or chord on the step where you want the sound to begin. For example, enter a note on Step 1.
Select TIES in the Step Program Mode section.
Click the next step through which you want the note to continue. For example, click Step 2.
Step 2 now acts as a Tie, extending the note or chord from Step 1 instead of triggering a new note.
To extend the note farther, click additional consecutive steps while TIES remains selected. For example, clicking Steps 2, 3, and 4 causes the note entered on Step 1 to sustain across all four steps.
Start the Sequencer and listen to the result. The original note or chord should sound once and remain held through the tied steps.
Example: To make a chord entered on Step 5 sustain for three steps, enter the chord on Step 5, select TIES, then click Steps 6 and 7.
Tip: Think of a Tie step as saying, “keep holding whatever the previous step was playing.” A Tie therefore needs valid note or chord data immediately before it, either from a normal note step or from an existing chain of tied steps.
Click the Steps button and choose the desired final step to define the active pattern length.
You can also set the length directly by clicking the number beneath the desired final step.
Programming a Sequence
Here’s a workflow for creating a pattern from scratch:
Select a Pattern. Choose Pattern A. Pattern A is usually the best place to establish the main musical idea. Patterns B, C, and D can later become variations.
Set the Length. Click the number beneath the desired final step. Begin with eight steps if you want a compact, easy-to-hear pattern. Once the basic workflow is familiar, try longer or odd-numbered lengths.
Choose Playback. Select Loop so the pattern repeats while you work. This lets you hear edits immediately.
Set Timing. Enable Sync and choose a Speed that suits the part. Start with an even division and leave Swing, Chance, and Feel near their neutral positions. Add groove after the notes are working.
Enter Notes. Select Note, choose Step 1, and play a note or chord. Continue through the remaining steps. Leave some steps empty if you want rests.
Add Ties. Select Tie and extend selected notes or chords across following steps. Ties are especially useful when the sequence feels too clipped or mechanical.
Adjust the Groove. Increase Swing for shuffle, lower Chance for variation, or use Feel to push or pull the pattern against the beat.
Create a Variation. Copy Pattern A to Pattern B using the Utility menu. Edit a few notes, remove ties, change Touch Animator values, or alter the pattern length. The result remains related to the original while providing useful contrast.
Tip: Program the pattern dry or with modest effects first. Long delays and reverbs can make almost anything sound impressive, but they can also conceal timing collisions, excessive release times, and notes that should never have met.
Pattern A, B, C, and D
The Sequencer includes four independent pattern slots. Each pattern stores its own note, chord, tie, pattern-length, and correlates to the Touch Animator sequence above it.
The four patterns can be used as separate ideas or as related sections of a longer performance:
Pattern A: Main phrase Pattern B: Variation Pattern C: Breakdown or alternate harmony Pattern D: Fill, transition
Sequence
Plays the currently selected pattern. Use the A, B, C, and D buttons to change patterns manually.
Manual - Plays the currently selected pattern. Use the A, B, C, and D buttons to change patterns manually.
x1 - Select which patterns to play by clicking on A, B, C, and/or D buttons. By selecting multiple patterns, they are "chained" as a pattern sequence to play successively in a loop. This will run each pattern once before advancing to the next, and the blinking LED will indicate which pattern is active. After the final pattern, playback returns to the beginning of the pattern sequence.
x2 - Plays each pattern twice before advancing to the next pattern.
x4 - Plays each pattern four times before advancing to the next pattern.
Tip: Use A as the main pattern and B as a busier variation. Set x4 to establish the idea for several passes before moving into the variation.
Sequencer Timing and Groove
The Sequencer has its own Speed, Swing, Chance, Feel, and Sync controls.
Sync - Locks the Sequencer to the master tempo. In the standalone version, it follows Memorymode 2’s internal tempo. In plug-in use, it follows the host DAW tempo.
Speed - Sets the Sequencer playback rate. When Sync is enabled, Speed selects musical divisions. With Sync disabled, it runs freely.
Swing - Delays alternating steps to create shuffle.
Chance - Sets the probability that programmed note events will play. Lower values introduce missing notes and rhythmic variation without altering the stored pattern.
Feel- Moves the pattern slightly behind the beat toward Pull or ahead of the beat toward Push.
Tip: Establish the notes first, then add one groove control at a time. Swing, Chance, and Feel are all useful, but turning all three aggressively can make things sound chaotic.
Touch Animator
Touch Animator turns the Sequencer into a four-lane modulation system. The four lanes correspond directly to the four Touch assignments in the Keyboard Mode section:
T1 animates Touch assignment 1
T2 animates Touch assignment 2
T3 animates Touch assignment 3
T4 animates Touch assignment 4
The Touch section determines what is modulated and by how much.
Touch Animator determines how that modulation amount changes from step to step.
For example, if Touch assignment 1 controls VCF Cutoff, selecting T1 lets the Sequencer vary filter movement across the pattern. One step might remain dark, another might open fully, and the following steps might create a gradual rising sweep.
Touch Animator On
Function: Enables step-based Touch animation of 16 steps per Pattern. With Touch Animator disabled, its stored values don’t affect the sound.
T1, T2, T3, and T4
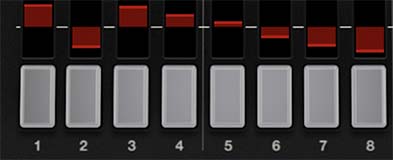
Selects which Touch Animator lane is shown and edited. The selected lane’s 16 values appear as red horizontal indicators above the step buttons. Only one lane is displayed for editing at a time, but all four lanes can operate simultaneously.
Editing Touch Animator Step Values
Drag a step’s red indicator vertically to set its Touch Animator value. Higher positions create greater positive modulation. Lower positions create negative modulation when the selected shape and Touch assignment permit bipolar movement.
The Touch knob on the main panel still determines:
Modulation destination
Overall polarity
Maximum modulation depth
Touch Animator supplies the changing step-by-step value within that range.
Touch Animator has 16-steps per Pattern (A,B,C, and D) that correlate to the note step-sequencer patterns. It is an independent sequence, however, and its values do not get copied or modified using the Sequencer Utility Functions (Transpose, Clear, Copy To, etc.). Use the Touch Animator Shape Menu (below) for these utilities specific to the Touch Animator.
Combining Touch Animator and Live Expression
Touch Animator values are combined with incoming polyphonic aftertouch or MPE expression. Stored animation doesn’t prevent you from adding live pressure or movement while the sequence runs. The two sources work together. This makes it possible to create a repeating baseline of modulation and then push individual notes further during performance.
In MPE mode, the four animator lanes correspond to the four V, X, Y, and Z Touch slots.
Using Touch Animator Without Sequenced Notes
In some cases, you may want to use the Touch Animator to play sequenced modulation without the Sequencer also playing notes.
To use Touch Animator as a pure modulation sequencer:
Program the desired Touch modulation assignments in the Touch section of the main panel.
Create Touch Animator modulation. To do this manually, drag a sequence step’s red indicator vertically up or down to set its value. Alternatively use the Touch Animator Shape Menu to choose a preset pattern for the modulation. (Click the white triangle next to the Touch Animator).
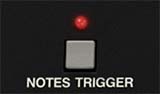
Click the Notes Trigger toggle to disable note playback on the Sequencer.
Tip: This is one of Touch Animator’s most useful applications. Hold a sustained pad and let the Sequencer animate filter cutoff, layer balance, or an effect parameter underneath it.
Touch Animator Shape Menu
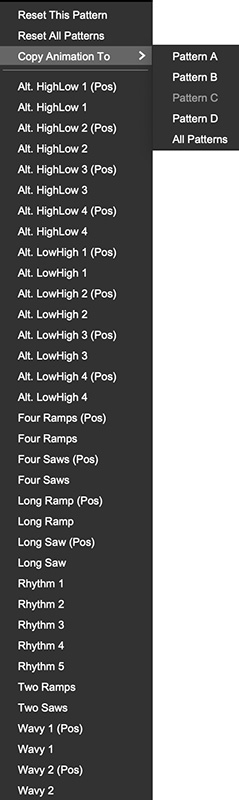
Click the triangle near the Touch Animator controls to open the shape menu. The menu provides ready-made patterns for quickly filling the four animator lanes.
Reset This Pattern
Clears the current Touch Animator pattern (A, B, C, or D) and returns its values to neutral.
Reset All Patterns
Clears all four Touch Animator patterns and returns their values to neutral.
Copy Animation To...
Copies the animation of the current Touch lane (T1, T2, T3, or T4) and its animated pattern (A, B, C, or D) and pastes it to the pattern(s) you choose.
Alternating High/Low and Low/High
The Alt. HighLow and Alt. LowHigh shapes create alternating step values.
Versions 1 through 4 provide different relationships among the four Touch Animator lanes.
Use these for:
Rhythmic filter switching
Alternating layer balance
Stereo or effect changes
Call-and-response modulation
Ramps and Saws
The menu includes:
Two Ramps
Four Ramps
Long Ramp
Two Saws
Four Saws
Long Saw
Ramp shapes gradually rise across part or all of the sequence.
Saw shapes rise or fall and then reset sharply.
Use them for evolving filter movement, gradual effect changes, pitch transitions, and repeating modulation cycles.
Wavy Shapes
Wavy 1 and Wavy 2 create smoother rising and falling contours.
Use them for pads, evolving effects, pulse-width changes, and modulation that should feel less rigidly stepped.
Rhythm 1–5
The Rhythm presets create more complex step patterns with varied accents and rests.
Use them when you want rhythmic movement without drawing every value manually.
Positive-Only Shapes
Preset names ending in (Pos) use positive values only.
The corresponding versions without (Pos) use both positive and negative values.
Positive-only shapes are useful when a destination should move away from its base setting in one direction.
Bipolar shapes move above and below the base setting, creating more balanced or dramatic motion.
Tip: Load a preset shape, listen to it in the context of the patch, then edit individual steps. The menu is a starting point, not a binding legal agreement.
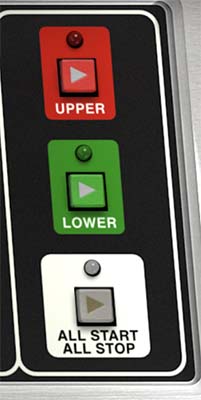
Layer Start and Stop Controls
Memorymode 2’s Upper and Lower layer Motion engines can be started independently or together. This lets the two layers function like separate musical parts. One layer might play a sequenced bass while the other remains manually playable. One might provide an arpeggiated upper texture while the other uses Touch Animator to move a sustained pad.
Upper - Starts Motion playback for the Upper layer.
Lower - Starts Motion playback for the Lower layer.
All Start - Starts Motion playback for both layers.
All Stop - Stops Motion playback for both layers.
Tip: Build and audition one layer at a time. Once each part works on its own, use All Start to hear them together. Two complicated patterns rarely become simpler merely through proximity.
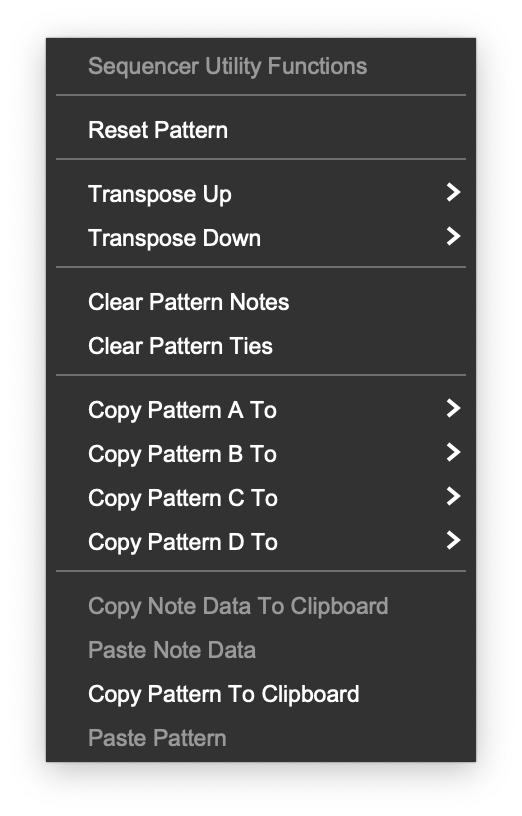
Sequencer Utility Menu
In addition to hands-on editing, the Sequencer features a dropdown menu (click the triangle in the upper-right corner of the Sequencer panel) with a set of utilities for managing your note patterns quickly: Click the triangle near the Step Program Mode controls to open the Sequencer Utility menu.
Reset Pattern - Clears the current pattern and returns it to its default state. Use this when you want a completely clean starting point.
Transpose Up and Transpose Down - Moves every stored note in the current pattern upward or downward. The submenu provides semitone and octave transposition options. Use this to move a phrase into another key or register without re-entering every note.
Clear Pattern Notes - Removes note and chord data from the current pattern while leaving ties and Touch Animator information intact. This is the quickest way to convert a note sequence into a pure Touch Animator modulation pattern.
Clear Pattern Ties - Removes all ties while preserving the stored notes and chords. Use it when a pattern has become too legato or when you want every note to retrigger independently.
Copy Pattern A/B/C/D To - Copies one pattern into another pattern slot.
This is ideal for creating variations:
Copy Pattern A to B.
Change a few notes or ties.
Switch or sequence between A and B.
Copy Note Data To Clipboard - Copies the current pattern’s note information for use elsewhere.
Paste Note Data - Pastes previously copied note information into the current pattern. This allows note material to be transferred without replacing the complete pattern setup.
Copy Pattern To Clipboard - Copies the entire current pattern, including its full sequence information.
Paste Pattern - Replaces the current pattern with the complete pattern stored in the clipboard. Clipboard commands can be used to move material among patterns, presets, projects, or separate Memorymode 2 instances.
Practical Motion Ideas
Transposable Bass Line - Program a short bass sequence in Pattern A and select Trans under Keyboard Control. Use the keyboard to move the running pattern through different keys. Keep VCA Release relatively short so successive notes remain clearly separated.
Sequenced Chord Progression - Enter full chords instead of individual notes. Use ties to hold some chords longer than others, then copy the pattern to B and alter the final few steps. Sequence A and B to create a repeating harmonic phrase with variation.
Rhythmic Filter Pattern - Assign Touch 1 to VCF Cutoff. Enable Touch Animator, select T1, and load an alternating or rhythmic shape. Edit individual steps until the filter accents support the programmed notes.
Evolving Pad - Clear the pattern notes but retain Touch Animator data. Assign T1 to VCF Cutoff, T2 to Upper/Lower Balance, and T3 to a reverb or phaser parameter. Hold a chord and allow the Sequencer to animate the sound without retriggering it.
Arpeggiated Sequence - Program chords into the Sequencer, set the Arpeggiator Trigger to Seq, and choose Leap or First-To-Last. The Sequencer determines the harmonic progression while the Arpeggiator generates movement within each step.
Layered Motion - Use the Lower layer for a sequenced bass and the Upper layer for a manually played pad with Touch Animator movement. Alternatively, run different patterns on both layers at related speeds for interlocking rhythmic parts.
Avoiding Motion Overload
The Motion Controls can produce a great deal of activity, and it’s easy to confuse complexity with improvement.
If a preset becomes crowded:
Turn off the Arpeggiator and listen to the Sequencer alone.
Disable Touch Animator and evaluate the note pattern.
Shorten VCA Release if notes are blurring together.
Increase Chance if too many notes are disappearing.
Reduce Octave Range if the Arpeggiator is covering too much territory.
Simplify one layer while the other provides motion.
Reduce delay or reverb if the pattern loses definition.
Motion is usually most effective when it moves against something stable. A steady pad beneath a busy sequence often sounds larger than two layers fighting each other with too much animation.