
The dark purple strip at the top of the Memorymode UI contains the newly designed Preset browser, navigation, "under-the-hood" settings, UI zoom and focus control, and more.
New- Opens a new blank patch preset. If an unsaved patch is currently open or you’ve modified an existing saved patch, a dialog asks if you’d like to save the patch in its current state. This greatly reduces the possibility of losing an edited unsaved patch.
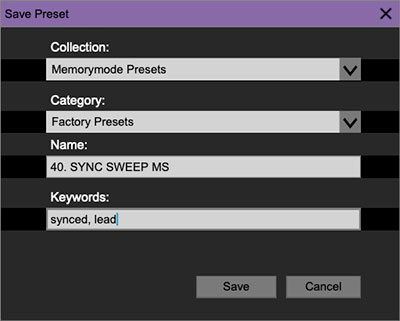
Save - Use this to save patch presets. There are a couple of levels of hierarchy that appear in the Save Preset box, which correlate to the Preset Browser below.
Collection- This is the top level of organization, and contains entire “sets” of presets. The Memorymode V2 Presets are the primarily new collection. We also include a User Presets collection for storing user presets, but you’re free to create your own collections. To create a new collection, click in the Collection text field (where it says User Presets above) and type a name. User-created sounds can be freely saved to any collection; we like to "keep ‘em sepa-rated" for organizational purposes. Select a collection in the left panel to filter the display of presets on the right to just those presets.
All Collections - As it says on the label: displays the available presets from all of the collections below, and any you may add in the future, such as the Foundation Preset Pack from Cherry Audio.
Andrew Longhurst Collection - All new presets designed specifically for Memorymode 2 and its features by Andrew Longhurst.
Dave Polich Collection - Memorymode v1 presets by the designer, converted to Memorymode 2. Dave also has new presets in the Memorymode V2 collection.
Huston Singletary Collection - Memorymode v1 presets by the designer, converted to Memorymode 2.
J3PO Collection - Memorymode v1 presets by the designer, converted to Memorymode 2.
Legacy Collection - The original default Memorymode v1 presets, converted to Memorymode 2. Note that all of these are single (whole) layer presets. The effects have been translated to the new Effects panel system.
Factory Presets - The original 100 programs from the Memorymoog, imported from a cassette backup of the hardware and using only the features available to the hardware (i.e., no effects, layers, etc.).
Memorymode V2 Presets - All new presets from the Memorymode 2 sound design team led by James Terris, created to demonstrate, inspire, and take advantage of all of the new features in Memorymode 2.
User Presets - Waiting for your creations!
Category- Within each Collection are a number of sound categories. As with collections, you’re free to create as many categories as you like. To create a category, click in the Category text field of the Save dialog window and type a new category name.
Name- The name for an individual sound preset. To save a patch, simply type the name in the Name field and click Save. Note that if you add characters into parentheses after the name, those characters are displayed as a suffix to the main name. You can use this as a handy way to indicate functionality (such as AT for aftertouch) or the name/initials of the sound designer.
Keywords- You can add descriptive words such as “huge,” “noisy,” “poly,” etc., to patches to make them appear when terms are typed in the Search field. Use commas to separate multiple keywords entries.
Presets now also include the initials of the sound designer who created the patch.
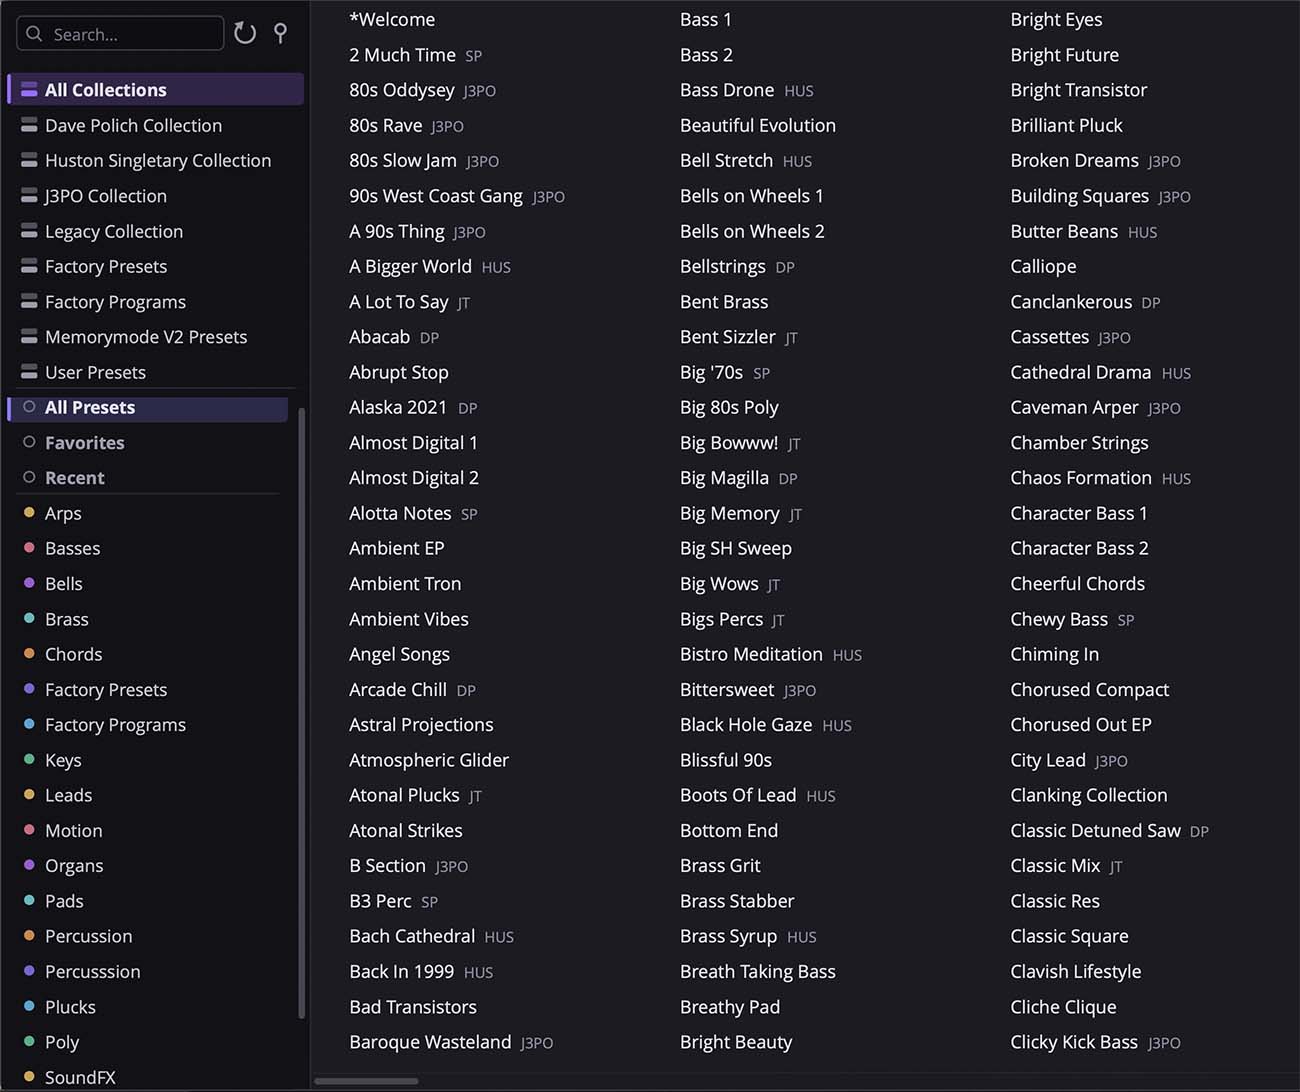
The Preset Browser
Memorymode 2 includes a newly redesigned preset browser with a presentation of the Collections, Search, filters for All/Favorites/Recent, and Presets by Category. Memorymode 2 includes over 200 completely new "V2" presets that take advantage of the latest features, as well as updated versions of the over 600 presets and collections originally included in version 1.
Browsing Patches- Patches can be browsed by clicking the <Select Preset> field. To select a preset collection, click in the area that says <All Collections> or on the downward-facing arrow next to it.
Clicking on the left-side categories narrows down which patches are displayed.
All Presets will show presets from all collections and categories.
Favorites displays presets that you have designated as favorites (by clicking the star icon next to the preset name in the preset name field).
Recent displays recently used presets.
Refresh- This is the circular arrow button to the right of the downward arrow; clicking this checks the Cherry Audio server for new or updated presets.
Preset- Step Back/Forward Arrows- These step to the previous or next preset. macOS [⌘+left/right arrow key] or Windows [CTRL+left/right arrow key] will navigate through presets back and forth in the currently selected collection/category.
Undo/Redo- These circular arrows will undo or redo the last action. It remembers many steps, so if you really loused something up, keep on (un)clickin'...
Settings- This is where user preferences for user interface, audio interfaces, user account, and more are configured. See the Settings section for full information.
Importing Presets with drag-and-drop
Memorymode 2 Presets (user or third-party) can be imported singly or en masse (as a single compressed ZIP file) simply by dragging and dropping from the desktop anywhere on the user interface.
If a single .*preset file is dragged and dropped, the sound is immediately loaded and the standard Save Preset dialog appears; this lets you save the sound to the instrument's preset browser. Note that you don't have to save the sound to preset browser; if you just want to hear and play the sound, click the Cancel button in the Save Preset dialog - the sound will still be loaded.
Compressed zip files containing multiple sounds can also be drag and dropped onto the UI. This works the same as with single sounds, but instead of the Save Preset dialog, you'll see the Import Preset Collection dialog. The presets will be added as a new collection and available in the categories for which they were tagged.
If you wish, you can selectively import your version 1 User Presets or third-party presets from v1 into Memorymode 2, simply by dragging and dropping the file(s) onto the user interface of Memorymode 2. You can select multiple presets. Do not zip them. These preset files will be automatically duplicated and translated to v2 format as single-layer whole presets, as v1 did not support layers or splits. They will be added to your v2 User Presets collection under the category "V1 Presets." The integrated effects associated with v1 presets -- Phaser, Ensemble, Echo, Reverbs -- are automatically assigned to Cherry Audio's latest effects and effects chain system in the Upper Layer effects chain. The original Phaser is the new Wide Phaser Effect, Ensemble becomes Flanger & Chorus, Echo becomes Digital Delay, and Reverb becomes Digital Reverb Room, Hall, or Plate).
Zoom Magnifying Glass- Click to resize the Memorymode interface window. Selecting 100% returns the user interface to native size.
MIDI tab- Opens the MIDI controllers tab for configuring internal and hardware MIDI controls. See the MIDI Controllers Setup and MIDI Tab section for full information.
! (MIDI Panic)- Click to send an all-notes-off message in case of rare, "make this #$!%ing thing shut up?!?" stuck-note incidents.
Tempo (Standalone Version Only)- Displays Memorymode's current internal tempo setting. Memorymode's internal tempo affects the LFO, Arpeggio, and the Echo section rates when their corresponding Sync buttons are enabled. The tempo setting can be changed by moving the mouse up and down anywhere in the tempo section, or by double-clicking the number and entering the desired BPM value.
The tempo display only appears in the standalone version of Memorymode 2. VST, AU, and AAX plug-in versions receive tempo data from their host DAW app.

QWERTY Musical Typing Keyboard- Opens an onscreen keyboard allowing a standard QWERTY computer keyboard to be used for playing music notes. For more information, see the QWERTY Musical Typing Keyboard (MTK) section.

? (Help)- Clicking this launches your web browser and opens the help document you’re already reading. Confusing circular logic at its finest.
Cherry Audio Memorymode 2 Synthesizer logo- Clicking this displays “about” information, and shows the version number and current registered user ID.
Focus Button

Since the original instrument is over three feet wide and your display likely isn't, it was necessary to ensmallinate lots of things (sure, that's a word). If you're using a tiny laptop, this could make things hard to see. With this in mind, the Focus button conveniently blows up Memorymode's user interface to roughly twice its normal size within the current window size. Unlike the Zoom "magnifying glass" function, Focus doesn't affect the current window size. By default, the patch panel section fills the current window, but the view can be scrolled vertically and horizontally with a mouse wheel, track pad, or Apple Mighty Mouse finger-scrolling. Or if you're the last person on earth still using a single-button mouse, scroll bars will appear at the window edges when in Focus mode. (Drop us a line from your AOL account, umkay?)
Using Focus mode couldn't be easier - just click the Focus button the top menu bar. To return to standard view, click Reset. There's also a superfast key shortcut - on Mac, hold the ⌘ [COMMAND] key and click the mouse; in Windows, hold the [OPTION] key and click the mouse. Focus can be reset with the same key shortcuts.
Preset List Right-Click Functions
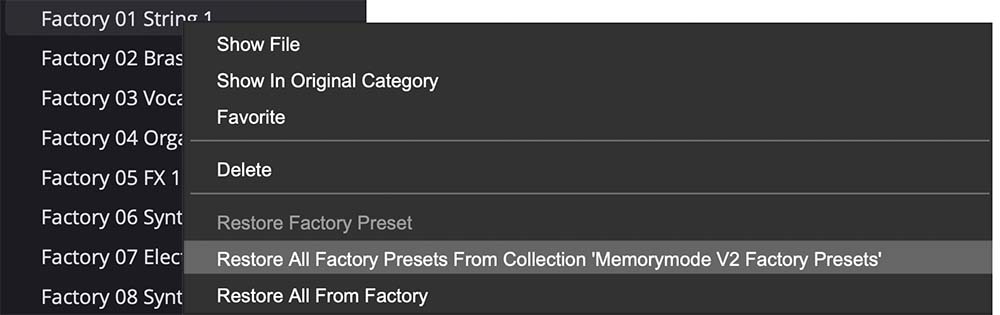
Show File- This displays the selected preset in the Mac or Windows folder containing it. This is useful for backing up or sending a preset file to another user.
Show In Original Category- Selects the preset within its category, i.e. the category will highlight in the left preset menu. The Show In Original Category command only displays if the preset was selected within the <All Presets>, <Favorites>, or <Recent> categories.
Favorites- Favorited presets will show in when the <Favorites> category is selected. A star will display next to the preset name. Right-click on the preset and reselect Favorite to un-favorite it.
Delete- Deletes the selected preset.
Restore Factory Preset- If one of the factory (i.e. not user) patches is edited and saved, selecting this command restores the patch to its unaltered "factory" setting. This menu will be grayed-out for user bank patches.
Restore All Factory Presets From 'Memorymode Presets'- If any patches from the "factory" Memorymode bank are edited and saved, selecting this command restores all of them to their unaltered factory setting.
Restore All From Factory- If any patches from the factory banks are edited and saved, selecting this command restores all of them to their unaltered factory setting. At the time of writing, the Memorymode bank mentioned above is the only factory bank, so this function and the Restore All Factory Presets From 'Memorymode Presets' above have the same effect.
Show File- This displays the selected preset in the Mac or Windows folder containing it. This is useful for backing up or sending a preset file to another user.