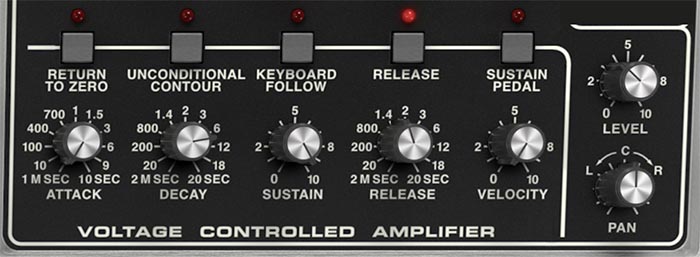
Voltage Controlled Amplifier and VCA Envelope Generator
The Voltage Controlled Amplifier, or VCA, controls the level of each note as it moves through time. The oscillators create the raw sound and the filter shapes its tone, but the VCA determines whether that sound snaps into existence, fades in gradually, sustains evenly, or disappears with a long trailing release.
Despite the name, the VCA isn’t primarily intended to make the synthesizer louder. It behaves more like an automatic volume control, opening and closing in response to its dedicated envelope generator. Each voice has its own VCA and envelope, allowing every note in a chord to progress through its volume contour independently.
The VCA Envelope follows the familiar four-stage ADSR structure:
Attack controls how quickly the sound rises to full level.
Decay determines how long it takes to fall from that initial peak to the Sustain level.
Sustain sets the level maintained while the note remains held.
Release controls how long the sound takes to fade after the note is released.
Because the VCA determines whether a voice can be heard at all, its envelope often has the greatest influence on the perceived shape and playing response of a patch.
VCA Envelope Controls
Attack
Function: Sets how long the sound takes to rise from silence to its maximum level after a note is played.
Range: Approximately 1 millisecond to 10 seconds.
Sound: Short settings produce an immediate entrance with a clearly defined attack. Longer settings cause the sound to fade in gradually.
Interactions: Attack works independently from the Filter Envelope Attack. This means the sound’s volume and brightness don’t have to rise at the same speed. For example, a fast VCA Attack with a slower Filter Attack produces a note that begins immediately but gradually becomes brighter. A slow VCA Attack with a faster Filter Attack creates a bright transient that fades into view more gently.
The shared Return To Zero and Keyboard Follow controls also affect VCA Attack behavior.
Tip: Use very short Attack settings for basses, percussion, plucks, and sharply articulated sequences. Increase Attack for strings, pads, bowed textures, and sounds that should emerge gradually.
Decay
Function: Sets how long the VCA Envelope takes to fall from its maximum Attack level to the Sustain setting.
Range: Approximately 2 milliseconds to 20 seconds.
Sound: Short settings create a quick drop in volume after the initial attack. Longer settings allow the sound to settle gradually.
Interactions: The audible result depends heavily on Sustain. If Sustain is set to maximum, there may be little or no audible Decay because the envelope has nowhere lower to go. When Sustain is set to zero, Attack and Decay together create a simple percussive volume contour. The note rises during Attack and then fades toward silence during Decay, even if the key remains held.
Tip: For plucked or struck sounds, use a fast Attack, moderate Decay, and low Sustain. For brass or keyboard sounds, use a medium Decay with a higher Sustain so the initial accent settles into a stable held level.
Sustain
Function: Sets the VCA level maintained after the Attack and Decay stages have completed and while the note remains held.
Sound: Low Sustain settings allow the note to fade substantially after its initial attack. Higher settings keep the held portion of the sound louder and more continuous.
At maximum Sustain, the sound remains near its peak level until the note is released.
Unlike Attack, Decay, and Release, Sustain controls level rather than time.
Interactions: Sustain establishes the destination of the Decay stage and the starting level of the Release stage. The shared Unconditional Contour control changes this behavior. When Unconditional Contour is enabled, the envelope doesn’t remain at the Sustain level while the key is held. Instead, it proceeds into Release automatically.
Tip: Use low Sustain for plucks, percussion, mallets, and short sequenced sounds. Use higher Sustain for organs, leads, strings, pads, and other sounds that need to remain present while the keys are held.
Release
Function: Sets how long the sound takes to fade to silence after the key is released.
Range: Approximately 2 milliseconds to 20 seconds.
Sound: Short settings stop the note almost immediately. Longer settings allow it to trail away gradually, ranging from a natural decay to a long ambient fade.
Interactions: The shared Release button must be enabled for the VCA Release knob to take effect. When the button is disabled, released notes stop immediately regardless of the knob setting. The VCA Release also determines how long the Filter Envelope remains audible after the key is released. If VCA Release is very short, a longer Filter Release may continue internally, but the amplifier will have already silenced the voice. Sustain-pedal behavior also interacts with Release. When a sustained note is finally released by lifting the pedal, the VCA enters its Release stage according to this setting.
Tip: Use short Release settings for tight basses, staccato sequences, and rhythmic parts. Longer settings work well for pads, strings, leads, and layered sounds that should overlap smoothly.
Velocity
Function: Sets how strongly incoming note velocity affects VCA level.
Sound: At zero, notes play at a consistent volume regardless of how hard or softly the keys are struck. Increasing Velocity causes harder playing to produce louder notes and softer playing to produce quieter notes.
Higher settings create a wider dynamic range and a more touch-sensitive response.
Interactions: The final response depends on the velocity curve and range of the connected MIDI keyboard or recorded MIDI data. Velocity also works independently from the Filter Envelope Velocity control. You can therefore make harder playing affect volume, brightness, or both.
For example:
Raise VCA Velocity but keep Filter Velocity low for dynamic volume without major tonal changes.
Raise Filter Velocity but keep VCA Velocity lower for notes that become brighter when played harder without changing dramatically in volume.
Raise both for a more natural acoustic-style response.
Tip: Moderate Velocity settings are often more playable than maximum values. Enough response to reward expressive playing is useful, but a patch that nearly disappears whenever you play gently can become hard work surprisingly quickly.
Layer Level and Pan
Each Memorymode 2 layer includes its own Level and Pan controls. These allow the Upper and Lower layers to be balanced and positioned independently within a preset.
Level
Function: Sets the overall output level of the current layer.
Sound: Raising Level makes the layer more prominent in the final sound. Lowering it allows the other layer to take the foreground while this one provides support, texture, or ambience.
Interactions: Level is separate from the oscillator Mixer controls. The Mixer determines how strongly the oscillators feed the filter and can affect internal saturation. The layer Level control adjusts the completed layer’s overall contribution without changing the oscillator balance or filter drive.
This distinction is important. If a patch sounds too loud but you like the driven character created by high Mixer settings, reduce the layer Level rather than turning down the oscillators.
Level also works with the Upper/Lower layer balance and the Master Volume control. When both layers are active, their combined output may be substantially louder than either layer alone.
Tip: When programming a dual-layer preset, temporarily lower one layer and establish the main sound first. Then raise the second layer until its role becomes audible without overwhelming the foundation.
Pan
Function: Places the current layer in the stereo field.
Sound: Center keeps the layer equally balanced between the left and right channels. Turning Pan left or right shifts the layer toward that side of the stereo image.
Interactions: The Upper and Lower layers have independent Pan settings, making it possible to place them in different stereo positions. Wide separation can make a layered preset sound expansive, but extreme panning can also make the instrument feel disconnected or unbalanced, especially when heard in mono or from speakers rather than headphones. Stereo effects may add additional width and movement after the layer’s basic position has been established, so evaluate Pan in the context of the entire effects chain.
Tip: For a naturally wide layered patch, pan one layer slightly left and the other slightly right rather than placing them at the extremes. Small differences in tuning, envelopes, and effects will make the image feel wider without leaving an empty space in the middle.
Shared Envelope Controls
The shared controls positioned between the VCF and VCA envelopes affect both sections simultaneously:
Return To Zero determines whether retriggered envelopes restart from zero or continue from their current levels.
Unconditional Contour causes the envelopes to move directly into Release after Attack rather than remaining at Sustain while a key is held.
Keyboard Follow shortens Attack, Decay, and Release times as higher notes are played.
Release enables or disables the Release stages of both envelopes.
Sustain Pedal determines whether incoming sustain-pedal messages hold the Filter and VCA envelopes. Like all of these controls, this is a per layer setting.
These controls are described in detail in the Filter Envelope section. Their placement between the two envelopes is a useful reminder that they affect both brightness and volume at the same time.
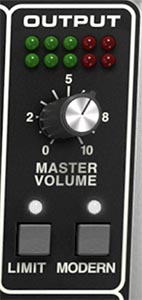
Output
The Output section controls Memorymode 2’s final level and provides protection against unwanted digital clipping. Unlike the oscillator Mixer, where higher settings can create musically useful modeled overdrive, overloading the final output can produce hard digital clipping. The first sounds like analog character. The second sounds like your audio interface is broken.
Master Volume
Function: Sets the overall output level of Memorymode 2 after the Upper and Lower layers and Global effects have been combined.
Sound: Master Volume doesn’t intentionally add coloration or saturation. It simply determines the final signal level sent to your DAW or audio interface.
Interactions: The final output level is influenced by many earlier stages, including oscillator Mixer levels, layer Level controls, effects, overlapping notes, long releases, and the combined output of both layers. A preset that sounds fine with one note may become much louder when played as a dense chord, particularly when both layers are active.
Tip: Use the individual layer Level controls to balance the Upper and Lower layers, then use Master Volume to set the overall preset level. This preserves the internal relationship between the two sounds.
Output Level Meters
The LED meters display Memorymode 2’s final stereo output level.
Green LEDs indicate a healthy operating range. Red LEDs indicate that the signal is approaching or exceeding the available digital headroom. Occasional brief peaks into the red may not cause obvious problems, but sustained red levels are a warning that clipping may occur. Reduce Master Volume, layer Level, effect output, or another earlier gain stage until the signal remains under control.
Tip: Test output level by playing the loudest chords or passages the preset is likely to encounter. Setting the level using a single note can provide an unrealistic picture of what happens when you play chords.
Limit
Function: Enables a transparent output limiter that reduces excessive peaks before they overload the final output.
Sound: At moderate levels, the limiter should have little or no obvious effect. When strong peaks occur, it restrains them to help prevent clipping.
Interactions: The limiter is useful for patches with high resonance, strong velocity response, dense polyphony, long overlapping releases, or effects that generate large level changes. It shouldn’t be used as a substitute for sensible gain staging. If the meters remain heavily in the red, reduce the signal level rather than asking the limiter to perform damage control.
Tip: Enable Limit as a safety measure for performance presets with unpredictable dynamics. When sound designing or mixing, compare the preset with the limiter off to make sure excessive internal levels aren’t being concealed.
Modern
Function: Applies an output EQ contour that increases low- and high-frequency emphasis for a broader, more contemporary tonal balance.
Sound: Modern adds extra bass weight and upper-frequency clarity, giving the completed sound a more polished and extended character. With the button disabled, the response is flatter and closer to the tonal balance associated with the original instrument.
Interactions: Modern processes the completed output, so it affects both layers and their effects together. Its impact depends heavily on the preset. Dark pads may gain useful air, while already-bright patches can become overly sharp. Bass-heavy sounds may gain weight or begin competing with everything else in the lower half of the mix.
Tip: Treat Modern as an alternate final voicing rather than an automatic improvement. Audition it in the context of the track. A sound that seems bigger in isolation isn’t always the one that leaves room for the rest of the arrangement.
Sound Design Tips
Shape the Volume Before Adding Effects
When creating a new sound, establish the VCA Envelope before adding delay or reverb. Effects can make almost any patch feel larger and smoother, but they can also disguise an envelope that isn’t working musically. Once the dry sound responds correctly, effects become an enhancement.
Match the Envelope to the Musical Role
A bass or rhythmic sequence usually benefits from a fast Attack and controlled Release so notes remain clearly separated. A pad can use slower Attack and Release settings to overlap and blend. A lead often works best somewhere between the two, with enough Attack to remove clicks but enough immediacy to remain playable.
Create Plucked Sounds with Decay
Set Attack very fast, Sustain low or zero, and adjust Decay to control the length of the note. Release can then be kept short for tight articulation or raised slightly so released notes fade more naturally. This works especially well when the Filter Envelope uses a similar shape but closes slightly faster than the VCA.
Make Pads Breathe
Use a medium or slow Attack, high Sustain, and long Release. Set the Filter Attack slightly slower than the VCA Attack so the volume arrives first and the brightness unfolds afterward. On a two-layer patch, give the layers slightly different Attack and Release times. The resulting movement feels more organic than two perfectly synchronized envelopes.
Use Velocity to Separate the Layers
Set one layer with stronger VCA Velocity response and the other with a more stable level. Soft playing can emphasize the steady layer, while harder playing brings the more dynamic layer forward. This creates expressive layer balance without requiring a dedicated crossfade control.
Keep Long Releases Under Control
Long VCA Release settings can sound beautiful, but they also cause notes to overlap and consume voices. With up to 16 voices available per layer, dense chords, sustain pedal, and long release times can still accumulate quickly. If a patch becomes cloudy or notes appear to disappear, shorten Release, reduce Sustain Pedal use, or lower the level of the supporting layer.
Utilize Sustain Pedal per Layer
Because the Sustain Pedal setting is independent for each layer, you can set up Duals or Splits so that one layer can sustain while the other doesn't. Use this method for bass in the left hand and sustained chords in the right, or sustained chords in the left and a mono solo performance on the right, and so on.