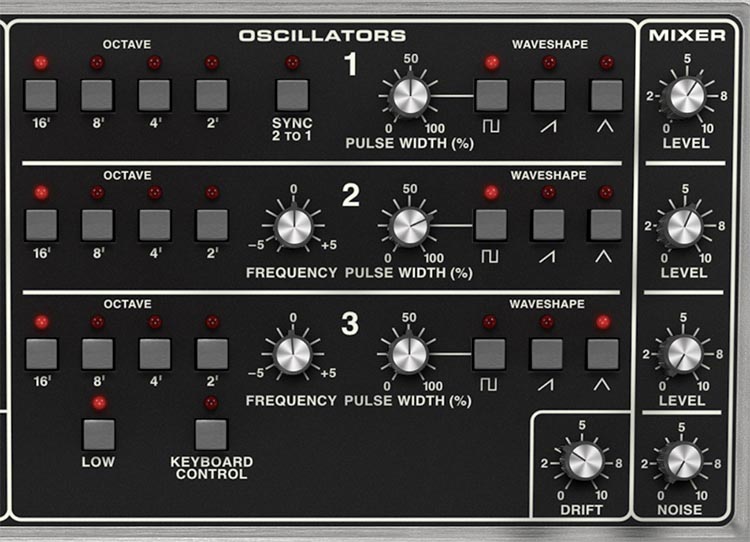
Every Memorymode 2 sound begins with three analog-modeled oscillators. Each one can generate pulse, ramp, and triangle waves, and those waveforms can be switched on individually or combined. A single oscillator can produce a clean, focused tone, while all three running together can deliver the broad, muscular sound that made the original instrument famous.
The three oscillators share the same basic design, but they aren’t identical:
Oscillator 1 includes oscillator sync.
Oscillators 2 and 3 include Frequency controls for detuning and creating musical intervals.
Oscillator 3 can also operate in a low-frequency range and be disconnected from keyboard tracking, allowing it to serve as a per-voice modulation source.
Because every note has its own set of three oscillators, these features operate polyphonically. Chords can therefore include independent oscillator movement within every voice rather than behaving like a single monophonic modulation source applied across the entire instrument.
Controls Common to All Three Oscillators
Octave: 16', 8', 4', and 2'
Function: Sets the oscillator’s basic pitch range using traditional organ-footage labels.
16' – Lowest range.
8' – One octave above 16' and generally the normal keyboard pitch.
4' – One octave above 8'.
2' – Two octaves above 8'.
Only one Octave setting can be active for each oscillator at a time. Selecting a new setting automatically disables the previous one.
Sound: Matching octave settings create a dense, unified tone. Placing the oscillators in different octaves spreads the harmonic energy across a wider range.
Tip: For a solid bass, try Oscillator 1 at 16', Oscillator 2 at 8', and Oscillator 3 at 16' with its Mixer level reduced slightly. For a bright lead or brass sound, combine 8', 4', and 2'.
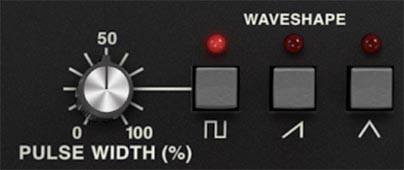
Waveshape
Each oscillator includes three independently selectable waveforms. More than one can be active at a time, allowing you to create a harmonically complex tone before the signals reach the Mixer.
Pulse
Sound: Hollow and focused at moderate widths, becoming thinner, brighter, and more nasal as the pulse narrows.
At a Pulse Width setting of 50%, the waveform is symmetrical and behaves like a square wave, with a strong fundamental and prominent odd-numbered harmonics.
Interactions: Pulse Width affects this waveform directly. The LFO Modulation section can animate the pulse width of all three oscillators, while Voice Modulation can affect the pulse width of Oscillators 1 and 2.
Tip: Use pulse waves for reedy leads, animated pads, clavinet-like tones, and wiry electronic textures.
Ramp
Sound: Bright, bold, and rich in harmonics. Ramp waves provide plenty of material for the filter to shape.
Use it for: Basses, brass, strings, leads, and classic filter sweeps.
Triangle
Sound: Smooth and rounded, with fewer upper harmonics than either ramp or pulse.
Use it for: Mellow leads, flute-like sounds, soft bass reinforcement, and strengthening the fundamental without making a patch excessively bright.
Tip: Layer triangle beneath ramp to add weight while preserving the ramp wave’s harmonic detail.
Pulse Width
Function: Sets the duty cycle of the pulse waveform, from a symmetrical square shape to an extremely narrow pulse.
Sound: At approximately 50%, the pulse sounds full and hollow. Narrower settings produce a thinner, brighter, and more nasal tone.
Interactions: Pulse Width has no effect unless the pulse waveform is enabled. It can be animated from the LFO Modulation or Voice Modulation sections.
Tip: For warm pads, begin near 50% and apply a small amount of slow LFO modulation. For thinner, more animated textures, start with a narrower pulse and use deeper modulation.
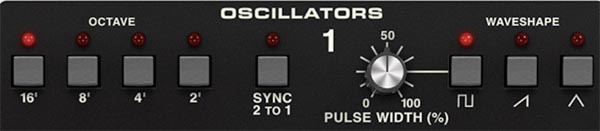
Oscillator 1
Oscillator 1 acts as the primary pitch reference for the oscillator section. Unlike Oscillators 2 and 3, it has no Frequency control, so its pitch is determined by the selected Octave setting and the notes played from the keyboard.
Sync 2 To 1
Function: Forces Oscillator 2 to restart its waveform every time Oscillator 1 begins a new cycle. Oscillator 1 acts as the master, while Oscillator 2 becomes the synchronized oscillator.
Sound: With both oscillators tuned similarly, the result may be subtle. Raising or sweeping Oscillator 2’s pitch creates the bright, tearing harmonics associated with classic oscillator-sync leads and effects.
The fundamental pitch remains anchored to Oscillator 1 while Oscillator 2’s harmonic structure changes.
Interactions: Oscillator 2 must be audible in the Mixer for the sync effect to be heard clearly. The most dramatic movement occurs when Oscillator 2’s pitch is modulated from the Voice Modulation section.
Tip: Enable Sync 2 To 1, set Oscillator 1 to 8', and set Oscillator 2 to 4' or 2'. Route the filter envelope to Oscillator 2 in the Voice Modulation section, then use the filter envelope Attack and Decay controls to shape the sweep.

Oscillator 2
Oscillator 2 adds independent tuning to the shared Octave, Waveshape, and Pulse Width controls.
Frequency
Function: Adjusts Oscillator 2 above or below its normal pitch by a little more than a perfect fifth in either direction.
Sound: Small adjustments create slow beating and analog-style thickness. Larger adjustments create fixed intervals, including fourths, fifths, harmonies, and dissonant relationships.
Interactions: When Sync 2 To 1 is enabled, Frequency changes the harmonic content of the synchronized waveform rather than simply detuning Oscillator 2.
Tip: For natural thickness, move the control only slightly away from center. For interval-based leads or basses, tune Oscillator 2 to a fifth above Oscillator 1.
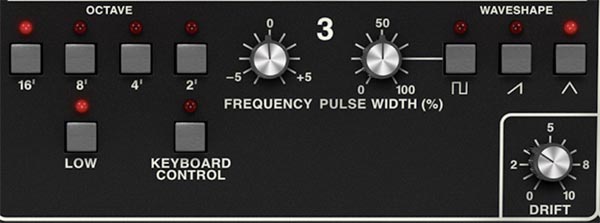
Oscillator 3
Oscillator 3 can function as a conventional audio oscillator, a low-frequency modulation source, or both.
Frequency
Function: Adjusts Oscillator 3 above or below its normal pitch by a little more than a perfect fifth.
Sound: When Oscillator 3 is audible, Frequency creates detuning, musical intervals, or deliberately unstable pitch relationships. When Oscillator 3 is used for Voice Modulation, Frequency determines the modulation rate.
Low
Function: Shifts Oscillator 3 into a sub-audio range so it can act as a low-frequency oscillator.
Sound: Oscillator 3 can create per-voice vibrato, filter sweeps, pulse-width movement, or tremolo. Because every voice has its own Oscillator 3, held notes can move independently rather than sharing one global modulation cycle.
Interactions: Turn down Oscillator 3 in the Mixer when using it purely as a modulation source. Disable Low for audio-rate modulation, which can produce metallic, bell-like, growling, or aggressively synthetic tones.
Tip: Enable Low, turn down Oscillator 3 in the Mixer, then route it to Filter in the Voice Modulation section. Sustained chords will develop complex internal movement as each voice follows its own modulation cycle.
Keyboard Control
Function: Determines whether Oscillator 3 follows the pitch of notes played on the keyboard.
On: Oscillator 3 tracks the keyboard normally. Higher notes produce higher oscillator frequencies.
Off: Oscillator 3 remains at a fixed frequency regardless of the note played.
Sound: With Low and Keyboard Control both enabled, low notes receive slower modulation while higher notes move faster. With Keyboard Control disabled, every voice uses the same Oscillator 3 frequency.
Interactions: Keyboard Control is normally enabled when Oscillator 3 is used as an audio source. Disabling it in the audio range creates a fixed-pitch oscillator that can be used for drones, pedal tones, beating effects, and unusual harmonic relationships.
Tip: For predictable per-voice modulation, enable Low and disable Keyboard Control. For more animated chords whose upper notes move faster than the lower notes, leave Keyboard Control enabled.
Drift
Function: Introduces random tuning variation among the oscillators.
Sound: Low settings add subtle movement. Moderate settings produce more noticeable beating and vintage looseness. High settings create deliberately unstable tuning.
Interactions: Frequency establishes a fixed pitch relationship for Oscillators 2 and 3. Drift adds continuously changing variation around those settings.
Tip: Increase Drift until the sound begins to move, then back it off slightly.
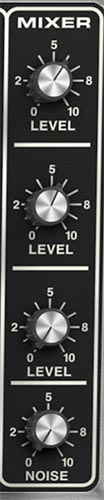
Mixer
Each Memorymode 2 layer includes its own Mixer for balancing the three oscillators and white-noise source before they enter the filter.
The Mixer does more than set relative volume. Its levels also determine how hard the combined signal drives the filter input. Lower settings preserve a cleaner, more open tone. Higher settings introduce gentle internal overdrive, adding density, warmth, and harmonic weight before the sound reaches the VCF.
Oscillator Level 1, 2, and 3
Function: Sets the volume of the corresponding oscillator in the mixed signal.
Sound: Low settings let the oscillator sit quietly beneath the others. Higher settings make it more prominent and increase the overall level feeding the filter.
Settings above approximately 4 begin to introduce gentle overdrive, similar to the behavior of the original instrument. This isn’t the harsh digital clipping you’d get by overloading the final output. It’s part of the modeled signal path and can add useful thickness and saturation.
Interactions: The amount of overdrive depends on the combined level of all active oscillators and waveforms. Three oscillators, each producing multiple waveforms, can build level quickly even when no single Mixer control is turned all the way up.
Tip: For a clean, spacious pad, keep the oscillator levels moderate and let the filter and effects provide the movement. For basses, leads, and aggressive brass sounds, push one or more levels above 4 to add weight and edge before the filter.
Noise
Function: Sets the level of the white-noise source sent into the Mixer.
Sound: White noise contains energy across the audible frequency spectrum. At low levels, it adds air, breath, grit, and a subtle sense of texture. At higher levels, it can become the main ingredient in wind, surf, percussion, and special-effect sounds.
Because noise has no fixed pitch, the filter plays a major role in shaping it. Lower Cutoff settings produce dark rumbles and soft bursts. Higher Cutoff settings create brighter hiss and sharper attacks.
Tip: Add a small amount of Noise to pads or brass patches to keep sustained tones from feeling too smooth. For synthesized percussion, turn down the oscillators, raise Noise, and use short filter and amplifier envelopes. High Emphasis settings can turn the filter into the pitched element while the noise provides the initial strike.
Balancing the Mixer
A three-oscillator synthesizer can become crowded quickly. Not every oscillator needs to be equally loud. Use one oscillator as the foundation, another for detuning or an interval, and the third for reinforcement or modulation. Reducing the level of supporting oscillators often makes the final sound larger and clearer than running everything at maximum.
For example:
Oscillator 1 can provide the main ramp-wave body.
Oscillator 2 can sit slightly lower and add detuned width.
Oscillator 3 can contribute a quiet triangle wave for low-frequency weight.
Noise can be added just enough to give the attack some texture.
The result will often sound more controlled than three equally loud oscillators competing for the same space.
Clean Versus Driven Mixer Settings
For cleaner patches, keep the oscillator levels around the lower half of their range and compensate with the final output level if necessary. For a thicker, more aggressive sound, push the oscillator levels beyond 4 and listen to how the filter responds. The added harmonics can make low resonance settings feel richer and high resonance settings more forceful. The useful setting is the one that serves the patch. More drive isn’t automatically better. Sometimes the fattest sound comes from leaving enough room for the oscillators, filter, and two layers to breathe.
Programming Tips
Build the Sound One Oscillator at a Time
Begin with Oscillator 1 alone. Choose a waveform that suits the basic character you want, then add Oscillator 2 for detuning or a musical interval. Bring in Oscillator 3 for additional weight, movement, or modulation. This makes it easier to hear what each oscillator contributes and prevents a patch from becoming dense simply because every available control was turned on.
Use Opposing Detuning
Turn Oscillator 2 slightly sharp and Oscillator 3 slightly flat relative to Oscillator 1. This spreads the beating around the central pitch and often sounds more balanced than detuning both oscillators in the same direction. Add a small amount of Drift afterward. Frequency establishes the relationship and Drift adds organic movement.
Combine Waveforms Before Adding More Oscillators
One oscillator can already be harmonically complex because multiple waveforms can be enabled simultaneously. Try ramp and triangle together for brightness with a stronger fundamental. Pulse and triangle create a hollow tone with additional low-frequency weight. Exploring waveform combinations before adding more oscillators often produces a clearer, more focused patch.
Use Oscillator Sync as a Harmonic Envelope
A sync sweep doesn’t always need to be dramatic. Enable Sync 2 To 1, apply a modest amount of filter-envelope modulation to Oscillator 2, and use short envelope times. Instead of an obvious ripping sweep, the beginning of each note gains a bright harmonic snap that settles quickly into the body of the sound. This works especially well for brass, bass, and percussive lead patches.
Give the Two Layers Different Jobs
In a dual-layer preset, the Upper and Lower layers don’t need equally dense oscillator settings. One layer might provide a stable foundation using triangle and gently detuned ramp waves, while the other supplies a brighter sync sweep, narrow pulse texture, or per-voice modulation. Dividing these roles often produces a larger and clearer result than stacking two equally massive three-oscillator patches.