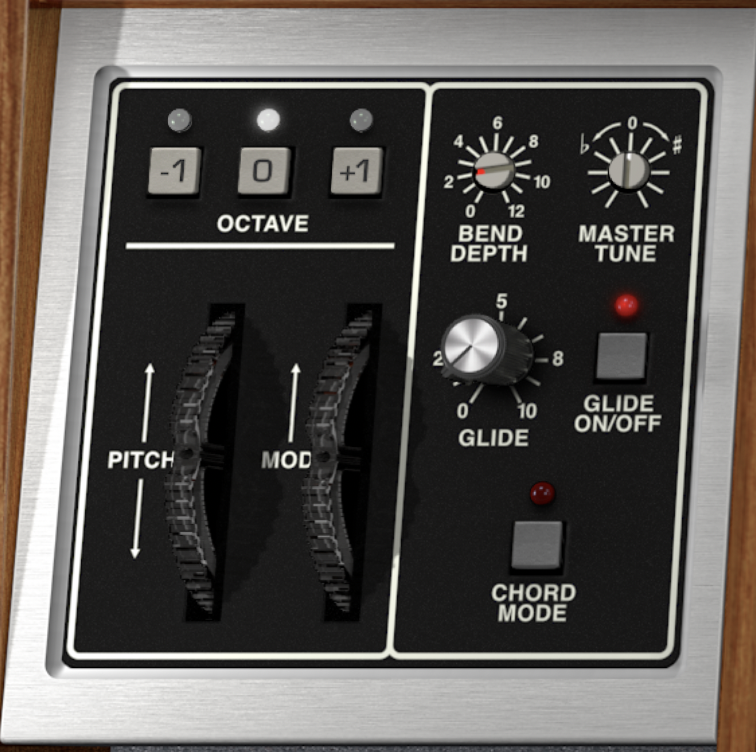
Performance Controls
The Performance Controls provide quick, hands-on access to pitch, modulation, tuning, glide, octave transposition, and Chord Mode. These are the controls most likely to be used while playing rather than while constructing the basic sound.
The Pitch and Mod wheels add expression in real time. Bend Depth determines how far the Pitch wheel moves. Glide creates smooth transitions between notes. The Octave buttons shift the instrument’s playing range without changing the oscillator settings inside the preset. Chord Mode turns any chord you play into a transposable one-finger performance tool.
Together, these controls can make a static preset feel much more like an instrument and considerably less like a handsome collection of knobs.
Octave: -1, 0, and +1
Function: Transposes the instrument’s playing range by one octave down, no transposition, or one octave up.
-1 – Transposes the played pitch down one octave.
0 – Plays at the normal pitch.
+1 – Transposes the played pitch up one octave.
Only one Octave setting can be active at a time.
Interactions: The Octave buttons transpose the complete preset without changing the octave-footage settings of the individual oscillators. This makes them useful for moving a sound into a different register while preserving the relationships among Oscillators 1, 2, and 3.
For example, a bass patch built with 16' and 8' oscillator settings can be shifted upward for a lead part without reprogramming the oscillator section.
Tip: Use the Octave buttons for broad performance changes and the oscillator Octave controls for designing the internal harmonic structure of the sound. They may both move pitch by octaves, but they solve different problems.
Pitch Wheel
Function: Bends the pitch of played notes upward or downward.
The wheel is spring-loaded and returns to its center position when released.
Sound: Small movements can add subtle expression, scoops, vibrato-like gestures, and blues-style inflections. Larger movements produce wide bends, dive-bombs, octave jumps, and more dramatic effects.
Interactions: The maximum bend range is determined by the Bend Depth control.
Pitch bending applies to the completed sound rather than changing the tuning relationship among the three oscillators. All oscillators therefore move together while preserving any detuning or intervals already programmed into the patch.
Tip: For expressive leads, use a Bend Depth of 2 semitones. This provides familiar whole-step bends that are easy to control. Wider ranges are useful for effects, but they demand a steadier hand. A 12-semitone bend can sound magnificent right up until it doesn’t.
Bend Depth
Function: Sets the maximum Pitch wheel range from 0 to 12 semitones in either direction.
At 0, the Pitch wheel has no effect. At 12, moving the wheel fully upward or downward bends the sound by one octave.
Common settings:
2 semitones – Conventional expressive bends for leads and solos.
3 semitones – Minor-third bends and more exaggerated melodic movement.
5 semitones – Perfect-fourth bends.
7 semitones – Perfect-fifth bends.
12 semitones – Full octave bends and dramatic effects.
Interactions: Bend Depth sets the range for both upward and downward movement.
A wider range also makes small wheel movements produce larger pitch changes. For subtle playing, use a narrower range. For dramatic performance effects, increase it.
Tip: Match Bend Depth to the musical role of the preset. A bass patch may benefit from a tight 2-semitone range, while a lead or effects sound can make good use of a fifth or octave.
Mod Wheel
Function: Introduces or increases modulation during performance.
Unlike the Pitch wheel, the Mod wheel remains at its current position when released.
The result depends on the settings programmed in the Modulation section. Each Modulation setup has its own Mod Wheel Amount, waveform, destinations, and other parameters. Because Modulation 1 and Modulation 2 remain active simultaneously, one wheel movement can control two different modulation behaviors at once.
For example, the Mod wheel could:
Add vibrato through Modulation 1
Open the filter through Modulation 2 in DC mode
Increase pulse-width animation
Introduce tremolo
Add oscillator pitch movement
Control several destinations simultaneously
Interactions: The Mod wheel doesn’t create modulation by itself. The destination buttons and Mod Wheel Amount controls in the Modulation section determine what it affects and how strongly.
If Initial Amount is set above zero, some modulation is already present before the wheel is moved. The Mod wheel adds to that amount.
To make modulation entirely wheel-controlled, set Initial Amount to minimum and raise Mod Wheel Amount.
Tip: Use Modulation 1 for gentle vibrato and Modulation 2 in DC mode for filter movement. The Mod wheel can then brighten the sound and add pitch expression in one coordinated gesture.
Master Tune
Function: Adjusts the overall tuning of Memorymode 2.
The center position applies no tuning offset. Turning toward the flat symbol lowers the tuning, while turning toward the sharp symbol raises it.
Use it for:
Matching instruments or recordings that aren’t tuned precisely to concert pitch
Correcting for a track recorded slightly sharp or flat
Creating deliberate tuning offsets between multiple instrument instances
Producing slow beating against another sustained instrument
Interactions: Master Tune shifts the complete instrument while preserving the internal tuning relationships among the oscillators and layers.
It shouldn’t be confused with the Frequency controls for Oscillators 2 and 3. Those controls change the pitch relationship inside the sound. Master Tune moves the entire sound together.
Tip: When layering two instances of Memorymode 2, leave one at center and adjust the other very slightly. A small tuning difference can create broad, natural movement without using chorus.
Glide
Glide, also known as portamento, creates a continuous pitch slide between notes rather than jumping instantly from one pitch to the next.
Glide On/Off
Function: Enables or disables Glide.
When Glide is disabled, notes move immediately to their new pitches. When enabled, pitch changes occur gradually according to the Glide control.
Glide Amount
Function: Sets how long the pitch transition takes.
Lower settings produce quicker slides. Higher settings create slower, more pronounced movement.
Sound: Short Glide settings add a subtle connection between notes. Longer settings create obvious sweeps, swoops, and classic analog lead effects.
Interactions: Glide behavior is influenced by the selected Keyboard Mode and voice-assignment mode.
In Mono and Unison modes, Glide produces the familiar monophonic portamento effect as one note moves into the next.
In Poly modes, the result depends on how notes are assigned to the available voices. The four legacy Poly modes provide different voice-memory and reset behaviors specifically because these differences become audible when Glide is used.
Mult Trig also changes the articulation of gliding Mono and Unison lines:
With Mult Trig enabled, each new note restarts the envelopes while pitch glides.
With Mult Trig disabled, legato notes glide without restarting the envelopes.
Tip: For a classic legato lead, select Mono Mode 1, disable Mult Trig, enable Glide, and use a moderate Glide setting. Overlapping notes will slide smoothly through one continuous filter and volume contour.
Tip: For a more articulated sound, enable Mult Trig. The pitches still glide, but every note receives a new envelope attack.
Chord Mode
Chord Mode memorizes a chord and lets you transpose the complete chord shape from a single key.
This is useful for chord stabs, house and techno patterns, stacked intervals, soundtrack gestures, and any situation where a complex voicing needs to be moved around the keyboard quickly and consistently.
Chord Mode stores the interval relationships among the notes rather than one fixed absolute chord. After the chord is learned, playing any single key transposes the stored shape to that position.
Programming a Chord
Click the Chord Mode button.
The LED flashes to indicate that Memorymode 2 is waiting for a chord.
Play and hold the desired chord on your MIDI controller or the onscreen keyboard.
The chord can contain simple intervals, triads, seventh chords, clusters, octave stacks, or any other collection of notes within the available polyphony.
Release all of the notes.
Memorymode 2 memorizes the chord. The Chord Mode LED remains steadily lit to indicate that Chord Mode is active.
Play a single key.
The complete memorized chord sounds and is transposed according to the key you play.
Play different single notes to move the chord shape around the keyboard.
The stored chord remains active until Chord Mode is disabled or a new chord is programmed.
Replacing the Stored Chord
To memorize a different chord:
Turn Chord Mode off.
Click Chord Mode again to enter chord-learning mode.
Play and release the new chord.
The new chord replaces the previous one.
Disabling Chord Mode
Click the Chord Mode button while it’s active.
The LED turns off, and the keyboard returns to normal note entry.
Chord Mode Ideas
One-Finger Stabs
Program a minor, minor-seventh, or suspended chord and use a short VCA envelope.
The entire voicing can then be played rhythmically with one finger, leaving the other hand free for filter, modulation, or effect changes.
Open Fifths and Octaves
Chord Mode isn’t limited to conventional chords. Store a root, fifth, and octave for a powerful interval stack that remains harmonically useful across many notes.
This works especially well for basses, leads, and cinematic unison sounds.
Wide Cinematic Voicings
Program a chord spread across several octaves rather than keeping every note close together.
Combine it with the dual-layer architecture so one layer supplies a solid center while the other adds a wider or brighter version of the chord.
Chord Mode and Unison Detune
Add a modest amount of Unison Detune to make the memorized chord broader and more animated. Large voice stacks and wide chord voicings can consume voices quickly, so use enough density to create the desired impact without turning every key press into an overwhelming cacophony of sound.
Chord Mode and Layering
Give the Upper and Lower layers different oscillator ranges, filter contours, envelope timing, or effects. A single played key can then trigger a complete chord built from two contrasting sounds. One layer might provide the attack while the other supplies a sustained pad or effect tail.
Performance Tips
Use the Wheels as Part of the Patch
A factory preset may sound intentionally restrained until the Mod wheel is raised or the Pitch wheel is used. When auditioning sounds, move both wheels and apply pressure if the controller supports it.
Match Glide to Envelope Timing
Long Glide with very short envelopes can produce disconnected pitch swoops. Long envelopes with very short Glide may make the slide nearly disappear. Adjust Glide and envelope timing together so the pitch movement remains audible for the duration of the note.
Keep Chord Voicings Clear
A stored chord played through two dense three-oscillator layers can become crowded quickly. Try reducing oscillator levels, using different filter slopes for the two layers, or placing one layer in a higher octave.
Save Performance Settings with the Preset
Octave selection, Bend Depth, Glide, Chord Mode, modulation behavior, and related performance settings are part of the sound’s playing experience. When a patch relies on a particular chord, wheel range, or Glide response, save it as part of the preset so it behaves correctly the next time it’s loaded.