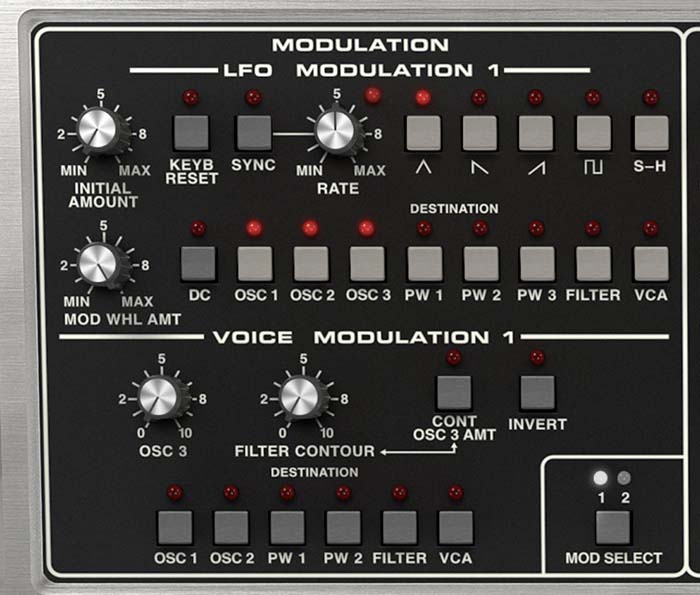
Memorymode 2 includes two complementary modulation systems: LFO Modulation and Voice Modulation.
LFO Modulation uses a shared low-frequency oscillator to move all active voices in a layer together. It’s ideal for unified vibrato, tremolo, pulse-width movement, rhythmic filter sweeps, and other effects that should follow one common cycle.
Voice Modulation works independently inside each voice, using that voice’s Oscillator 3 and Filter Envelope as modulation sources. This allows each note in a chord to develop its own movement, much like the Poly-Mod systems found on some classic programmable polysynths.
Memorymode 2 expands this architecture with two complete modulation setups per layer: Modulation 1 and Modulation 2. Both remain active at the same time, giving each layer two LFOs and two parallel Voice Modulation paths.
With both Upper and Lower layers active, a preset can contain four independent modulation setups. Things can become animated rather quickly.
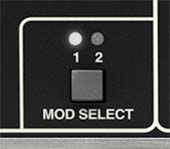
Mod Select
Function: Chooses whether Modulation 1 or Modulation 2 is currently displayed and available for editing. The LEDs above the button indicate the selected setup.
Important: Mod Select doesn’t turn either setup on or off. Both modulation systems remain active simultaneously. The button simply changes which set of controls is shown on the panel. Every parameter is stored independently for Modulation 1 and Modulation 2. Each Upper and Lower layer also stores its own pair of modulation setups.
Tip: Use Modulation 1 for the patch’s basic motion, such as slow pulse-width animation or vibrato, and reserve Modulation 2 for a contrasting rhythmic effect or a performance-controlled flourish.
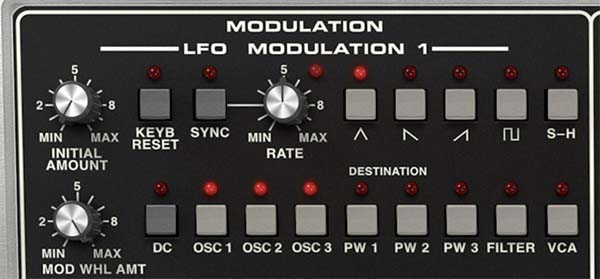
LFO Modulation
Each modulation setup includes its own low-frequency oscillator. The LFO produces a repeating control signal that can be routed to one or more destinations. Because the LFO is shared across the layer, all sounding voices receive the same modulation cycle. A held chord therefore rises, falls, pulses, or vibrates as a unified group.
Initial Amount
Function: Sets the baseline depth of LFO modulation, before any additional amount is introduced by the Mod Wheel.
Sound: At minimum, the selected LFO produces no audible modulation unless the Mod Wheel adds some. Increasing Initial Amount makes the modulation active continuously.
Interactions: Initial Amount works together with Mod Wheel Amount.
Use Initial Amount for modulation that should always be present.
Use Mod Wheel Amount for modulation that should be introduced or increased during performance.
Use both when you want a small permanent amount with additional depth available from the wheel.
Tip: For natural vibrato, set a very small Initial Amount and use the Mod Wheel to increase it only when needed.
Keyb Reset
Function: Restarts the LFO waveform from the beginning of its cycle when a new phrase begins. Because the LFO is shared by the entire layer, Keyb Reset behaves monophonically. It resets only when a note is played while no other notes are currently held.
Sound: With Keyb Reset disabled, the LFO runs continuously in the background, and each note enters at whatever point the waveform has reached. With Keyb Reset enabled, each new phrase begins from a consistent modulation position.
Interactions: Keyb Reset is particularly useful with sawtooth, square, and sample-and-hold waveforms, where the starting position is easy to hear. It also helps synced modulation line up predictably with played notes.
Tip: Enable Keyb Reset for rhythmic pulses, repeated filter movements, and one-note sequences that need consistent timing. Disable it for pads and drifting textures where variation from note to note is desirable.
Sync
Function: Locks the LFO Rate to tempo.
In the standalone version, Sync follows Memorymode 2’s internal tempo. When used as a plug-in, it follows the host DAW’s project tempo.
Sound: Synced modulation repeats in musical divisions rather than free-running frequencies.
Interactions: When Sync is disabled, Rate is freely adjustable from slow sweeps into audio-rate territory. When Sync is enabled, Rate selects rhythmic note values.
Tip: Use Sync for tremolo, filter pulses, alternating pitch patterns, and other modulation that should reinforce the groove. Leave it off for vibrato, slow drift, and movement that should float independently of the tempo grid.
Rate
Function: Sets the speed of the selected LFO.
Sound: Low settings create gradual sweeps and slow movement. Medium settings produce familiar vibrato, tremolo, and pulse-width modulation. High settings enter the audio range and can create rough, metallic, or FM-like coloration.
Interactions: When Sync is enabled, Rate selects tempo divisions. When Sync is disabled, it controls the LFO frequency directly. The LED near the Rate control flashes in time with the current LFO cycle.
Tip: Don’t overlook very slow rates. A modulation cycle that takes several seconds can add life to a pad without sounding obviously like an LFO.
LFO Waveforms
Only one waveform can be selected within each modulation setup. Modulation 1 and Modulation 2 offer slightly different waveform choices, allowing them to complement one another.
Modulation 1 Waveforms
Triangle - Smooth, symmetrical rising and falling movement. Use it for Vibrato, tremolo, pulse-width modulation, gentle filter sweeps, and any effect that should move evenly in both directions.
Falling Sawtooth - Gradually moves in one direction, then snaps back to the beginning. Use it for Repeating downward pitch sweeps, rhythmic filter falls, and descending modulation patterns.
Rising Sawtooth - Gradually rises, then snaps back. Use it for Rising pitch ramps, repeating filter openings, and upward rhythmic motion.
Square - Alternates abruptly between two levels. Unlike the smoothly changing waveforms, square modulation jumps instantly between states. Use it for Trills, octave alternation, rhythmic switching, pulsing filter or VCA effects, and mechanical step-like motion.
S-H - Produces a new random value at each LFO step and holds it until the next step. Unpredictable stepped movement. Use it for Random pitch sequences, filter burbles, computer-like effects, and unstable modulation.
Modulation 2 Waveforms
Sine - Smooth and rounded, similar to triangle but with softer transitions at the top and bottom of the cycle. Use it for: Natural vibrato, gentle filter motion, smooth tremolo, and subtle modulation that shouldn’t feel sharply mechanical.
Falling Sawtooth - Produces a repeating downward ramp followed by an instantaneous reset.
Rising Sawtooth - Produces a repeating upward ramp followed by an instantaneous reset.
Opposite-Phase Square - Alternates between the same two levels as the Modulation 1 square wave but begins on the opposite phase. When both LFOs run at the same Rate and are reset together, one square wave is high while the other is low. Try routing the two opposite-phase square waves to different layers, oscillator levels, filter settings, or stereo-related parameters for alternating call-and-response effects.
S-H - Produces stepped random modulation independently from the S-H waveform in Modulation 1. Because the two modulation setups have separate rates and random streams, using both S-H sources can create complex, irregular motion that takes a long time to repeat.
Mod Wheel Amount
Function: Sets how much additional LFO modulation can be introduced by the MIDI Mod Wheel.
Sound: Higher settings give the wheel greater control over the selected destinations. At minimum, the wheel adds no modulation from that setup.
Interactions: Mod Wheel Amount adds to the modulation established by Initial Amount.For wheel-only modulation, set Initial Amount to minimum and raise Mod Wheel Amount. For continuous modulation with additional performance control, raise both.
Because Modulation 1 and Modulation 2 have independent Mod Wheel Amount settings, the wheel can control two different modulation effects at once.
Tip: Set Modulation 1 to add gentle vibrato and Modulation 2 to open the filter. One wheel gesture can then introduce both pitch expression and brightness in carefully balanced amounts.
DC
Function: Replaces the selected LFO waveform with a steady control value. DC stands for direct current. Instead of constantly rising and falling, the modulation signal remains fixed and is controlled by the Mod Wheel and Mod Wheel Amount.
Sound: DC doesn’t create automatic movement. It turns the Mod Wheel into a direct manual controller for the selected LFO destinations.
Use it for:
Manual filter sweeps
Pulse-width control
Oscillator pitch changes
VCA level control
Static parameter offsets introduced during performance
Interactions: Mod Wheel Amount limits the maximum range of the wheel, allowing the movement to be carefully scaled. When DC and the VCA destination are selected, Memorymode 2 adjusts the available VCA range so that the Mod Wheel can increase volume even if the VCA Sustain setting is already high.
Tip: Use DC with Filter as a simple performance macro. Set a moderate Mod Wheel Amount so the wheel opens the filter expressively.

LFO Destinations
Multiple destination buttons can be active simultaneously.
Osc 1, Osc 2, and Osc 3
Function: Route LFO modulation to the pitch of the selected oscillator.
Sound: Small amounts create vibrato. Larger amounts produce sirens, trills, wide pitch sweeps, and audio-rate frequency modulation.
Tip: Modulate only one oscillator for harmonic movement while the others hold the central pitch. Modulating all three together produces conventional whole-patch vibrato.
PW 1, PW 2, and PW 3
Function: Route LFO modulation to the Pulse Width of the corresponding oscillator.
Sound: Creates animated harmonic movement in the pulse waveform, ranging from subtle thickening to dramatic nasal sweeps.
Interactions: The pulse waveform must be enabled for the result to be heard.
Tip: Use different LFO rates from Modulation 1 and Modulation 2 on separate oscillators. The pulse widths will move independently, creating a richer result than modulating all three from one source.
Filter
Function: Modulates the VCF Cutoff frequency.
Sound: Triangle or sine waves create smooth wah-like movement. Sawtooth waves produce repeating rises or falls. Square waves create abrupt two-position filter switching. S-H produces stepped random tone changes.
Tip: Use a low Rate and shallow depth for gentle animation. For synced rhythmic filtering, choose a sawtooth or square wave and enable Keyb Reset.
VCA
Function: Modulates amplitude.
Sound: At moderate rates, this creates tremolo. Square waves produce hard rhythmic gating, while sawtooth waves create repeating swells or fades. At high rates, VCA modulation introduces rough, buzzy amplitude-modulation effects.
Tip: Use opposite-phase square waves from Modulation 1 and 2 on different layers to alternate their levels rhythmically.
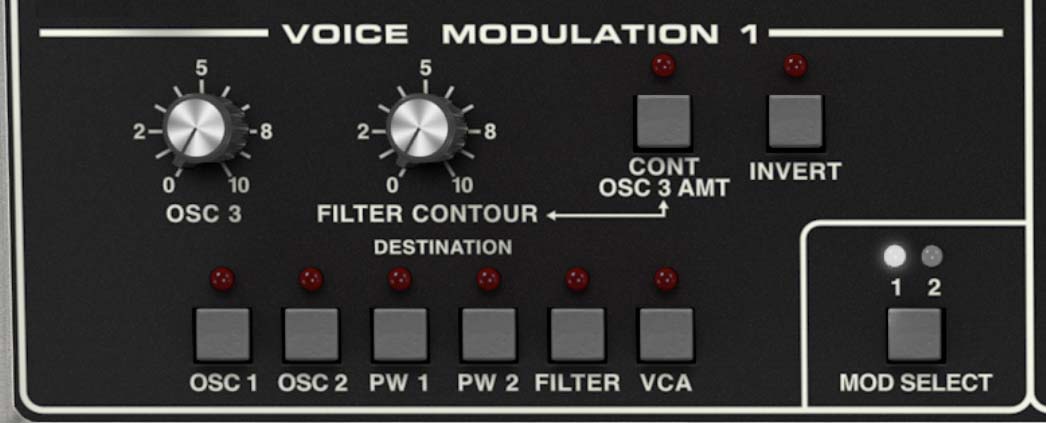
Voice Modulation
Voice Modulation uses the Oscillator 3 and Filter Envelope belonging to each individual voice. This is fundamentally different from LFO Modulation. The LFO is shared across the layer, so all notes move together. Voice Modulation is polyphonic, so every note in a chord has its own modulation sources. If notes begin at different times, their Oscillator 3 cycles and Filter Envelopes can develop independently. This creates complex internal movement that a single global LFO can’t reproduce.
Each Modulation setup contains its own Voice Modulation routing and amounts.
Osc 3
Function: Sets the amount of modulation supplied by Oscillator 3.
Interactions: Oscillator 3’s controls in the Oscillator section determine the character of the modulation.
For conventional low-frequency modulation:
Enable Oscillator 3 Low.
Turn down Oscillator 3 in the Mixer if you don’t want to hear it directly.
Disable Keyboard Control for a consistent modulation rate across the keyboard.
Leave Keyboard Control enabled when you want the modulation rate to rise with played pitch.
Disable Low to use Oscillator 3 at audio frequencies.
Sound: At low frequencies, Oscillator 3 can create per-voice vibrato, pulse-width movement, filter sweeps, and tremolo. At audio frequencies, it produces metallic, bell-like, growling, and aggressively synthetic modulation.
Tip: Route Oscillator 3 to Filter with Low enabled and Keyboard Control disabled. Play a chord one note at a time. Each note begins its own sweep cycle, creating a lively, loosely synchronized texture.
Filter Contour
Function: Sets the amount of Voice Modulation supplied by the Filter Envelope.
Sound: The selected destinations follow the envelope’s Attack, Decay, Sustain, and Release shape.
Interactions: The Filter Envelope can control the filter directly through the VCF Contour Amount and simultaneously act as a Voice Modulation source.
To use it only for Voice Modulation, set the main VCF Contour Amount to zero.
Tip: Route Filter Contour to Oscillator 2 while Sync 2 To 1 is enabled. The envelope sweeps Oscillator 2’s pitch, producing the classic tearing oscillator-sync effect.
Cont Osc 3 Amt
Function: Allows the Filter Envelope to control the amount of Oscillator 3 modulation. When enabled, the Osc 3 amount knob is bypassed. The Filter Contour setting determines how strongly the envelope shapes the depth of Oscillator 3 modulation.
Sound: Oscillator 3 modulation can fade in, fade out, peak briefly, or evolve according to the Filter Envelope shape.
Use it for:
Vibrato that appears gradually
Audio-rate modulation that intensifies during the note
Filter movement that blooms after the attack
Tremolo that fades away
Laser-like pitch and sync effects
Tip: Set Oscillator 3 to an audio range, route it to Oscillator 1 or 2, enable Cont Osc 3 Amt, and use a slow Filter Envelope Attack. The sound will begin relatively stable and become progressively more complex as the modulation depth rises.
Invert
Function: Reverses the polarity of the Voice Modulation signal.
Invert affects modulation from Oscillator 3 and Filter Contour.
Sound: An upward envelope movement becomes downward at the destination. Positive oscillator movement becomes negative, and vice versa.
Interactions: The exact result depends on the selected destination.
For example:
Filter Contour normally opens the filter. Inverted, it closes it.
An upward oscillator pitch sweep becomes downward.
VCA modulation reverses its direction.
Tip: Use normal Voice Modulation in one setup and inverted modulation in the other. When both address related destinations, the result can create push-pull motion rather than simply adding more of the same sweep.
Voice Modulation Destinations
Multiple destinations can be enabled at once.
Osc 1 and Osc 2
Function: Route Voice Modulation to oscillator pitch.
Sound: Filter Contour creates envelope-driven pitch sweeps. Oscillator 3 creates per-voice vibrato or audio-rate frequency modulation.
Use it for: Sync sweeps, pitch envelopes, bells, metallic tones, percussion, and effects. Oscillator 3 isn’t offered as a pitch destination because it serves as the modulation source.
PW 1 and PW 2
Function: Route Voice Modulation to the Pulse Width of Oscillators 1 and 2.
Sound: Filter Contour creates pulse-width changes that evolve over the life of each note. Oscillator 3 produces independent per-voice pulse-width cycling.
Interactions: The pulse waveform must be active on the destination oscillator.
Tip: Use the Filter Envelope for a pulse width that begins narrow and gradually opens, adding movement without changing filter cutoff.
Filter
Function: Routes Voice Modulation to VCF Cutoff.
Sound: Oscillator 3 creates per-note filter animation. Filter Contour adds an additional envelope path to the cutoff.
Tip: Combine a small amount of global LFO filter movement with per-voice Oscillator 3 modulation. The chord moves together broadly while each note also develops its own finer motion.
VCA
Function: Routes Voice Modulation to amplitude.
Sound: Low-frequency Oscillator 3 produces independent tremolo for each voice. Audio-rate modulation produces rough amplitude-modulation textures. Filter Contour can add envelope-shaped level movement beyond the normal VCA Envelope.
Tip: Use shallow Oscillator 3 modulation on VCA for ensemble-like movement. Because each voice has its own modulation cycle, sustained chords gently shift internally rather than pulsing as one block.
Programming Tips
Give the Two Modulation Setups Different Jobs
A useful starting strategy is to assign a clear role to each system.
For example:
Modulation 1: Slow free-running triangle modulation of pulse width.
Modulation 2: Synced rising sawtooth modulation of filter cutoff.
One creates continuous organic motion while the other contributes rhythm.
Build Movement on Two Time Scales
Use one LFO at a very slow rate and the other at a moderate rate. The slow source can shape Filter or Pulse Width, while the faster source adds subtle pitch or amplitude movement. Because their cycles differ, the patch feels more complex and less obviously repetitive.
Combine Global and Per-Voice Motion
Use LFO Modulation for broad movement shared by the entire chord, then add a smaller amount of Voice Modulation for independent note-to-note variation. This is one of the best ways to make pads and sustained chords sound alive without making them chaotic.
Create Complementary Square-Wave Patterns
Set Modulation 1 and Modulation 2 to the same synced Rate, enable Keyb Reset on both, and select their opposite-phase square waves. Route them to different destinations or layers. When one modulation signal rises, the other falls. This can produce alternating oscillator levels, stereo movement, filter responses, or rhythmic exchanges between the Upper and Lower layers.
Turn the Mod Wheel into a Multi-Parameter Performance Control
Set Initial Amount to zero in both modulation setups. Use Modulation 1 to route the wheel to oscillator pitch for vibrato. Use Modulation 2 in DC mode to route the same wheel to Filter or another destination. One gesture can then introduce vibrato and brighten the sound at different depths.
Use the Filter Envelope Without Filtering
Set the VCF Contour Amount to zero, then raise Filter Contour in Voice Modulation. The Filter Envelope becomes a dedicated polyphonic modulation envelope while the main filter remains stationary. Use it for oscillator sync, pulse-width movement, pitch envelopes, or VCA articulation.
Use Audio-Rate Modulation Carefully
Audio-range LFO and Oscillator 3 modulation can produce striking tones, but small control changes often have large effects. Start with low modulation amounts, especially when routing to oscillator pitch or VCA. Increase gradually while listening for useful harmonic relationships rather than simply turning every control.
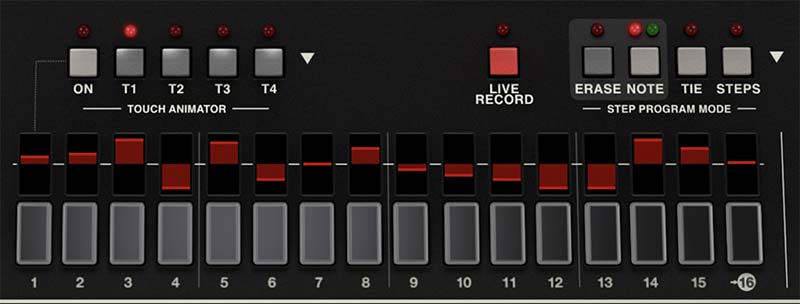
Touch Animator and Sequenced Modulation
The four bipolar Touch knobs at the upper left of the panel normally set the modulation amounts for the four Touch modulation slots. The Touch Animator takes that idea further by letting the Sequencer change those modulation amounts step by step.
When Touch Animator is enabled in the Sequencer, the Sequencer can act as a 16-step x 4-pattern modulation source, varying the amount of modulation applied by one of the four Touch modulation slots.
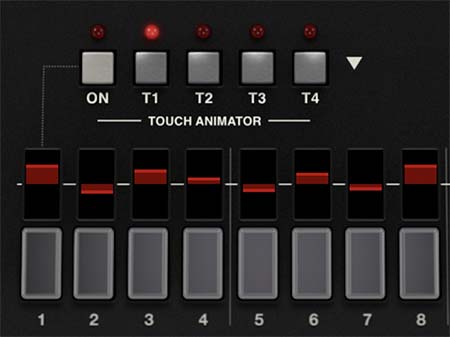
Controls:
• T1 – Animates the amount for Touch Mod slot 1.
• T2 – Animates the amount for Touch Mod slot 2.
• T3 – Animates the amount for Touch Mod slot 3.
• T4 – Animates the amount for Touch Mod slot 4.
For example, if Touch Mod knob 1 is routed to filter cutoff, enabling the Touch Animator and sequencing T1 lets the Sequencer vary the strength of that filter envelope movement on each step. Some steps can have a sharp, bright filter sweep, while others have little or none.
Refer to the "Motion Controls" chapter for details on how to use the Sequencer to control the Touch Animator.
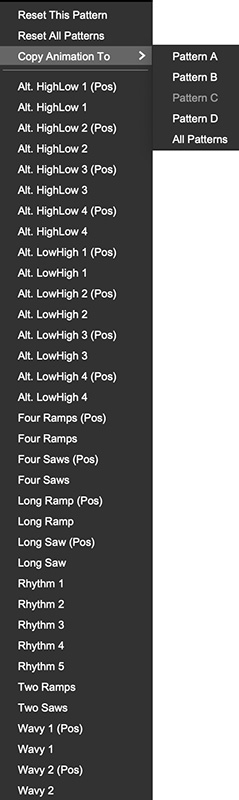
Touch Animator Shape Menu
The white triangle near the Touch Animator section opens a menu of preset motion shapes. These can quickly create step-based modulation patterns such as ramps, saws, alternating high/low shapes, waves, and rhythmic patterns.
Use these as starting points, then adjust individual steps by hand if needed.
Good uses:
• Ramp shapes for gradual builds
• Saw shapes for repeating rises or drops
• Alternating high/low shapes for pulsing motion
• Wavy shapes for smoother movement
• Rhythm shapes for more complex step emphasis
Tip: Load a preset shape, listen, then edit. The shapes are starting points. Refer to the "Motion Controls" chapter for details on how to use the Touch Animator and Sequencer to control modulation.
MPE
MPE, short for MIDI Polyphonic Expression, allows compatible controllers to send continuous, expressive touch control for individual notes instead of applying the same pitch bend, pressure, or controller movement to the entire instrument (generally known as channel aftertouch). That means one note in a chord can bend, brighten, or respond to pressure while the other notes remain unchanged.
To leverage the expanded potential of MPE, you need an MPE-compatible controller such as those from companies like Expressive E, Roli, Roger Linn Design, Haken Audio, Ableton, and others.
In previous Cherry Audio instruments such as Memorymode version 1, Dreamsynth, Sines, Miniverse, DCO-106 and others, the MPE implementation required the user to change to MPE mode in Settings, then map the controls in the MIDI MPE Control Tab.
In Memorymode 2, MPE is now more integrated into the modulation system. To use MPE, select MPE as the current Keyboard Mode (Poly > Poly Mode 6 - MPE). If MPE is not selected as the Keyboard Mode, Memorymode 2 won’t respond to MPE performance data from your controller, even if the controller is transmitting MPE correctly.
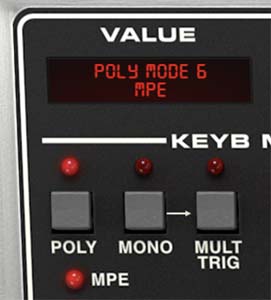
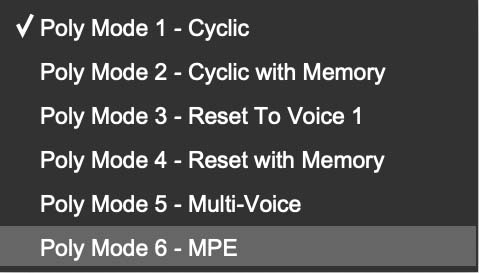
In MPE mode, Memorymode 2 responds to up to 15 polyphonic voices per layer (one MIDI channel is reserved for control information). Note that MPE mode is individually configured and assigned on a per layer basis.
Once MPE is enabled, the Touch Panels allow you to freely assign MPE V, MPE X, MPE Y, and MPE Z to modulation sources. Note that the assignable Touch controls 1 - 4 change to show V, X, Y, and Z, respectively.
Typical MPE sources:
• MPE V - Velocity
• MPE X – Often associated with left/right movement, commonly used for per-note pitch bends.
• MPE Y – Often associated with forward/backward or vertical touch-position movement, commonly used for timbral control.
• MPE Z – Usually associated with pressure.
Note: Other MPE dimensions such as strike and release are not directly supported in Memorymode 2.
Using MPE Musically
MPE is most powerful when used musically rather than as a technical demonstration.
Try these approaches:
• For pads, route MPE Z to filter cutoff or oscillator level so individual notes bloom inside a chord.
• For leads, route MPE X to pitch and MPE Z to vibrato depth or filter brightness.
• For digital keys, use MPE pressure or slide to add brightness, tremolo, or subtle pitch movement.
• For evolving textures, assign MPE gestures to filter cutoff, oscillator mix, formant-wave level, LFO depth, or effects mix.
Tip: The most musical MPE assignments usually feel like natural gestures: slide to bend or brighten, press to intensify, move along the playing surface to change tone.
A Note on MPE Controllers
Cherry Audio's Memorymode 2 includes several MPE presets, which were designed using a variety of MPE controllers. Consider the MPE presets included with Memorymode 2 as practical examples and starting points.
As MPE technology is still in its early stages, we've noticed that different manufacturers like Roli, Keith McMillan, Haken, and Expressive E have varying default implementations and interpretations of how MPE should function with their hardware. Some presets may require fine-tuning to align with your hardware or to suit your personal preferences for expressive performance.
For example, when using MPE to express filter frequency or pitch more effectively with certain controllers, you may need to increase some parameter values in the preset. Some controllers automatically map the MPE X dimension to pitch, so you might have to disable this mapping in the presets and save (overwrite) them to work better with your gear. Additionally, you may find you need to adjust the settings for the lower and upper ranges in the controller's configuration software. Consult your controller documentation for further details.