VCA
In a traditional synth, the VCA is “the part that makes it louder or quieter.” In SH-MAX, the VCA is still the amplitude stage, but it’s also something more important: it’s one of the three parallel signal lanes you can route sources into directly from the Mixer.
That means the VCA isn’t just the end of the chain. It’s a creative destination.
If you route a source to VCA in the Mixer, you are bypassing both filters entirely and sending that source straight into the amp lane. Because the VCA lane has its own effects chain, routing to VCA is not “dry and boring.” It’s “direct, punchy, and separately processable.”
Why Route Something Straight to the VCA?
Though it might seem unusual, sometimes you might want to route a sound source (VCO-1, VCO-2A, VCO 2B, Ring Modulator, or Noise) straight to the VCA. Why do this? Because you might want:
A full-bandwidth layer under heavily filtered tones
A bit of raw noise for percussive effects
A direct oscillator layer that keeps a patch present in a mix (think sine wave for weight and fundamental tone)
A parallel clean part of a sound blended with other filtered parts
Tip: VCA routing is one way to stop a patch from disappearing. If your filtered sound is gorgeous but gets swallowed in a dense track, route one oscillator quietly to VCA. You can regain definition without making the filter less interesting.
VCA controls
The VCA section includes several controls that shape how the amplifier behaves and how it responds to modulation and performance.
MOD (VCA modulation amount)
This sets how much a selected modulation source affects the VCA level. In other words: tremolo, pulsing, gating, and rhythmic level movement live here.
There’s also a small source selector associated with VCA modulation. This is where you choose what drives the VCA’s modulation: one of the orange lanes (LFO-1, LFO-2, S/H) or an envelope/manual source depending on what’s offered in that selector.
Musical uses:
LFO tremolo (smooth pulsing)
Repeating envelope gating (if you’re using LFO-triggered ADSR in non-Poly modes)
S/H amplitude jitter (for lo-fi instability or broken circuitry vibes)
HOLD
Hold sets a baseline level that the VCA will maintain. It sets how much the amp stays open even when the envelope closes. It lets you keep a continuous layer present while still using envelopes for articulation. It’s useful for drones, sustained ambience, and always-on texture beds. It allows you to add a direct VCA layer (from Mixer routing) that doesn’t fully disappear between notes. This control and function is available only in the non-Poly voice assign modes, and is otherwise grayed out.
Practical examples:
Set HOLD low and use an envelope for normal playing.
Raise HOLD to keep a pad alive even when notes release.
Use HOLD with noise routed to VCA for a gentle noise floor that follows your performance but never fully drops to silence.
Tip: HOLD is basically your drone knob. A low-level constant bed from VCA Hold can make a patch feel sustained and spacious without drowning it in effects like reverb or delay.
SENS
SENS controls how strongly the selected envelope drives the VCA. In plain terms, it’s your “envelope amount” for the amp. This matters because SH-MAX can behave like:
A fully envelope-controlled amp (classic synth behavior)
A partially held-open amp with envelope articulation on top
Or a modulated amp where envelope, LFO, and hold all contribute
Tip: If the patch feels too percussive, don’t only lengthen Release. Try lowering SENS and raise HOLD slightly.
DRIFT
VCA Drift adds a little per-voice level inconsistency, so that each note doesn’t land at exactly the same loudness or envelope shape. Think of it as analog behavior in the amplitude domain: the tiny inconsistencies you get when a vintage synth’s individual voice circuits never quite act identical.
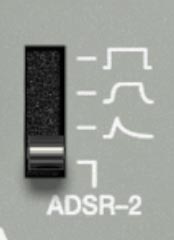
VCA Envelope Shapes
In the VCA section, you’re not locked into a full ADSR every time. This selector lets you choose ADSR-2, or any one of three preset amp envelope shapes.
Here’s what the four positions do (top to bottom):
1) Hard Gate (square shape)
Instant on, instant off. The sound jumps to full level the moment a note starts, and cuts the moment it ends. It's super-tight and percussive, but can feel abrupt. On very bright or click-prone patches, it can also sound edgy because there’s no fade-in/out. It's good for organ-style parts, tight sequences, choppy rhythmic lines, aggressive bass that needs to start and stop immediately.
2) Soft Gate (rounded shape)
Like Hard Gate, but with slightly softened edges. It still reaches full level quickly, but the start and end are smoothed. It keeps things tight while reducing the hard cut feeling. It often sounds more natural and less clicky on bright waveforms. It's useful for plucks that should stay clean, rhythmic parts that need precision without sounding harsh, and fast comping parts.
3) Pluck (spike + decay shape)
A quick hit that naturally falls away, with no sustained hold. Each note triggers a pre-shaped “thwack → fade” contour. It provides instant built-in articulation. Even if you hold the key, the level drops off like a struck or picked sound. It's good for classic synth plucks, pseudo-guitar/harp behavior, short melodic hooks, and percussive sequences.
4) ADSR-2 (full envelope control)
Uses ADSR-2 normally, so the amp behavior follows your Attack/Decay/Sustain/Release settings. It's good for anything where you want precise control over swell, sustain, release tail, or velocity feel.
VCA as a Parallel Lane
Because the Mixer lets you route each source to VCA, you can build patches that would normally require multiple synth instances or parallel buses.
Workflow 1: Punch layer + filtered body
Route VCO-1 quietly to VCA for direct punch or full harmonic body.
Route VCO-2A to VCF for sculpted tone.
Route noise to BPF for snap or breath.
Now you can animate filters aggressively while the VCA layer keeps the patch present.
Workflow 2: Direct noise bed behind a filtered tone
Route pink noise to VCA, very low level.
Use HOLD to keep a tiny constant bed.
Route oscillators to VCF/BPF for the tonal part. This adds air and a subtle noise floor that can make a patch feel vintage.
Workflow 3: Ring mod as a controlled layer
Route Ring Mod to VCA only if you want full-spectrum clang.
More commonly, route Ring Mod to BPF or VCF+BPF, then use VCA lane for your stable anchor. This keeps ring mod from taking over while still letting it add character.
VCA Modulation Recipes
1: Classic tremolo that doesn’t affect tone
Select LFO-1 as the VCA modulation source.
Set VCA MOD depth low to moderate.
Set LFO Rate to tempo-feel.
This gives you rhythmic motion without changing filter cutoff or oscillator pitch.
Tip: Tremolo sounds clean in a mix. If you want motion that survives compression and dense instrumentation, amplitude movement is usually the first place to go.
2: “Shaky tape” amplitude behavior
Select S/H as the VCA modulation source.
Set S/H Sample Time fairly fast.
Add Lag to smooth the steps.
Keep VCA MOD depth very low. Now you get subtle, irregular level movement that feels like unstable playback or analog circuitry.
3: Rhythmic gating using repeating envelopes (non-Poly modes)
Set ADSR Trigger Source to LFO-1.
Repeat ON.
Use ADSR-2 as the VCA envelope.
Shape ADSR for the gate rhythm you want. This creates rhythmic pulses that have a defined envelope shape, not a simple on/off chop.
Tip: This can replace a trance gate, but with taste. Short decay and low sustain gives you tight pulses. Longer decay and some sustain gives you breathing rhythmic swells.
Output and Limiter
SH-MAX patches can get big fast. But hey... that’s not a warning, it’s a feature. You’ve got multiple sources, three parallel lanes (VCF, BPF, VCA), and each lane has its own effects chain. It's no surprise then that it’s easy to build a patch that sounds huge and also accidentally overloads your DAW input.
The Output section is your last checkpoint. It gives you two things that matter in real-world use:
A stereo output meter (L/R), so you can see when you’re pushing too hard.
An Out Level control for final gain staging.
A Limiter switch to catch peaks and keep things under control.
Stereo Output Meter (L/R)
The meter shows your final output level after the internal signal path is summed. Use it as a sanity check, especially when you’re doing any of these:
Routing sources to VCF+BPF (because you’re summing two filtered versions of the same source)
Blending multiple sources across lanes
Using resonance-heavy filters (which can create big peaks)
Layering ring mod + noise + direct VCA sources
Tip: Watch the meter while you build, not after you finish. If you only check levels at the end, you’ll end up designing patches that feel great because they’re loud. The meter helps you keep your ears honest.
Out Level
Out Level is the final master volume for SH-MAX. It doesn’t change the internal tone, it just sets how hard you hit the outside world.
Practical guidance:
Tip: Set SH-MAX to unity-ish and mix responsibly. A good workflow is to keep Out Level in a sensible mid position, build your patch so the meter behaves, then mix in your DAW. If you crank Out Level to compensate for a low patch, you’re often masking an internal gain-staging issue (or an envelope/HOLD/SENS setting).
Limiter
The Limiter is your peak safety net. It’s there because SH-MAX can generate sharp transients and resonant spikes, especially if you have:
snappy envelopes
high resonance
ring mod clang
noise bursts
stacked parallel lanes
What it’s good for:
What it’s not for:
Fixing a patch that’s consistently too loud internally
Making a wildly overdriven patch clean
Replacing basic gain staging
Tip: Use the limiter as a safety belt. If the limiter is working all the time, the patch is probably too hot inside. Back down mixer faders first, then reassess.
Gain Staging
Because SH-MAX is parallel-capable, a patch can get louder without any single fader looking out of line. Here’s the clean approach that keeps tone intact:
Step 1: Start conservative at the mixer. Bring up one source at a time. Keep individual source faders around the middle while you choose routing and filter behavior.
Step 2: Expect level jumps when using VCF+BPF. Routing a source to VCF+BPF creates two processed versions and sums them. That will often be louder. That’s normal. Compensate by lowering that source’s fader a bit.
Step 3: Watch resonance spikes. Resonant peaks can add big level jumps at certain cutoff/frequency settings. If the meter suddenly leaps when you sweep a filter, that’s resonance doing its job. Compensate by lowering the source level feeding that filter lane, or by reducing resonance if the spike isn’t musically useful.
Step 4: Balance lanes like you’re mixing stems. Think of VCF, BPF, and VCA as three parallel stems you’re blending. If one lane dominates, you’ll fight level and tone at the same time.
Step 5: Use Out Level last. Once the patch is balanced and the meter looks okay, set Out Level to sit properly in your project.
Tip: The best patches are often quieter than you expect. If you build at a reasonable level, you’ll have more headroom for effects, layering, and mastering later. If you build everything at the edge of clipping, you’re probably headed for trouble.
Practical Output/limiter Scenarios
1: “My patch sounds good but it’s clipping”
Fix order:
Lower the loudest mixer source fader(s).
If you’re using VCF+BPF, lower those sources a bit extra.
Check resonance and reduce if it’s causing runaway peaks.
Only then, toggle the limiter if you still get occasional spikes.
Set Out Level for the final match.
2: “The limiter is always on and my patch feels squashed”
That usually means the patch is hot internally.
Lower mixer faders, especially any source routed to VCF+BPF.
Check VCA HOLD and SENS. Too much baseline level can keep everything pinned.
Reduce resonance if you’re building constant resonant emphasis. Then try the limiter again as a peak catcher rather than a constant compressor.
3: “My patch is quiet unless I crank the Out Level”
Before you crank Out Level:
Check VCA SENS (envelope might not be opening the amp much).
Check VCA HOLD (if it’s too low and sustain is low, the sound may decay too quickly).
Check mixer faders (you may have built with everything low to avoid clipping and forgot to rebalance). Once the patch behaves the way you want it to, use Out Level to place it in the mix.
A Couple of SH-MAX-Specific Tips
Tip: Parallel routing is loudness in disguise. You can create a bigger sound by layering lanes, but you’re also summing energy. Make headroom part of the sound design, not a clean-up chore.
Tip: Ring mod and noise love the limiter, but don’t let them drive it constantly. Those sources can create sharp peaks. The limiter is great insurance. Just keep those faders moderate so the limiter isn’t doing full-time damage control.