Unlike "control-per-function" synthesizers of the 70s that utilized a separate knob, slider, or button for each parameter, the original Chroma made use of a single data slider along with a multitude of membrane buttons and LEDs for parameter adjustment. This type of UI was very popular in the 80s, for a couple of reasons:
1) It drastically reduced the number of necessary physical knobs, sliders, or switch controls , which greatly reduced production costs.
2) As the complexity of instrument architecture ballooned, so did the number of necessary controls. This made it almost impossible for manufacturers to continue producing "control-per-function" user interfaces, as it would've necessitated an overwhelming number of physical controls, as well as making instruments prohibitively expensive.
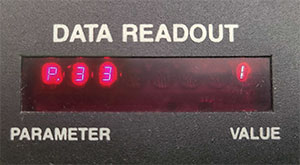
Specifically, the way the 80s-era single data-slider/many buttons instruments worked was that the parameter to be adjusted would be selected using a dedicated button (or worse, by selecting a "parameter number" with an LED display). For example, if you wanted to change the oscillator wave shape in the original Chroma, you'd press the #33 membrane button:
The teeny LED number display would show the current parameter number being adjusted and its value. In this case you'd choose value of 0, 1, 2, or 3 using the single PARAMETER CONTROL slider:
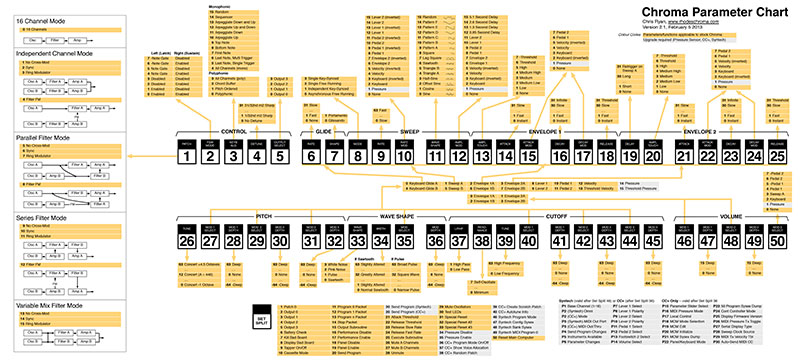
Obviously, the user would have no way of knowing which oscillator wave the value number selection corresponded to, so they would simply refer to this handy-dandy chart (!):
Stay with us here... now imagine having these kinds of arbitrary numbers for dozens of parameters, many consisting of menus with up to 16 choices. Most Chroma users had this chart printed out in a large format and laminated (and on the trip back from Kinko's, they probably made a second stop at Costco to pick up a 65-gallon drum of Excedrin).
To be fair, the Chroma certainly wasn't the only offender at the time - everyone jumped on the the single-data-slider bandwagon, including Yamaha, Korg, Roland, and Ensoniq. It's no accident that the control-per-function synths immediately preceding the single-data-slider era are generally considered far more desirable these days,
CHERRY AUDIO, MAKING A BRIGHTER TOMORROW
There was no way we were going to subject users to this kind of madness, so we put our heads together and created a much easier-to-navigate user experience while retaining all of the Chroma's awesome synthesis power. Obviously, having a large bank of microscopically changeable light (aka, your computer's display) made a friendly UI far more feasible. This was accomplished in a few basic ways:
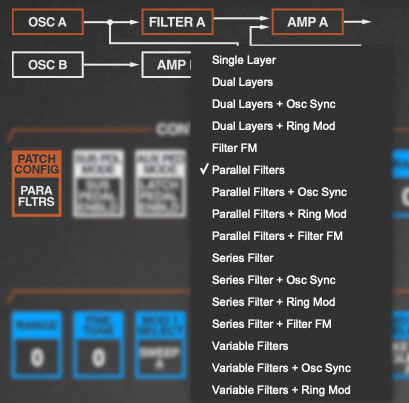
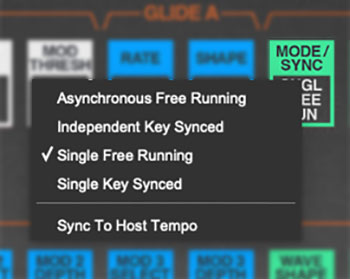
Roughly half of the buttons are used to choose a selection from a menu list. Instead of users selecting an arbitrary number, Cherry Chroma opens popup windows with text lists of clickable selections:
The remaining buttons are used to specify a value setting just like a regular knob or slider. On the original, you'd click the button, then move the single data slider to the desired setting.
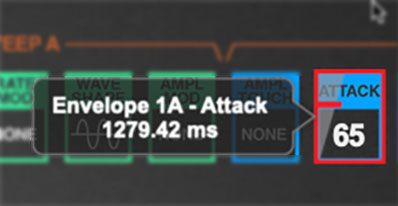
In Cherry Chroma, the button itself is the "slider" control. The current value is displayed in bold text, and the setting is varied by simply clicking and dragging directly on the control. When the mouse is positioned over the control, a more accurate numeric display will show in the popup tooltip and a red line and scale appear for additional visual feedback.
In the original instrument, the Parameter Program buttons did double-duty: not only did they specify the current sound edit parameter, they also were used to select the current patch preset, hence the 1-50 numbers printed on them (original instrument panel shown below): Since Cherry Chroma's preset browser operates independently of the parameter buttons, we were able to use the space on the buttons where the big numbers used to be to display either the current menu selection or numeric parameter values:
 This makes it MUCH easier to know what's going on with patches at a glance. On the original instrument, if you wanted to know what the current filter resonance setting was, for example, you'd have to make sure you were in sound edit mode, then hit button 38, then check the value in the teeny LED numeric display (and if you didn't have the values memorized, refer to your value chart). Yuck.
PATCH CONFIGURATION MENU AND BLOCK DIAGRAM
PATCH CONFIGURATION in the CONTROL section specifies the basic setup of Chroma's synthesis components. Its modular-like ability to rearrange the voice path is possibly the most significant aspect of what makes the Chroma special. (more about this in the Voice Architecture section, and specifics of each configuration in Appendix: Patch Configurations)
If you've been reading up to this point, it should come as no surprise that the original Chroma's 16 patch configurations were selected by clicking the PATCH CONFIG membrane button, then selecting a number from 0-15... and referring to the aforementioned chart to see what you were getting. More yuck.
Cherry Audio's Chroma adds block diagram images right above the PATCH CONFIG button that change to reflect the current voicing configuration. Its boxes also turn orange to indicate which voice path is currently being edited: A, B, or both A and B (or C, D, or both C and D for the Expander).
Additionally, the patch configuration selection menu can be opened either by clicking the PATCH CONFIG button or by clicking anywhere on the patch configuration block diagram. See how we thought of everything?