AirStep is a digital oscillator that allows sampled waveforms to play in stepped, sequential patterns of up to 64 steps in length. Step durations can be controlled via internal or external clock source, and as you might expect, AirStep features a number of CV mod inputs as well as dual trigger outs, allowing external augmentation of patterns.
How It Works
AirStep includes close to 300 onboard wave samples. One of these waves is selected for each step of a pattern. Duration, crossfade percentage, level, and tuning can be specified for each step, and pattern length can be up to 64 steps. If "normal" Internal or External clock mode is chosen, AirStep plays through the sequence beginning at step one when a gate voltage is received. If the wave crossfade settings are at 0%, waves will abruptly transition from one to the next, creating a rhythmic feel. If longer crossfade settings are used, waves smoother transition, creating gently evolving textures.
If Manual clock mode is active, the entire pattern can be smoothly or abruptly swept with the Initial Position knob or via CV for wildly evolving tonal and melodic "swept wavetable" style effects. (AirStep is not a wavetable oscillator - in fact, its stepped waveform patterns do a whole lot more than wavetable synthesis, but we'll further explain this later.)
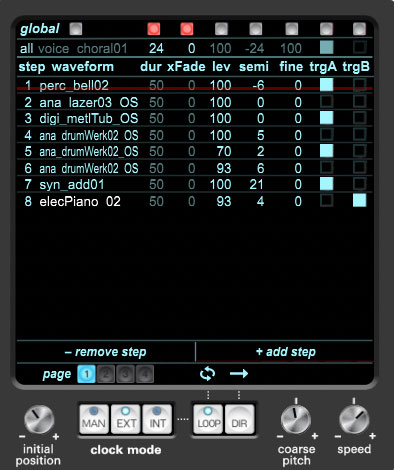
AirStep Pattern Control Section
This the giant section in the middle of module, and it's where sample waves and patterns are configured as well as how they'll play back.
Step- Patterns can be from 1-64 steps in length. The number of steps in the current pattern is displayed at the left of the screen. This isn't an adjustable parameter, per se, but steps may be added or removed using the -Remove Step and +Add Step buttons at the bottom of the window.
Waveform- Clicking waveform name area opens a pop-up menu where waves can be selected. These are subdivided into folders. Most of the waves will loop, allowing endless playback. Waves found in the One Shot and One Shot Reverse folders play for a finite time then stop.
Duration- Defines how long a wave will play with lower numbers playing shorter and higher numbers playing longer.
xFade- Any value over zero adds a crossfade from the current wave to the next, expressed in percentage. If crossfade is set to maximum, the crossfade begins at exactly the halfway point of the current step (50% setting), and ends at exactly the halfway point of the following step; the exact point in time is dependent upon each step's duration.
Level- Sets the volume of the current step.
Semi- Sets the basic range for the current step in semitones. Tuning range is up or down 36 semitones.
Fine- Fine pitch setting for detuning. Range is just over a fifth, up or down.
Trigger A/Trigger B- Enabling these boxes toggles two independent trigger CV at the very start of the step, sent to the Trig Out A and Trig Out B jacks, respectively. These have plenty of creative uses; the simplest would be triggering drum sounds. More applications open up by combining the trigger outs with a Cherry Audio Trig To Gate module.
Pro Tip: Using Trigger Outs For Clocking
The trigger outs were initially conceived as "one-shot" trigger sources for drum sounds, sequencer start/stop, etc., but enabling the trigger for all steps of a pattern effectively creates an external clock out. It isn't even necessary to enable the trigger box for each step - just click the Global button for Trg A or Trg B and check the box to enable it for all pattern steps. This makes syncing other modules to AirStep really easy. Patching this trigger out to a Clock Divider module and/or a Trigger to Gate opens up many creative possibilities. Furthermore, if you're using a module that needs a reset signal for accurate timing, enabling the other trigger out on pattern step 1 only works well.
-Remove Step/+Add Step- Clicking these adds or removes steps pattern steps.
Inserting, Adding, and Deleting Steps Between Existing Steps- This isn't a visible button or control, but right-clicking on a step number at the left side opens a pop-up allowing insertion of steps before or after the step number you've clicked on, or deletion of the step. Inserted steps will have the same settings as the currently clicked step.
Page 1/2/3/4- A pattern may be up to 64 steps in length, but AirStep's display can only display 16 steps at a time. If a patterns exceed 16 steps, the Page 2 button will become active and allow viewing of all steps. Additional Page buttons become active as more steps are added. The Step numbers in the left column and all parameters change to reflect the currently displayed steps. So much typing to explain something totally obvious, am I right?!?
Global buttons (Top Row)
The Global section contains a duplicate of the Waveform, Duration, xFade, Level, Semi, Fine, Trg A, and Trg B step controls, as well as a toggle button atop each parameter. If one or more of the buttons is engaged, the parameter settings in this row will override the individual step settings.
The idea behind global pattern controls is that the setting of some parameters are often the same for every step in a pattern (most commonly Duration and xFade). In this case, global controls save you from having to set a parameter to the same value for every step of the pattern. Because each Global button functions independently, it's easy to choose which parameters the global setting applies to.
Individual step settings will dim when a global button is engaged for a parameter, but step settings are retained (in case the Global button is bypassed).
Position, Clock, and Speed (Bottom Row)
The very bottom row of controls define how AirStep's patterns behave. We'll start in the middle, because we like to keep you on your toes!
CLOCK MODE
The Clock Mode setting determines the timing of pattern playback. The three modes are as follows:
Internal (INT)- Patterns are locked to AirStep's internal clock. This is the default setting.
External (EXT)- When an external sync signal is plugged into the Ext Syn In jack, patterns lock to incoming sync signals.
Manual (MAN)- Manual sync mode disconnects pattern clocking altogether, allowing manual control of wave position. All Duration step controls are disabled (including Global).
Initial Position and Position Mod CV input and attenuator- This is only active when Manual clock mode is selected. It defines the current static wave position and is visibly represented by the red horizontal display line.
The knob range for each wave is divided across the knob throw according to the number of waves in the current pattern. For example, if the current pattern contained two waves, the first half of the knob range would represent the first wave, and the second half of the knob range would represent the second wave. If the current pattern contained four waves, the knob range would divide over four sections, and so on, up to AirStep's 64-step maximum.
Since xFade settings represent a percentage (i.e. not a time value), step xFade settings apply to wave transitions in manual clock mode as with internal and external modes.
If you're using one-shot samples in manual clock mode, you'll find that samples initiate playing one time just as the wave position "arrives." It's a little tricky, but suffice to say, our programmers did a bang-up job of making this work really well - it's one of those things that just behaves how you'd want it to.
Initial position can be CV-controlled using the Position Mod CV input and attenuator. CV modulation works in conjunction with the current setting of the Initial Position knob.
Initial Position/Manual Clock Mode Pro Tip
"Shutting off" clock and using Manual mode is useful for setting pitches one step at a time when creating melodic patterns. You can take this idea further by enabling the Global button for xFade and setting it to zero; this guarantees that each wave plays discretely (i.e., not partially blended with the preceding or following wave). Once pitches are set, the Global xFade button can be toggled off.
Loop- Enabling loop causes the pattern to return to step 1 following the last pattern step. The pattern will end at the last step with Loop disabled, but will continue to play the last wave step (as an analog-style oscillator would) if the waveform is looped. If the last step's waveform is a "one-shot" (i.e., non-looping), the wave plays and sound stops at the final pattern step.
Direction (DIR)- The Direction button toggles through three step playback orders: forward (1-2-3-4, etc.), reverse (4-3-2-1, etc. ), and forward and reverse (1-2-3-4-3-2-1).
Speed and Speed Mod input and attenuator- The Speed works in conjunction with the pattern window Duration settings and acts as an overall multiplier or divider, affecting the entire pattern playback rate. It's used to speed up or slow down the entire pattern without tweaking the Duration settings for each step.
The Speed knob is voltage controllable via the bipolar CV jack and attenuator to its right.
Inputs, Outputs, and Controls
This is everything else on left and right side of AirStep that we haven't covered thus far.
Pitch CV jack- Accepts a CV input for pitch. Typically this would come from the Pitch jack in the IO Panel CV Sources section, or from a sequencer pitch CV out.
Gate CV jack- Accepts a standard +5V gate voltage input, typically from the IO Panel CV Sources section, or from a sequencer gate output. The Gate input is used to initiate pattern playback when Internal or External clock mode is selected. If Manual clock mode is selected, the Gate jack is effectively disconnected.
Ext Sync In jack- Used in conjunction with Clock Mode/Ext, this accepts a 96 PPQN sync signal to allow external clocking of patterns. It's not a clock input like you'd see an analog step sequencer (one clock= one sequencer step). It can be used with sync signals from either the IO panel Transport/Sync Out jack, or a Sync Generator module if you're using the standalone version of Voltage Modular. The sync signal can also be multed to a Sync Divider module if you're like to lock up to modules that expect to see standard "slow" clock signals.
With the Speed knob zeroed (center position), a pattern step duration setting of 24 is equal to a quarter-note. (48 = half-note, 16 = eighth-note, etc. We trust you to do the rest of the math.) When the clock mode is set to Manual, the Speed knob is quantized to integer values. This makes it easy to multiply or divide the overall pattern rate to rhythmic playback values that make musical sense.
Frequency Mod CV input and attenuator- Allows negative or positive pitch modulation. It's applies to all waves equally and has range of five octaves, up or down. That should be plenty!
Ext In A/B jacks- The Ext In jacks let you use an externally patched signal at any step. To use an Ext In jack, plug a source into the desired jack, click a waveform name in the pattern area and select External Input A or B at the top of the pop-up menu list.
At the risk of pointing out the obvious, make sure the external audio source is making noise when the pattern step plays. This isn't an issue if the source is an oscillator or something else that sounds continuously, but it can be if the sound source is a drum/percussion hit or other quick sample. In this case, one of the trigger outs could be used to fire off the sound at the appropriate time. See how we thought of everything?
Trig Out A/B jacks- These are the trigger output jacks corresponding to the Trg A and Trg B buttons described in the AirStep Pattern Control Section above.
Out- AirStep's audio output jack.