The Cherry Audio Sampler II is a unique, retro-inspired digital sampler module, designed with creativity at the fore. It's useful for musical tones, drum loops, droning effects and more, and allows instant user sampling, import, and storage of sounds.
We usually try explain panel controls from top to bottom, or left to right, but here we'll go over things in a way that'll make the most sense for learning how to use Sampler II.
Concept
Though it bears a resemblance to a classic 80s sampling keyboard, Sampler II works a little differently. It can hold one sample at a time, and can play back one note at a time. And because it has no onboard amplifiers or envelope generators, it's best to think of it more as a sophisticated digital oscillator (as opposed to a self-contained sampling instrument). Since samples don't necessarily play continuously as a standard oscillator would, we've included a few different trigger modes to accommodate different ways you might to use it.
Audio and CV Inputs and Outputs
Keyb CV- Standard 1V/octave CV input for pitch control.
Gate- Standard 5V gate input for initiating sample playback. This operates a little differently depending on the currently selected Trigger Mode.
Master Volume- This is an output volume control. Center position is unity, and turning it adds up to 12db of additional gain, which is useful if a sample is really quiet.
Left / Right Stereo Outputs- These are the audio outputs, but you knew that.
File Section
This is where existing audio samples can be loaded, and currently loaded samples can be saved and exported. Sampler II can load and play samples in AIF, WAV, MP3, and OGG formats. User samples are in WAV format at 32-bit/48kHz resolution.
Load- Opens a standard dialog for loading raw samples or .voltagesample files, which contain samples as well as the following settings:
Trigger Mode
Sample Start, End, and Loop Point settings and CV modulation attenuator settings
Snap To Transient, Crossfade Length, and Loop Enable button settings
Tune section Octave, Fine, and CV modulation attenuator settings
Sample Rate/Bit Depth section Rate, Bit Depth and CV modulation attenuator settings
Save- Saves .voltagesample files detailed in above.
Export- Exports the entire current sample in WAV format. The exported sample is not affected by Sample Start, End, or Loop Enable control settings (or any other Sampler II settings). The exception is that if a sample has been cropped or normalized, it will export that way.
Trigger Mode
This affects how samples play back when a gate voltage is received. It's important to understand how the trigger modes work to best use Sampler II, so now's the time to turn off Celebrity Big Brother and hunker down.
As mentioned earlier, it's best to think of Sampler II as a sort of big bad sampling oscillator (as opposed to a self-contained instrument), because it doesn't have its own envelope generators or amplifiers. Though it can be used on its own, it's best to create a standard subtractive synth patch where Sampler II's output is patched to filter and amplifier modules, with the amplifier module controlled by an envelope generator, like this:
The way the Trigger Modes function may initially seem counterintuitive, but as you use Sampler II, they'll make more sense, we promise!
Normal- In Normal mode with Loop Enable off, a sample plays from start to finish when 5V is present at the Gate input. The sample plays until the end point regardless of the voltage at the gate input. This is often referred to as "one-shot" playback.
If Loop Enable is on, when 5V is present at the Gate input, the sample plays from start to finish, then jumps to the loop point and continues loop playback (from loop to end) indefinitely.
In conjunction with the Sampler>Filter>Env>Amp patch shown above, Normal mode is useful for playing standard pitched sounds, particularly with looping enabled. The idea is that Sampler II outputs sound continuously while the envelope generator/amplifier combo articulates the amplitude curves of each note. Each time a key is played, the pitch changes to the incoming pitch CV and the new gate voltage restarts playback from the sample start point while retriggering the envelope generator(s).
Gate- Gate mode works much like Normal mode, but instead of playing continuously when a voltage is applied to the gate input, sample playback only occurs when a gate voltage is present. With Loop Enable off, the sample plays from the sample start point until the end as long as a gate voltage is present. If Loop Enable is on, playback jumps to the loop point, and the sample plays continuously from the loop point to the end as long as a gate voltage is present.
Gate mode is useful when Sampler II is used by itself, as the on/off nature of the gate effectively functions as a basic on/off organ-style envelope. It's also useful for drum loops when a complex volume envelope isn't needed.
Drone- The sample plays back continuously and the Gate CV jack is effectively disabled. This is useful for sound effects beds, background noises, etc. Loop Enable is automatically engaged and cannot be disabled in Drone mode.
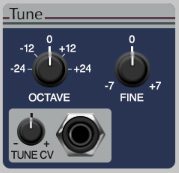
Tune Section
Octave- Allows transposition of sample playback up or down up to two octaves.
Fine- Allows fine tuning by just over a fifth interval, up or down.
Tune CV jack and attenuator- Allows bipolar CV control of pitch, up to five octaves up or down. You can get pretty crazy with this.
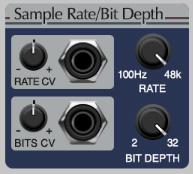
Sample Rate/Bit Depth Section
Rate- Allows adjustment of sample rate from 48 kHz down to 100Hz. This is a playback parameter, so it won't permanently alter sample data (but it'll temporarily make a real mess). There is no anti-aliasing filtering applied; at lower sample rate settings, you'll hear delicious digital aliasing noise above the playback rate frequency, just like a vintage sampler. The Rate setting can be modulated with the Rate CV mod jack and bipolar attenuator.
Bit Depth- Sets the bit rate of sample playback from 32 bits down to a grunky 2 bits. As with Rate, Bit Depth is a playback parameter that won't alter stored sample data. Its setting can be modulated with the Bits CV mod jack and bipolar attenuator.
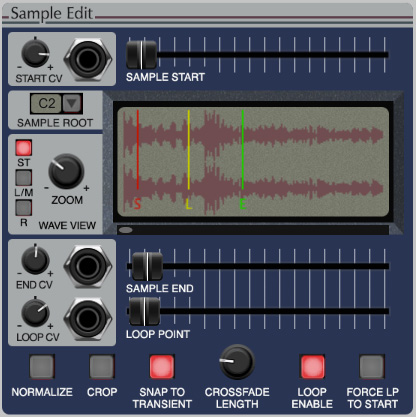
Sample Edit Section
Here's where the action happens. This where sample start, end, loop points, and other parameters affecting sample playback are set. We'll jump around this section a bit to best explain its operation.
Sample Root- As its name implies, this sets the root position for the current sample. Click on the down arrow button to choose a note value. C2 corresponds to a 2V keyboard CV input, and plays the sample at its native pitch at MIDI note C2.
Sample Start- Sets the sample playback start point. The sample number appears in the tooltip as the slider is moved. As with any control in Voltage, it will move in finer increments by holding down the Command key in OS X, or the Option key in Windows. Sample Start may also be adjusted by grabbing the red start marker in the Wave View display. Sample Start position can be modulated in real time using the Start CV mod jack and bipolar attenuator.
Sample End- Sets the sample playback end point. Sample End may also be adjusted by grabbing the red end marker in the Wave View display. Sample End position can be modulated in real time using the End CV mod jack and bipolar attenuator.
Loop Point- With the Loop Enable button on, this sets the point at which sample playback loops. Looping always plays from the loop point to the end point, regardless of whether the loop point is set before or after the end point. This potentially translates to all kinds of forward/backward playback shenanigans - see "Pushin' Forward Back" section below. Loop Point can be modulated in real time using the Loop CV mod jack and bipolar attenuator.
Setting Sample Start, End, and Loop points: Note that the Sample Start slider's movement resolution stays constant regardless of the Wave View Zoom setting, but the resolution of the Wave View start marker increases as the Zoom size is increased. As a result, it's best to use the Sample Start, End, and Loop Point sliders for big adjustments, and to directly move the Wave View Start, End, and Loop markers for finer adjustments.
Wave View display and controls- Sampler II's Wave View screen makes it easy to see and edit samples. The view select buttons have no effect on sound, they only affect the current display.
ST- displays both left and right channels
L/M- displays the left channel, or the entire wave if a mono sample is loaded
R- displays the right channel of a stereo wave
Zoom- rotating clockwise magnifies the wave view. Use the Zoom knob in conjunction with the scroll bar thumb beneath the wave display for precise sample editing.
Normalize- This is a fancy term for "increase the overall volume of the sample so that the loudest peak is at 0 db." It's generally a good idea to hit the Normalize button if samples aren't very loud. Keep in mind that unlike compression or limiting, normalizing doesn't change the dynamics of a sample, it just proportionally raises the overall gain, and won't affect noise floor. Normalizing does not permanently edit samples loaded from your hard drive, but any exported or saved versions will retain normalization.
Crop- Deletes sample data before the start point and after the end point. This is particularly useful for extracting a region of audio (a drum loop, for example) from a much larger sound file, and will make editing much easier. As with normalization, cropping will not permanently alter samples loaded from your hard drive, but any exported or saved versions will retain cropping.
Snap To Transient- Toggling Snap To Transient on makes the start, end, and loop markers snap to detected transient "hits" in the waveform. This is very helpful when editing drum loops, because the markers will instantly snap to drum hits. It's also handy for setting the start point when there's silence at the beginning of a sample. We like it so much that we set to "on" by default.
Crossfade Length- Adds an equal-power crossfade of up to 300ms from the end point to the loop point when looping is enabled. It's very helpful for creating smooth loop transition points with sustained sounds.
Loop Enable- Turns looping on and off. When disabled, the yellow loop marker disappears from the Wave View display.
Force LP To Start- Clicking this button instantly sets the loop point to the same location as the start point for situations where you want the sample to repeatedly play from start to end.
Pushin' Forward Back: The inspiration for Sampler II's horizontal Start, End, and Loop sliders came from a crude 80s hardware sampler. Not only did the sliders make real-time sample editing super easy, its niftiest trick was that samples could instantly be played in reverse by swapping the start and end points. Sampler II lets you do the same- if the end point is set before the start point, the sample will play backwards. As mentioned, when Loop Enable is on, the loop always plays from the loop point to the end point. If the loop point position is modulated using its CV in, it's possible to move the loop point past the end point. Not only does this allow changing from a forward loop to a backward one, it makes very nifty noise as you cross over the end point. To try this, patch the I/O panel Mod Wheel out to the Loop CV mod input (you may need to experiment with positive or negative mod amount settings depending on the loop point location).
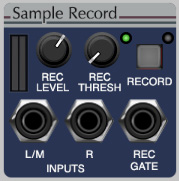
Sample Record Section
The Sample Record section allows real-time user sampling.
Left/Mono and Right inputs- Patch audio to be sampled to these inputs.
Rec Level and Stereo Input Meters- Sets the input level of audio to be sampled. If you've made it this far, you probably know how to set input levels - just into the yellow region for optimum signal-to-noise ratio and overall volume.
Record Button and indicator LED- The Record button initiates sample recording. The red LED next to it flashes to indicate "arm" mode, and glows solid to indicate "record" mode. Its operation is closely tied to the Rec Threshold control setting. Keep on readin'!
Record Threshold and indicator LED- The sets the level at which Sampler II begins recording. The green LED next to it lights when the recording threshold level has been reached.
If the Rec Threshold knob is at zero, the green light is always on, regardless of input level. This means that when the Record button is clicked, sample recording begins instantaneously. If the Record button is pressed and the Rec Threshold LED is not lit, the Record button flashes, indicating that it's in "arm" mode - i.e., it's waiting for a signal louder than the Rec Threshold setting before it commences recording.
Record Threshold is useful for sampling sources that are quiet and then get loud, such as a drum. In this situation, you'd first set the Rec Level, then set Rec Threshold so that the green light flashes when the drum sound is played. Now click the Record button - its LED flashes to show that it's waiting in arm mode (not recording) until the drum sound is played. When this happens, the threshold has been reached, and recording begins (Record LED glows solid). Recording continues until the Record button is clicked a second time.
Record Gate- Applying a gate voltage of greater than 2.5V initiates sample recording for the duration of the gate voltage only. This is useful for "triggered" on-the-fly recording. Be careful with this, as gate recording will overwrite the currently loaded sample.