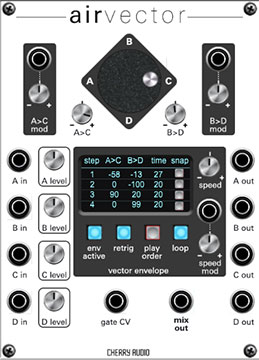
AirVector is a quad envelope for audio sources that dynamically mixes up to four input sources. The volume of all four sources is controlled in four quadrants by a virtual joystick, and joystick movements can be programmed with a flexible and easy-to-use vector envelope. It's inspired by the vector synthesis concepts used in the classic Prophet VS, Korg Wavestation, and Yamaha SY22/TG33 synthesizers.
It's closely related to the Cherry Audio AirWave vector oscillator module, but unlike AirWave, it contains no onboard sound generation. Its primary intention is to dynamically mix audio waves to create composite sounds, but it can be used with any audio source material, from simple waves to entire songs. With four individual outputs, it can even be used for quad-surround audio mixing.
AirVector is functionally identical to AirWave, less the audio waves and associated controls. It's a bit smaller (18 HP versus 24 HP), and because it only accepts external audio inputs, there are no pop-up menus to configure the input source.
Inputs, Outputs, and Controls
We'll jump around the panel a bit, going from the basic stuff to the more intense vector madness parameters.
Gate CV jack- Accepts a standard +5V gate voltage input, typically from the IO Panel CV Sources section, or from a sequencer's gate output. The gate input is used to initiate AirVector's vector envelope; its functionality varies depending on the vector envelope's button settings (more on this later).
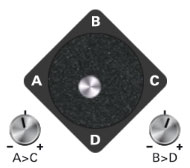
VECTOR JOYSTICK
Vector Joystick- The silver-knob-floating-over-a-diamond is a joystick controller that allows real-time control of the volume balance of up to four input sources. When the vector envelope is enabled, it also moves to show the current vector envelope position.
Like all knobs and controls in Voltage Modular, onscreen joystick movements can be recorded in a DAW as MIDI CC data. This is especially cool if you have a hardware instrument with a joystick controller (see A>C and B>D joystick position knobs section below for setup info), but the same can be accomplished by simply moving the onscreen vector joystick control.
A>C and B>D joystick position knobs / A>C and B>D Mod Input Jacks and Attenuators- A joystick describes control positions on two axes: X representing horizontal, and Y representing vertical. The A>C and B>D knobs are tied to the joystick X and Y axes.
Note that the MIDI controllers cannot be assigned to the joystick itself, so the A>C and B>D knobs are useful for assigning controllers within Voltage Modular, or hardware controllers such as joysticks, sliders/knobs/etc.
The A>C Mod and B>D Mod CV input jacks and bipolar attenuators are located to the left and right of the vector joystick diamond. These allow CV control of the A>C and B>D knobs, respectively. This can get a little nutty if you're trying to control both the X and Y axes simultaneously, but remember that AirWave can be configured for two waves at opposite sides with simple crossfading between them. If you're more ambitious, you can also use both mod inputs at once for more random results.
VECTOR ENVELOPE
The Vector Envelope enables precise automation of the vector mix joystick position. Unlike some implementations, it's designed to be easy to understand and setup is super quick. Please take a moment to carefully read the How It Works section, we promise, it's really simple to wrap your head around!
How It Works
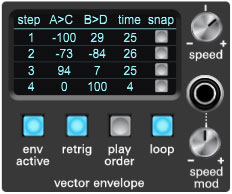
AirWave's vector envelope has four steps, with each step's settings displayed in a horizontal row. Each step contains two settings defining the joystick position for that step. When the vector envelope starts playing, it moves through the steps. Instead of abruptly jumping from step to step, AirWave smoothly transitions from one position to the next, at a rate defined by the step's Time setting (as well as the overall Speed knob setting).
Vector Envelope Window Parameters
The step parameters are displayed across the top of the window and are the same for each of the four steps. All settings in the Vector Envelope window can be changed by either clicking and dragging a number, or by double-clicking and typing an exact value. Let's go over its parameters:
A>C- X-axis (horizontal) position of the joystick for that step. Setting this to 0 corresponds to center position, i.e., a 50/50 mix of A and C waves. Negative settings move the joystick left toward wave A, positive settings move the joystick right toward wave C.
B>D- Just like the A>C setting above, but defining the Y-axis (vertical) position of the joystick for that step. Setting this to 0 corresponds to center position, i.e., a 50/50 mix of B and D waves. Negative settings move the joystick up toward wave B, positive settings move the joystick down toward wave D.
Time- Defines the length of the step, i.e. how long it takes for the joystick to arrive at the next step position. Lower value settings are faster, higher value settings are slower.
Snap- Clicking the Snap button immediately sets that step's A>C and B>D position parameters to the current joystick position. This makes setting the A>C and B>D positions very easy. The Snap buttons only work when the Env Active button is disabled.
Vector Envelope Controls
Env Active- Enables and disables the vector envelope. Disabling the vector envelope is useful for "manually" playing the vector joystick, or if you're setting vector envelope window parameters using the Snap buttons discussed above.
When the Env Active button is toggled on, you'll notice that the vector envelope begins moving through its steps, even if no gate signal is present. It's designed this way to enable ever-shifting drones using the internal wave samples or the external audio inputs. (If the vector envelope were to only move when a gate voltage was present, the envelope would cease to move during an envelope generator's release phase.)
Retrig- When Retrig is enabled, the vector envelope restarts at step one every time a new gate signal is received, meaning every note will have the same vector envelope. Disabling Retrig causes the vector envelope to play continuously and ignore newly received gates. This is useful for continuously evolving sounds while playing a melody (particularly if the Loop button is engaged for non-stop vector movement).
If you're using the IO Panel CV Sources Gate output, vector envelope restart will be affected by the IO Panel Single and Multi trigger setting as with standard envelopes if Retrig is enabled. If Single trigger mode is selected in the IO Panel and the keyboard is played legato holding a previous key while playing new keys), the vector envelope will not restart when new keys are played. If Multi trigger mode is selected in the IO Panel, the vector envelope always restarts from step one when a new key is played, regardless of existing held notes.
Play Order- The Play Order button opens a pop-up menu that defines the playback order of the vector envelope steps. The default setting is 1–>4; this means the vector envelope plays step 1, step 2, step 3, then step 4. If the Loop button is engaged, it returns to step 1 and continues. The –> arrow indicates forward playback.
Selections with <–> bidirectional arrows indicate playback in both directions. For example 2<–>4 would play step 2, step 3, step 4, step 3, then step 2. If the Loop button is engaged, it would play step 2, step 3, step 4, step 3, then step 2, (loop here) then step 3, step 4, etc. Note that it won't repeat the same step twice when the loop occurs. We thought of that!
Loop- Enabling the Loop button causes the vector envelope to return back to the first step (depending on the Play Order setting) and continue playing.
Speed and Speed mod input and attenuator- The Speed works in conjunction with the vector envelope window Time settings and acts as an overall multiplier or divider, affecting the entire vector envelope playback rate. It allows you to globally speed up or slow down the entire vector envelope without tweaking the individual Time parameters.
The Speed knob is voltage controllable via the bipolar CV jack and attenuator directly beneath.
A/B/C/D CONTROLS
All of the following parameters, inputs, and outputs are available individually for each of the four waves.
A/B/C/D Level knobs- These allow a static boost or cut in volume for each waveform. Although all of the built-in samples are normalized for maximum volume, some sound louder or quieter than others; the level knobs make it easy to equalize each wave's initial (i.e., pre vector mix) volume. The Level knobs also affect signals plugged into the A/B/C/D Ext In jacks.
A/B/C/D In jacks- Patch the desired audio sources into these. Any number or combination of these can be used. For example, A In and C In only could be used to for vector control of two audio sources.
A/B/C/D Out jacks- Separate outs for each waves. Each wave's volume will be affected by the current vector position. These are useful for creating stereo mixes (by routing waves to a stereo mixer and using pan controls) or for processing of individual waves.
Mix Out jack- Mono mix of the current vector mix of all four sources.